


《并行分布式》这门课程,需要小组进行该实验,由于网上大多都是安装配置以及简单的修改文件操作,所以在此基础上,自己使用python的ldap3库对LDAP进行增删改查操作,并设计出操作界面,代码比较冗余,请谅解!
Windows下安装
https://blog.csdn.net/heyitian/article/details/53508663#commentBox
我的安装教程,参考本博客!

还有这篇博客:https://blog.csdn.net/Jarrrrr/article/details/99681405#commentBox

需要注意的点是:如果自己新建了mydemo.ldif,需要一条导入该文件的dos命令行的命令:ldapadd -f ./mydemo.ldif
我的mydemo.ldif是长这样的,
#o=Classmates,dc=cn
#配置一个公司
dn: dc=wto,dc=com
objectclass: domain
objectclass: top
dc: wto

#定义俩部门
dn: ou=InformationofEngineering,dc=wto,dc=com
objectclass: organizationalUnit
ou: InformationofEngineering
description: Container for InformationofEngineering entries

dn: ou=SchoolofComputerScience,dc=wto,dc=com
objectclass: organizationalUnit
ou: SchoolofComputerScience
description: Container for SchoolofComputerScience entries

#添加成员
dn: uid=2019224003,ou=InformationofEngineering,dc=wto,dc=com
uid: 2019224003
objectClass: inetOrgPerson
mail: [email protected]
userPassword: 123456
sn: Yang
cn: Yang Kang

dn: uid=2019224002,ou=SchoolofComputerScience,dc=wto,dc=com
uid: 2019224002
objectClass: inetOrgPerson
userPassword: 123456
sn: Guo
cn: Jing Guo

# 学院一:信息工程学院
#dn: ou=SchoolofInformationEngineering,dc=university,dc=com
#objectclass: organizationalUnit
#ou: SchoolofInformationEngineering
#description: School of Information Engineering Students

# 学院二:公路学院
#dn: ou=SchoolofComputerScience,dc=university,dc=com
#objectclass: organizationalUnit
#ou: SchoolofComputerScience
#description: Container for School of ComputerScience Students
为大家重新推荐一个LDAP的管理器,可为后面自己的程序操作时,提供实时的检验。

网上该程序的安装教程应该有很多,自己动动手~我来讲讲成功导入自己修改的数据后,如何登陆LdapAdmin
LdapAdmin的使用
登陆界面是这样的:

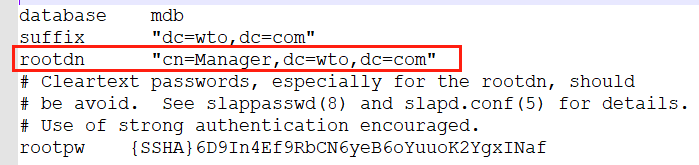
在你的slapd.conf文件中,你的suffix "dc=wto,dc=com"就是你的Base,Host就是你的IP地址,端口号389不变。
如果你仅仅需要在LdapAdmin中进行查看的操作,那么勾选下放的匿名登陆就可以。
但是你如果还需要在LdapAdmin中进行增删改查的功能,那就需要登录。Username就是slapd.conf文件中的rootdn,Password就是"secret",你在安装配置OpenLDAP时的默认密码。

注意:测试连接时,请保证在dos界面下,"slapd -d 1"进行了LDAP服务器启动命令。
以上信息填写完成后,进行“测试连接“,如果连接成功,那么恭喜;没有成功,请再看一遍上述的过程。

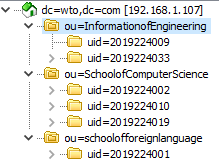
这就是我的电脑的LdapAdmin登录后的界面,里面的内容,是我之前做实验已经增加进去的。
如果你是用管理员账号登录的,那么就恭喜了,你可以在LdapAdmin里进行增删改查条目、部门。
解释一下:
dc=wto,dc=com:这代表你的登录用户名,之后程序的任何操作都是基于此
三个ou="......":这代表LDAP里存在三个部门,分别是...,...,...
uid=一串数字:这代表部门里面人员,uid是区别他们的唯一标识符,相当于数据库里的主键
点进去看看人员信息:

mail:就不多说了
userPassword:这个暂时没有用到,就先放在这里吧
sn:人员的姓
cn:人员的全称
objectClass:LDAP内置的一些类
uid:学号,相当于唯一标识符
好了,LdapAdmin的使用,也就这么简单,接下就直接把程序copy上来吧!
使用ldap3进行简单操作
首先需要在python环境下,安装ldap3库,官方文档:https://ldap3.readthedocs.io/tutorial_intro.html
389端口绑定
from ldap3 import Server, Connection, ALL
import time
server = Server('192.168.43.122')
conn = Connection(server)
time.sleep(1)
if(conn.bind()):
    flag = True
    port_info.set("389端口首次绑定成功!")
    tkinter.messagebox.showinfo('Welcome!', '389端口绑定成功!')
查看服务器信息
server = Server('192.168.43.122')
conn = Connection(server)
#print(server.info)
管理员登录
server = Server('192.168.43.122',get_info=ALL)
#print(new_name.get())
#print(new_pwd_confirm.get())
conn = Connection(server, user="cn=Manager,dc=wto,dc=co",
                    password="secret", auto_bind=True)
增删改查
官方文档里有详细的例子~ 后面的程序也有根据我自己的例子。
程序代码:
# -*- coding: utf-8 -*-
"""
Created on Wed Nov 6 09:37:20 2019
@author: Administrator
"""
import tkinter as tk # 使用Tkinter前需要先导入
from ldap3 import Server, Connection, ALL
import time
import tkinter.messagebox
# 第1步,实例化object,建立窗口window
window = tk.Tk()
# 第2步,给窗口的可视化起名字
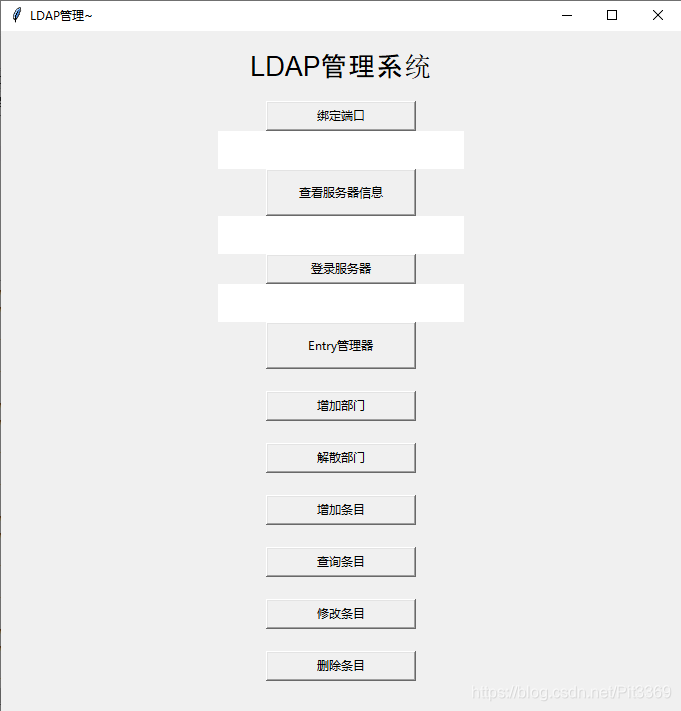
window.title('LDAP管理~')
# 第3步,设定窗口的大小(长 * 宽)
window.geometry('680x680') # 这里的乘是小x
# 第4步,在图形界面上设定标签
l = tk.Label(window, text='LDAP管理系统', font=('Arial', 20), width=30, height=2)
# 说明: bg为背景,font为字体,width为长,height为高,这里的长和高是字符的长和高,比如height=2,就是标签有2个字符这么高
# 第5步,放置标签
l.pack() # Label内容content区域放置位置,自动调节尺寸
# 放置lable的方法有:1)l.pack(); 2)l.place();
global server
global conn
flag = False
global ou_lists
port_info = tk.StringVar() # 将label标签的内容设置为字符类型,用var来接收hit_me函数的传出内容用以显示在标签上
def Bind_port():
global flag
global server
global conn
# window_sign_up = tk.Toplevel(window)
# window_sign_up.geometry('300x200')
# window_sign_up.title('Search users')
if flag == False:
try:
server = Server('192.168.43.122')
conn = Connection(server)
time.sleep(1)
if(conn.bind()):
flag = True
port_info.set("389端口首次绑定成功!")
tkinter.messagebox.showinfo('Welcome!', '389 最低0.47元/天 解锁文章


 1424
1424


 被折叠的 条评论
为什么被折叠?
被折叠的 条评论
为什么被折叠?
 到【灌水乐园】发言


