


Spring Security认证和授权
一、Spring Security的认识
Spring Security是Spring家族中的一个安全管理框架。相比与另外一个安全框架Shiro,它提供了更丰富的功能,社区资源也比Shiro丰富。
一般来说中大型的项目都是使用SpringSecurity来做安全框架。小项目有Shiro的比较多,因为相比与SpringSecurity,Shiro的上手更加的简单。
一般Web应用的需要进行认证和授权。
认证:验证当前访问系统的是不是本系统的用户,并且要确认具体是哪个用户。
授权:经过认证后判断当前用户是否有权限进行某个操作
而认证和授权也是SpringSecurity作为安全框架的核心功能。
二、Spring Security的项目
1、点击菜单中的“File”----->“New”----->“Project”。如下图所示。

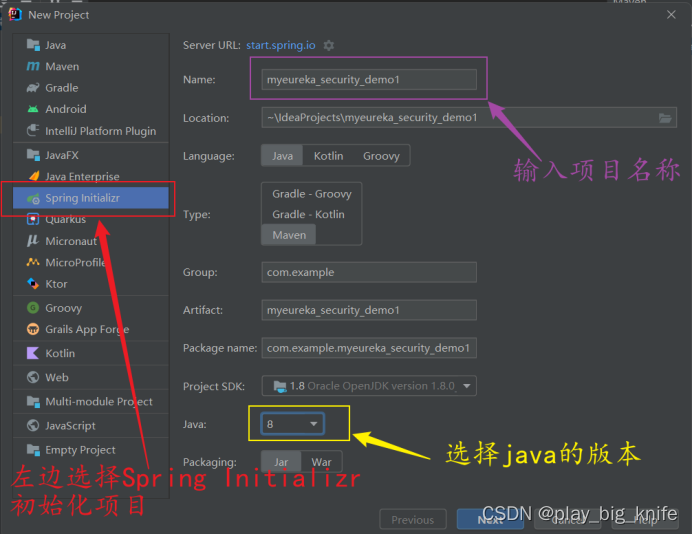
2、在弹出的对话框中,左边选择Spring initializr初始化项目,右边输入项目名称,并选择java对应的版本。
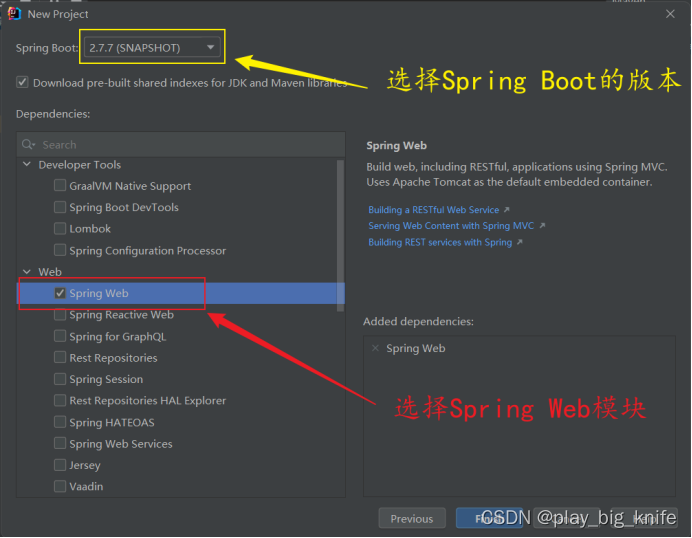
3、确认信息后,点击“Next”,进入下一页对话框,选择spring Boot需要的Spring Web模块,并选择Spring Boot的版本号。如下图所示。
4、点击“Finish”结束项目,然后在pom.xml中输入security的相关依赖。具体依赖代码如下。
<dependency>
    <groupId>org.springframework.boot</groupId>
    <artifactId>spring-boot-starter-security</artifactId>
</dependency>
<dependency>
    <groupId>org.springframework.cloud</groupId>
    <artifactId>spring-cloud-starter-netflix-eureka-server</artifactId>
</dependency>
这里包括了spring-boot-starter-security安全验证模块和spring-cloud-starter-netflix-eureka-server微服务注册模块。
这里的pom.xml中整体的依赖内容如下图所示。

接下来写代码,首先这是一个eureka server的注册中心,注册中心需要在主程序中使用注解@EnableEurekaServer进行eurekaServer的注册。主程序的代码添加上注解后的代码如下。
package com.example.myeureka_security_demo1;

import org.springframework.boot.SpringApplication;
import org.springframework.boot.autoconfigure.SpringBootApplication;
import org.springframework.cloud.netflix.eureka.server.EnableEurekaServer;
@SpringBootApplication
@EnableEurekaServer
public class MyeurekaSecurityDemo1Application {

    public static void main(String[] args) {
        SpringApplication.run(MyeurekaSecurityDemo1Application.class, args);
    }

}
这里可以实现controller方法,设定一个访问的地址,当访问这个地址时,返回“hello”的相关网页信息。代码如下。
package com.example.myeureka_security_demo1.controller;
import org.springframework.web.bind.annotation.RestController;
import org.springframework.web.bind.annotation.GetMapping;
@RestController
public class HelloController {
    @GetMapping("/hello")
    public String hello(){
        return "hello world!";
    }
}
设置完controller控制器后,需要编写application.yml的文件内容,其内容如下。
spring:
  application:
    name: myprovider1
server:
  port: 9000
eureka:
  client:
    register-with-eureka: false
    fetch-registry: false
    service-url:
      defaultZone: http://localhost:9000/eureka
  instance:
    hostname: myprovider1
这里设置的服务发现端口号为9000。
这时启动服务,是可以访问这个controller对应的地址“/hello”。
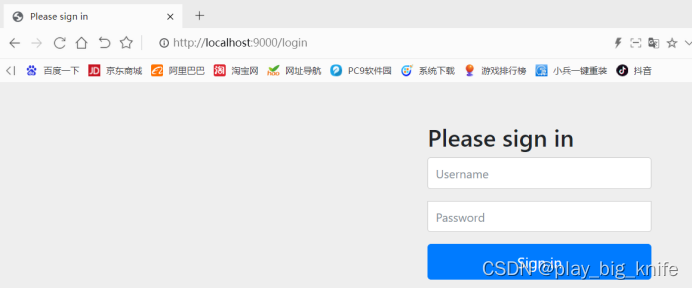
这里访问的地址是/hello,结果跳转到/login。需要输入用户名和密码。这是由于spring-boot-starer-security安全模块的作用。
这时需要设置spring security的用户名和密码来进行登陆,需要在application.yml中设置spring中的security项目中的user用户的名字和密码。 application.yml的设置修改如下 。
spring:
  security:
    user:
      name: admin
      password: admin
  application:
    name: myprovider1
server:
  port: 9000
eureka:
  client:
    register-with-eureka: false
    fetch-registry: false
    service-url:
      defaultZone: http://localhost:9000/eureka
  instance:
    hostname: myprovider1
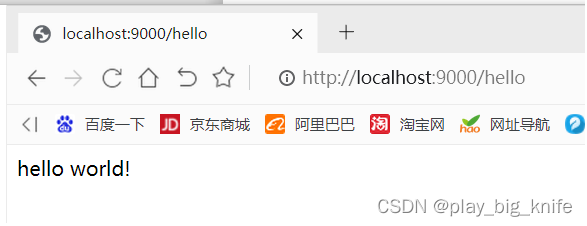
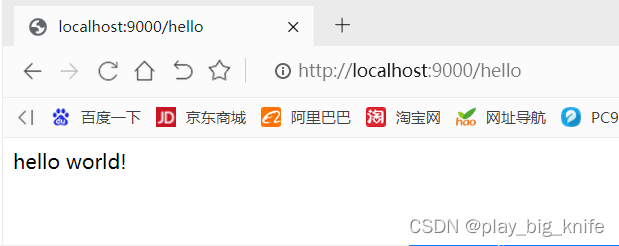
这时再访问地址“/hello”后,再次跳转到“/login”后,输入用户名admin和密码admin后,就可以正常访问“/hello”这个地址。
这就是Spring Security的作用。
也可以通过配置文件来完成Spring Security的认证。
这里去除application.yml的用户名和密码项。
application.yml的文件变化如下。
spring:
  application:
    name: myprovider1
server:
  port: 9000
eureka:
  client:
    register-with-eureka: false
    fetch-registry: false
    service-url:
      defaultZone: http://localhost:9000/eureka
  instance:
    hostname: myprovider1
然后定义config包,先重写配置中的PasswordEncoder类,当密码解码时显示字符串,并重写matches方法,验证从存储器中获取的编码密码在编码后是否与提交的原始密码匹配。
代码如下。
package com.example.myeureka_security_demo1.config;

import org.springframework.security.crypto.password.PasswordEncoder;
public class MyPasswordEncode implements PasswordEncoder {
    @Override
    public String encode(CharSequence rawPassword) {

        return rawPassword.toString();
    }

    @Override
    public boolean matches(CharSequence rawPassword, String encodedPassword) {
        return encodedPassword.equals(rawPassword);
    }
}
然后通过注解EnableWebSecurity启动web的安全认证,并将这个类设置成Configuration的配置类。这个类需要继承WebSecurityConfigurationAdaper,并重写其中的config方法,重设security登录时的用户名和密码。代码如下。
package com.example.myeureka_security_demo1.config;
import org.springframework.context.annotation.Configuration;
import org.springframework.security.config.annotation.authentication.builders.AuthenticationManagerBuilder;
import org.springframework.security.config.annotation.web.builders.HttpSecurity;
import org.springframework.security.config.annotation.web.builders.WebSecurity;
import org.springframework.security.config.annotation.web.configuration.EnableWebSecurity;
import org.springframework.security.config.annotation.web.configuration.WebSecurityConfigurerAdapter;
import org.springframework.security.crypto.bcrypt.BCryptPasswordEncoder;

@EnableWebSecurity
@Configuration
public class WebSecurityConfig extends WebSecurityConfigurerAdapter{
    @Override
    public void configure(AuthenticationManagerBuilder auth) throws Exception {
        auth.inMemoryAuthentication().passwordEncoder(new MyPasswordEncode()).withUser("user").password("123456").roles("USER");
        auth.inMemoryAuthentication().passwordEncoder(new MyPasswordEncode()).withUser("admin").password("123456").roles("ADMIN");

    }

    @Override
    protected void configure(HttpSecurity http) throws Exception {
        http.authorizeRequests()
                .antMatchers("/login").permitAll()
                .antMatchers("/user").hasRole("USER")
                .antMatchers("/admin").hasRole("ADMIN")
                .anyRequest().authenticated()
                .and()
                .formLogin().defaultSuccessUrl("/hello");
    }
}
代码中设置的用户名有admin和user,其密码都是“123456”,
只不过admin通过roles指定为超级用户,user通过roles指定为普通用户,不同的用户其权限不同。通过authorizeRequests()进行认证请求,其请求只有login才会permitAll进行通过,输入完User和admin两个用户的认证后的任意请求都可以authenticated()进行认证,成功后的地址就是/hello。这样也可以实现/hello地址的访问。
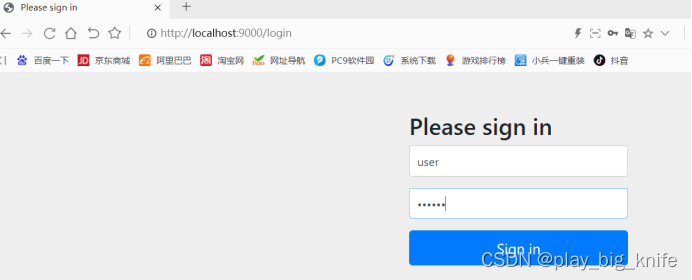
如图中所示的地址中,输入了“user”和“123456”,再次点击“Sign in”登陆后就可以正常访问/hello。
至此,spring cloud中的security基本使用方法可以实现。


 2342
2342


 被折叠的 条评论
为什么被折叠?
被折叠的 条评论
为什么被折叠?
 到【灌水乐园】发言


