现在大多数App都会用到底部导航栏,比如常见的聊天工具QQ、微信,购物App等等,有了底部导航栏,用户可以随时切换界面,查看不同的内容。它的实现方式也很多,以前大多使用TabHost来实现,但是现在我们有很多更好的选择。
使用LinearLayout + TextView实现了底部导航栏的效果
首先看看工程目录:
Step 1:实现底部选项的一些资源文件
图片Drawable资源:tab_menu_deal.xml
<?xml version="1.0" encoding="utf-8"?>
<selector xmlns:android="http://schemas.android.com/apk/res/android">
    <item android:drawable="@mipmap/ic_menu_deal_on" android:state_selected="true"/>
    <item android:drawable="@mipmap/ic_menu_deal_off"/>
</selector>
不用做过多解释了吧,点击图片,变换图片。
其他三个依葫芦画瓢。
文字资源:tab_menu_deal_text.xml
<?xml version="1.0" encoding="utf-8"?>
<selector xmlns:android="http://schemas.android.com/apk/res/android">

    <item android:color="@color/text_blue" android:state_selected="true"/>
    <item android:color="@color/text_gray" />

</selector>
背景资源 tab_menu_bg.xml:
<?xml version="1.0" encoding="utf-8"?>
<selector xmlns:android="http://schemas.android.com/apk/res/android">

    <item android:state_selected="true">
        <shape>
            <solid android:color="#FFC4C4C4"/>
            </shape>
        </item>
    <item>
        <shape>
            <solid android:color="@color/transparent" />
        </shape>
    </item>

</selector>
Step 2:编写我们的Activity布局
activity_main.xml:
<?xml version="1.0" encoding="utf-8"?>
<RelativeLayout xmlns:android="http://schemas.android.com/apk/res/android"
    xmlns:tools="http://schemas.android.com/tools"
    android:layout_width="match_parent"
    android:layout_height="match_parent">

    <RelativeLayout
        android:id="@+id/tab_title"
        android:layout_width="match_parent"
        android:layout_height="48dp"
        android:background="@color/transparent">
        <TextView
            android:id="@+id/txt_top"
            android:layout_width="match_parent"
            android:layout_height="match_parent"
            android:gravity="center"
            android:textSize="18sp"
            android:textColor="@color/text_gray"
            android:text= "@string/infomation" />

        <View
            android:layout_width="match_parent"
            android:layout_height="2px"
            android:background="@color/text_gray"
            android:layout_alignParentBottom="true"/>
        </RelativeLayout>

    <LinearLayout
        android:id="@+id/tab_menu"
        android:layout_width="match_parent"
        android:layout_height="56dp"
        android:orientation="horizontal"
        android:layout_alignParentBottom="true">

        <TextView
            android:id="@+id/txt_deal"
            android:layout_width="0dp"
            android:layout_height="match_parent"
            android:layout_weight="1"
            android:background="@drawable/tab_menu_bg"
            android:drawablePadding="3dp"
            android:drawableTop="@drawable/tab_menu_deal"
            android:gravity="center"
            android:textColor="@drawable/tab_menu_deal_text"
            android:text="点餐"/>

        <TextView
            android:id="@+id/txt_poi"
            android:layout_width="0dp"
            android:layout_height="match_parent"
            android:layout_weight="1"
            android:background="@drawable/tab_menu_bg"
            android:drawablePadding="3dp"
            android:drawableTop="@drawable/tab_menu_poi"
            android:gravity="center"
            android:textColor="@drawable/tab_menu_poi_text"
            android:text="商铺"/>

        <TextView
            android:id="@+id/txt_user"
            android:layout_width="0dp"
            android:layout_height="match_parent"
            android:layout_weight="1"
            android:background="@drawable/tab_menu_bg"
            android:drawablePadding="3dp"
            android:drawableTop="@drawable/tab_menu_user"
            android:gravity="center"
            android:textColor="@drawable/tab_menu_user_text"
            android:text="用户"/>

        <TextView
            android:id="@+id/txt_more"
            android:layout_width="0dp"
            android:layout_height="match_parent"
            android:layout_weight="1"
            android:background="@drawable/tab_menu_bg"
            android:drawablePadding="3dp"
            android:drawableTop="@drawable/tab_menu_more"
            android:gravity="center"
            android:textColor="@drawable/tab_menu_more_text"
            android:text="更多"/>

        </LinearLayout>

    <View
        android:id="@+id/div_tab_bar"
        android:layout_width="match_parent"
        android:layout_height="2px"
        android:background="@color/text_gray"
        android:layout_above="@id/tab_menu"/>

    <FrameLayout
        android:id="@+id/fragment_container"
        android:layout_width="match_parent"
        android:layout_height="match_parent"
        android:layout_below="@id/tab_title"
        android:layout_above="@id/tab_menu"
        android:background="@color/transparent">
        </FrameLayout>

</RelativeLayout>
- 1
- 2
- 3
- 4
- 5
- 6
- 7
- 8
- 9
- 10
- 11
- 12
- 13
- 14
- 15
- 16
- 17
- 18
- 19
- 20
- 21
- 22
- 23
- 24
- 25
- 26
- 27
- 28
- 29
- 30
- 31
- 32
- 33
- 34
- 35
- 36
- 37
- 38
- 39
- 40
- 41
- 42
- 43
- 44
- 45
- 46
- 47
- 48
- 49
- 50
- 51
- 52
- 53
- 54
- 55
- 56
- 57
- 58
- 59
- 60
- 61
- 62
- 63
- 64
- 65
- 66
- 67
- 68
- 69
- 70
- 71
- 72
- 73
- 74
- 75
- 76
- 77
- 78
- 79
- 80
- 81
- 82
- 83
- 84
- 85
- 86
- 87
- 88
- 89
- 90
- 91
- 92
- 93
- 94
- 95
- 96
- 97
- 98
- 99
- 100
- 101
- 102
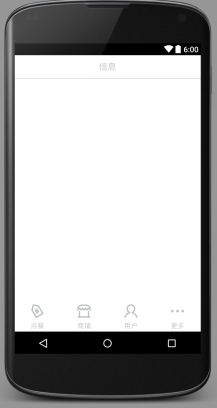
效果图如下:
Step 3:创建一个Fragment的简单布局与类:
first_fragment.xml:
<?xml version="1.0" encoding="utf-8"?>
<LinearLayout xmlns:android="http://schemas.android.com/apk/res/android"
    android:orientation="vertical" android:layout_width="match_parent"
    android:layout_height="match_parent"
    android:background="@color/transparent">


    <TextView
        android:id="@+id/txt_content"
        android:layout_width="match_parent"
        android:layout_height="match_parent"
        android:gravity="center"
        android:text="呵呵"
        android:textColor="@color/text_blue"
        android:textSize="20sp"/>

</LinearLayout>
- 1
- 2
- 3
- 4
- 5
- 6
- 7
- 8
- 9
- 10
- 11
- 12
- 13
- 14
- 15
- 16
- 17
- 1
- 2
- 3
- 4
- 5
- 6
- 7
- 8
- 9
- 10
- 11
- 12
- 13
- 14
- 15
- 16
- 17
FirstFragment.java:
public class FirstFragment extends Fragment {
private String context;
private TextView mTextView;
public FirstFragment(String context){
this.context = context;
}
@Nullable
@Override
public View onCreateView(LayoutInflater inflater, ViewGroup container, Bundle savedInstanceState) {
View view = inflater.inflate(R.layout.first_fragment,container,false);
mTextView = (TextView)view.findViewById(R.id.txt_content);
mTextView.setText(context);
return view;
}
}
- 1
- 2
- 3
- 4
- 5
- 6
- 7
- 8
- 9
- 10
- 11
- 12
- 13
- 14
- 15
- 16
- 17
- 18
- 19
- 1
- 2
- 3
- 4
- 5
- 6
- 7
- 8
- 9
- 10
- 11
- 12
- 13
- 14
- 15
- 16
- 17
- 18
- 19
Step 4:编写MainActivity.java
public class MainActivity extends AppCompatActivity implements View.OnClickListener{
private TextView topBar;
private TextView tabDeal;
private TextView tabPoi;
private TextView tabMore;
private TextView tabUser;
private FrameLayout ly_content;
private FirstFragment f1,f2,f3,f4;
private FragmentManager fragmentManager;
@Override
protected void onCreate(Bundle savedInstanceState) {
super.onCreate(savedInstanceState);
requestWindowFeature(Window.FEATURE_NO_TITLE);
setContentView(R.layout.activity_main);
bindView();
}
private void bindView() {
topBar = (TextView)this.findViewById(R.id.txt_top);
tabDeal = (TextView)this.findViewById(R.id.txt_deal);
tabPoi = (TextView)this.findViewById(R.id.txt_poi);
tabUser = (TextView)this.findViewById(R.id.txt_user);
tabMore = (TextView)this.findViewById(R.id.txt_more);
ly_content = (FrameLayout) findViewById(R.id.fragment_container);
tabDeal.setOnClickListener(this);
tabMore.setOnClickListener(this);
tabUser.setOnClickListener(this);
tabPoi.setOnClickListener(this);
}
public void selected(){
tabDeal.setSelected(false);
tabMore.setSelected(false);
tabPoi.setSelected(false);
tabUser.setSelected(false);
}
public void hideAllFragment(FragmentTransaction transaction){
if(f1!=null){
transaction.hide(f1);
}
if(f2!=null){
transaction.hide(f2);
}
if(f3!=null){
transaction.hide(f3);
}
if(f4!=null){
transaction.hide(f4);
}
}
@Override
public void onClick(View v) {
FragmentTransaction transaction = getFragmentManager().beginTransaction();
hideAllFragment(transaction);
switch(v.getId()){
case R.id.txt_deal:
selected();
tabDeal.setSelected(true);
if(f1==null){
f1 = new FirstFragment("第一个Fragment");
transaction.add(R.id.fragment_container,f1);
}else{
transaction.show(f1);
}
break;
case R.id.txt_more:
selected();
tabMore.setSelected(true);
if(f2==null){
f2 = new FirstFragment("第二个Fragment");
transaction.add(R.id.fragment_container,f2);
}else{
transaction.show(f2);
}
break;
case R.id.txt_poi:
selected();
tabPoi.setSelected(true);
if(f3==null){
f3 = new FirstFragment("第三个Fragment");
transaction.add(R.id.fragment_container,f3);
}else{
transaction.show(f3);
}
break;
case R.id.txt_user:
selected();
tabUser.setSelected(true);
if(f4==null){
f4 = new FirstFragment("第四个Fragment");
transaction.add(R.id.fragment_container,f4);
}else{
transaction.show(f4);
}
break;
}
transaction.commit();
}
}
- 1
- 2
- 3
- 4
- 5
- 6
- 7
- 8
- 9
- 10
- 11
- 12
- 13
- 14
- 15
- 16
- 17
- 18
- 19
- 20
- 21
- 22
- 23
- 24
- 25
- 26
- 27
- 28
- 29
- 30
- 31
- 32
- 33
- 34
- 35
- 36
- 37
- 38
- 39
- 40
- 41
- 42
- 43
- 44
- 45
- 46
- 47
- 48
- 49
- 50
- 51
- 52
- 53
- 54
- 55
- 56
- 57
- 58
- 59
- 60
- 61
- 62
- 63
- 64
- 65
- 66
- 67
- 68
- 69
- 70
- 71
- 72
- 73
- 74
- 75
- 76
- 77
- 78
- 79
- 80
- 81
- 82
- 83
- 84
- 85
- 86
- 87
- 88
- 89
- 90
- 91
- 92
- 93
- 94
- 95
- 96
- 97
- 98
- 99
- 100
- 101
- 102
- 103
- 104
- 105
- 106
- 107
- 108
- 109
- 110
- 111
- 112
- 113
- 114
- 115
- 116
实现效果图如下:
这一次的资源文件和上一次是一样的,只需要把外drawable类的资源的selected 状态修改成checked状态:
<?xml version="1.0" encoding="utf-8"?>
<selector xmlns:android="http://schemas.android.com/apk/res/android">

    <item android:drawable="@mipmap/ic_menu_deal_on" android:state_checked="true"/>
    <item android:drawable="@mipmap/ic_menu_deal_off"/>

</selector>
其他文字资源及背景资源不变
这里我们首先从主布局文件开始:
Step 2:编写我们的Activity布局
由于布局中的RadioButton的属性大部分是一样的,因此我们可以将这一部分一样的代码抽取出来,写到style.xml文件中:
style.xml:
<resources>
<!
<style name="AppTheme" parent="Theme.AppCompat.Light.DarkActionBar">
<!
<item name="colorPrimary">@color/colorPrimary</item>
<item name="colorPrimaryDark">@color/colorPrimaryDark</item>
<item name="colorAccent">@color/colorAccent</item>
</style>
<style name="tab_menu_item">
<item name="android:layout_width">0dp</item>
<item name="android:layout_weight">1</item>
<item name="android:layout_height">match_parent</item>
<item name="android:background">@drawable/tab_menu_bg</item>
<item name="android:button">@null</item>
<item name="android:gravity">center</item>
<item name="android:paddingTop">3dp</item>
<item name="android:textColor">@drawable/tab_menu_text</item>
<item name="android:textSize">18sp</item>
</style>
</resources>
- 1
- 2
- 3
- 4
- 5
- 6
- 7
- 8
- 9
- 10
- 11
- 12
- 13
- 14
- 15
- 16
- 17
- 18
- 19
- 20
- 21
- 22
- 23
- 24
- 1
- 2
- 3
- 4
- 5
- 6
- 7
- 8
- 9
- 10
- 11
- 12
- 13
- 14
- 15
- 16
- 17
- 18
- 19
- 20
- 21
- 22
- 23
- 24
然后我们的activity_main.xml中的RadioButton就用不着次次都写相同的代码了, 只需让RadioButton的style=”@style/tab_menu_item”就可以了!
activity_main.xml :
<?xml version="1.0" encoding="utf-8"?>
<RelativeLayout xmlns:android="http://schemas.android.com/apk/res/android"
    xmlns:tools="http://schemas.android.com/tools"
    android:layout_width="match_parent"
    android:layout_height="match_parent">

    <RelativeLayout
        android:id="@+id/ly_top_bar"
        android:layout_width="match_parent"
        android:layout_height="48dp"
        android:background="@color/transparent">

        <TextView
            android:id="@+id/txt_topbar"
            android:layout_width="match_parent"
            android:layout_height="match_parent"
            android:layout_centerInParent="true"
            android:gravity="center"
            android:text="信息"
            android:textColor="@color/text_gray"
            android:textSize="18sp" />

        <View
            android:layout_width="match_parent"
            android:layout_height="2px"
            android:layout_alignParentBottom="true"
            android:background="@color/text_gray" />

    </RelativeLayout>

    <RadioGroup
        android:id="@+id/rd_group"
        android:layout_width="match_parent"
        android:layout_height="56dp"
        android:layout_alignParentBottom="true"
        android:background="@color/transparent"
        android:orientation="horizontal">
        <RadioButton
            android:id="@+id/rd_menu_deal"
            style="@style/tab_menu_item"
            android:drawableTop="@drawable/tab_menu_deal"
            android:text="点餐"/>

        <RadioButton
            android:id="@+id/rd_menu_poi"
            style="@style/tab_menu_item"
            android:drawableTop="@drawable/tab_menu_poi"
            android:text="商铺"/>

        <RadioButton
            android:id="@+id/rd_menu_more"
            style="@style/tab_menu_item"
            android:drawableTop="@drawable/tab_menu_more"
            android:text="更多"/>

        <RadioButton
            android:id="@+id/rd_menu_user"
            style="@style/tab_menu_item"
            android:drawableTop="@drawable/tab_menu_user"
            android:text="用户"/>
        </RadioGroup>

    <FrameLayout
        android:id="@+id/fragment_container"
        android:layout_width="match_parent"
        android:layout_height="match_parent"
        android:layout_above="@id/rd_group"
        android:layout_below="@id/ly_top_bar"
        android:background="@color/transparent">
        </FrameLayout>
</RelativeLayout>
- 1
- 2
- 3
- 4
- 5
- 6
- 7
- 8
- 9
- 10
- 11
- 12
- 13
- 14
- 15
- 16
- 17
- 18
- 19
- 20
- 21
- 22
- 23
- 24
- 25
- 26
- 27
- 28
- 29
- 30
- 31
- 32
- 33
- 34
- 35
- 36
- 37
- 38
- 39
- 40
- 41
- 42
- 43
- 44
- 45
- 46
- 47
- 48
- 49
- 50
- 51
- 52
- 53
- 54
- 55
- 56
- 57
- 58
- 59
- 60
- 61
- 62
- 63
- 64
- 65
- 66
- 67
- 68
- 69
- 70
- 71
- 72
效果图如下:

Step 3:创建一个Fragment的简单布局与类:
my_fragment.xml :
<?xml version="1.0" encoding="utf-8"?>
<LinearLayout xmlns:android="http://schemas.android.com/apk/res/android"
    android:orientation="vertical" android:layout_width="match_parent"
    android:layout_height="match_parent">

    <TextView
        android:id="@+id/textView"
        android:layout_width="match_parent"
        android:layout_height="match_parent"
        android:textSize="20sp"
        android:textColor="@color/text_blue"
        android:gravity="center"
        android:text="呵呵"/>

</LinearLayout>
MyFragment.java :
public class MyFragment extends Fragment{
    private String context;
    private TextView mTextView;

    public MyFragment(String context){
       this.context = context;
    }

    @Nullable
    @Override
    public View onCreateView(LayoutInflater inflater, ViewGroup container, Bundle savedInstanceState) {
        View view = inflater.inflate(R.layout.my_fragment,container,false);
        mTextView = (TextView)view.findViewById(R.id.textView);
        mTextView.setText(context);
        return view;
    }
}
- 1
- 2
- 3
- 4
- 5
- 6
- 7
- 8
- 9
- 10
- 11
- 12
- 13
- 14
- 15
- 16
- 17
- 18
- 1
- 2
- 3
- 4
- 5
- 6
- 7
- 8
- 9
- 10
- 11
- 12
- 13
- 14
- 15
- 16
- 17
- 18
Step 4:编写MainActivity.java
public class MainActivity extends AppCompatActivity implements RadioGroup.OnCheckedChangeListener{

    private RadioGroup rpTab;
    private RadioButton rbDeal,rbPoi,rbMore,rbUser;
    private MyFragment fg1,fg2,fg3,fg4;

    @Override
    protected void onCreate(Bundle savedInstanceState) {
        super.onCreate(savedInstanceState);
        setContentView(R.layout.activity_main);

        bindView();
    }

    private void bindView() {
        rpTab = (RadioGroup)findViewById(R.id.rd_group);
        rpTab.setOnCheckedChangeListener(this);

        rbDeal = (RadioButton)findViewById(R.id.rd_menu_deal);
        rbPoi = (RadioButton)findViewById(R.id.rd_menu_poi);
        rbMore = (RadioButton)findViewById(R.id.rd_menu_more);
        rbUser = (RadioButton)findViewById(R.id.rd_menu_user);

        rbDeal.setChecked(true);
    }

    public void hideAllFragment(FragmentTransaction transaction){
        if(fg1!=null){
            transaction.hide(fg1);
        }
        if(fg2!=null){
            transaction.hide(fg2);
        }
        if(fg3!=null){
            transaction.hide(fg3);
        }
        if(fg4!=null){
            transaction.hide(fg4);
        }
    }

    @Override
    public void onCheckedChanged(RadioGroup group, int checkedId) {
        FragmentTransaction transaction = getFragmentManager().beginTransaction();
        hideAllFragment(transaction);
        switch (checkedId){
            case R.id.rd_menu_deal:
                if(fg1==null){
                    fg1 = new MyFragment("第一个Fragment");
                    transaction.add(R.id.fragment_container,fg1);
                }else{
                    transaction.show(fg1);
                }
                break;
            case R.id.rd_menu_poi:
                if(fg2==null){
                    fg2 = new MyFragment("第二个Fragment");
                    transaction.add(R.id.fragment_container,fg2);
                }else{
                    transaction.show(fg2);
                }
                break;
            case R.id.rd_menu_more:
                if(fg3==null){
                    fg3 = new MyFragment("第三个Fragment");
                    transaction.add(R.id.fragment_container,fg3);
                }else{
                    transaction.show(fg3);
                }
                break;
            case R.id.rd_menu_user:
                if(fg4==null){
                    fg4 = new MyFragment("第四个Fragment");
                    transaction.add(R.id.fragment_container,fg4);
                }else{
                    transaction.show(fg4);
                }
                break;
        }
        transaction.commit();
    }
}
- 1
- 2
- 3
- 4
- 5
- 6
- 7
- 8
- 9
- 10
- 11
- 12
- 13
- 14
- 15
- 16
- 17
- 18
- 19
- 20
- 21
- 22
- 23
- 24
- 25
- 26
- 27
- 28
- 29
- 30
- 31
- 32
- 33
- 34
- 35
- 36
- 37
- 38
- 39
- 40
- 41
- 42
- 43
- 44
- 45
- 46
- 47
- 48
- 49
- 50
- 51
- 52
- 53
- 54
- 55
- 56
- 57
- 58
- 59
- 60
- 61
- 62
- 63
- 64
- 65
- 66
- 67
- 68
- 69
- 70
- 71
- 72
- 73
- 74
- 75
- 76
- 77
- 78
- 79
- 80
- 81
- 82
- 83
效果图和上面一样:

实现类似新浪微博的底部导航栏
前面我们已经跟大家讲解了实现底部导航栏的两种方案,但是这两种方案只适合普通的情况,如果 是像新浪微博那样的,想在底部导航栏上的item带有一个红色的小点,然后加上一个消息数目这样, 前面两种方案就显得无力了,我们来看看别人的APP是怎么做的,打开手机的开发者选项,勾选里面的: 显示布局边界,然后打开我们参考的那个App,可以看到底部导航栏是这样的:

上面这个图我们就可以看出,这种底部导航栏不是简单的TextView或者RadioGroup构成的, 大概布局方案可能是:外层一个LinearLayout,中间一个RelativeLayout,而在中间有一个TextView, 然后再在TextView的右上角有一个红色圆圈背景的TextView或者一个红色的小点; 大概就这样,而这些小点平时的时候应该设置的不可见,当收到信息推送,即有相关类别信息的 时候再可见,并且显示对应的信息数目!那么下面我们就来实现下这种底部导航栏的效果,!
实现效果:
为了方便理解,这里通过点击按钮的形式,模拟收到推送信息,然后显示红色点!
Step 1:相关资源文件的准备:
和前面一样,准备好drawable系列的资源:
文字资源:tab_menu_text.xml
<selector xmlns:android="http://schemas.android.com/apk/res/android">

    <item android:color="@color/text_blue" android:state_selected="true"/>
    <item android:color="@color/text_gray" />

</selector>
图标资源:tab_menu_better.xml
<selector xmlns:android="http://schemas.android.com/apk/res/android">

    <item android:drawable="@mipmap/ic_menu_deal_on" android:state_selected="true"/>
    <item android:drawable="@mipmap/ic_menu_deal_off"/>

</selector>
其他三个依葫芦画瓢!
Step 2:编写activity的布局代码:
因为四个选项的TextView以及右上角的红点数字属性都差不多,如下:
 <TextView
                    android:id="@+id/tab_menu_channel"
                    android:layout_marginTop="5dp"
                    android:layout_width="wrap_content"
                    android:layout_height="48dp"
                    android:layout_centerInParent="true"
                    android:textColor="@drawable/tab_menu_text"
                    android:drawableTop="@drawable/tab_menu_channel"
                    android:text="@string/tab_menu_alert"/>
                <TextView
                    android:layout_width="20dp"
                    android:layout_height="20dp"
                    android:background="@mipmap/bg_num"
                    android:layout_toRightOf="@+id/tab_menu_channel"
                    android:layout_marginLeft="-10dp"
                    android:text="99+"
                    android:textSize="12sp"
                    android:gravity="center"
                    android:textColor="@color/text_white"/>
- 1
- 2
- 3
- 4
- 5
- 6
- 7
- 8
- 9
- 10
- 11
- 12
- 13
- 14
- 15
- 16
- 17
- 18
- 19
- 1
- 2
- 3
- 4
- 5
- 6
- 7
- 8
- 9
- 10
- 11
- 12
- 13
- 14
- 15
- 16
- 17
- 18
- 19
我们将他们抽取出来,写到style.xml里:
<style name="tab_menu_text">
    <item name="android:layout_marginTop">5dp</item>
    <item name="android:layout_width">wrap_content</item>
    <item name="android:layout_height">48dp</item>
    <item name="android:layout_centerInParent">true</item>
    <item name="android:textColor">@drawable/tab_menu_text</item>
</style>


<style name="tab_menu_bgnum">
    <item name="android:layout_width">20dp</item>
    <item name="android:layout_height">20dp</item>
    <item name="android:background">@mipmap/bg_num</item>
    <item name="android:layout_marginLeft">-10dp</item>
    <item name="android:textSize">12sp</item>
    <item name="android:gravity">center</item>
    <item name="android:textColor">@color/text_white</item>
</style>
- 1
- 2
- 3
- 4
- 5
- 6
- 7
- 8
- 9
- 10
- 11
- 12
- 13
- 14
- 15
- 16
- 17
- 18
- 1
- 2
- 3
- 4
- 5
- 6
- 7
- 8
- 9
- 10
- 11
- 12
- 13
- 14
- 15
- 16
- 17
- 18
然后开始编写我们的activity.xml布局:
<?xml version="1.0" encoding="utf-8"?>
<RelativeLayout xmlns:android="http://schemas.android.com/apk/res/android"
    xmlns:tools="http://schemas.android.com/tools"
    android:layout_width="match_parent"
    android:layout_height="match_parent">

    <RelativeLayout
        android:id="@+id/ly_top_bar"
        android:layout_width="match_parent"
        android:layout_height="48dp"
        android:background="@color/transparent">

        <TextView
            android:id="@+id/txt_topbar"
            android:layout_width="match_parent"
            android:layout_height="match_parent"
            android:layout_centerInParent="true"
            android:gravity="center"
            android:text="信息"
            android:textColor="@color/text_gray"
            android:textSize="18sp" />

        <View
            android:layout_width="match_parent"
            android:layout_height="2px"
            android:layout_alignParentBottom="true"
            android:background="@color/text_gray" />

    </RelativeLayout>

    <LinearLayout
        android:id="@+id/ly_tab_menu"
        android:layout_width="match_parent"
        android:layout_height="56dp"
        android:layout_alignParentBottom="true"
        android:background="@color/transparent"
        android:orientation="horizontal">

    <LinearLayout
        android:id="@+id/ly_tab_menu_deal"
        android:layout_width="0dp"
        android:layout_height="match_parent"
        android:layout_weight="1"
        android:gravity="center">

        <RelativeLayout
            android:layout_width="wrap_content"
            android:layout_height="match_parent"
            android:padding="5dp">

            <TextView
                android:id="@+id/tab_menu_deal"
                style="@style/tab_menu_text"
                android:drawableTop="@drawable/tab_menu_deal"
                android:text="点餐" />

            <TextView
                android:id="@+id/tab_menu_deal_num"
                style="@style/tab_menu_bgnum"
                android:layout_toRightOf="@+id/tab_menu_deal"
                android:text="99+"
                android:visibility="gone" />
        </RelativeLayout>
    </LinearLayout>

        <LinearLayout
            android:id="@+id/ly_tab_menu_poi"
            android:layout_width="0dp"
            android:layout_height="match_parent"
            android:layout_weight="1"
            android:gravity="center">

            <RelativeLayout
                android:layout_width="wrap_content"
                android:layout_height="match_parent"
                android:padding="5dp">

                <TextView
                    android:id="@+id/tab_menu_poi"
                    style="@style/tab_menu_text"
                    android:drawableTop="@drawable/tab_menu_poi"
                    android:text="商铺" />

                <TextView
                    android:id="@+id/tab_menu_poi_num"
                    style="@style/tab_menu_bgnum"
                    android:layout_toRightOf="@+id/tab_menu_poi"
                    android:text="99+"
                    android:visibility="gone" />
            </RelativeLayout>
        </LinearLayout>

        <LinearLayout
            android:id="@+id/ly_tab_menu_more"
            android:layout_width="0dp"
            android:layout_height="match_parent"
            android:layout_weight="1"
            android:gravity="center">

            <RelativeLayout
                android:layout_width="wrap_content"
                android:layout_height="match_parent"
                android:padding="5dp">

                <TextView
                    android:id="@+id/tab_menu_more"
                    style="@style/tab_menu_text"
                    android:drawableTop="@drawable/tab_menu_more"
                    android:text="更多" />

                <TextView
                    android:id="@+id/tab_menu_more_num"
                    style="@style/tab_menu_bgnum"
                    android:layout_toRightOf="@+id/tab_menu_more"
                    android:text="99+"
                    android:visibility="gone" />
            </RelativeLayout>
        </LinearLayout>

        <LinearLayout
            android:id="@+id/ly_tab_menu_user"
            android:layout_width="0dp"
            android:layout_height="match_parent"
            android:layout_weight="1"
            android:gravity="center">

            <RelativeLayout
                android:layout_width="wrap_content"
                android:layout_height="match_parent"
                android:padding="5dp">

                <TextView
                    android:id="@+id/tab_menu_user"
                    style="@style/tab_menu_text"
                    android:drawableTop="@drawable/tab_menu_user"
                    android:text="用户" />

                <ImageView
                    android:id="@+id/tab_menu_setting_partner"
                    android:layout_width="12dp"
                    android:layout_height="12dp"
                    android:layout_marginLeft="-5dp"
                    android:layout_toRightOf="@id/tab_menu_user"
                    android:visibility="gone"
                    android:src="@mipmap/partner_red" />

            </RelativeLayout>
        </LinearLayout>


    </LinearLayout>

    <View
        android:id="@+id/div_tab_bar"
        android:layout_width="match_parent"
        android:layout_height="2px"
        android:layout_above="@id/ly_tab_menu"
        android:background="@color/text_gray" />

    <FrameLayout
        android:id="@+id/fragment_container"
        android:layout_width="match_parent"
        android:layout_height="match_parent"
        android:background="@color/transparent"
        android:layout_above="@id/div_tab_bar"
        android:layout_below="@id/ly_top_bar"/>

</RelativeLayout>
- 1
- 2
- 3
- 4
- 5
- 6
- 7
- 8
- 9
- 10
- 11
- 12
- 13
- 14
- 15
- 16
- 17
- 18
- 19
- 20
- 21
- 22
- 23
- 24
- 25
- 26
- 27
- 28
- 29
- 30
- 31
- 32
- 33
- 34
- 35
- 36
- 37
- 38
- 39
- 40
- 41
- 42
- 43
- 44
- 45
- 46
- 47
- 48
- 49
- 50
- 51
- 52
- 53
- 54
- 55
- 56
- 57
- 58
- 59
- 60
- 61
- 62
- 63
- 64
- 65
- 66
- 67
- 68
- 69
- 70
- 71
- 72
- 73
- 74
- 75
- 76
- 77
- 78
- 79
- 80
- 81
- 82
- 83
- 84
- 85
- 86
- 87
- 88
- 89
- 90
- 91
- 92
- 93
- 94
- 95
- 96
- 97
- 98
- 99
- 100
- 101
- 102
- 103
- 104
- 105
- 106
- 107
- 108
- 109
- 110
- 111
- 112
- 113
- 114
- 115
- 116
- 117
- 118
- 119
- 120
- 121
- 122
- 123
- 124
- 125
- 126
- 127
- 128
- 129
- 130
- 131
- 132
- 133
- 134
- 135
- 136
- 137
- 138
- 139
- 140
- 141
- 142
- 143
- 144
- 145
- 146
- 147
- 148
- 149
- 150
- 151
- 152
- 153
- 154
- 155
- 156
- 157
- 158
- 159
- 160
- 161
- 162
- 163
- 164
- 165
- 166
- 167
- 168
效果图如下:

Step 3:编写Fragment界面布局以及类
Fragment布局由四个普通按钮构成:
fragment_my.xml:
<LinearLayout xmlns:android="http://schemas.android.com/apk/res/android"
    android:layout_width="match_parent"
    android:layout_height="match_parent"
    android:orientation="vertical"
    android:padding="5dp">
    <Button
        android:id="@+id/btn_one"
        android:layout_width="match_parent"
        android:layout_height="wrap_content"
        android:gravity="center"
        android:text="显示第一个消息"/>

    <Button
        android:id="@+id/btn_two"
        android:layout_width="match_parent"
        android:layout_height="wrap_content"
        android:gravity="center"
        android:text="第二个显示信息"/>

    <Button
        android:id="@+id/btn_three"
        android:layout_width="match_parent"
        android:layout_height="wrap_content"
        android:gravity="center"
        android:text="第三个显示信息"/>

    <Button
        android:id="@+id/btn_four"
        android:layout_width="match_parent"
        android:layout_height="wrap_content"
        android:gravity="center"
        android:text="第四个显示信息"/>

</LinearLayout>
- 1
- 2
- 3
- 4
- 5
- 6
- 7
- 8
- 9
- 10
- 11
- 12
- 13
- 14
- 15
- 16
- 17
- 18
- 19
- 20
- 21
- 22
- 23
- 24
- 25
- 26
- 27
- 28
- 29
- 30
- 31
- 32
- 33
- 34
- 1
- 2
- 3
- 4
- 5
- 6
- 7
- 8
- 9
- 10
- 11
- 12
- 13
- 14
- 15
- 16
- 17
- 18
- 19
- 20
- 21
- 22
- 23
- 24
- 25
- 26
- 27
- 28
- 29
- 30
- 31
- 32
- 33
- 34
接着是自定义的Fragment类,这里的话我们通过getActivity.findViewById()来获得Activity 中的小红点,这里仅仅是简单的控制显示而已!
MyFragment.java:
public class MyFragment extends Fragment implements View.OnClickListener{
    private Context mContext;
    private Button btn_one;
    private Button btn_two;
    private Button btn_three;
    private Button btn_four;
    @Nullable
    @Override
    public View onCreateView(LayoutInflater inflater, ViewGroup container, Bundle savedInstanceState) {
        View view = inflater.inflate(R.layout.frament_my,container,false);
        btn_one = (Button)view.findViewById(R.id.btn_one);
        btn_two = (Button)view.findViewById(R.id.btn_two);
        btn_three = (Button)view.findViewById(R.id.btn_three);
        btn_four = (Button)view.findViewById(R.id.btn_four);

        btn_one.setOnClickListener(this);
        btn_two.setOnClickListener(this);
        btn_three.setOnClickListener(this);
        btn_four.setOnClickListener(this);
        return view;
    }

    @Override
    public void onClick(View v) {
        switch(v.getId()){
            case R.id.btn_one:
                TextView mTextViewDeal = (TextView)getActivity().findViewById(R.id.tab_menu_deal_num);
                mTextViewDeal.setText("11");
                mTextViewDeal.setVisibility(View.VISIBLE);
                break;
            case R.id.btn_two:
                TextView mTextViewPoi = (TextView)getActivity().findViewById(R.id.tab_menu_poi_num);
                mTextViewPoi.setText("99");
                mTextViewPoi.setVisibility(View.VISIBLE);
                break;
            case R.id.btn_three:
                TextView mTextViewMore = (TextView)getActivity().findViewById(R.id.tab_menu_more_num);
                mTextViewMore.setText("999+");
                mTextViewMore.setVisibility(View.VISIBLE);
                break;
            case R.id.btn_four:
                ImageView mImageView = (ImageView) getActivity ().findViewById(R.id.tab_menu_setting_partner);
                mImageView.setVisibility(View.VISIBLE);
                break;
        }
    }
}
- 1
- 2
- 3
- 4
- 5
- 6
- 7
- 8
- 9
- 10
- 11
- 12
- 13
- 14
- 15
- 16
- 17
- 18
- 19
- 20
- 21
- 22
- 23
- 24
- 25
- 26
- 27
- 28
- 29
- 30
- 31
- 32
- 33
- 34
- 35
- 36
- 37
- 38
- 39
- 40
- 41
- 42
- 43
- 44
- 45
- 46
- 47
- 48
- 1
- 2
- 3
- 4
- 5
- 6
- 7
- 8
- 9
- 10
- 11
- 12
- 13
- 14
- 15
- 16
- 17
- 18
- 19
- 20
- 21
- 22
- 23
- 24
- 25
- 26
- 27
- 28
- 29
- 30
- 31
- 32
- 33
- 34
- 35
- 36
- 37
- 38
- 39
- 40
- 41
- 42
- 43
- 44
- 45
- 46
- 47
- 48
Step 4:编写MainActivity
我们在这里完成主要的逻辑实现,有些部分和前面TextView实现底部导航栏的效果类似, 就不具体讲解了,代码如下:
MainActivity.java:
public class MainActivity extends AppCompatActivity implements View.OnClickListener{
private LinearLayout ly_one,ly_two,ly_three,ly_four;
private TextView mTextView1,mTextView2,mTextView3,mTextView4;
private TextView mTextNum1,mTextNum2,mTextNum3,mTxetNum3;
private ImageView mImageView;
@Override
protected void onCreate(Bundle savedInstanceState) {
super.onCreate(savedInstanceState);
setContentView(R.layout.activity_main);
bindView();
ly_one.performClick();
FragmentTransaction transaction = getFragmentManager().beginTransaction();
MyFragment fg1 = new MyFragment();
transaction.add(R.id.fragment_container,fg1);
transaction.commit();
}
private void bindView() {
ly_one = (LinearLayout)findViewById(R.id.ly_tab_menu_deal);
ly_two = (LinearLayout)findViewById(R.id.ly_tab_menu_poi);
ly_three = (LinearLayout)findViewById(R.id.ly_tab_menu_more);
ly_four = (LinearLayout)findViewById(R.id.ly_tab_menu_user);
mTextView1 = (TextView)findViewById(R.id.tab_menu_deal);
mTextView2 = (TextView)findViewById(R.id.tab_menu_poi);
mTextView3 = (TextView)findViewById(R.id.tab_menu_more);
mTextView4 = (TextView)findViewById(R.id.tab_menu_user);
mTextNum1 = (TextView)findViewById(R.id.tab_menu_deal_num);
mTextNum2 = (TextView)findViewById(R.id.tab_menu_poi_num);
mTextNum3 = (TextView)findViewById(R.id.tab_menu_more_num);
mImageView = (ImageView)findViewById(R.id.tab_menu_setting_partner);
ly_one.setOnClickListener(this);
ly_two.setOnClickListener(this);
ly_three.setOnClickListener(this);
ly_four.setOnClickListener(this);
}
private void setSelected() {
mTextView1.setSelected(false);
mTextView2.setSelected(false);
mTextView3.setSelected(false);
mTextView4.setSelected(false);
}
@Override
public void onClick(View v) {
switch (v.getId()) {
case R.id.ly_tab_menu_deal:
setSelected();
mTextView1.setSelected(true);
mTextNum1.setVisibility(View.INVISIBLE);
break;
case R.id.ly_tab_menu_poi:
setSelected();
mTextView2.setSelected(true);
mTextNum2.setVisibility(View.INVISIBLE);
break;
case R.id.ly_tab_menu_more:
setSelected();
mTextView3.setSelected(true);
mTextNum3.setVisibility(View.INVISIBLE);
break;
case R.id.ly_tab_menu_user:
setSelected();
mTextView4.setSelected(true);
mImageView.setVisibility(View.INVISIBLE);
break;
}
}
}
- 1
- 2
- 3
- 4
- 5
- 6
- 7
- 8
- 9
- 10
- 11
- 12
- 13
- 14
- 15
- 16
- 17
- 18
- 19
- 20
- 21
- 22
- 23
- 24
- 25
- 26
- 27
- 28
- 29
- 30
- 31
- 32
- 33
- 34
- 35
- 36
- 37
- 38
- 39
- 40
- 41
- 42
- 43
- 44
- 45
- 46
- 47
- 48
- 49
- 50
- 51
- 52
- 53
- 54
- 55
- 56
- 57
- 58
- 59
- 60
- 61
- 62
- 63
- 64
- 65
- 66
- 67
- 68
- 69
- 70
- 71
- 72
- 73
- 74
- 75
- 76
- 77
- 78
- 79
- 80
- 81
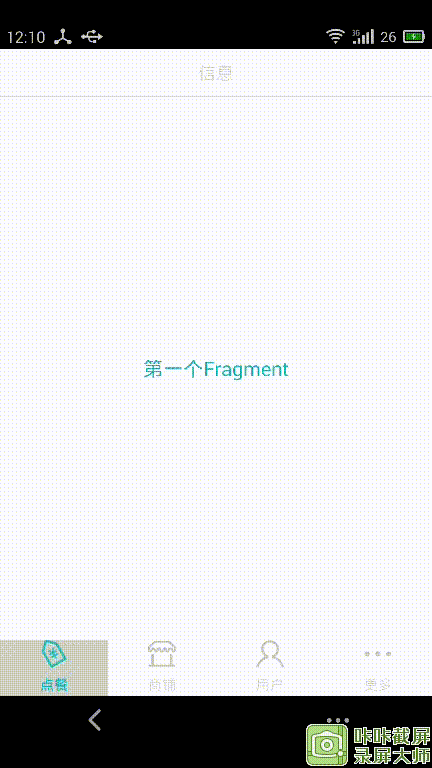
代码实现效果图:
利用BottomNavigationBar实现底部导航栏
这篇博客讲得很清楚~
http://blog.csdn.net/u010046908/article/details/50962081
http://www.open-open.com/lib/view/open1465996383855.html
参考:点击打开链接
参考2 参考3


 3752
3752

 被折叠的 条评论
为什么被折叠?
被折叠的 条评论
为什么被折叠?
 到【灌水乐园】发言


