


转自:http://blog.csdn.net/ysysbaobei/article/details/17390639
英文:http://www.raywenderlich.com/59255/afnetworking-2-0-tutorial
网络 —你的程序离开了它就不能生存下去!苹果的Foundationframework中的NSURLConnection又非常难以理解,不过这里有一个可以使用的替代品:AFNetworking.
AFNetworking 非常受开发者欢迎 –它赢得了我们读者的青睐:2012年最佳的iOS Library奖(2012 Best iOS Library Award.)所以现在我就写这篇文章来向你介绍如何在程序中有效的使用它。
AFNetworking 包括了所有你需要与在线资源交互的内容,从web services到文件下载。当你的程序在下载一个大文件期间,AFNetworking还能确保你的UI是可以响应的。
本文将介绍AFNetworking框架主要的组成部分。一路上,你将使用World Weather Online提供的咨询(Feeds)来创建一个天气(Weather)程序。刚开始使用的天气数据是静态的,不过在学完本文内容之后,程序将连接到实时的天气咨询。
今日预计:一个很酷的开发者学习所有关于AFNetworking知识,并在他的程序中使用AFNetworking。我们开始忙活吧!
首先来这里(here)下载本文的启动项目。这个工程提供了一个基本的UI— AFNetworking相关代码还没有添加。
打开MainStoryboard.storyboard文件,将看到3个view controller:

从左到右,分别是:
· 顶级(top-level)的导航控制器;
· 用来显示天气的一个table view controller,每天一行;
· 一个自定义的view controller (WeatherAnimationViewController)当用户点击某个table view cell时,这个view controller将显示某一天的天气咨询。
生成并运行项目,你将看到相关的UI出现,但是什么都没有实现!因为程序需要从网络中获取到所需要的数据,而相关代码还没有添加。这也是本文中你将要实现的!
首先,你需要将AFNetworking框架包含到工程中。如果你还没有AFNetworking的话,在这里下载最新的版本:GitHub.
当你解压出下载的文件后,你将看到其中有一个AFNetworking子文件夹,里面全是.h和 .m 文件, 如下高亮显示的:
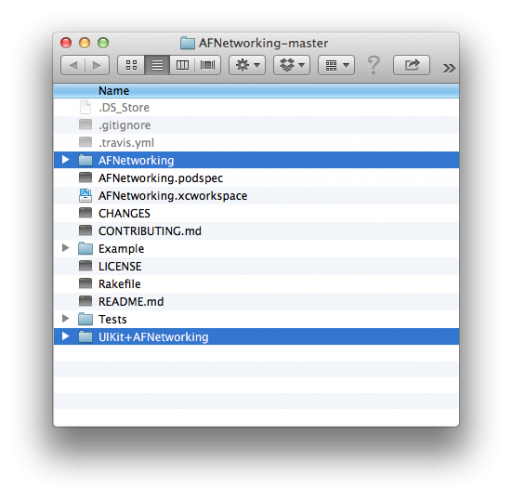
将AFNetworking拖拽到Xcode工程中.
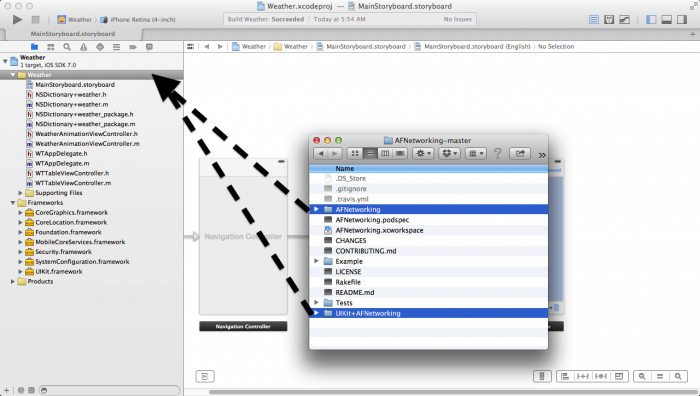
当出现了添加文件的选项时,确保勾选上Copy items into destination group’s folder (if needed) 和 Create groups for any addedfolders.
要完成相关配置,请在工程的Supporting Files群组中打开预编译头文件Weather-Prefix.pch.然后在别的import后面添加如下一行代码:
#import "AFNetworking.h"
将AFNetworking添加到预编译头文件,意味着这个框架会被自动的添加到工程的所有源代码文件中。
很容易,不是吗?现在你已经准备好“天气”程序代码了!
AFNetworking通过网络来加载和处理结构化的数据是非常智能的,普通的HTTP请求也一样。尤其是它支持JSON, XML和 Property Lists (plists).
你可以下载一些JSON数据,然后用自己的解析器来解析,但这何必呢?通过AFNetworking就可以完成这些操作!

首先,你需要测试脚本(数据)所需的一个基本URL。将下面的这个静态NSString声明到WTTableViewController.m顶部,也就是所有#import下面:
1. staticNSString*const BaseURLString=@"http://www.raywenderlich.com/demos/weather_sample/";
这个URL是一个非常简单的“web service”,在本文中我特意为你创建的。如果你想知道它看起来是什么样,可以来这里下载代码:download the source.
这个web service以3种不同的格式(JSON, XML和 PLIST)返回天气数据。你可以使用下面的这些URL来看看返回的数据:
· http://www.raywenderlich.com/downloads/weather_sample/weather.php?format=json
· http://www.raywenderlich.com/downloads/weather_sample/weather.php?format=xml
· http://www.raywenderlich.com/downloads/weather_sample/weather.php?format=plist (mightnot show up right in your browser)
第一个数据格式使用的是JSON. JSON是一种常见的JavaScript派生类对象格式。看起来如下:
| { "data": { "current_condition": [ { "cloudcover": "16", "humidity": "59", "observation_time": "09:09 PM", } ] } } |
注意: 如果你想要结更多关于JSON内容,请参考:Working with JSON Tutorial.
当用户点击程序中的JSON按钮时,你希望对从服务中获得的JSON数据进行加载并处理。在WTTableViewController.m中,找到jsonTapped: 方法 (现在应该是空的) ,并用下面的代码替换:
-(IBAction)jsonTapped:(id)sender
{
// 1
NSString*string=[NSStringstringWithFormat:@"%@weather.php?format=json", BaseURLString];
NSURL*url=[NSURLURLWithString:string];
NSURLRequest*request=[NSURLRequestrequestWithURL:url];
// 2
AFHTTPRequestOperation*operation=[[AFHTTPRequestOperation alloc]
initWithRequest:request];
operation.responseSerializer=[AFJSONResponseSerializer serializer];
[operation setCompletionBlockWithSuccess:^(AFHTTPRequestOperation*operation,id
responseObject){
// 3
self.weather=(NSDictionary*)responseObject;
self.title=@"JSONRetrieved";
[self.tableView reloadData];
} failure:^(AFHTTPRequestOperation*operation,NSError*error){
// 4
UIAlertView*alertView=[[UIAlertView alloc] initWithTitle:@"ErrorRetrieving Weather"
message:[error
localizedDescription]
delegate:nil
cancelButtonTitle:@"Ok"
otherButtonTitles:nil];
[alertView show];
}];
// 5
[operation start];
}
这是你的第一个AFNetworking代码!因此,这看起来是全新的,我将对这个方法中代码进行介绍。
1. 根据基本的URL构造出完整的一个URL。然后通过这个完整的URL获得一个NSURL对象,然后根据这个url获得一个NSURLRequest.
2. AFJSONRequestOperation是一个功能完整的类(all-in-one)—整合了从网络中获取数据并对JSON进行解析。
3. 当请求成功,则运行成功块(success block)。在本示例中,把解析出来的天气数据从JSON变量转换为一个字典(dictionary),并将其存储在属性 weather 中.
4. 如果运行出问题了,则运行失败块(failure block),比如网络不可用。如果failure block被调用了,将会通过提示框显示出错误信息。
如上所示,AFNetworking的使用非常简单。如果要用苹果提供的APIs(如NSURLConnection)来实现同样的功能(下载和解析JSON数据),则需要许多代码才能做到。
现在天气数据已经存在于self.weather中,你需要将其显示出来。找到tableView:numberOfRowsInSection: 方法,并用下面的代码替换:
-(NSInteger)tableView:(UITableView*)tableView numberOfRowsInSection:(NSInteger)section
{
if(!self.weather)
return0;
switch(section){
case0:{
return1;
}
case1:{
NSArray*upcomingWeather=[self.weather upcomingWeather];
return[upcomingWeather count];
}
default:
return0;
}
}
table view有两个section:第一个用来显示当前天气,第二个用来显示未来的天气。
等一分钟,你可能正在思考。这里的 [self.weather upcomingWeather]是什么? 如果self.weather是一个普通的NSDictionary,它是怎么知道“upcomingWeather”是什么呢?
为了更容易的解析数据,在starter工程中,有一对NSDictionary categories:
· NSDictionary+weather.m
· NSDictionary+weather_package.m
这些categories添加了一些方便的方法,通过这些方法可以很方便的对字典中的数据元素进行访问。这样你就可以专注于网络部分,而不是NSDictionary中数据的访问。对吧?
回到 WTTableViewController.m,找到 tableView:cellForRowAtIndexPath: 方法,并用下面的实现替换:
-(UITableViewCell*)tableView:(UITableView*)tableView cellForRowAtIndexPath:
(NSIndexPath*)indexPath
{
staticNSString*CellIdentifier=@"WeatherCell";
UITableViewCell*cell=[tableView dequeueReusableCellWithIdentifier:CellIdentifier
forIndexPath:indexPath];
NSDictionary*daysWeather=nil;
switch(indexPath.section){
case0:{
daysWeather=[self.weather currentCondition];
break;
}
case1:{
NSArray*upcomingWeather=[self.weather upcomingWeather];
daysWeather= upcomingWeather[indexPath.row];
break;
}
default:
break;
}
cell.textLabel.text=[daysWeather weatherDescription];
// Youwill add code here later to customize the cell, but it's good for now.
return cell;
}
跟tableView:numberOfRowsInSection:方法一样,在这里使用了便利的NSDictionarycategories来获得数据。当前天的天气是一个字典,而未来几日的天气则存储在一个数组中。
生成并运行工程,然后点击JSON按钮.这将会动态的获得一个AFJSONOperation对象,并看到如下画面内容:
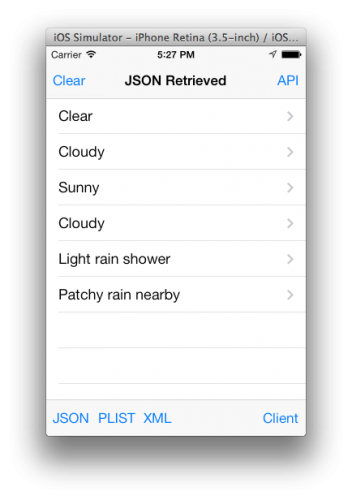
JSON 操作成功!
Property lists (或简称为 plists)是以确定的格式(苹果定义的)构成的XML文件。苹果一般将plists用在用户设置中。看起来如下:
<dict>
<key>data</key>
<dict>
<key>current_condition</key>
<array>
<dict>
<key>cloudcover</key>
<string>16</string>
<key>humidity</key>
<string>59</string>
上面的意思是:
· 一个字典中有一个名为“data”的key,这个key对应着另外一个字典。
· 这个字典有一个名为 “current_condition”的key,这个key对应着一个array.
· 这个数组包含着一个字典,字典中有多个key和values。比如cloudcover=16和humidity=59.
现在是时候加载plist版本的天气数据了!找到plistTapped: 方法,并用下面的实现替换:
-(IBAction)plistTapped:(id)sender
{
NSString*string=[NSStringstringWithFormat:@"%@weather.php?format=plist", BaseURLString];
NSURL*url=[NSURLURLWithString:string];
NSURLRequest*request=[NSURLRequestrequestWithURL:url];
AFHTTPRequestOperation*operation=[[AFHTTPRequestOperation alloc] initWithRequest:request];
// Makesure to set the responseSerializer correctly
operation.responseSerializer=[AFPropertyListResponseSerializer serializer];
[operation setCompletionBlockWithSuccess:^(AFHTTPRequestOperation*operation,id responseObject){
self.weather=(NSDictionary*)responseObject;
self.title=@"PLISTRetrieved";
[self.tableView reloadData];
} failure:^(AFHTTPRequestOperation*operation,NSError*error){
UIAlertView*alertView=[[UIAlertView alloc] initWithTitle:@"ErrorRetrieving Weather"
message:[error localizedDescription]
delegate:nil
cancelButtonTitle:@"Ok"
otherButtonTitles:nil];
[alertView show];
}];
[operation start];
}
注意到,上面的代码几乎与JSON版的一致,只不过将操作(operation)的类型从AFJSONOperation修改为AFPropertyListOperation.这非常的整齐:你才程序只需要修改一丁点代码就可以接收JSON或plist格式的数据了!
生成并运行工程,然后点击PLIST按钮。将看到如下内容:

如果你需要重置所有的内容,以重新开始操作,导航栏顶部的Clear按钮可以清除掉title和table view中的数据。
AFNetworking处理JSON和plist的解析使用的是类似的方法,并不需要花费太多功夫,而处理XML则要稍微复杂一点。下面,就根据XML咨询构造一个天气字典(NSDictionary)。
iOS提供了一个帮助类:NSXMLParse (如果你想了解更多内容,请看这里的链接:SAX parser).
还是在文件WTTableViewController.m,找到 xmlTapped: 方法,并用下面的实现替换:
-(IBAction)xmlTapped:(id)sender
{
NSString*string=[NSStringstringWithFormat:@"%@weather.php?format=xml", BaseURLString];
NSURL*url=[NSURLURLWithString:string];
NSURLRequest*request=[NSURLRequestrequestWithURL:url];
AFHTTPRequestOperation*operation=[[AFHTTPRequestOperation alloc] initWithRequest:request];
// Makesure to set the responseSerializer correctly
operation.responseSerializer=[AFXMLParserResponseSerializer serializer];
[operation setCompletionBlockWithSuccess:^(AFHTTPRequestOperation*operation,id responseObject){
NSXMLParser*XMLParser=(NSXMLParser*)responseObject;
[XMLParser setShouldProcessNamespaces:YES];
// Leavethese commented for now (you first need to add the delegate methods)
//XMLParser.delegate = self;
//[XMLParser parse];
} failure:^(AFHTTPRequestOperation*operation,NSError*error){
UIAlertView*alertView=[[UIAlertView alloc] initWithTitle:@"ErrorRetrieving Weather"
message:[error localizedDescription]
delegate:nil
cancelButtonTitle:@"Ok"
otherButtonTitles:nil];
[alertView show];
}];
[operation start];
}
到现在为止,这看起来跟之前处理JSON和plist很类似。最大的改动就是在成功块(success block)中, 在这里不会传递给你一个预处理好的NSDictionary对象.而是AFXMLRequestOperation实例化的NSXMLParse对象,这个对象将用来处理繁重的XML解析任务。
NSXMLParse对象有一组delegate方法是你需要实现的 —用来获得XML数据。注意,在上面的代码中我将XMLParser的delegate设置为self,因此WTTableViewController将用来处理XML的解析任务。
首先,更新一下WTTableViewController.h 并修改一下类声明,如下所示:
@interface WTTableViewController: UITableViewController<NSXMLParserDelegate>
上面代码的意思是这个类将实现(遵循)NSXMLParserDelegate协议.
为了支持资讯的解析,还需要一些属性来存储相关的数据。将下面的代码添加到@implementatio后面:
1. @property(nonatomic, strong)NSMutableDictionary*currentDictionary; // current section being parsed
2. @property(nonatomic, strong)NSMutableDictionary*xmlWeather; //completed parsed xml response
3. @property(nonatomic, strong)NSString*elementName;
4. @property(nonatomic, strong)NSMutableString*outstring;
接着打开WTTableViewController.m,现在你需要一个一个的实现上面所说的几个delegate方法。将下面这个方法粘贴到实现文件中:
-(void)parserDidStartDocument:(NSXMLParser*)parser
{
self.xmlWeather=[NSMutableDictionary dictionary];
}
当NSXMLParser开始处理时会调用这个方法,在这个方法中初始化xmlWeather,xmlWeather用于保存XML数据。
然后将下面这个方法粘贴到上一个方法的后面:
- (void)parser:(NSXMLParser *)parser didStartElement:(NSString *)elementName namespaceURI:(NSString *)namespaceURI qualifiedName:(NSString *)qName attributes:(NSDictionary *)attributeDict
{
self.elementName = qName;
if([qName isEqualToString:@"current_condition"] ||
[qName isEqualToString:@"weather"] ||
[qName isEqualToString:@"request"]) {
self.currentDictionary = [NSMutableDictionary dictionary];
}
self.outstring = [NSMutableString string];
}
当NSXMLParser发现了新的元素开始标签时,会调用上面这个方法。在这个方法中,在构造一个新字典用来存储赋值给currentDictionary属性之前,首先保存住上一个元素名称用elementName。还要将outstring重置一下,这个字符串用来构造XML标签中的数据。
然后将下面这个方法粘贴到上一个方法的后面:
-(void)parser:(NSXMLParser*)parser foundCharacters:(NSString*)string
{
if(!self.elementName)
return;
[self.outstring appendFormat:@"%@",string];
}
如名字一样,当NSXMLParser在一个XML标签中发现了字符数据,会调用这个方法。该方法将字符数据追加到outstring属性中,当XML标签结束的时候,这个outstring会被处理。
继续,将下面这个方法粘贴到上一个方法的后面:
- (void)parser:(NSXMLParser *)parser didEndElement:(NSString *)elementName namespaceURI:(NSString *)namespaceURI qualifiedName:(NSString *)qName
{
// 1
if ([qName isEqualToString:@"current_condition"] ||
[qName isEqualToString:@"request"]) {
self.xmlWeather[qName] = @[self.currentDictionary];
self.currentDictionary = nil;
}
// 2
else if ([qName isEqualToString:@"weather"]) {
// Initialize the list of weather items if it doesn't exist
NSMutableArray *array = self.xmlWeather[@"weather"] ?: [NSMutableArray array];
// Add the current weather object
[array addObject:self.currentDictionary];
// Set the new array to the "weather" key on xmlWeather dictionary
self.xmlWeather[@"weather"] = array;
self.currentDictionary = nil;
}
// 3
else if ([qName isEqualToString:@"value"]) {
// Ignore value tags, they only appear in the two conditions below
}
// 4
else if ([qName isEqualToString:@"weatherDesc"] ||
[qName isEqualToString:@"weatherIconUrl"]) {
NSDictionary *dictionary = @{@"value": self.outstring};
NSArray *array = @[dictionary];
self.currentDictionary[qName] = array;
}
// 5
else if (qName) {
self.currentDictionary[qName] = self.outstring;
}
self.elementName = nil;
}
当检测到元素的结束标签时,会调用上面这个方法。在这个方法中,会查找一些标签:
1. urrent_condition 元素表示获得了一个今天的天气。会把今天的天气直接添加到xmlWeather字典中。
2. weather 元素表示获得了随后一天的天气。今天的天气只有一个,而后续的天气有多个,所以在此,将后续天气添加到一个数组中。
3. value 标签出现在别的标签中,所以这里可以忽略掉这个标签。
4. weatherDesc 和 weatherIconUrl 元素的值在存储之前,需要需要被放入一个数组中 — 这里的结构是为了与JSON和plist版本天气咨询格式相匹配。
5. 所有其它元素都是按照原样(as-is)进行存储的。
下面是最后一个delegate方法!将下面这个方法粘贴到上一个方法的后面:
-(void) parserDidEndDocument:(NSXMLParser*)parser
{
self.weather = @{@"data": self.xmlWeather};
self.title =@"XML Retrieved";
[self.tableView reloadData];
}
当NSXMLParser解析到document的尾部时,会调用这个方法。在此,xmlWeather字典已经构造完毕,table view可以重新加载了。
在上面代码中将xmlWeather添加到一个字典中,看起来是冗余的,不过这样可以确保与JSON和plist版本的格式完全匹配。这样所有的3种数据格式(JSON, plist和XML)都能够用相同的代码来显示!

现在所有的delegate方法和属性都搞定了,找到xmlTapped: 方法,并取消注释成功块(success block)中的一行代码:
-(IBAction)xmlTapped:(id)sender
{
...
[operation setCompletionBlockWithSuccess:^(AFHTTPRequestOperation*operation,id responseObject){
NSXMLParser*XMLParser=(NSXMLParser*)responseObject;
[XMLParser setShouldProcessNamespaces:YES];
// Theselines below were previously commented
XMLParser.delegate= self;
[XMLParser parse];
...
}
生成和运行工程,然后点击XML按钮,将看到如下内容:

嗯,上面的这个程序看起来体验不太友好,有点像整周都是阴雨天。如何让table view中的天气信息体验更好点呢?
再仔细看看之前的JSON格式数据:JSON format from before,你会看到每个天气项里面都有一个图片URLs。 将这些天气图片显示到每个table view cell中,这样程序看起来会更有意思。
AFNetworking给UIImageView添加了一个category,让图片能够异步加载,也就是说当图片在后台下载的时候,程序的UI界面仍然能够响应。为了使用这个功能,首先需要将这个category import到WTTableViewController.m文件的顶部:
#import"UIImageView+AFNetworking.h"
找到tableView:cellForRowAtIndexPath: 方法,并将下面的代码粘贴到最后的returncell; 代码上上面(这里应该有一个注释标记)
cell.textLabel.text=[daysWeather weatherDescription];
NSURL*url=[NSURLURLWithString:daysWeather.weatherIconURL];
NSURLRequest*request=[NSURLRequestrequestWithURL:url];
UIImage*placeholderImage=[UIImage imageNamed:@"placeholder"];
__weak UITableViewCell*weakCell= cell;
[cell.imageView setImageWithURLRequest:request
placeholderImage:placeholderImage
success:^(NSURLRequest*request,NSHTTPURLResponse*response, UIImage*image){
weakCell.imageView.image= image;
[weakCell setNeedsLayout];
} failure:nil];
首先创建一个弱引用(weak)的cell,这样就可以在block中使用这个cell。如果你直接访问cell变量,Xcode会提示一个关于retain循环和内存泄露的警告。
UIImageView+AFNetworkingcategory定义了一个setImageWithURLRequest… 方法.这个方法的参数包括:一个指向图片URL的请求,一个占位符图片,一个success block和一个failure block。
当cell首次被创建的时候,cell中的UIImageView将显示一个占位符图片,直到真正的图片被下载完成。在这里你需要确保占位符的图片与实际图片尺寸大小相同。
如果尺寸不相同的话,你可以在success block中调用cell的setNeedsLayout方法.上面代码中对两行代码进行了注释,这是因为这里的占位符图片尺寸正好合适,留着注释,可能在别的程序中需要用到。
现在生成并运行工程,然后点击之前添加的3个操作中的任意一个,将看到如下内容:
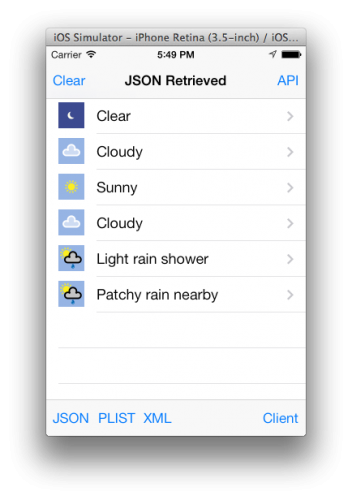
很好!异步加载图片从来没有这么简单过。
到现在你已经使用类似AFJSONRequestOperation这样的类创建了一次性的HTTP请求。另外,AFHTTPRequestOperationManager 和AFHTTPSessionManager是设计用来方便访问单个的web service终端的类。
当操作系统是iOS7及以上时使用AFHTTPSessionManager类,其使用了NSURLSession 及相关对象;
当操作系统是iOS6及以上时使用AFHTTPRequestOperationManager类,它跟AFHTTPSessionManager类相似,其使用了NSURLConnection类替换NSURLSession类的使用
注意: 对REST, GET和POST不清楚?看看这里比较有趣的介绍 – 我如何给妻子解释REST(How I Explained REST to My Wife.)
在WTTableViewController.h 顶部将类声明按照如下修改:
@interface WTTableViewController:UITableViewController<NSXMLParserDelegate, CLLocationManagerDelegate,UIActionSheetDelegate>
在 WTTableViewController.m中,找到httpClientTapped: 方法,并用下面的实现替换:
-(IBAction)clientTapped:(id)sender
{
UIActionSheet*actionSheet=[[UIActionSheet alloc] initWithTitle:@"AFHTTPSessionManager"
delegate:self
cancelButtonTitle:@"Cancel"
destructiveButtonTitle:nil
otherButtonTitles:@"HTTPGET",@"HTTPPOST",nil];
[actionSheet showFromBarButtonItem:sender animated:YES];
}
上面的方法会弹出一个action sheet,用以选择GET和POST请求。粘贴如下代码以实现action sheet中按钮对应的操作:
-(void)actionSheet:(UIActionSheet*)actionSheet clickedButtonAtIndex:(NSInteger)buttonIndex
{
if(buttonIndex==[actionSheet cancelButtonIndex]){
// Userpressed cancel -- abort
return;
}
// 1
NSURL*baseURL=[NSURLURLWithString:BaseURLString];
NSDictionary*parameters= @{@"format":@"json"};
// 2
AFHTTPSessionManager*manager=[[AFHTTPSessionManager alloc] initWithBaseURL:baseURL];
manager.responseSerializer=[AFJSONResponseSerializer serializer];
// 3
if(buttonIndex==0){
[manager GET:@"weather.php" parameters:parameters success:^(NSURLSessionDataTask*task,id responseObject){
self.weather= responseObject;
self.title=@"HTTPGET";
[self.tableView reloadData];
} failure:^(NSURLSessionDataTask*task,NSError*error){
UIAlertView*alertView=[[UIAlertView alloc] initWithTitle:@"ErrorRetrieving Weather"
message:[error localizedDescription]
delegate:nil
cancelButtonTitle:@"Ok"
otherButtonTitles:nil];
[alertView show];
}];
}
// 4
elseif(buttonIndex==1){
[manager POST:@"weather.php" parameters:parameters success:^(NSURLSessionDataTask*task,id responseObject){
self.weather= responseObject;
self.title=@"HTTPPOST";
[self.tableView reloadData];
} failure:^(NSURLSessionDataTask*task,NSError*error){
UIAlertView*alertView=[[UIAlertView alloc] initWithTitle:@"ErrorRetrieving Weather"
message:[error localizedDescription]
delegate:nil
cancelButtonTitle:@"Ok"
otherButtonTitles:nil];
[alertView show];
}];
}
}
上面的代码作用如下:
1. 构建一个baseURL,以及一个参数字典变量.
2. 创建AFHTTPSessionManager实例并设置其responseSerializer属性为JSON序列化;
3. 做了一个GET请求,这个请求有一对block:success和failure。
4. POST请求跟GET一样。
在这里,将请求一个JSON回应,当然也可以使用之前讨论过的另外两种格式来代替JSON。
生成并运行工程,点击HTTPClient按钮,然后选择GET或 POST按钮来初始化一个相关的请求。之后会看到如下内容:

至此,你已经知道AFHTTPSessionManager最基本的使用方法。不过,这里还有更好的一种使用方法,它可以让代码更加干净整齐,下面我们就来学习一下吧。
在你可以使用Live Service前,你需要在World Weather Online,上注册一个免费账户,别担心,它的操作非常简单。
注册后你会在你(注册时)提供的邮箱中收到确认邮件,邮件中会有一个确认链接,然后你需要在My Account页面请求一个免费的API key。
来,离开页面打开你的API密钥你很快就会需要它。
现在你获取到了API key,返回到工程上来吧。
到现在为止,你已经在table view controller中直接调用了AFRequestOperations和 AFHTTPSessionManager.实际上,大多数时候不是这样的,你的网络请求会跟某个web service或API相关。
AFHTTPSessionManager已经具备与web API通讯的所有内容。AFHTTPSessionManager在代码中已经把网络通讯部分做了解耦处理,让网络通讯的代码在整个工程中都可以重用。
下面是两个关于AFHTTPSessionManager最佳实践的指导:
1. 为每个web service创建一个子类。例如,如果你在写一个社交网络聚合器,那么可能就会有Twitter的一个子类,Facebook的一个子类,Instragram的一个子类等等。
2. 在AFHTTPSessionManager子类中,创建一个类方法,用来返回一个共享的单例,这将会节约资源并省去必要的对象创建。
当前,你的工程中还没有一个AFHTTPSessionManager的子类,下面就来创建一个吧。我们来处理一下,让代码清洁起来。
首先,在工程中创建一个新的文件:iOSCocoa TouchObjective-C Class.命名为WeatherHTTPClient 并让其继承自AFHTTPSessionManager.
你希望这个类做3件事情:
A:执行HTTP请求
B:当有新的可用天气数据时,调用delegate
C:使用用户当前地理位置来获得准确的天气。
用下面的代码替换WeatherHTTPClient.h:
#import "AFHTTPSessionManager.h"
@protocol WeatherHTTPClientDelegate;
@interface WeatherHTTPClient: AFHTTPSessionManager
@property(nonatomic, weak) id<WeatherHTTPClientDelegate>delegate;
+(WeatherHTTPClient*)sharedWeatherHTTPClient;
-(instancetype)initWithBaseURL:(NSURL*)url;
-(void)updateWeatherAtLocation:(CLLocation*)location forNumberOfDays:(NSUInteger)number;
@end
@protocol WeatherHTTPClientDelegate <NSObject>
@optional
-(void)weatherHTTPClient:(WeatherHTTPClient*)client didUpdateWithWeather:(id)weather;
-(void)weatherHTTPClient:(WeatherHTTPClient*)client didFailWithError:(NSError*)error;
@end
在实现文件中,你将了解头文件中定义的更多相关内容。打开WeatherHTTPClient.m 并将下面的代码添加到@implementation下面:
// Setthis to your World Weather Online API Key
staticNSString*const WorldWeatherOnlineAPIKey=@"PASTEYOUR API KEY HERE";
staticNSString*const WorldWeatherOnlineURLString=@"http://api.worldweatheronline.com/free/v1/";
+(WeatherHTTPClient*)sharedWeatherHTTPClient
{
static WeatherHTTPClient*_sharedWeatherHTTPClient=nil;
static dispatch_once_t onceToken;
dispatch_once(&onceToken,^{
_sharedWeatherHTTPClient=[[self alloc] initWithBaseURL:[NSURLURLWithString:WorldWeatherOnlineURLString]];
});
return _sharedWeatherHTTPClient;
}
-(instancetype)initWithBaseURL:(NSURL*)url
{
self=[super initWithBaseURL:url];
if(self){
self.responseSerializer=[AFJSONResponseSerializer serializer];
self.requestSerializer=[AFJSONRequestSerializer serializer];
}
return self;
sharedWeatherHTTPClient方法使用Grand Central Dispatch(GCD)来确保这个共享的单例对象只被初始化分配一次。这里用一个base URL来初始化对象,并将其设置为期望web service响应为JSON。
将下面的方法粘贴到上一个方法的下面:
-(void)updateWeatherAtLocation:(CLLocation*)location forNumberOfDays:(NSUInteger)number
{
NSMutableDictionary*parameters=[NSMutableDictionarydictionary];
parameters[@"num_of_days"]= @(number);
parameters[@"q"]=[NSStringstringWithFormat:@"%f,%f",location.coordinate.latitude,location.coordinate.longitude];
parameters[@"format"]=@"json";
parameters[@"key"]= WorldWeatherOnlineAPIKey;
[self GET:@"weather.ashx" parameters:parameters success:^(NSURLSessionDataTask*task,id responseObject){
if([self.delegate respondsToSelector:@selector(weatherHTTPClient:didUpdateWithWeather:)]){
[self.delegate weatherHTTPClient:self didUpdateWithWeather:responseObject];
}
} failure:^(NSURLSessionDataTask*task,NSError*error){
if([self.delegate respondsToSelector:@selector(weatherHTTPClient:didFailWithError:)]){
[self.delegate weatherHTTPClient:self didFailWithError:error];
}
}];
}
这个方法调用World Weather Online接口,以获得具体位置的天气信息。
非常重要!本实例中的API key仅仅是为本文创建的。如果你创建了一个程序,请在WorldWeather Online创建一个账号,并获得你自己的API key!
一旦对象获得了天气数据,它需要一些方法来通知对此感兴趣的对象:数据回来了。这里要感谢WeatherHttpClientDelegate协议和它的delegate方法,在上面代码中的success和 failure blocks可以通知一个controller:指定位置的天气已经更新了。这样,controller就可以对天气做更新显示。
现在,我们需要把这些代码片段整合到一起!WeatherHTTPClient希望接收一个位置信息,并且WeatherHTTPClient定义了一个delegate协议,现在对WTTableViewControlle类做一下更新,以使用WeatherHTTPClient.
打开WTTableViewController.h 添加一个import,并用下面的代码替换@interface声明:
@interface WTTableViewController: UITableViewController <NSXMLParserDelegate,CLLocationManagerDelegate, UIActionSheetDelegate, WeatherHTTPClientDelegate>
另外添加一个新的Core Location manager属性:
1. @property(nonatomic, strong) CLLocationManager*locationManager;
在 WTTableViewController.m中,将下面的代码添加到viewDidLoad:的底部:
self.locationManager=[[CLLocationManager alloc] init];
self.locationManager.delegate= self;
上面这两行代码初始化了Core Location manager,这样当view加载的时候,用来确定用户的当前位置。Core Location然后会通过delegate回调以传回位置信息。将下面的方法添加到实现文件中:
-(void)locationManager:(CLLocationManager*)manager didUpdateLocations:(NSArray*)locations
{
// Lastobject contains the most recent location
CLLocation*newLocation=[locations lastObject];
// If thelocation is more than 5 minutes old, ignore it
if([newLocation.timestamp timeIntervalSinceNow] > 300)
return;
[self.locationManager stopUpdatingLocation];
WeatherHTTPClient*client=[WeatherHTTPClient sharedWeatherHTTPClient];
client.delegate= self;
[client updateWeatherAtLocation:newLocation forNumberOfDays:5];
}
现在,当用户的位置有了变化时,你就可以使用WeatherHTTPClient单例来请求当前位置的天气信息。
记住,WeatherHTTPClient有两个delegate方法需要实现。将下面两个方法添加到实现文件中:
-(void)weatherHTTPClient:(WeatherHTTPClient*)client didUpdateWithWeather:(id)weather
{
self.weather= weather;
self.title=@"APIUpdated";
[self.tableView reloadData];
}
-(void)weatherHTTPClient:(WeatherHTTPClient*)client didFailWithError:(NSError*)error
{
UIAlertView*alertView=[[UIAlertView alloc] initWithTitle:@"ErrorRetrieving Weather"
message:[NSStringstringWithFormat:@"%@",error]
delegate:nil
cancelButtonTitle:@"OK" otherButtonTitles:nil];
[alertView show];
}
上面的两个方法,当WeatherHTTPClient请求成功,你就可以更新天气数据并重新加载table view。如果网络错误,则显示一个错误信息。
找到apiTapped: 方法,并用下面的方法替换:
-(IBAction)apiTapped:(id)sender
{
[self.locationManager startUpdatingLocation];
}
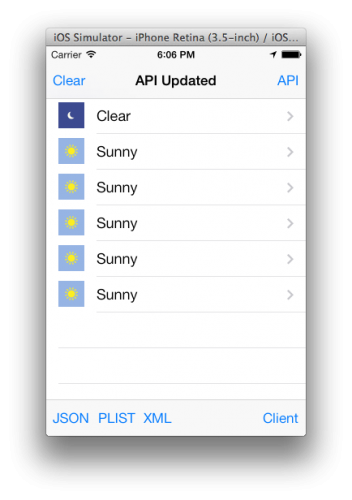
生成并运行程序,点击AP按钮以初始化一个WeatherHTTPClient请求,然后会看到如下画面:
希望在这里你未来的天气跟我的一样:晴天!
你可能注意到了,这里调用的外部web service需要花费一些时间才能返回数据。当在进行网络操作时,给用户提供一个信息反馈是非常重要的,这样用户才知道程序是在运行中或已奔溃了。

很幸运的是,AFNetworking有一个简便的方法来提供信息反馈:AFNetworkActivityIndicatorManager.
在WTAppDelegate.m中添加如下头文件
| #import "AFNetworkActivityIndicatorManager.h" |
在 WTAppDelegate.m中,找到application:didFinishLaunchingWithOptions: 方法,并用下面的方法替换:
| -(BOOL)application:(UIApplication*)application didFinishLaunchingWithOptions:(NSDictionary*)launchOptions { [AFNetworkActivityIndicatorManager sharedManager].enabled=YES; returnYES; } |
让sharedManager可以自动的显示出网络活动指示器( networkactivity indicator)—无论射门时候,只要有一个新的网络请求在后台运行着。这样你就不需要每次请求的时候,都要单独进行管理。
生成并运行工程,无论什么时候,只要有网络请求,都可以在状态栏中看到一个小的网络风火轮:

现在,即使你的程序在等待一个很慢的web service,用户都知道程序还在运行着!
如果你在table view cell上点击,程序会切换到天气的详细画面,并且以动画的方式显示出相应的天气情况。
这非常不错,但目前动画只有一个背景图片。除了通过网络来更新背景图片,还有更好的方法吗!
下面是本文关于介绍AFNetworking的最后内容了:AFImageRequestOperation. 跟AFJSONRequestOperation一样,AFImageRequestOperation封装了HTTP请求:获取图片。
在WeatherAnimationViewController.m 中有两个方法需要实现.找到updateBackgroundImage: 方法,并用下面的代码替换:
-(IBAction)updateBackgroundImage:(id)sender
{
NSURL*url=[NSURLURLWithString:@"http://www.raywenderlich.com/wp-content/uploads/2014/01/sunny-background.png"];
NSURLRequest*request=[NSURLRequestrequestWithURL:url];
AFHTTPRequestOperation*operation=[[AFHTTPRequestOperation alloc] initWithRequest:request];
operation.responseSerializer=[AFImageResponseSerializer serializer];
[operation setCompletionBlockWithSuccess:^(AFHTTPRequestOperation*operation,id responseObject){
self.backgroundImageView.image= responseObject;
[self saveImage:responseObject withFilename:@"background.png"];
} failure:^(AFHTTPRequestOperation*operation,NSError*error){
NSLog(@"Error:%@", error);
}];
[operation start];
}
这个方法初始化并下载一个新的背景图片。在结束时,它将返回请求到的完整图片。
在WeatherAnimationViewController.m中,你将看到两个辅助方法:imageWithFilename:和 saveImage:withFilename:,通过这两个辅助方法,可以对下载下来的图片进行存储和加载。updateBackgroundImage:将通过辅助方法把下载的图片存储到磁盘中。
接下来找到deleteBackgroundImage: 方法,并用下面的代码替换:
-(IBAction)deleteBackgroundImage:(id)sender
{
NSArray*paths= NSSearchPathForDirectoriesInDomains(NSDocumentDirectory, NSUserDomainMask,YES);
NSString*path=[[paths objectAtIndex:0] stringByAppendingPathComponent:@"WeatherHTTPClientImages/"];
NSError*error=nil;
[[NSFileManagerdefaultManager] removeItemAtPath:path error:&error];
NSString*desc=[self.weatherDictionary weatherDescription];
[self start:desc];
}
这个方法将删除已经下载的图片,这样在测试程序的时候,你可以再次下载图片。
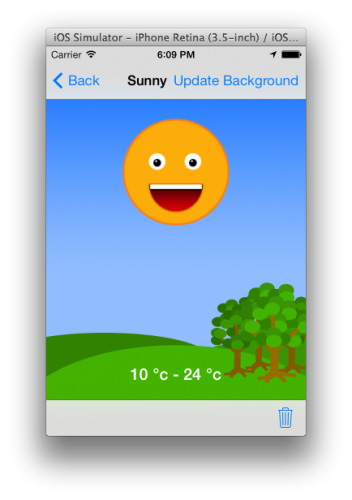
最后一次:生成并运行工程,下载天气数据,并点击某个cell,以打开详细天气画面。在详细天气画面中,点击UpdateBackground按钮.如果你点击的是晴天cell,将会看到如下画面:


 1万+
1万+

 被折叠的 条评论
为什么被折叠?
被折叠的 条评论
为什么被折叠?
 到【灌水乐园】发言


