


1.tabs选项卡【页签】
<title></title>
		<!-- 1.引入easyui的样式主题文件 -->
		<link rel="stylesheet" type="text/css" href="easyui/themes/default/easyui.css">
		<!-- easyui的系统图标-->
		<link rel="stylesheet" type="text/css" href="easyui/themes/icon.css">
		<!-- easyui依赖的jquery库-->
		<script type="text/javascript" src="easyui/jquery.min.js"></script>
		<!-- easyui的插件库-->
		<script type="text/javascript" src="easyui/jquery.easyui.min.js"></script>
		<!-- easyui的汉化包 -->
		<script type="text/javascript" src="easyui/locale/easyui-lang-zh_CN.js"></script>
		<script type="text/javascript">
			/*添加选项卡的函数*/
			function addPanel(){
				$('#div1').tabs('add',{
					title: '新选项卡',
					selected: false,
					closable:true

				});
			}
			/*删除选项卡的功能*/
			function removePanel(){
				//获取选项卡的索引
				var tab = $('#div1').tabs('getSelected');
				var index = $('#div1').tabs('getTabIndex',tab);
				console.log(index)


				$('#div1').tabs('close',index);
			}

		</script>
	</head>
	<body>
		<!--
			padding  内边距
			tabs:选项卡
			closable:关闭按钮
			iconCls:图标
			tools:添加工具栏
		-->
		<div id="div1" style="width: 500px;height: 300px;" class="easyui-tabs" tools="#tool">
			<div  style="padding:20px;" title="tab1"></div>
			<div  style="padding:20px;" title="tab2" data-options="closable:true" ></div>
			<div  style="padding:20px;" title="tab3" data-options="closable:true"></div>


		</div>
		<!--添加工具栏-->
		<div id="tool">
			<a href="javascript:void(0)" class="easyui-linkbutton" data-options="plain:true,iconCls:'icon-add'" onclick="addPanel()"></a>
    		<a href="javascript:void(0)" class="easyui-linkbutton" data-options="plain:true,iconCls:'icon-remove'" onclick="removePanel()"></a>
		</div>
2.Messager(消息窗口)
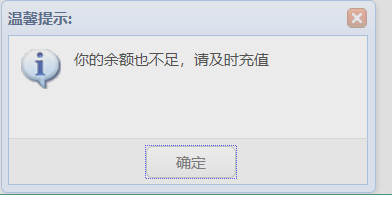
(1)提示弹窗
$.messager.alert('温馨提示:','你的余额也不足,请及时充值','info');
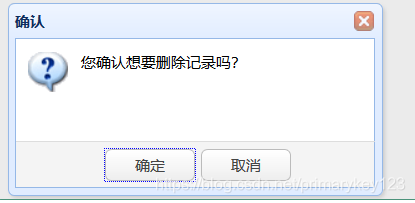
(2)确认弹窗
$.messager.confirm('确认','您确认想要删除记录吗?',function(r){
				    if (r){
				        alert('确认删除');
				    }
 (3)进度条
$.messager.progress({
					'title':'加载中。。',
					 'msg':'玩命加载 中',
					 'text':'等等 ,别走',
					 'interval':1000  //每次进度更新的间隔时间*/
});
(4)带输入框带确认和取消的弹框
$.messager.prompt('提示信息', '请输入你的姓名:', function(r){
					if (r){
						alert('你的姓名是:' + r);
					}
});
(5)右下角弹窗
$.messager.show({
					title:'我的消息',
					width:'350px',
					msg:'消息将在5秒后关闭。',
					timeout:5000,
					showSpeed:3000,
					showType:'slide'   //show 从右下角往左下角   slide 滑动  fade 淡入
				})
3.Form组件 【可以放入到dialog对话框中,实现弹窗的功能】
<form id="ff" method="get" action="/xxx">
	    	<table cellpadding="5">
	    		<tr>
	    			<td>Name:</td>
	    			<td><input class="easyui-textbox" type="text" name="name" data-options="required:true"></input></td>
	    		</tr>
	    		<tr>
	    			<td>Email:</td>
	    			<td><input class="easyui-textbox" type="text" name="email" data-options="required:true,validType:'email'"></input></td>
	    		</tr>
	    		<tr>
	    			<td>Subject:</td>
	    			<td><input class="easyui-textbox" type="text" name="subject" data-options="required:true"></input></td>
	    		</tr>
	    		<tr>
	    			<td>Message:</td>
	    			<td><input class="easyui-textbox" name="message" data-options="multiline:true" style="height:60px"></input></td>
	    		</tr>

	    	</table>
	    </form>
4.DataGrid面板
请求数据的函数
<script type="text/javascript">
$(function(){
$("#tt").datagrid({
method:'get',
url:'datagrid_data2.json'
});
})
</script>
-------------------------------------------------------------------------------------------------
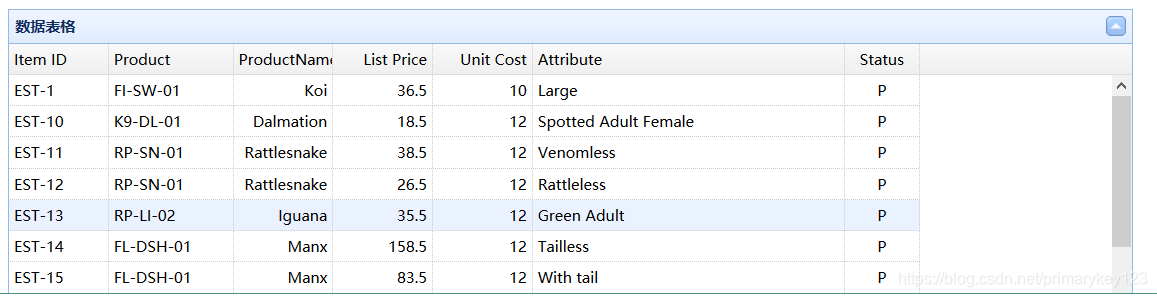
<table class="easyui-datagrid" title="数据表格" style="width:900px;height:250px"
data-options="singleSelect:true,collapsible:true,url:'datagrid_data1.json',method:'get'">
<thead>
<tr>
<th data-options="field:'itemid',width:80">Item ID</th>
<th data-options="field:'productid',width:100">Product</th>
<th data-options="field:'productname',width:80,align:'right'">ProductName</th>
<th data-options="field:'listprice',width:80,align:'right'">List Price</th>
<th data-options="field:'unitcost',width:80,align:'right'">Unit Cost</th>
<th data-options="field:'attr1',width:250">Attribute</th>
<th data-options="field:'status',width:60,align:'center'">Status</th>
</tr>
</thead>
</table>
<!--
toolbar:引入工具条
fitColumns:自适应列
rownumbers:行数
striped:斑马线
pagination:分页
-->
<table id="tt" title="员工管理" class="easyui-datagrid"
data-options="toolbar:'#tb',fitColumns:true,rownumbers:true,striped:true,pagination:true">
<thead>
<tr>
<th field="id" width="50" hidden="true">ID</th>
<th field="name" width="50">姓名</th>
<th field="age" width="50">年龄</th>
<th field="dept" width="50">部门</th>
</tr>
</thead>
</table>
5.layout布局组件【常用】
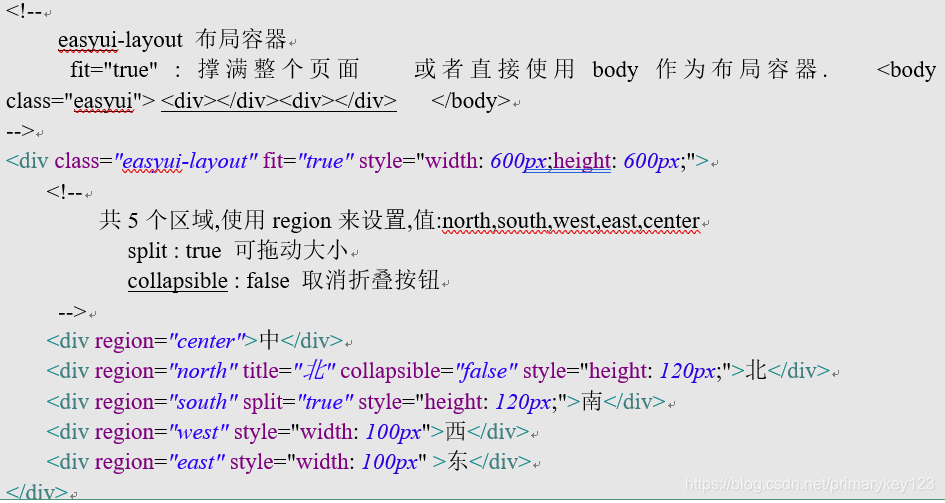
<body class="easyui-layout">
	<!--	<div class="easyui-layout" data-options="fit:true" style="width:700px;height:350px;">-->
		<!-- north 北 上面-->
		<div data-options="region:'north'" style="height:130px"></div>
		<!-- south 南 下面-->
		<div data-options="region:'south',split:true" style="height:50px;"></div>
		<!-- east 东 右面-->
		<!--<div data-options="region:'east',split:true" title="East" style="width:100px;"></div>-->
		<!-- west 西 左面-->
		<div data-options="region:'west',collapsible:false" title="菜单" style="width:200px;"></div>
		<!-- center 中 -->
		<div data-options="region:'center',title:'Main Title',iconCls:'icon-ok'">
			<table class="easyui-datagrid"
					data-options="url:'datagrid_data1.json',method:'get',border:false,singleSelect:true,fit:true,fitColumns:true">
				<thead>
					<tr>
						<th data-options="field:'itemid'" width="80">Item ID</th>
						<th data-options="field:'productid'" width="100">Product ID</th>
						<th data-options="field:'listprice',align:'right'" width="80">List Price</th>
						<th data-options="field:'unitcost',align:'right'" width="80">Unit Cost</th>
						<th data-options="field:'attr1'" width="150">Attribute</th>
						<th data-options="field:'status',align:'center'" width="60">Status</th>
					</tr>
				</thead>
			</table>
		</div>
<!--	</div>-->

	</body>
效果展示
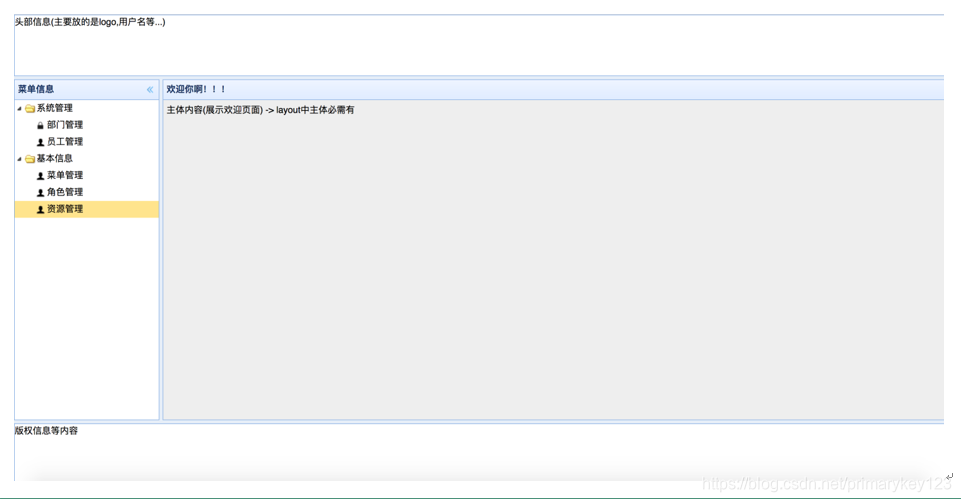
6.综合布局练习
(1) 创建左侧菜单tree
(2) 创建分页标签 【获取菜单名称作页签标题】
(3) 处理页签相关,不能重复创建页签
(4) 在指定页签 接入 iframe标签,展示信息
(5) 添加查询,添加,修改,删除的linkbutten按钮 绑定相应的事件
(6) 通过扩展jquery的扩展包【jquery.jdirk.js】调用$("#searchForm").serializeObject()方法,可以直接将搜索栏的信息封装成一个对象返回
(7) 给添加按钮绑定事件,逻辑如下
	1.点击添加按钮,弹出文本信息框
	2.作表单验证【jeasyui.extensions.validatebox.rules.js】
	3.提交,下一次添加前应清空弹窗中的数据

(8) 修改按钮事件分析
	1.获取选中的需要修改的行,没选中提示  ,选中确认修改提示
	2.隐藏密码框[$("tr[data-save=true]").hide();]
	3.回显部门信息[row['department.id'] =row.department.id;]
	4.弹出窗口[$("#formDlg").dialog("open");]
	5.加载此行中其他信息[$('#operateForm').form('load',row);]
(9) 删除按钮事件分析
	1.获取选中的需要删除的行,没选中提示  ,选中确认删除提示
	2.使用aAjax请求将此行的id发送到后台,通过回调函数的result来确认是否删除成功
	[ $.get('success.json',{'id':row.id},function(result){
										if(result.message){
											alert("删除成功")
										}else{
											alert("删除失败")
										}
									}) ]
	3.重新加载表【面板】
	[  $("#tt").datagrid('reload') ]


 229
229


 被折叠的 条评论
为什么被折叠?
被折叠的 条评论
为什么被折叠?
 到【灌水乐园】发言


