


系列文章目录
提示:这里可以添加系列文章的所有文章的目录,目录需要自己手动添加
例如:第一章 Python 机器学习入门之pandas的使用
提示:写完文章后,目录可以自动生成,如何生成可参考右边的帮助文档
前言
提示:这里可以添加本文要记录的大概内容:
例如:随着人工智能的不断发展,机器学习这门技术也越来越重要,很多人都开启了学习机器学习,本文就介绍了机器学习的基础内容。
提示:以下是本篇文章正文内容,下面案例可供参考
一、声明响应式状态
1、使用 reactive() 函数声明响应式引用类型数据
我们可以使用 reactive() 函数来声明一个响应式引用类型数据,例如:一个对象,一个数组等,值得注意的是 reactive() 函数只能用来声明一些复杂类型数据:例如:对象、(数组、Map、Set等集合),而对 string、number、boolean等基本数据类型无效。
2、使用 ref() 函数声明响应式数据
reactive() 的种种限制归根结底是因为 JavaScript 没有可以作用于所有值类型的 “引用” 机制。为此,Vue 提供了一个 ref() 方法来允许我们创建可以使用任何值类型的响应式 ref:
import { ref } from 'vue'

const count = ref(0)
ref() 函数将传入的参数包装成一个带 .value属性的 ref 对象
const count = ref(0)

console.log(count) // { value: 0 }
console.log(count.value) // 0

count.value++
console.log(count.value) // 1
也可以在使用 ref() 函数时为参数指定泛型,以此来规范参数的数据类型。
// 得到的类型:Ref<string | number>
const year = ref<string | number>('2020')

year.value = 2020 // 成功!
3、使用 computed() 函数声明响应式数据
computed() 函数可以用于动态的计算出数据,它会通过被使用时动态的计算出所需要的结果
<template>
  <div>
    <input v-model="testName" type="text" />
    <p v-for="(item, index) in tests" :key="index">{{ item.name }}</p>
  </div>
</template>

<script setup lang="ts">
import { ref, reactive, computed } from "vue";
const testName = ref("");
const names = reactive([
  { name: "小李" },
  { name: "小张" },
  { name: "小王" },
  { name: "小明" },
]);
const tests = computed(() => {
  console.log(testName);
  return names.filter((item) => item.name.includes(testName.value));
});
</script>

<style scoped></style>
通过是同tests从而完成 computed() 函数计算,动态的获取数据
4、Props声明
一个组件需要显式声明它所接受的 props,这样 Vue 才能知道外部传入的哪些是 props,在使用 <script setup> 的单文件组件中,props 可以使用 defineProps() 函数宏来声明:参考如下:
1、父组件中使用子组件并绑定数据传值给子组件,绑定的子组件属性名为isCollapse,数据为 isCollapse的值
<menu-logo :isCollapse="isCollapse"></menu-logo>2、子组件定义被绑定的属性,用于接收父组件的传值
const props = defineProps({
  isCollapse: {
    require: true,
    type: Boolean,
  },
});
特别要注意的是:父组件绑定的属性名必须和子组件定义的属性名相同,此外,该传值是单向的,只能从父组件传递给子组件。
5、事件的监听与触发
在组件的模板表达式中,我们可以直接使用 $emit 方法来触发自定义事件,父组件可以通过 v-on (缩写为 @) 来监听事件:例如:
<!-- ChildComponent -->
<button @click="$emit('someEvent')">click me</button>

<!-- ParentComponent -->
<menu-logo :isCollapse="isCollapse" @custome-event="someFunction"></menu-logo>
有时候我们想在触发事件的时候附带一个参数,通过这个参数来传递数据
<!-- ChildComponent -->
<button @click="$emit('someEvent', 1)">click me</button>

<!-- ParentComponent -->
<menu-logo :isCollapse="isCollapse" @some-event="someFunction"></menu-logo>

someFunction(n) {
    const data = n
}
此外:所有传入 $emit() 的额外参数都会被直接传向监听器。举例来说,$emit('foo', 1, 2, 3) 触发后,监听器函数将会收到这三个参数值。
声明触发的事件
组件要触发的事件可以通过 defineEmits() 函数显示的声明。该声明定义在子组件中,然后父组件可以在引入的子组件上监听定义事件,然后通过 $emit('funcation') 来触发一个函数
<script setup>
const emit = defineEmits(['inFocus', 'submit'])

function buttonClick() {
  emit('submit')
}
</script>
通过watch监听事件
watch监听的对象必须是可以变化的,不能是不变的,当监听对象变化时,会触发watch监听并执行其中的回调函数。此外,其中的回调函数可以接收两个参数,第一个是监听对象变化后的新值,第二个是监听对象变化前的值。
<template>
  <div>
    <input v-model="testName" type="text" />
    <p v-for="(item, index) in tests" :key="index">{{ item.name }}</p>
  </div>
</template>

<script setup lang="ts">
import { ref, reactive, computed, watch } from "vue";
const testName = ref("");
const names = reactive([
  { name: "小李" },
  { name: "小张" },
  { name: "小王" },
  { name: "小明" },
]);
const tests = computed(() => {
  return names.filter((item) => item.name.includes(testName.value));
});

// watch 监听单个对象变化,回调不带参数
watch(testName, () => {
  console.log("watch监听单个对象变化,回调不带参数", testName.value);
});

// watch 监听单个对象变化,回调带参数
watch(testName, (after, before) => {
  console.log(`watch监听单个对象变化,回调带参数,变化前为: ${before} ,变化后为: ${after}`);
});

// watch 监听多对象变化,回调带参数
watch([testName,names], ([newTestName, newName],[oldTestName, oldName]) => {
  console.log(`watch监听多对象变化,回调带参数,变化前为: ${oldTestName} ,${oldName},变化后为: ${newTestName},${newName}`);
});
</script>

<style scoped></style>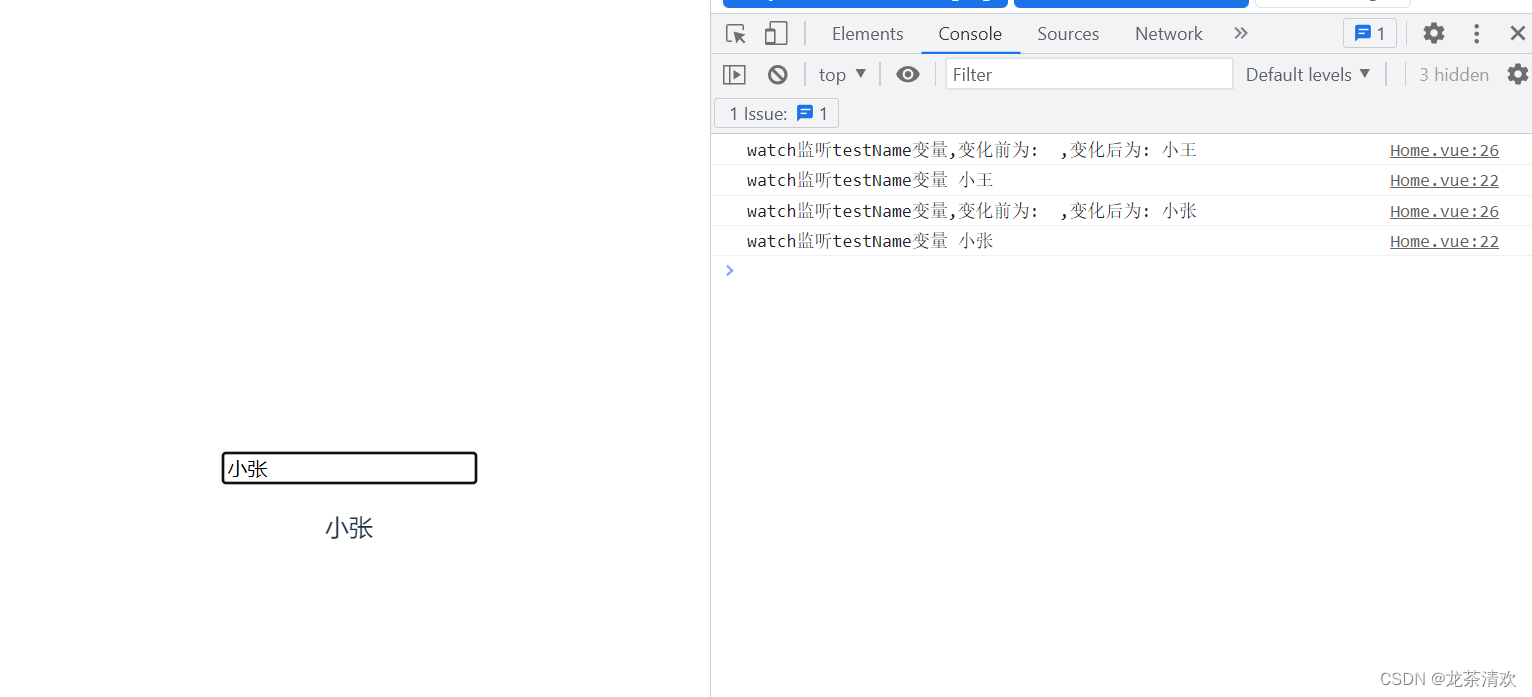
常用的声明周期钩子函数:
// 页面绚烂前执行
onMounted(() => {
  alert("页面渲染前调用");
});

// 页面销毁前执行
onUnmounted(() => {
  alert("页面销毁前执行");
});
const isShow = ref(true)
function show():void {
console.log("show",isShow.value)
isShow.value = !isShow.value
}
</script>
<template>
<div>
<!-- <Home></Home> -->
<HelloWorld v-if="isShow"></HelloWorld>
<button @click="show">显示/隐藏组件</button>
</div>
</template>demo:
<template>
  <div>
   <p>refData: 姓名-{{refData.name}} 年龄-{{refData.age}}</p>
   <button @click="updateRefData">更新refData</button>
   <p>reacticeData: 姓名-{{reactiveData.name}} 年龄-{{reactiveData.age}}</p>
   <button @click="updateReactiveData">更新reactiveData</button>
  </div>
</template>

<script setup lang="ts">
import {ref,reactive} from "vue"

const refData = ref({
  name: "小李",
  age: 20
})

const reactiveData = reactive({
  name: "小王",
  age: 30
})


const updateRefData = () => {
  refData.value.name = "小龙"
}

const updateReactiveData = () => {
  reactiveData.name = "小张"
}
</script>

<style scoped></style>
<template>
  <div>
    <post-list :posts="posts"></post-list>
  </div>
</template>

<script setup lang="ts">
import { ref, reactive } from "vue";
import PostList from "../views/PostList.vue";

// 父组件通过子组件属性传值,绑定的属性可以看作是通信信号
const posts = ref([
  {
    id: 1,
    title: "李龙发坚持学习vue3",
    body: "vue3是一个有意的前端框架,要好好学习",
  },
  {
    id: 2,
    title: "李龙发坚持学习springboot",
    body: "springboot是一个有意的前端框架,要好好学习",
  },
]);
</script>

<style scoped></style>
<template>
  <div>
    <p>博客列表</p>
    <div v-for="(item,index) in posts" :key="index">
    <h3>{{item.title}}</h3>
    <p>{{item.body}}</p>
    </div>
  </div>
</template>

<script setup lang="ts">
// 子组件定义属性,用于接收传值
defineProps({
  posts: Array,
});
</script>

<style scoped></style>
<template>
  <div>
    <p>博客列表</p>
    <div v-for="(post,index) in posts" :key="index">
    <single-post :post="post"></single-post>
    </div>
  </div>
</template>

<script setup lang="ts">
import SinglePost from "../views/SinglePost.vue"
// 子组件定义属性,用于接收传值
defineProps({
  posts: Array,
});
</script>

<style scoped></style>
<template>
<div>
<h3>{{post.title}}</h3>
<p>{{post.body}}</p>
</div>
</template>
<script setup lang="ts">
defineProps({
post: Object
})
</script>
<style scoped>
</style>
总结
提示:这里对文章进行总结:
例如:以上就是今天要讲的内容,本文仅仅简单介绍了pandas的使用,而pandas提供了大量能使我们快速便捷地处理数据的函数和方法。


 1055
1055


 被折叠的 条评论
为什么被折叠?
被折叠的 条评论
为什么被折叠?
 到【灌水乐园】发言


