


Relative Layout
Relative Layout布局:相对位置布局,的几个重要属性
第一类 : 属性值为 true 或 false
- android:layout_centerHrizontal 水平居中
- android:layout_centerVertical 垂直居中
- android:layout_centerInparent 相对于父元素完全居中
- android:layout_alignParentBottom 贴紧父元素的下边缘
- android:layout_alignParentLeft 贴紧父元素的左边缘
- android:layout_alignParentRight 贴紧父元素的右边缘
- android:layout_alignParentTop 贴紧父元素的上边缘
- android:layout_alignWithParentIfMissing 若找不到兄弟元素以父元素做参照物
第二类:属性值必须为 id 的引用名“ @id/id-name ”
- android:layout_below 在某元素的下方
- android:layout_above 在某元素的上方
- android:layout_toLeftOf 在某元素的左边
- android:layout_toRightOf 在某元素的右边
- android:layout_alignTop 本元素的上边缘和某元素的的上边缘对齐
- android:layout_alignLeft 本元素的左边缘和某元素的的左边缘对齐
- android:layout_alignBottom 本元素的下边缘和某元素的的下边缘对齐
- android:layout_alignRight 本元素的右边缘和某元素的的右边缘对齐
第三类:属性值为具体的像素值,如 30dip , 40px
- android:layout_marginBottom 离某元素底边缘的距离
- android:layout_marginLeft 离某元素左边缘的距离
- android:layout_marginRight 离某元素右边缘的距离
- android:layout_marginTop 离某元素上边缘的距离
Relative Layout布局:相对位置布局,类似于Word中的位置对齐,总共有九个方位,如下图所示

可以分别对应Word中的九个方位,以及还可以设置类似CSS中的组件与组件之间的外边距,如margin即是设置这一项,注意layout_margin这一项设置像素以后,则是设置的上下左右四个方位的值,如果只想设置某一边的话,则使用下面的marginLeft……之一,
设置组件内文字与组件边距可用属性padding,如下图:

下面,我们来看看布局文件的代码与详解
<?xml version="1.0" encoding="utf-8"?>
<RelativeLayout xmlns:android="http://schemas.android.com/apk/res/android"
android:layout_width="fill_parent"
android:layout_height="fill_parent" >
<TextView
android:id="@+id/label"
android:layout_width="fill_parent"
android:layout_height="wrap_content"
android:text="Type here:" />
<EditText
android:id="@+id/entry"
android:layout_width="fill_parent"
android:layout_height="wrap_content"
android:layout_below="@id/label"
android:background="@android:drawable/editbox_background" />
<Button
android:id="@+id/ok"
android:layout_width="wrap_content"
android:layout_height="wrap_content"
android:layout_alignParentRight="true"
android:layout_below="@id/entry"
android:layout_marginLeft="10dip"
android:text="OK" />
<Button
android:layout_width="wrap_content"
android:layout_height="wrap_content"
android:layout_alignTop="@id/ok"
android:layout_toLeftOf="@id/ok"
android:text="Cancel" />
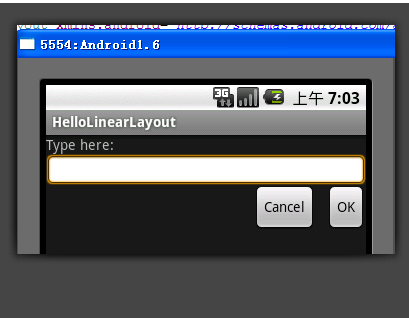
</RelativeLayout>最后的效果图为:
还需知道:
1.android:paddingLeft与android:layout_marginLeft的区别:
padding margin都是边距的含义,关键问题得明白是什么相对什么的边距.
padding是控件的内容相对控件的边缘的边距.
layout_margin是控件边缘相对父空间的边距.
2.android: gravity和android:layout_gravity区别
android:gravity 属性是对该view 内容的限定.比如一个button 上面的text. 你可以设置该text 在view的靠左,靠右等位置.该属性就干了这个.
android:layout_gravity是用来设置该view相对与起父view 的位置.比如一个button 在linearlayout里,你想把该button放在靠左靠右等位置就可以通过该属性设置.
这样就解释了,有什么我们弄个最外布局,然后里面包了几个布局,如果要使这几个布局都靠底,就可以在最外布局的属性里设置androi:gravity="botton" 因为gravity是对里面的内容起作用.


 123
123

 被折叠的 条评论
为什么被折叠?
被折叠的 条评论
为什么被折叠?
 到【灌水乐园】发言


