


什么是MVVM , 为什么需要MVVM?
MVVM是Model-View-ViewModel的简写. 它是有三个部分组成:Model、View、ViewModel。
Model:数据模型层。包含业务逻辑和校验逻辑。
View:屏幕上显示的UI界面(layout、views)。
ViewModel:View和Model之间的链接桥梁,处理视图逻辑。
MVVM架构图如下:

MVVM架构通过ViewModel隔离了UI层和业务逻辑层,降低程序的耦合度。通过DataBinding实现View和ViewModel之间的绑定。
Android App 中MVC的不足
一般来说,我们开发Android App是基于MVC,由于MVC的普及和快速开发的特点,一个app从0开发一般都是基于MVC的。
Activity、Fragment相当于C (Controller), 布局相当于V(View), 数据层相当于M(Model)
随着业务的增长,Controller里的代码会越来越臃肿,因为它不只要负责业务逻辑,还要控制View的展示。也就是说Activity、Fragment杂糅了Controller和View,耦合变大。并不能算作真正意义上的MVC。
编写代码基本的过程是这样的,在Activity、Fragment中初始化Views,然后拉取数据,成功后把数据填充到View里。
假如有如下场景:
我们基于MVC开发完第一版本,然后企业需要迭代2.0版本,并且UI界面变化比较大,业务变动较小,怎么办呢?
当2.0的所有东西都已经评审过后。这个时候,新建布局,然后开始按照新的效果图,进行UI布局。然后还要新建Activity、Fragment把相关逻辑和数据填充到新的View上。
如果业务逻辑比较复杂,需要从Activity、Fragment中提取上个版本的所有逻辑,这个时候自己可能就要晕倒了,因为一个复杂的业务,一个Activity几千行代码也是很常见的。千辛万苦做完提取完,可能还会出现很多bug。
MVP架构图如下:
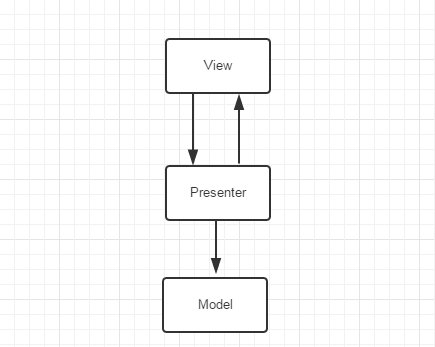
MVP把视图层抽象到View接口,逻辑层抽象到Presenter接口,提到了代码的可读性。降低了视图逻辑和业务逻辑的耦合。
但是有MVP的不足:
- 接口过多,一定程度影响了编码效率。其实这也不算是不足,为了更好的分层解耦,这也是必须的。
- 导致Presenter的代码量过大。
这个时候MVVM就闪亮登场了。从上面的MVVM功能图我们知道:
- 可重用性。你可以把一些视图逻辑放在一个ViewModel里面,让很多view重用这段视图逻辑。
在Android中,布局里可以进行一个视图逻辑,并且Model发生变化,View也随着发生变化。 - 低耦合。以前Activity、Fragment中需要把数据填充到View,还要进行一些视图逻辑。现在这些都可在布局中完成(具体代码请看后面)
甚至都不需要再Activity、Fragment去findViewById。这时候Activity、Fragment只需要做好的逻辑处理就可以了。
现在我们回到上面从app1.0到app2.0迭代的问题,如果用MVVM去实现那就比较简单,这个时候不需要动Activity、Fragment,
只需要把布局按照2.0版本的效果实现一遍即可。因为视图逻辑和数据填充已经在布局里了,这就是上面提到的可重用性。
Android中如何实现DataBinding?
Google在2015年的已经为我们DataBinding技术。下面就详细讲解如何使用DataBinding。
环境准备
在工程根目录build.gradle文件加入如下配置,把Android Gradle 插件升级到最新:
dependencies {
    classpath 'com.android.tools.build:gradle:2.0.0'
}
在app里的build.gradle文件 android 中加入如下配置,启用data binding 功能:
dataBinding {
    enabled true
}
来个简单的例子
实现上面效果的“Data Binding Simple ”
data binding 布局格式和以往的有些区别(注意不能使用主Activity布局)
<?xml version="1.0" encoding="utf-8"?>
<layout xmlns:android="http://schemas.android.com/apk/res/android">
   <data>
       <variable name="user" type="com.mvvm.model.User"/>
   </data>

   //normal layout
   <TextView android:layout_width="wrap_content"
           android:layout_height="wrap_content"
           android:text="@{user.firstName}"/>
</layout>
布局的根节点为:
<layout xmlns:android="http://schemas.android.com/apk/res/android">布局里使用的model 通过中的指定:
<variable name="user" type="com.mvvm.model.User"/>设置空间属性的值,通过@{}语法来设置:
android:text="@{user.firstName}"<?xml version="1.0" encoding="utf-8"?>
<layout xmlns:android="http://schemas.android.com/apk/res/android">
<data>
<variable
name="user"
type="com.jackli.mvvm.model.User" />
</data>
<LinearLayout xmlns:tools="http://schemas.android.com/tools"
android:layout_width="match_parent"
android:layout_height="wrap_content"
android:orientation="vertical"
tools:context=".ui.MainActivity">
<TextView
android:layout_width="match_parent"
android:layout_height="wrap_content"
android:text="@{user.realName}" />
<TextView
android:layout_width="match_parent"
android:layout_height="wrap_content"
android:text="@{user.userName}" />
<TextView
android:layout_width="match_parent"
android:layout_height="wrap_content"
android:text="@{user.mobile}" />
<TextView
android:layout_width="match_parent"
android:layout_height="wrap_content"
android:text="@{user.realName}" />
<Button
android:layout_width="match_parent"
android:layout_height="wrap_content"
android:onClick="setData" />
</LinearLayout>
</layout>
数据模型类User
package com.jackli.mvvm.model;

import android.databinding.BaseObservable;
import android.databinding.Bindable;
import android.util.Log;

import com.jackli.mvvm.BR;


/**
 * Created by liguoqing on 2017/4/28.
 */
public class User extends BaseObservable {
    private String realName;

    private String userName;
    private String mobile;
    private int age;

    /**
     * 注意: 在BR里对应的常量为follow
     */
    private boolean isFollow;


    public User(String realName, String mobile) {
        this.realName = realName;
        this.mobile = mobile;
        Log.d("User", "user construct invoked");
    }


    @Bindable
    public boolean isFollow() {
        return isFollow;
    }

    public void setIsFollow(boolean isFollow) {
        this.isFollow = isFollow;
        notifyPropertyChanged(BR.follow);
    }
    public User(  ) {
    }


    @Bindable
    public String getRealName() {
        return realName;
    }

    public void setRealName(String realName) {
        this.realName = realName;
    }
    @Bindable
    public String getMobile() {
        return mobile;
    }

    public void setMobile(String mobile) {
        this.mobile = mobile;
        notifyPropertyChanged(BR.mobile);
    }
    @Bindable
    public String getUserName() {
        return userName;
    }

    public void setUserName(String userName) {
        this.userName = userName;
        notifyPropertyChanged(BR.userName);
    }
    @Bindable
    public int getAge() {
        return age;
    }

    public void setAge(int age) {
        this.age = age;
        notifyPropertyChanged(BR.age);
    }


}
在Activity中 绑定数据
public class MainActivity extends AppCompatActivity {

    private ActivityDataBinding  binding;

    @Override
    protected void onCreate(Bundle savedInstanceState) {
        super.onCreate(savedInstanceState);
        binding = DataBindingUtil.setContentView(this, R.layout.activity_data);

    }


    public void setData(View view)
    {
        User user = new User("001","zhangsan");
        binding.setUser(user);

    }
}
通过DataBindingUtil.setContentView设置布局,通过binding类设置数据模型:
binding.setUser(user);ActivityDataBinding 类名,见布局详解;
布局详解
Variables
在节点中使用来设置。
<import type="android.graphics.drawable.Drawable"/>
<variable name="user"  type="com.mvvm.model.User"/>
<variable name="image" type="Drawable"/>
<variable name="note" type="String"/>-
Binding类里将会包含通过variable设置name的getter和setter方法。如上面的setUser,getUser等。
-
如果控件设置了id,那么该控件也可以在binding类中找到,这样就不需要findViewById来获取View了。
自定义Binding类名(Custom Binding Class Names)
以为根节点布局,android studio默认会自动产生一个Binding类。类名为根据布局名产生,如一个名为activity_simple的布局,它的Binding类为ActivitySimpleBinding,所在包为app_package/databinding。
当然也可以自定义Binding类的名称和包名:
-
<data class="CustomBinding"></data>在app_package/databinding下生成CustomBinding; -
<data class=".CustomBinding"></data>在app_package下生成CustomBinding; -
<data class="com.example.CustomBinding"></data>明确指定包名和类名。


 1220
1220


 被折叠的 条评论
为什么被折叠?
被折叠的 条评论
为什么被折叠?
 到【灌水乐园】发言


