


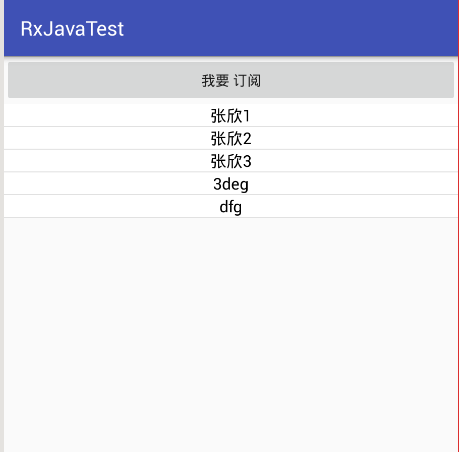
大家先看下下面这个程序的运行:
AppInfo类
package com.example.acer.rxjavatest;

/**
 * @author w_x_g
 * @time 2016/11/9 13:54
 * @note ${TODO}
 */
public class AppInfo implements Comparable<Object> {
    private String name;
    private int icon;

    public AppInfo(String name,int icon){
        this.name=name;
        this.icon=icon;
    }
    public String getName() {
        return name;
    }

    public void setName(String name) {
        this.name = name;
    }

    public int getIcon() {

        return icon;
    }

    public void setIcon(int icon) {
        this.icon = icon;
    }

    @Override
    public int compareTo(Object another) {
        AppInfo f = (AppInfo) another;
        return getName().compareTo(f.getName());
    }

}
AppInfoAdapter类
package com.example.acer.rxjavatest;

import android.content.Context;
import android.view.LayoutInflater;
import android.view.View;
import android.view.ViewGroup;
import android.widget.BaseAdapter;
import android.widget.TextView;

import java.util.ArrayList;
import java.util.List;

/**
 * @author w_x_g
 * @time 2016/11/9 14:01
 * @note ${TODO}
 */
public class AppInfoAdapter extends BaseAdapter {
    private List<AppInfo> appInfolist;
    private LayoutInflater inflater;
    public AppInfoAdapter(Context context){
        inflater=LayoutInflater.from(context);
        appInfolist=new ArrayList<AppInfo>();
    }
    public void addAppInfo(AppInfo appInfo){
        this.appInfolist.add(appInfo);
    }
    @Override
    public int getCount() {
        return appInfolist.size();
    }

    @Override
    public Object getItem(int position) {
        return appInfolist.get(position);
    }

    @Override
    public long getItemId(int position) {
        return position;
    }

    @Override
    public View getView(int position, View convertView, ViewGroup parent) {
        View view=null;
        if(convertView==null){
            view=inflater.inflate(R.layout.item_appinfo,parent,false);
        } else{
            view=convertView;
        }
        TextView tv_item= (TextView) view.findViewById(R.id.tv_text);
        tv_item.setText(appInfolist.get(position).getName());
        return view;
    }
}
布局类
<?xml version="1.0" encoding="utf-8"?>
<LinearLayout
    xmlns:android="http://schemas.android.com/apk/res/android"
    xmlns:tools="http://schemas.android.com/tools"
    android:layout_width="match_parent"
    android:layout_height="match_parent"
     android:orientation="vertical"
  tools:context="com.example.acer.rxjavatest.MainActivity">

    <Button
        android:id="@+id/bt_click"
        android:onClick="click"
        android:layout_width="match_parent"
        android:layout_height="wrap_content"
        android:text="我要 订阅"/>

   <ListView
       android:id="@+id/lv_app_name"
       android:layout_width="match_parent"
       android:layout_height="match_parent"
       android:cacheColorHint="#000000">

   </ListView>

</LinearLayout>
item_appinfo布局
<?xml version="1.0" encoding="utf-8"?>
<LinearLayout xmlns:android="http://schemas.android.com/apk/res/android"
              android:layout_width="match_parent"
              android:layout_height="match_parent"
    android:background="@android:color/white"
    android:gravity="center"
    android:orientation="horizontal">
    <TextView
        android:id="@+id/tv_text"
        android:textColor="@android:color/black"
        android:layout_width="wrap_content"
        android:textSize="16sp"
        android:layout_height="wrap_content"/>

</LinearLayout>
MainActivity类
package com.example.acer.rxjavatest;

import android.os.Bundle;
import android.support.v7.app.AppCompatActivity;
import android.view.View;
import android.widget.ListView;

import rx.Observable;
import rx.Observer;

public class MainActivity extends AppCompatActivity {


    private Observable<AppInfo> mObservable;
    private AppInfoAdapter mAdapter;

    @Override
    protected void onCreate(Bundle savedInstanceState) {
        super.onCreate(savedInstanceState);
        setContentView(R.layout.activity_main);
        ListView listView = (ListView) findViewById(R.id.lv_app_name);
        mAdapter = new AppInfoAdapter(this);
        listView.setAdapter(mAdapter);
        mObservable = getApps();

    }

    private Observable<AppInfo> getApps() {
        AppInfo a1 = new AppInfo("张欣1", 19);
        AppInfo a2 = new AppInfo("张欣2", 19);
        AppInfo a3 = new AppInfo("张欣3", 19);
        AppInfo a4 = new AppInfo("3deg", 19);
        AppInfo a5 = new AppInfo("dfg", 19);

        return Observable.just(a1, a2, a3, a4, a5);

    }

    public void click(View v) {
        mObservable.subscribe(new Observer<AppInfo>() {
            @Override
            public void onCompleted() {
                mAdapter.notifyDataSetChanged();
            }

            @Override
            public void onError(Throwable e) {

            }

            @Override
            public void onNext(AppInfo appInfo) {
                mAdapter.addAppInfo(appInfo);
            }
        });
    }


}
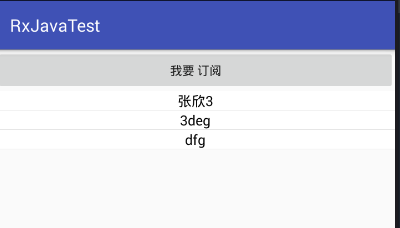
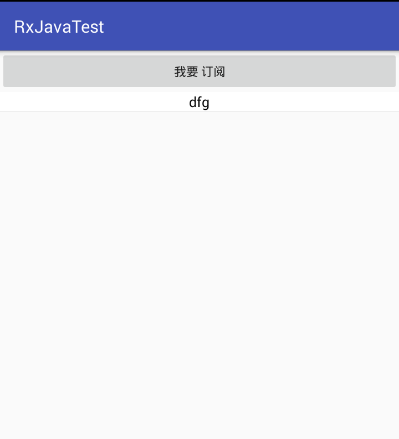
大家看下运行效果:
下面我们修改下MainActiviy类
package com.example.acer.rxjavatest;

import android.os.Bundle;
import android.support.v7.app.AppCompatActivity;
import android.view.View;
import android.widget.ListView;

import rx.Observable;
import rx.Observer;
import rx.functions.Func1;

public class MainActivity extends AppCompatActivity {


    private Observable<AppInfo> mObservable;
    private AppInfoAdapter mAdapter;

    @Override
    protected void onCreate(Bundle savedInstanceState) {
        super.onCreate(savedInstanceState);
        setContentView(R.layout.activity_main);
        ListView listView = (ListView) findViewById(R.id.lv_app_name);
        mAdapter = new AppInfoAdapter(this);
        listView.setAdapter(mAdapter);
        mObservable = getApps();

    }

    private Observable<AppInfo> getApps() {
        AppInfo a1 = new AppInfo("张欣1", 19);
        AppInfo a2 = new AppInfo("张欣2", 19);
        AppInfo a3 = new AppInfo("张欣3", 19);
        AppInfo a4 = new AppInfo("3deg", 19);
        AppInfo a5 = new AppInfo("dfg", 19);
        //filter方法里面传入Func类
        return Observable.just(a1, a2, a3, a4, a5).filter(new Func1<AppInfo, Boolean>() {
            @Override
            public Boolean call(AppInfo appInfo) {
                return appInfo.getName().contains("张");
            }
        });

    }

    public void click(View v) {
        mObservable.subscribe(new Observer<AppInfo>() {
            @Override
            public void onCompleted() {
                mAdapter.notifyDataSetChanged();
            }

            @Override
            public void onError(Throwable e) {

            }

            @Override
            public void onNext(AppInfo appInfo) {
                mAdapter.addAppInfo(appInfo);
            }
        });
    }


}
看下运行效果
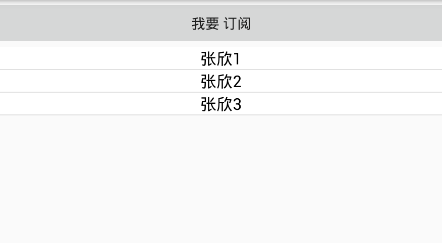
过滤带张字的
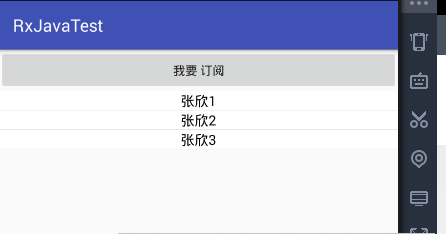
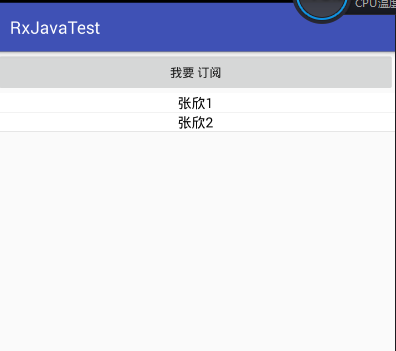
我们下面学习take方法:过滤前三条数据该怎么写呢?
package com.example.acer.rxjavatest;

import android.os.Bundle;
import android.support.v7.app.AppCompatActivity;
import android.view.View;
import android.widget.ListView;

import rx.Observable;
import rx.Observer;

public class MainActivity extends AppCompatActivity {


    private Observable<AppInfo> mObservable;
    private AppInfoAdapter mAdapter;

    @Override
    protected void onCreate(Bundle savedInstanceState) {
        super.onCreate(savedInstanceState);
        setContentView(R.layout.activity_main);
        ListView listView = (ListView) findViewById(R.id.lv_app_name);
        mAdapter = new AppInfoAdapter(this);
        listView.setAdapter(mAdapter);
        mObservable = getApps();

    }

    private Observable<AppInfo> getApps() {
        AppInfo a1 = new AppInfo("张欣1", 19);
        AppInfo a2 = new AppInfo("张欣2", 19);
        AppInfo a3 = new AppInfo("张欣3", 19);
        AppInfo a4 = new AppInfo("3deg", 19);
        AppInfo a5 = new AppInfo("dfg", 19);
        //我发送了5条数据但我只要前三条数据
        return Observable.just(a1, a2, a3, a4, a5).take(3);

    }

    public void click(View v) {
        mObservable.subscribe(new Observer<AppInfo>() {
            @Override
            public void onCompleted() {
                mAdapter.notifyDataSetChanged();
            }

            @Override
            public void onError(Throwable e) {

            }

            @Override
            public void onNext(AppInfo appInfo) {
                mAdapter.addAppInfo(appInfo);
            }
        });
    }


}
看下运行效果
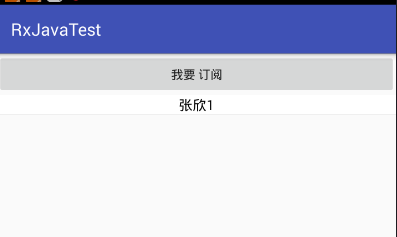
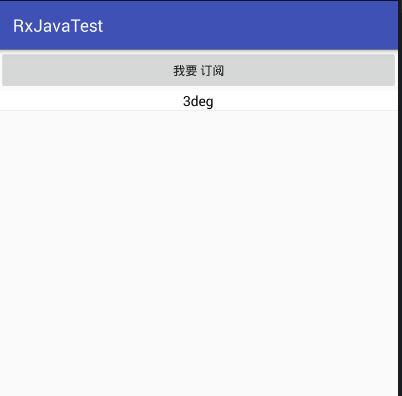
另外由于使用了Builder设计的模式,我们可以进行filter,take的双重过滤
package com.example.acer.rxjavatest;

import android.os.Bundle;
import android.support.v7.app.AppCompatActivity;
import android.view.View;
import android.widget.ListView;

import rx.Observable;
import rx.Observer;
import rx.functions.Func1;

public class MainActivity extends AppCompatActivity {


    private Observable<AppInfo> mObservable;
    private AppInfoAdapter mAdapter;

    @Override
    protected void onCreate(Bundle savedInstanceState) {
        super.onCreate(savedInstanceState);
        setContentView(R.layout.activity_main);
        ListView listView = (ListView) findViewById(R.id.lv_app_name);
        mAdapter = new AppInfoAdapter(this);
        listView.setAdapter(mAdapter);
        mObservable = getApps();

    }

    private Observable<AppInfo> getApps() {
        AppInfo a1 = new AppInfo("张欣1", 19);
        AppInfo a2 = new AppInfo("张欣2", 19);
        AppInfo a3 = new AppInfo("张欣3", 19);
        AppInfo a4 = new AppInfo("3deg", 19);
        AppInfo a5 = new AppInfo("dfg", 19);
        //我发送了5条数据但我只要包含张字的第一条数据
        return Observable.just(a1, a2, a3, a4, a5).filter(new Func1<AppInfo, Boolean>() {
            @Override
            public Boolean call(AppInfo appInfo) {
                return appInfo.getName().contains("张");
            }
        }).take(1);

    }

    public void click(View v) {
        mObservable.subscribe(new Observer<AppInfo>() {
            @Override
            public void onCompleted() {
                mAdapter.notifyDataSetChanged();
            }

            @Override
            public void onError(Throwable e) {

            }

            @Override
            public void onNext(AppInfo appInfo) {
                mAdapter.addAppInfo(appInfo);
            }
        });
    }


}
看下运行效果
我们在看下takelast方法
package com.example.acer.rxjavatest;

import android.os.Bundle;
import android.support.v7.app.AppCompatActivity;
import android.view.View;
import android.widget.ListView;

import rx.Observable;
import rx.Observer;

public class MainActivity extends AppCompatActivity {


    private Observable<AppInfo> mObservable;
    private AppInfoAdapter mAdapter;

    @Override
    protected void onCreate(Bundle savedInstanceState) {
        super.onCreate(savedInstanceState);
        setContentView(R.layout.activity_main);
        ListView listView = (ListView) findViewById(R.id.lv_app_name);
        mAdapter = new AppInfoAdapter(this);
        listView.setAdapter(mAdapter);
        mObservable = getApps();

    }

    private Observable<AppInfo> getApps() {
        AppInfo a1 = new AppInfo("张欣1", 19);
        AppInfo a2 = new AppInfo("张欣2", 19);
        AppInfo a3 = new AppInfo("张欣3", 19);
        AppInfo a4 = new AppInfo("3deg", 19);
        AppInfo a5 = new AppInfo("dfg", 19);
        //我发送了5条数据但我只要最后三条数据,
        return Observable.just(a1, a2, a3, a4, a5).takeLast(3);

    }

    public void click(View v) {
        mObservable.subscribe(new Observer<AppInfo>() {
            @Override
            public void onCompleted() {
                mAdapter.notifyDataSetChanged();
            }

            @Override
            public void onError(Throwable e) {

            }

            @Override
            public void onNext(AppInfo appInfo) {
                mAdapter.addAppInfo(appInfo);
            }
        });
    }


}
看下运行效果
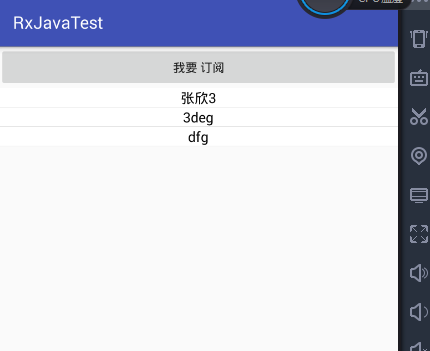
我们在看下下一个过滤的方法,distinct,去除重复
package com.example.acer.rxjavatest;
import android.os.Bundle;
import android.support.v7.app.AppCompatActivity;
import android.util.Log;
import android.view.View;
import android.widget.ListView;
import rx.Observable;
import rx.Observer;
public class MainActivity extends AppCompatActivity {
private Observable<AppInfo> mObservable;
private AppInfoAdapter mAdapter;
@Override
protected void onCreate(Bundle savedInstanceState) {
super.onCreate(savedInstanceState);
setContentView(R.layout.activity_main);
ListView listView = (ListView) findViewById(R.id.lv_app_name);
mAdapter = new AppInfoAdapter(this);
listView.setAdapter(mAdapter);
mObservable = getApps();
}
private Observable<AppInfo> getApps() {
AppInfo a1 = new AppInfo("张欣1", 19);
AppInfo a2 = new AppInfo("张欣2", 19);
AppInfo a3 = new AppInfo("张欣3", 19);
AppInfo a4 = new AppInfo("3deg", 19);
AppInfo a5 = new AppInfo("dfg", 19);
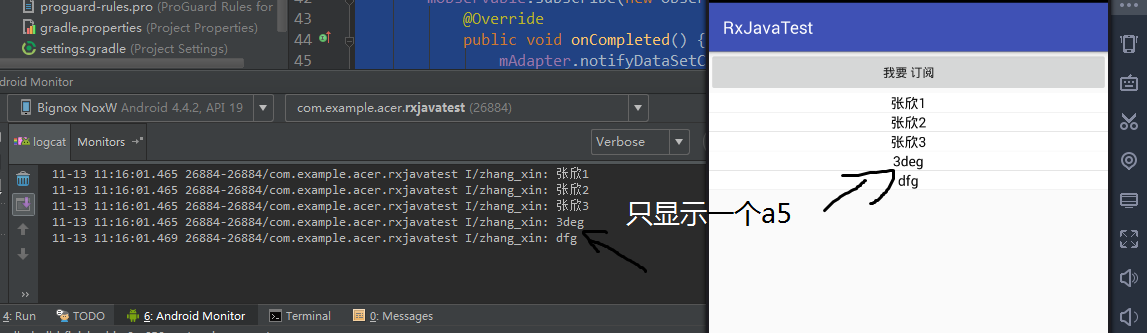
//过滤重复的数据,应用场景,过滤重复的网络请求
//我在这里发送了两个a5,单通过distinct方法过滤,只显示一个a5
return Observable.just(a1, a2, a3, a4, a5,a5).distinct();
}
public void click(View v) {
mObservable.subscribe(new Observer<AppInfo>() {
@Override
public void onCompleted() {
mAdapter.notifyDataSetChanged();
}
@Override
public void onError(Throwable e) {
}
@Override
public void onNext(AppInfo appInfo) {
mAdapter.addAppInfo(appInfo);
Log.i("zhang_xin",appInfo.getName());
}
});
}
}
既然是去除重复,我们当然可以自己定义重复标准
package com.example.acer.rxjavatest;

import android.os.Bundle;
import android.support.v7.app.AppCompatActivity;
import android.util.Log;
import android.view.View;
import android.widget.ListView;

import rx.Observable;
import rx.Observer;
import rx.functions.Func1;

public class MainActivity extends AppCompatActivity {


    private Observable<AppInfo> mObservable;
    private AppInfoAdapter mAdapter;

    @Override
    protected void onCreate(Bundle savedInstanceState) {
        super.onCreate(savedInstanceState);
        setContentView(R.layout.activity_main);
        ListView listView = (ListView) findViewById(R.id.lv_app_name);
        mAdapter = new AppInfoAdapter(this);
        listView.setAdapter(mAdapter);
        mObservable = getApps();

    }

    private Observable<AppInfo> getApps() {
        AppInfo a1 = new AppInfo("张欣1", 19);
        AppInfo a2 = new AppInfo("张欣2", 19);
        AppInfo a3 = new AppInfo("张欣3", 19);
        AppInfo a4 = new AppInfo("3deg", 19);
        AppInfo a5 = new AppInfo("dfg", 18);
        //我定义icon为重复标准,凡是icon为19的都会被过滤掉
        return Observable.just(a1, a2, a3, a4, a5,a5).distinct(new Func1<AppInfo, Object>() {
            @Override
            public Object call(AppInfo appInfo) {
                return appInfo.getIcon();
            }
        });

    }

    public void click(View v) {
        mObservable.subscribe(new Observer<AppInfo>() {
            @Override
            public void onCompleted() {
                mAdapter.notifyDataSetChanged();
            }

            @Override
            public void onError(Throwable e) {

            }

            @Override
            public void onNext(AppInfo appInfo) {
                mAdapter.addAppInfo(appInfo);
                Log.i("zhang_xin",appInfo.getName());
            }
        });
    }


}
distinctUntilChanged的方法,类似于温度计,有新的数据发射就更新;不过很抱歉,这个方法我也没演示成功,就不贴代码了
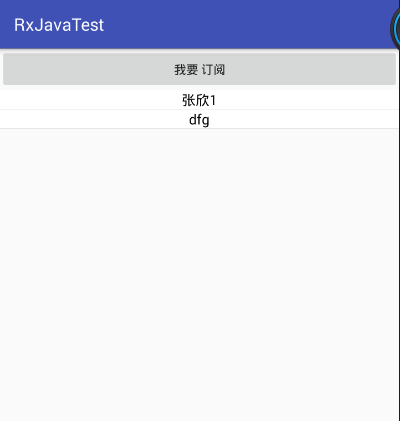
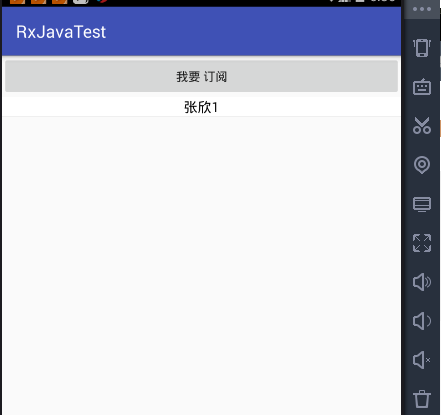
看下first()和last()方法这两个方法比较简单,
package com.example.acer.rxjavatest;

import android.os.Bundle;
import android.support.v7.app.AppCompatActivity;
import android.util.Log;
import android.view.View;
import android.widget.ListView;

import java.util.ArrayList;
import java.util.List;

import rx.Observable;
import rx.Observer;

public class MainActivity extends AppCompatActivity {


    private Observable<AppInfo> mObservable;
    private AppInfoAdapter mAdapter;
    private List<AppInfo> mMyList;
    private AppInfo mA5;
    private AppInfo mA4;

    @Override
    protected void onCreate(Bundle savedInstanceState) {
        super.onCreate(savedInstanceState);
        setContentView(R.layout.activity_main);
        ListView listView = (ListView) findViewById(R.id.lv_app_name);
        mAdapter = new AppInfoAdapter(this);
        listView.setAdapter(mAdapter);
        mObservable = getApps();

    }


    private Observable<AppInfo> getApps() {
        AppInfo a1 = new AppInfo("张欣1", 19);
        AppInfo a2 = new AppInfo("张欣2", 19);
        AppInfo a3 = new AppInfo("张欣3", 19);
        mA4 = new AppInfo("3deg", 19);
        mA5 = new AppInfo("dfg", 18);
        mMyList = new ArrayList<>();
        mMyList.add(a1);
        mMyList.add(a2);
        mMyList.add(a3);
        mMyList.add(mA4);
        mMyList.add(mA5);
       //5条数据只发送第一条和最后一条
//        return Observable.from(mMyList).first();
        return Observable.from(mMyList).last();

    }

    public void click(View v) {
        mObservable.subscribe(new Observer<AppInfo>() {
            @Override
            public void onCompleted() {
                mAdapter.notifyDataSetChanged();
            }

            @Override
            public void onError(Throwable e) {

            }

            @Override
            public void onNext(AppInfo appInfo) {
                mAdapter.addAppInfo(appInfo);
                Log.i("zhang_xin", appInfo.getName());
            }
        });
    }


}
看下运行效果
第一个数据

最后一个数据
skin和skinlast方法:
skin方法时跳过前n个数据
package com.example.acer.rxjavatest;

import android.os.Bundle;
import android.support.v7.app.AppCompatActivity;
import android.util.Log;
import android.view.View;
import android.widget.ListView;

import java.util.ArrayList;
import java.util.List;

import rx.Observable;
import rx.Observer;

public class MainActivity extends AppCompatActivity {


    private Observable<AppInfo> mObservable;
    private AppInfoAdapter mAdapter;
    private List<AppInfo> mMyList;
    private AppInfo mA5;
    private AppInfo mA4;

    @Override
    protected void onCreate(Bundle savedInstanceState) {
        super.onCreate(savedInstanceState);
        setContentView(R.layout.activity_main);
        ListView listView = (ListView) findViewById(R.id.lv_app_name);
        mAdapter = new AppInfoAdapter(this);
        listView.setAdapter(mAdapter);
        mObservable = getApps();

    }


    private Observable<AppInfo> getApps() {
        AppInfo a1 = new AppInfo("张欣1", 19);
        AppInfo a2 = new AppInfo("张欣2", 19);
        AppInfo a3 = new AppInfo("张欣3", 19);
        mA4 = new AppInfo("3deg", 19);
        mA5 = new AppInfo("dfg", 18);
        mMyList = new ArrayList<>();
        mMyList.add(a1);
        mMyList.add(a2);
        mMyList.add(a3);
        mMyList.add(mA4);
        mMyList.add(mA5);
       //5条数据,跳过前两条或者后面三条数据不要
//        return Observable.from(mMyList).skip(2);
        return Observable.from(mMyList).skipLast(3);

    }

    public void click(View v) {
        mObservable.subscribe(new Observer<AppInfo>() {
            @Override
            public void onCompleted() {
                mAdapter.notifyDataSetChanged();
            }

            @Override
            public void onError(Throwable e) {

            }

            @Override
            public void onNext(AppInfo appInfo) {
                mAdapter.addAppInfo(appInfo);
                Log.i("zhang_xin", appInfo.getName());
            }
        });
    }


}
看下效果
跳过前两条数据
跳过后面三个数据
elementAt()方法
package com.example.acer.rxjavatest;

import android.os.Bundle;
import android.support.v7.app.AppCompatActivity;
import android.util.Log;
import android.view.View;
import android.widget.ListView;

import java.util.ArrayList;
import java.util.List;

import rx.Observable;
import rx.Observer;

public class MainActivity extends AppCompatActivity {


    private Observable<AppInfo> mObservable;
    private AppInfoAdapter mAdapter;
    private List<AppInfo> mMyList;
    private AppInfo mA5;
    private AppInfo mA4;

    @Override
    protected void onCreate(Bundle savedInstanceState) {
        super.onCreate(savedInstanceState);
        setContentView(R.layout.activity_main);
        ListView listView = (ListView) findViewById(R.id.lv_app_name);
        mAdapter = new AppInfoAdapter(this);
        listView.setAdapter(mAdapter);
        mObservable = getApps();

    }


    private Observable<AppInfo> getApps() {
        AppInfo a1 = new AppInfo("张欣1", 19);
        AppInfo a2 = new AppInfo("张欣2", 19);
        AppInfo a3 = new AppInfo("张欣3", 19);
        mA4 = new AppInfo("3deg", 19);
        mA5 = new AppInfo("dfg", 18);
        mMyList = new ArrayList<>();
        mMyList.add(a1);
        mMyList.add(a2);
        mMyList.add(a3);
        mMyList.add(mA4);
        mMyList.add(mA5);
       // 要某一条数据,注意数据从0开始,3就是第四条数据
        return Observable.from(mMyList).elementAt(3);

    }

    public void click(View v) {
        mObservable.subscribe(new Observer<AppInfo>() {
            @Override
            public void onCompleted() {
                mAdapter.notifyDataSetChanged();
            }

            @Override
            public void onError(Throwable e) {

            }

            @Override
            public void onNext(AppInfo appInfo) {
                mAdapter.addAppInfo(appInfo);
                Log.i("zhang_xin", appInfo.getName());
            }
        });
    }


}
看下效果
elementAtOrDefault()方法
package com.example.acer.rxjavatest;

import android.os.Bundle;
import android.support.v7.app.AppCompatActivity;
import android.util.Log;
import android.view.View;
import android.widget.ListView;

import java.util.ArrayList;
import java.util.List;

import rx.Observable;
import rx.Observer;

public class MainActivity extends AppCompatActivity {


    private Observable<AppInfo> mObservable;
    private AppInfoAdapter mAdapter;
    private List<AppInfo> mMyList;
    private AppInfo mA5;
    private AppInfo mA4;

    @Override
    protected void onCreate(Bundle savedInstanceState) {
        super.onCreate(savedInstanceState);
        setContentView(R.layout.activity_main);
        ListView listView = (ListView) findViewById(R.id.lv_app_name);
        mAdapter = new AppInfoAdapter(this);
        listView.setAdapter(mAdapter);
        mObservable = getApps();

    }


    private Observable<AppInfo> getApps() {
        AppInfo a1 = new AppInfo("张欣1", 19);
        AppInfo a2 = new AppInfo("张欣2", 19);
        AppInfo a3 = new AppInfo("张欣3", 19);
        mA4 = new AppInfo("3deg", 19);
        mA5 = new AppInfo("dfg", 18);
        mMyList = new ArrayList<>();
        mMyList.add(a1);
        mMyList.add(a2);
        mMyList.add(a3);
        mMyList.add(mA4);
        mMyList.add(mA5);
       // 我们发送第几条数据,但我们mMyList集合中并没有第九条数据,那我们就发送默认值a1
        return Observable.from(mMyList).elementAtOrDefault(9,a1);

    }

    public void click(View v) {
        mObservable.subscribe(new Observer<AppInfo>() {
            @Override
            public void onCompleted() {
                mAdapter.notifyDataSetChanged();
            }

            @Override
            public void onError(Throwable e) {

            }

            @Override
            public void onNext(AppInfo appInfo) {
                mAdapter.addAppInfo(appInfo);
                Log.i("zhang_xin", appInfo.getName());
            }
        });
    }


}
看下效果
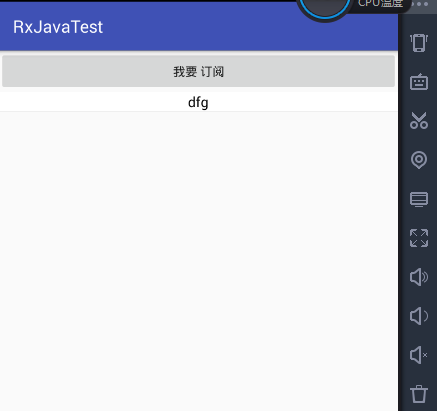
Sampling()方法
再回到前面那个温度计,这个方法是每隔指定的时间发射一次数据
package com.example.acer.rxjavatest;

import android.os.Bundle;
import android.support.v7.app.AppCompatActivity;
import android.util.Log;
import android.view.View;
import android.widget.ListView;

import java.util.ArrayList;
import java.util.List;
import java.util.concurrent.TimeUnit;

import rx.Observable;
import rx.Observer;

public class MainActivity extends AppCompatActivity {


    private Observable<AppInfo> mObservable;
    private AppInfoAdapter mAdapter;
    private List<AppInfo> mMyList;
    private AppInfo mA5;
    private AppInfo mA4;

    @Override
    protected void onCreate(Bundle savedInstanceState) {
        super.onCreate(savedInstanceState);
        setContentView(R.layout.activity_main);
        ListView listView = (ListView) findViewById(R.id.lv_app_name);
        mAdapter = new AppInfoAdapter(this);
        listView.setAdapter(mAdapter);
        mObservable = getApps();

    }


    private Observable<AppInfo> getApps() {
        AppInfo a1 = new AppInfo("张欣1", 19);
        AppInfo a2 = new AppInfo("张欣2", 19);
        AppInfo a3 = new AppInfo("张欣3", 19);
        mA4 = new AppInfo("3deg", 19);
        mA5 = new AppInfo("dfg", 18);
        mMyList = new ArrayList<>();
        mMyList.add(a1);
        mMyList.add(a2);
        mMyList.add(a3);
        mMyList.add(mA4);
        mMyList.add(mA5);

        return Observable.from(mMyList);

    }

    public void click(View v) {
        //sample:在指定的时间之内发送最新的一条数据
        //线程中执行相关逻辑,例如网络请求,数据库查询
        mObservable.sample(6, TimeUnit.SECONDS).subscribe(new Observer<AppInfo>() {
            @Override
            public void onCompleted() {
                mAdapter.notifyDataSetChanged();
            }

            @Override
            public void onError(Throwable e) {

            }

            @Override
            public void onNext(AppInfo appInfo) {
                mAdapter.addAppInfo(appInfo);
                Log.i("zhang_xin", appInfo.getName());
            }
        });
    }


}
看下效果,是最后一个数据
timeout方法抱歉这个方法也没演示成功,所以就不贴代码了


 584
584


 被折叠的 条评论
为什么被折叠?
被折叠的 条评论
为什么被折叠?
 到【灌水乐园】发言


