


http://blog.csdn.net/tkokof1/article/details/40819225#comments
0. 引子
一直想随便写写自己关于水面效果2D实现的一些了解,可惜各种原因一直拖沓,幸而近来有些事情终算告一段落,自己也有了一些闲暇时间,于是便有了这篇东西 :)
1. 概述
关于水面效果的实现方法,google一下非常之多,目前的很多游戏也有非常好的呈现,其中最令我印象深刻的当数《Crysis》~
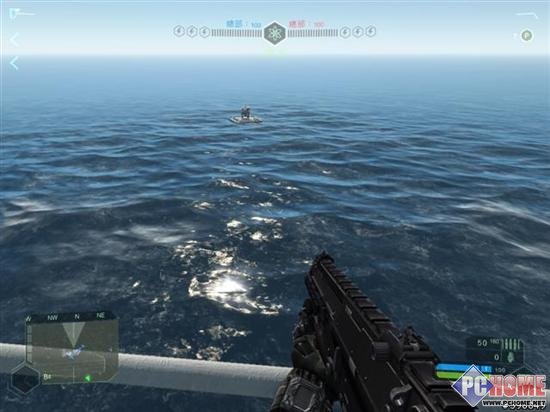
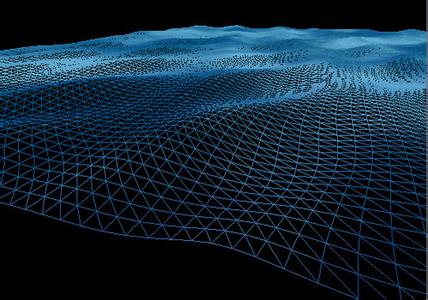
自己由于工作原因接触过一段时间的CryEngine,对于Crysis的水面渲染有一点点的了解,当然其中细节非常复杂,但就基本原理来讲,就是将整块水面细分成适当粒度的三角面,然后通过动态改变各个三角面的顶点位置来模拟水面的运动:
可能用Crysis举例略显“高大上”了一些,但其实就在我们接触比较多的cocos2d-x引擎中,就有现成的使用这种原理来实现的水面效果——Waves3D,有兴趣的朋友可以仔细看一看~不过正是由于Waves3D使用了这种3D方式来实现,所以其与cocos2d-x中其他的不少“2D”元素(譬如Sprite)协作起来就多少有些不顺畅的感觉,再加上三角面切分的粒度问题,有时总会让人感觉效果略有生硬粗糙,还有的就是Waves3D使用CPU计算来实现效果,切分粒度细致起来CPU负担很重,白白浪费了很适合这项工作的GPU~(Waves3D其实还有一个2D版本:Waves,可惜其并不能解决上面提到的后两个问题~)
那么还有没有其他方法来实现水面效果,并且能够克服上面所提到的这些问题呢?其实答案很简单,想必很多朋友也想到了,那就是使用Shader :)
2. 方法
使用Shader来实现2D水面效果,网上亦有不少资料,在此我也仅仅是简单的按照自己的理解重述一遍而已,示例代码基于cocos2d-x-3.3rc0(由于原理代码都使用GLSL,所以引擎平台其实并不重要,代码改改形式在Unity中使用应该也是可以的),个中源码内容其实就是个简单的HelloWorld,唯一值得一提的就是WaterEffectSprite类型,在此完整列出:
- //WaterEffectSprite.h
- #ifndef __WATER_EFFECT_SPRITE_H__
- #define __WATER_EFFECT_SPRITE_H__
- #include "cocos2d.h"
- USING_NS_CC;
- class WaterEffectSprite : public Sprite {
- public:
- static WaterEffectSprite* create(const char *pszFileName);
- public:
- bool initWithTexture(Texture2D* texture, const Rect& rect);
- void initGLProgram();
- };
- #endif
- //WaterEffectSprite.cpp
- #include "WaterEffectSprite.h"
- WaterEffectSprite* WaterEffectSprite::create(const char *pszFileName) {
- auto pRet = new (std::nothrow) WaterEffectSprite();
- if (pRet && pRet->initWithFile(pszFileName)) {
- pRet->autorelease();
- }
- else {
- CC_SAFE_DELETE(pRet);
- }
- return pRet;
- }
- bool WaterEffectSprite::initWithTexture(Texture2D* texture, const Rect& rect) {
- if (Sprite::initWithTexture(texture, rect)) {
- #if CC_ENABLE_CACHE_TEXTURE_DATA
- auto listener = EventListenerCustom::create(EVENT_RENDERER_RECREATED, [this](EventCustom* event) {
- setGLProgram(nullptr);
- initGLProgram();
- });
- _eventDispatcher->addEventListenerWithSceneGraphPriority(listener, this);
- #endif
- initGLProgram();
- return true;
- }
- return false;
- }
- void WaterEffectSprite::initGLProgram() {
- auto fragSource = (GLchar*)String::createWithContentsOfFile(
- FileUtils::getInstance()->fullPathForFilename("Shaders/WaterEffect.fsh").c_str())->getCString();
- auto program = GLProgram::createWithByteArrays(ccPositionTextureColor_noMVP_vert, fragSource);
- auto glProgramState = GLProgramState::getOrCreateWithGLProgram(program);
- setGLProgramState(glProgramState);
- }
WaterEffectSprite的内容其实非常简单,仅仅是继承了Sprite类型然后将其fragment shader改写为使用WaterEffect.fsh,而WaterEffect.fsh便是我们需要真正实现效果逻辑的地方~
OK,准备工作结束,我们可以屡起袖子,进入正题了 :)
#“旋转”像素
第一种方法类似于“旋转”像素,相关的解释可以看看这里,另外这里也有一份HLSL实现,使用GLSL编写,大概是这个样子:
- varying vec4 v_fragmentColor;
- varying vec2 v_texCoord;
- void main() {
- float timeFactor = 1;
- float texFactor = 10;
- float ampFactor = 0.01f;
- // just like rotate pixel according to texture coordinate
- v_texCoord.x += sin(CC_Time.y * timeFactor + v_texCoord.x * texFactor) * ampFactor;
- v_texCoord.y += cos(CC_Time.y * timeFactor + v_texCoord.y * texFactor) * ampFactor;
- gl_FragColor = texture2D(CC_Texture0, v_texCoord) * v_fragmentColor;
- }
其中timeFactor可以控制水波运动的快慢,texFactor可以控制水波运动的“粒度”,ampFactor则可控制水波运动的幅度,给张截图:

当然,由于我们单独控制UV两个方向的纹理坐标偏移,所以相关参数自然也可以不同,就像这样:
- varying vec4 v_fragmentColor;
- varying vec2 v_texCoord;
- void main() {
- float timeFactorU = 1;
- float texFactorU = 10;
- float ampFactorU = 0.01f;
- float timeFactorV = 1;
- float texFactorV = 10;
- float ampFactorV = 0.01f;
- v_texCoord.x += sin(CC_Time.y * timeFactorU + v_texCoord.x * texFactorU) * ampFactorU;
- v_texCoord.y += cos(CC_Time.y * timeFactorV + v_texCoord.y * texFactorV) * ampFactorV;
- gl_FragColor = texture2D(CC_Texture0, v_texCoord) * v_fragmentColor;
- }
如果再将这些参数变为uniform,那么扩展性就更强了 :)
# “偏移”像素
第二种方法其实类似于3D方式的水面渲染,首先我们计算水面上任意一点的“高度”,然后将其直接映射到对应贴图坐标的偏移中,方法很简单,直接按照“高度”值成比例做偏移即可(此处我不是非常肯定,但感觉上这种映射方法似乎是平行映射(parallax mapping)的一种简单应用,熟悉的朋友可以告知一下~)(这里和这里也有相关的介绍)
相关shader代码大概是这个样子:
- varying vec4 v_fragmentColor;
- varying vec2 v_texCoord;
- // get wave height based on distance-to-center
- float waveHeight(vec2 p) {
- float timeFactor = 4.0;
- float texFactor = 12.0;
- float ampFactor = 0.01;
- float dist = length(p);
- return cos(CC_Time.y * timeFactor + dist * texFactor) * ampFactor;
- }
- void main() {
- // convert to [-1, 1]
- vec2 p = -1.0 + 2.0 * v_texCoord;
- vec2 normal = normalize(p);
- // offset texcoord along dist direction
- v_texCoord += normal * waveHeight(p);
- gl_FragColor = texture2D(CC_Texture0, v_texCoord) * v_fragmentColor;
- }
其中timeFactor、texFactor 和ampFactor 的含义与第一种方法相同(其实从正弦曲线函数y=Asin(ωx+φ)中参数含义的角度可以更好的理解:)),同样给张截图:

与第一种方法一样,我们也可以以上面的代码为基础,稍稍做些扩展,简单的譬如改变水波的中心位置:
- varying vec4 v_fragmentColor;
- varying vec2 v_texCoord;
- // get wave height based on distance-to-center
- float waveHeight(vec2 p) {
- float timeFactor = 4.0;
- float texFactor = 12.0;
- float ampFactor = 0.01;
- float dist = length(p);
- return cos(CC_Time.y * timeFactor + dist * texFactor) * ampFactor;
- }
- void main() {
- vec2 center = vec2(0, 0);
- vec2 p = (v_texCoord - center) * 2.0;
- vec2 normal = normalize(p);
- // offset texcoord along dist direction
- v_texCoord += normal * waveHeight(p);
- gl_FragColor = texture2D(CC_Texture0, v_texCoord) * v_fragmentColor;
- }
再来张截图:

复杂一些的还有引入简单的光照:
基本思路就是通过水面任意点的“高度”变化计算出该点的normal值,接着就是普通的光照计算了(示例代码可能有误,仅作参考了~)
- varying vec4 v_fragmentColor;
- varying vec2 v_texCoord;
- // get wave height based on distance-to-center
- float waveHeight(vec2 p) {
- float timeFactor = 4.0;
- float texFactor = 12.0;
- float ampFactor = 0.01;
- float dist = length(p);
- return cos(CC_Time.y * timeFactor + dist * texFactor) * ampFactor;
- }
- // get point fake normal
- vec3 waveNormal(vec2 p) {
- vec2 resolution = vec2(480, 320);
- float scale = 240;
- float waveHeightRight = waveHeight(p + vec2(2.0 / resolution.x, 0)) * scale;
- float waveHeightLeft = waveHeight(p - vec2(2.0 / resolution.x, 0)) * scale;
- float waveHeightTop = waveHeight(p + vec2(0, 2.0 / resolution.y)) * scale;
- float waveHeightBottom = waveHeight(p - vec2(0, 2.0 / resolution.y)) * scale;
- vec3 t = vec3(1, 0, waveHeightRight - waveHeightLeft);
- vec3 b = vec3(0, 1, waveHeightTop - waveHeightBottom);
- vec3 n = cross(t, b);
- return normalize(n);
- }
- void main() {
- vec2 p = -1.0 + 2.0 * v_texCoord;
- vec2 normal = normalize(p);
- v_texCoord += normal * waveHeight(p);
- vec4 lightColor = vec4(1, 1, 1, 1);
- vec3 lightDir = vec3(1, 1, 1);
- gl_FragColor = texture2D(CC_Texture0, v_texCoord) * v_fragmentColor * lightColor * max(0, dot(lightDir, waveNormal(p)));
- gl_FragColor.a = 1;
- }
这里仅仅引入了一个平行光,效果有限,不过同样给张截图:)

# 凸凹映射
第三种方法可能大家都耳熟能详了,就是3D渲染中常见的凸凹映射,其中法线贴图可能是最常见的一种凸凹映射技术了,在此我们亦可以仿照3D的做法,将法线贴图映射至普通的Sprite之上,以达到模拟水面的效果~
当然,之前所列出的WaterEffectSprite类需要做些简单修改,大抵是改写一下其中的initGLProgram方法:
- void WaterEffectSprite::initGLProgram() {
- auto fragSource = (GLchar*)String::createWithContentsOfFile(
- FileUtils::getInstance()->fullPathForFilename("Shaders/WaterEffect.fsh").c_str())->getCString();
- auto program = GLProgram::createWithByteArrays(ccPositionTextureColor_noMVP_vert, fragSource);
- auto glProgramState = GLProgramState::getOrCreateWithGLProgram(program);
- setGLProgramState(glProgramState);
- auto normalMapTextrue = TextureCache::getInstance()->addImage("Textures/water_normal.jpg");
- Texture2D::TexParams texParams = { GL_LINEAR, GL_LINEAR, GL_REPEAT, GL_REPEAT };
- normalMapTextrue->setTexParameters(texParams);
- getGLProgramState()->setUniformTexture("u_normalMap", normalMapTextrue);
- }
我们还需要准备一张水面Normal贴图,我使用的大概是这么一张:
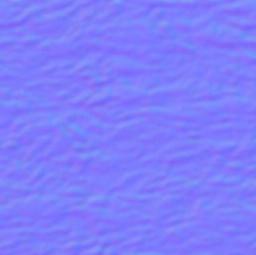
GLSL代码大致上简单的实现了一下水面的折射效果以及简单的normal UV动画(代码可能有误,仅作参考了~)
- varying vec4 v_fragmentColor;
- varying vec2 v_texCoord;
- uniform sampler2D u_normalMap;
- vec3 waveNormal(vec2 p) {
- vec3 normal = texture2D(u_normalMap, p).xyz;
- normal = -1.0 + normal * 2.0;
- return normalize(normal);
- }
- void main() {
- float timeFactor = 0.2;
- float offsetFactor = 0.5;
- float refractionFactor = 0.7;
- // simple UV animation
- vec3 normal = waveNormal(v_texCoord + vec2(CC_Time.y * timeFactor, 0));
- // simple calculate refraction UV offset
- vec2 p = -1 + 2 * v_texCoord;
- vec3 eyePos = vec3(0, 0, 100);
- vec3 inVec = normalize(vec3(p, 0) - eyePos);
- vec3 refractVec = refract(inVec, normal, refractionFactor);
- v_texCoord += refractVec.xy * offsetFactor;
- gl_FragColor = texture2D(CC_Texture0, v_texCoord) * v_fragmentColor;
- }
同样给张截图:

当然,我们还可以继续引入光照(例如高光)等元素来加强水面效果的显示,不过3D味道也会愈来愈浓,有兴趣的朋友可以深入尝试一下 :)
# 其他
我所见到的其他2D水面实现方法大抵都是上面方法的一些变种,如果你还知道其他方式,就请不吝告之一下吧~
3. 后记
OK,讲了不少东西,也该停一停了,这次讲了一些我自己归类为Water Effect的2D水面效果实现方法,另外一类我觉得比较重要的还有个人称为Ripple Effect的2D水面效果,有机会下次再随便讲讲吧,就这样了~


 1135
1135

 被折叠的 条评论
为什么被折叠?
被折叠的 条评论
为什么被折叠?
 到【灌水乐园】发言


