


环境配置
手机环境设置
首先在手机的开发者选项中关闭三个选项。由于我的手机开发者选项并不是默认显示的,所以我先打开开发者选项。
进入设置->关于手机

在版本号一栏双击出现提示。然后再按提示点击几下。提示成功后,出现开发者选项。看一下前后对比:


开发者选项调出来后,进入里面:
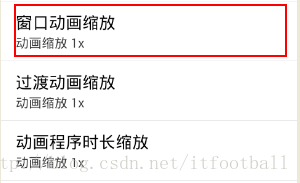
将图上的三项全部关闭。关闭后的样子如下:

Eclipse配置
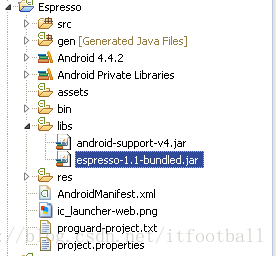
首先创建一个普通的android应用Espresso。然后从espresso网站上下载jar包,我下载的我上传到网站上来了。
http://code.google.com/p/android-test-kit/source/browse/#git%2Fbin
下载完成以后,我们将其中的espresso-1.1-bundled.jar添加到android项目中。
然后我们编写具体代码。在src下创建测试文件夹,编写测试用例。
EspressoTest.java:
package com.ibm.espresso.test;


import com.google.android.apps.common.testing.ui.espresso.action.ViewActions;
import com.google.android.apps.common.testing.ui.espresso.assertion.ViewAssertions;
import com.google.android.apps.common.testing.ui.espresso.matcher.ViewMatchers;
import static com.google.android.apps.common.testing.ui.espresso.Espresso.onView;
import com.ibm.espresso.MainActivity;
import com.ibm.espresso.R;

import android.test.ActivityInstrumentationTestCase2;

@SuppressWarnings("rawtypes")
public class EspressoTest extends ActivityInstrumentationTestCase2 {
    @SuppressWarnings("unchecked")
    public EspressoTest() {
        super(MainActivity.class);
    }

    @Override
    protected void setUp() throws Exception {
        super.setUp();
        getActivity();
    }

    public void testClickButton() throws InterruptedException {
        onView(ViewMatchers.withId(R.id.button1)).perform(ViewActions.click()).check(ViewAssertions.matches(ViewMatchers.isDisplayed()));
    }

    @Override
    protected void tearDown() throws Exception {
        super.tearDown();
    }
}
先不求具体意思,我们先让一个完整的过程跑起来。所以上面的测试用例也是从网上找的。
参考文章:http://www.cnblogs.com/oscarxie/p/3521695.html
以上代码完成后,我们就要配置测试环境啦。首先在AndroidManifest.xml文件中做如下配置:
<?xml version="1.0" encoding="utf-8"?>
<manifest xmlns:android="http://schemas.android.com/apk/res/android"
    package="com.ibm.espresso"
    android:versionCode="1"
    android:versionName="1.0" >

    <uses-sdk
        android:minSdkVersion="8"
        android:targetSdkVersion="18" />

    <application
        android:allowBackup="true"
        android:icon="@drawable/ic_launcher"
        android:label="@string/app_name"
        android:theme="@style/AppTheme" >
        <span style="color:#FF0000;"><uses-library android:name="android.test.runner" /></span>
        <activity
            android:name="com.ibm.espresso.MainActivity"
            android:label="@string/app_name" >
            <intent-filter>
                <action android:name="android.intent.action.MAIN" />

                <category android:name="android.intent.category.LAUNCHER" />
            </intent-filter>
        </activity>
    </application>
	<span style="color:#FF0000;"><instrumentation
        android:name="com.google.android.apps.common.testing.testrunner.GoogleInstrumentationTestRunner"
        android:targetPackage="com.ibm.espresso" /></span>
</manifest>
红色标志的就是我们添加到2个标签,一个是测试用的库标签,还有一个是<instrumentation>标签。在<instrumentation>中的android:targetPackage属性里填的是被测试的主包名。
然后在项目名上右键选Run As->Run Configurations进入到如下画面:
双击Android Junit Test进入如下配置:
配置完成后,我们点Run按钮,会发现你的手机会自动安装应用,然后点击。测试结果通过!
[2014-04-01 16:09:51 - Espresso] ------------------------------
[2014-04-01 16:09:51 - Espresso] Android Launch!
[2014-04-01 16:09:51 - Espresso] adb is running normally.
[2014-04-01 16:09:51 - Espresso] Performing com.google.android.apps.common.testing.testrunner.GoogleInstrumentationTestRunner JUnit launch
[2014-04-01 16:09:51 - Espresso] Automatic Target Mode: using device '16442209010961'
[2014-04-01 16:09:51 - Espresso] Uploading Espresso.apk onto device '16442209010961'
[2014-04-01 16:09:51 - Espresso] Installing Espresso.apk...
[2014-04-01 16:09:57 - Espresso] Success!
[2014-04-01 16:09:57 - Espresso] Launching instrumentation com.google.android.apps.common.testing.testrunner.GoogleInstrumentationTestRunner on 16442209010961
[2014-04-01 16:10:07 - Espresso] Sending test information to Eclipse
[2014-04-01 16:10:17 - Espresso] Test run finished


 550
550

 被折叠的 条评论
为什么被折叠?
被折叠的 条评论
为什么被折叠?
 到【灌水乐园】发言


