


Spring全家桶-Spring Security 初探
Spring Security是一个能够为基于Spring的企业应用系统提供声明式的安全访问控制解决方案的安全框架。它提供了一组可以在Spring应用上下文中配置的Bean,充分利用了Spring IoC(控制反转),DI(依赖注入)和AOP(面向切面编程)功能,为应用系统提供声明式的安全访问控制功能,减少了为企业系统安全控制编写大量重复代码的工作。
文章目录
一、Spring Security初探
以下搭建是基于Spring boot进行相关的开发,并使用Spring boot的最新版本(2.6.6)。用过Spring boot的都知道,它的目的是用来简化新Spring应用的初始搭建以及开发过程。该框架使用了特定的方式来进行配置,从而使开发人员不再需要定义样板化的配置。
二、工程创建
1.使用spring官方Spring Initializr
访问地址:https://start.spring.io/
界面如下:
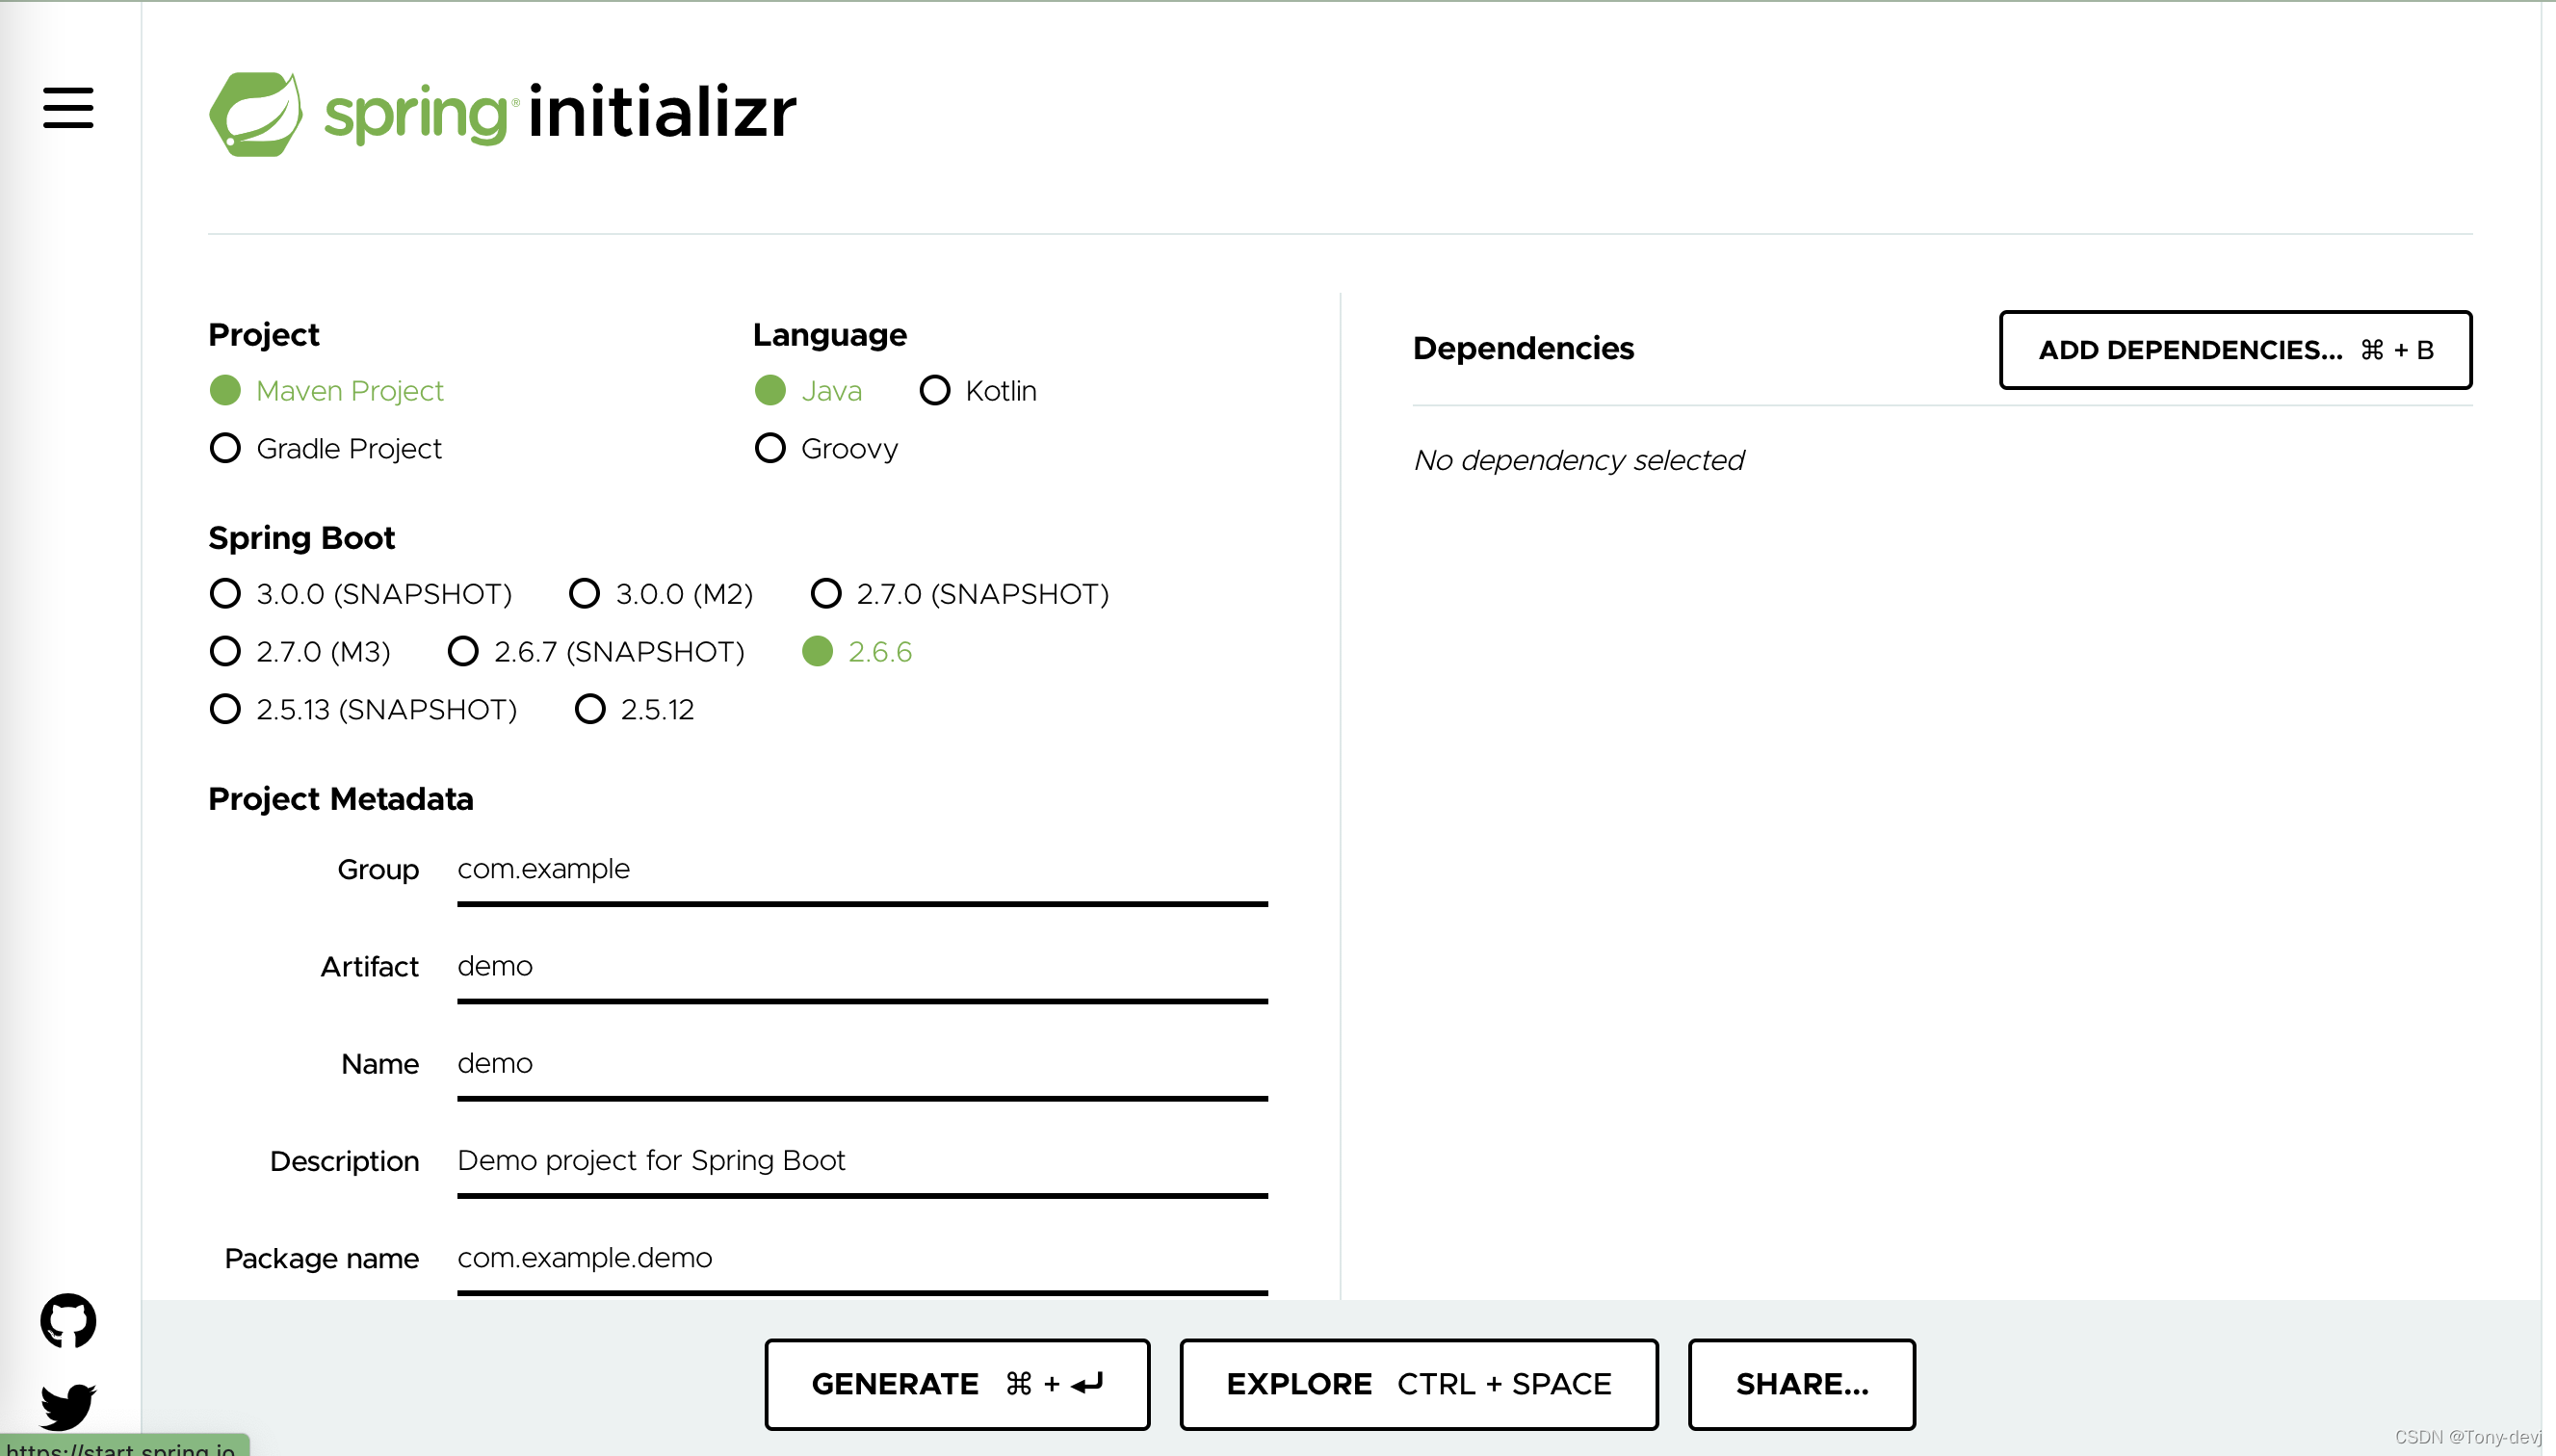
- project
project声明项目的类型,可以创建maven工程或者gradle工程,可以根据自己的熟练程度进行选择,我本人使用的maven创建 - language
项目的编程语言,这里支持Java,Kotlin,Groovy,相信大部分人还是选择Java,😄 - springBoot:选择springboot的版本
- project Metadata:项目的相关元数据,像maven的话会有group等数据和打包的方式,是jar还是war
- dependencies:即相关的包依赖,我们可以点击ADD dependencies按钮进行添加相关依赖,我们这里使用spring security,所有需要添加security的依赖以及web的依赖
- generate:生产相关的工程初始化代码
我们下载下来的代码中maven如下:
<?xml version="1.0" encoding="UTF-8"?>
<project xmlns="http://maven.apache.org/POM/4.0.0" xmlns:xsi="http://www.w3.org/2001/XMLSchema-instance"
	xsi:schemaLocation="http://maven.apache.org/POM/4.0.0 https://maven.apache.org/xsd/maven-4.0.0.xsd">
	<modelVersion>4.0.0</modelVersion>
	<parent>
		<groupId>org.springframework.boot</groupId>
		<artifactId>spring-boot-starter-parent</artifactId>
		<version>2.6.6</version>
		<relativePath/> <!-- lookup parent from repository -->
	</parent>
	<groupId>com.example</groupId>
	<artifactId>demo</artifactId>
	<version>0.0.1-SNAPSHOT</version>
	<name>demo</name>
	<description>Demo project for Spring Boot</description>
	<properties>
		<java.version>11</java.version>
	</properties>
	<dependencies>
		<dependency>
			<groupId>org.springframework.boot</groupId>
			<artifactId>spring-boot-starter-web</artifactId>
		</dependency>
		<dependency>
			<groupId>org.springframework.boot</groupId>
			<artifactId>spring-boot-starter-security</artifactId>
		</dependency>

		<dependency>
			<groupId>org.springframework.boot</groupId>
			<artifactId>spring-boot-starter-test</artifactId>
			<scope>test</scope>
		</dependency>
		<dependency>
			<groupId>org.springframework.security</groupId>
			<artifactId>spring-security-test</artifactId>
			<scope>test</scope>
		</dependency>
	</dependencies>

	<build>
		<plugins>
			<plugin>
				<groupId>org.springframework.boot</groupId>
				<artifactId>spring-boot-maven-plugin</artifactId>
			</plugin>
		</plugins>
	</build>
</project>
2.通过自建maven工程进行创建(推荐)
为了更清楚相关工程的依赖包,我这边是通过自建工程进行构建的。
- 创建maven工程(IDE进行创建)环境搭建
因为我是多module管理,因此自建的POM.xml如下:
<?xml version="1.0" encoding="UTF-8"?>
<project xmlns="http://maven.apache.org/POM/4.0.0"
         xmlns:xsi="http://www.w3.org/2001/XMLSchema-instance"
         xsi:schemaLocation="http://maven.apache.org/POM/4.0.0 http://maven.apache.org/xsd/maven-4.0.0.xsd">
    <modelVersion>4.0.0</modelVersion>

    <groupId>org.tony.spring.security</groupId>
    <artifactId>spring-security-learn</artifactId>
    <version>1.0-SNAPSHOT</version>
    <modules>
    	<!--子工程-->
        <module>spring-security-ch1</module>
    </modules>
    <!-- pom 主工程-->
    <packaging>pom</packaging>

    <properties>
        <maven.compiler.source>11</maven.compiler.source>
        <maven.compiler.target>11</maven.compiler.target>
        <spring.boot.version>2.6.6</spring.boot.version>
    </properties>

    <dependencyManagement>
        <dependencies>
        	<!-- spring boot的版本使用官方的-->
            <dependency>
                <groupId>org.springframework.boot</groupId>
                <artifactId>spring-boot-dependencies</artifactId>
                <version>${spring.boot.version}</version>
                <type>pom</type>
                <scope>import</scope>
            </dependency>
        </dependencies>
    </dependencyManagement>

    <build>
        <plugins>
            <plugin>
                <groupId>org.springframework.boot</groupId>
                <artifactId>spring-boot-maven-plugin</artifactId>
            </plugin>
        </plugins>
    </build>
</project>
- 创建子工程(通过IDE)
在创建好主工程之后,点击主工程创建module,即可创建子工程,子工程的POM.xml如下:
<?xml version="1.0" encoding="UTF-8"?>
<project xmlns="http://maven.apache.org/POM/4.0.0"
         xmlns:xsi="http://www.w3.org/2001/XMLSchema-instance"
         xsi:schemaLocation="http://maven.apache.org/POM/4.0.0 http://maven.apache.org/xsd/maven-4.0.0.xsd">
    <parent>
        <artifactId>spring-security-learn</artifactId>
        <groupId>org.tony.spring.security</groupId>
        <version>1.0-SNAPSHOT</version>
    </parent>
    <modelVersion>4.0.0</modelVersion>

    <artifactId>spring-security-ch1</artifactId>

    <properties>
        <maven.compiler.source>11</maven.compiler.source>
        <maven.compiler.target>11</maven.compiler.target>
    </properties>

    <dependencies>
        <dependency>
            <groupId>org.springframework.boot</groupId>
            <artifactId>spring-boot-starter-security</artifactId>
        </dependency>

        <dependency>
            <groupId>org.springframework.boot</groupId>
            <artifactId>spring-boot-starter-web</artifactId>
        </dependency>
    </dependencies>

</project>
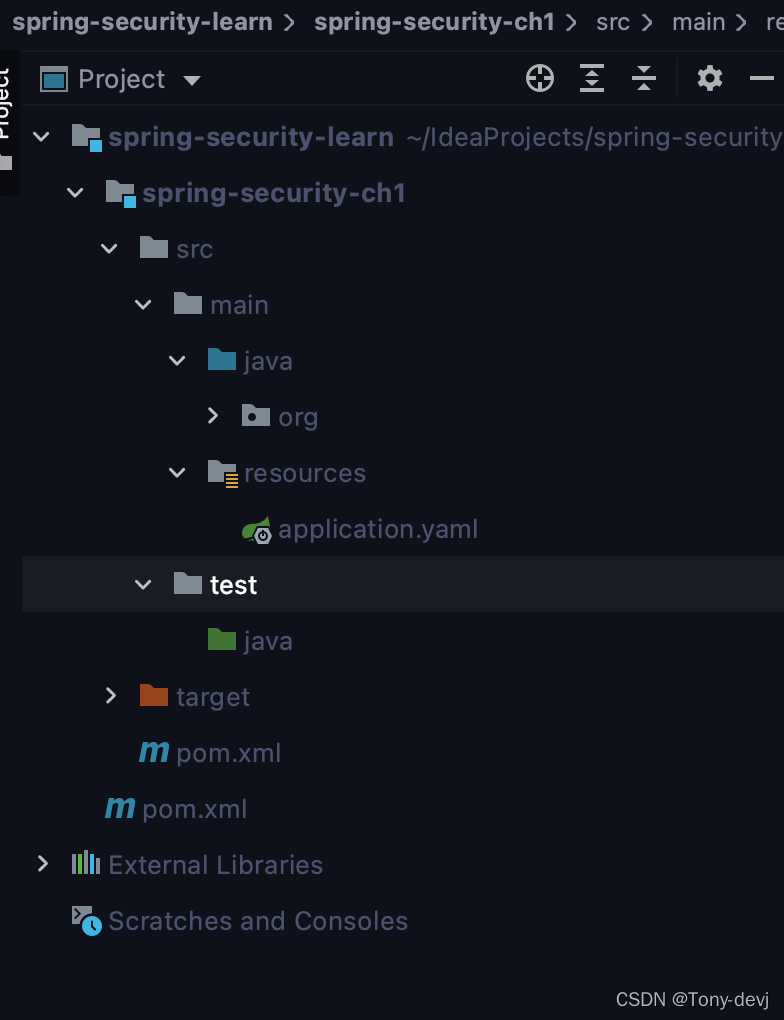
- 项目结构
3.编写代码并运行
现在项目工程创建好了之后,就可以代码的Coding了。
- 创建应用启动类,Application.java
package org.tony.spring.security;
import org.springframework.boot.SpringApplication;
import org.springframework.boot.autoconfigure.SpringBootApplication;

/**
 * 程序入口
 * @author Tony
 */
@SpringBootApplication
public class Application {
    public static void main(String[] args) {
        SpringApplication.run(Application.class,args);
    }
}
- 创建Controller包
package org.tony.spring.security.controller;

import org.springframework.web.bind.annotation.GetMapping;
import org.springframework.web.bind.annotation.RestController;

import static org.tony.spring.security.controller.Constants.HELLO_WORLD;

/**
 * index controller
 * @author Tony
 */
@RestController
public class IndexController {
    @GetMapping("/")
    public String index(){
        return HELLO_WORLD;
    }
}
- 创建application.yml文件
server:
  port: 8080   #默认的端口号就是8080
- 运行
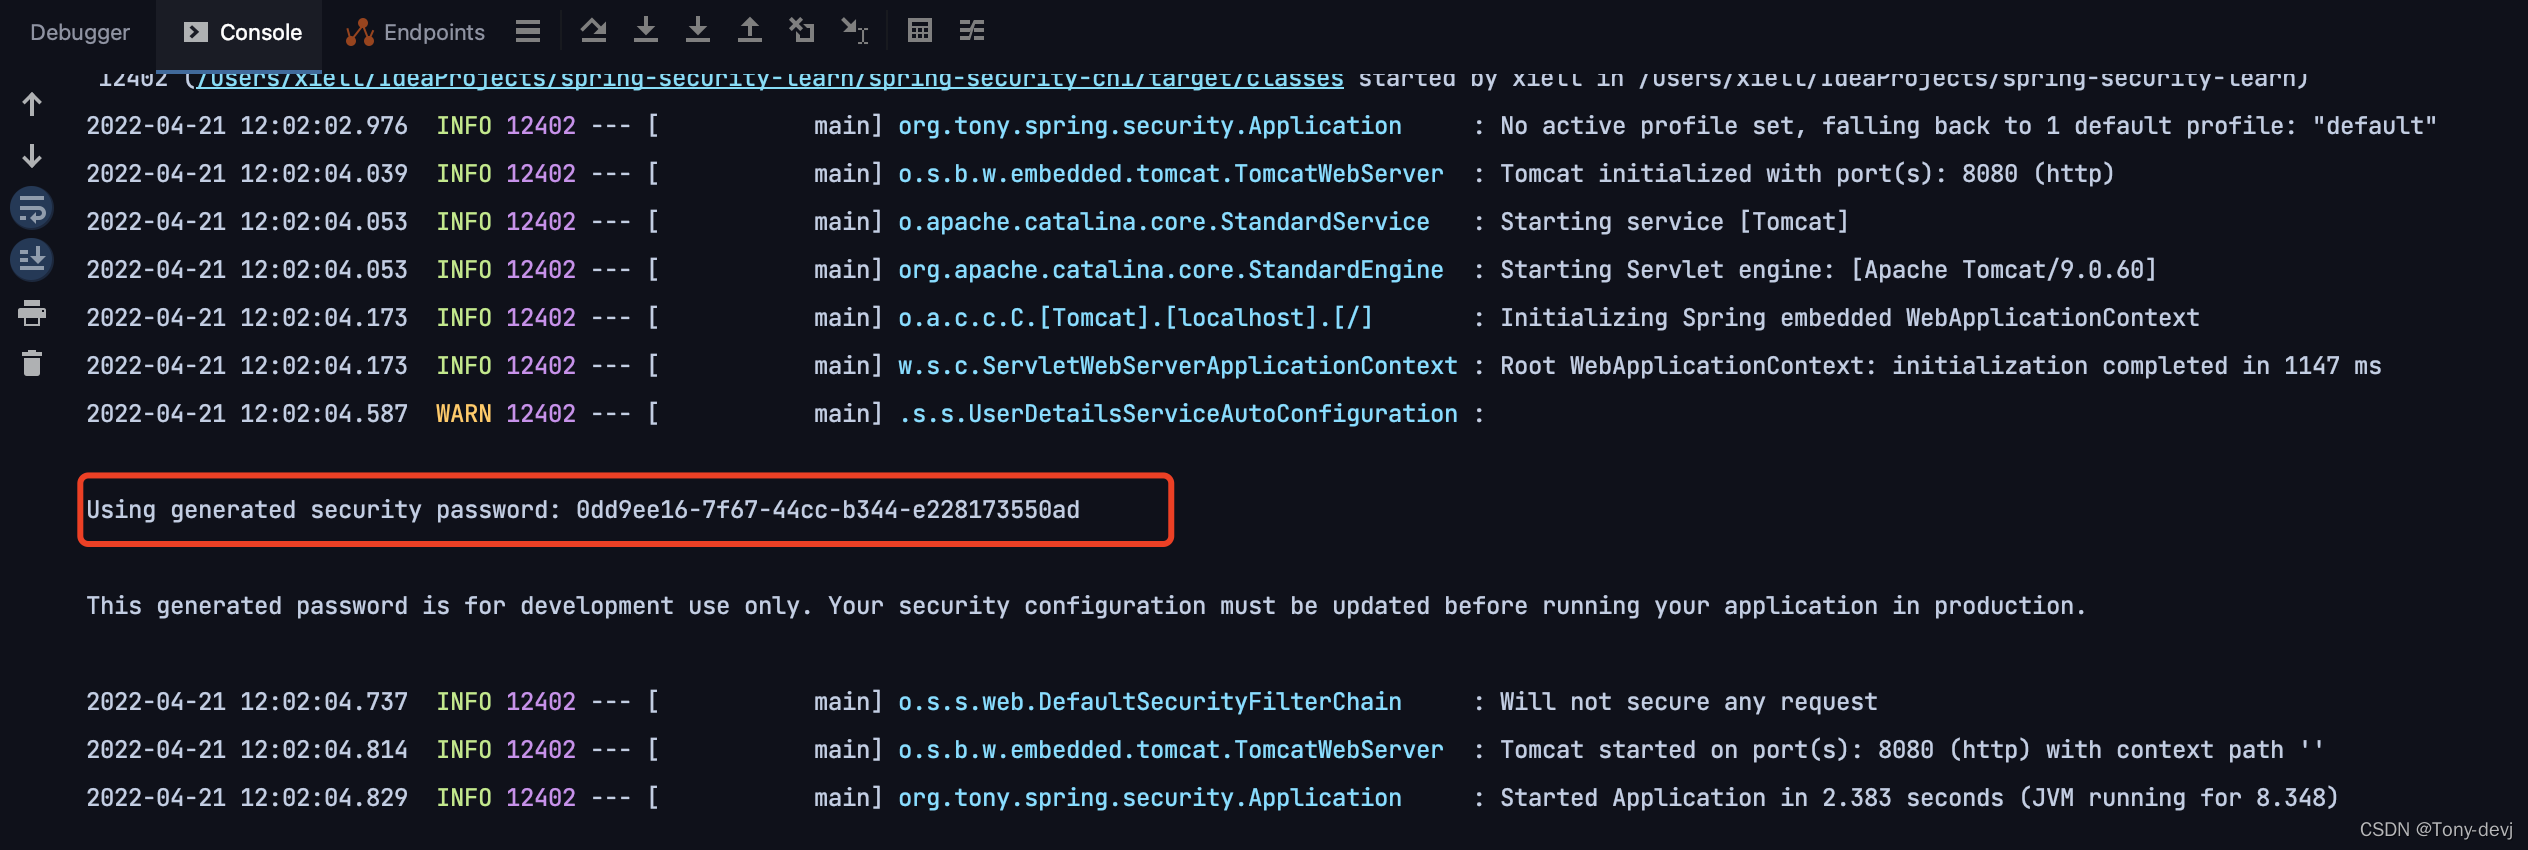
记住上面标红的一串字符,password后面的就是默认的密码。 - 访问
打开浏览器访问http://localhost:8080/
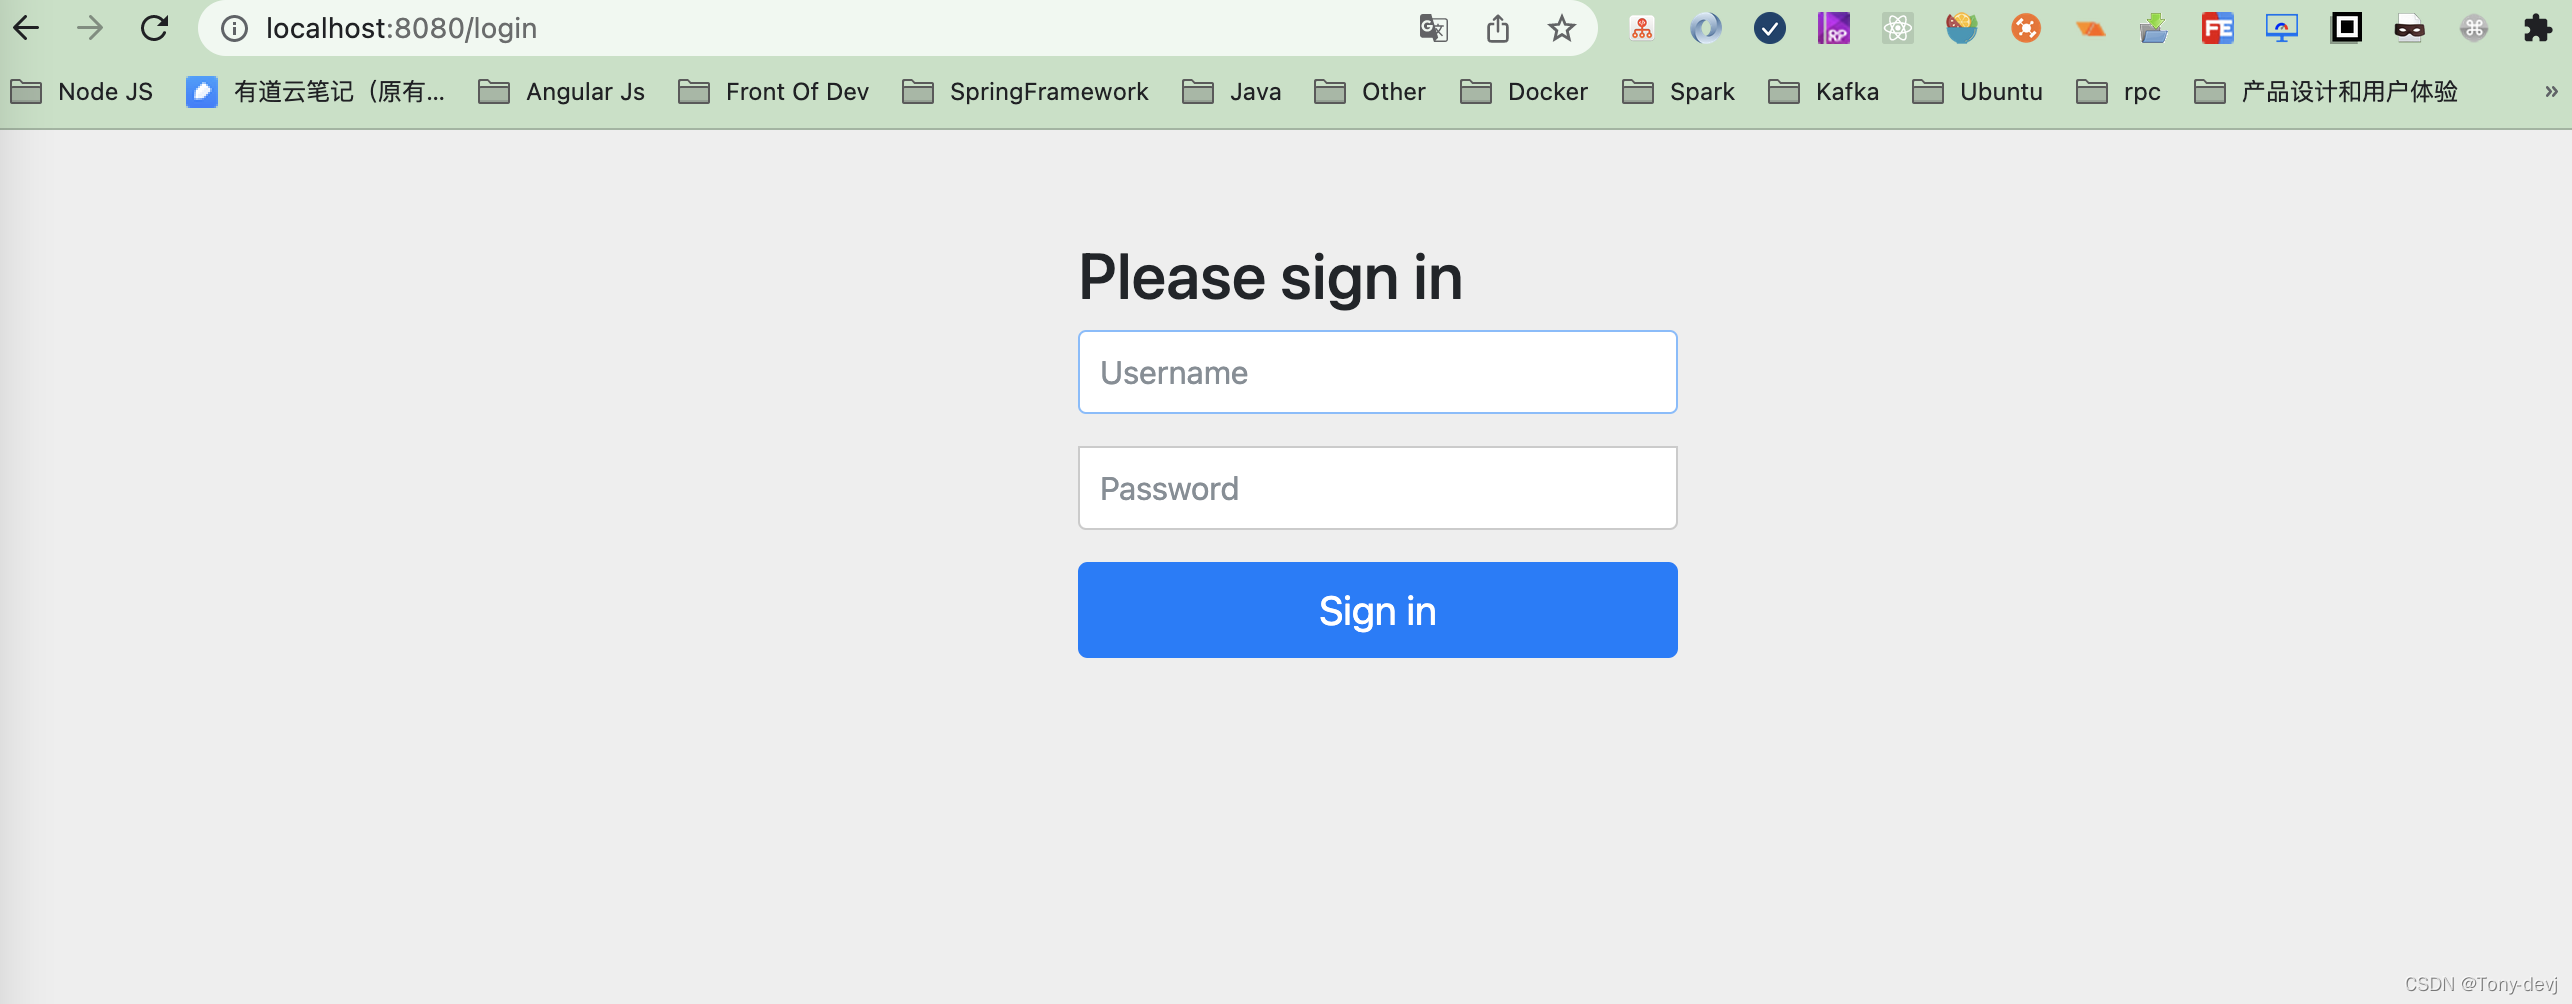
用户名默认为user,源码中有,我们等会说,密码就是刚刚标记的。

证明已经成功了。
设置用户名和密码
我们使用默认的用户名和密码的话,不太智能,因为不是我们自己设置的密码,并且密码还那么长?(UUID生成的,源码),我们自己怎么设置用户名和密码呢?
- 修改用户名密码其实很简单。修改YML文件就可以了
spring:
  security:
    user:
      name: tony
      password: 123456
重启服务即可。
一探究竟(源码分析)
前面项目中,提到过默认的用户名是user,密码是一长串,是怎么生成的呢?我们只引入了security的包,怎么就自动访问的时候需要登陆呢?我们现在就来说说。
- 我们在进行引入包的时候,是引入的spring-boot-starter-security,这个自动配置是有starter进行处理的。spring-boot-starter是通过下面的包进行自动加载的。

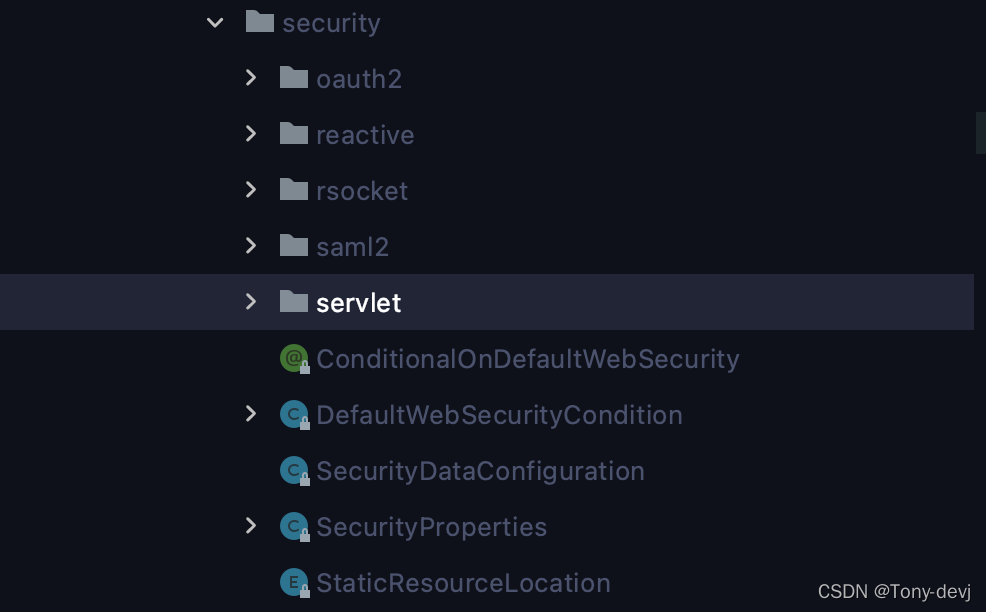
我们看看这个包下有哪些内容?默认是通过servlet进行处理,使用servlet包下进行查看。
Security包下就是对spring-security的自动配置的相关都在这里面。我们具体看看。
- SecurityProperties进行属性的解析
//加载属性解析
@ConfigurationProperties(
    prefix = "spring.security"
)
public class SecurityProperties {
    public static final int BASIC_AUTH_ORDER = 2147483642;
    public static final int IGNORED_ORDER = -2147483648;
    public static final int DEFAULT_FILTER_ORDER = -100;
    private final SecurityProperties.Filter filter = new SecurityProperties.Filter();
    private final SecurityProperties.User user = new SecurityProperties.User();

    public SecurityProperties() {
    }

    public SecurityProperties.User getUser() {
        return this.user;
    }

    public SecurityProperties.Filter getFilter() {
        return this.filter;
    }
	//创建一个静态的用户
    public static class User {
    	//默认的用户名,就是没有设置的时候
        private String name = "user";
        //设置密码,默认的密码是通过UUID生成的
        private String password = UUID.randomUUID().toString();
        private List<String> roles = new ArrayList();
        private boolean passwordGenerated = true;
        public User() {
        }
        public String getName() {
            return this.name;
        }

        public void setName(String name) {
            this.name = name;
        }

        public String getPassword() {
            return this.password;
        }

        public void setPassword(String password) {
            if (StringUtils.hasLength(password)) {
                this.passwordGenerated = false;
                this.password = password;
            }
        }

        public List<String> getRoles() {
            return this.roles;
        }

        public void setRoles(List<String> roles) {
            this.roles = new ArrayList(roles);
        }

        public boolean isPasswordGenerated() {
            return this.passwordGenerated;
        }
    }
    //默认的拦截器filter
    public static class Filter {
        private int order = -100;
        private Set<DispatcherType> dispatcherTypes;
        public Filter() {
            this.dispatcherTypes = new HashSet(Arrays.asList(DispatcherType.ASYNC, DispatcherType.ERROR, DispatcherType.REQUEST));
        }
        public int getOrder() {
            return this.order;
        }
        public void setOrder(int order) {
            this.order = order;
        }
        public Set<DispatcherType> getDispatcherTypes() {
            return this.dispatcherTypes;
        }
        public void setDispatcherTypes(Set<DispatcherType> dispatcherTypes) {
            this.dispatcherTypes = dispatcherTypes;
        }
    }
}
有上面属性的代码可以看出,我们在属性中设置的用户名和密码就是在这里起了作用。
- UserDetailsServiceAutoConfiguration用户详情自动配置
@Configuration(
    proxyBeanMethods = false
)
@ConditionalOnClass({AuthenticationManager.class})
@ConditionalOnBean({ObjectPostProcessor.class})
@ConditionalOnMissingBean(
    value = {AuthenticationManager.class, AuthenticationProvider.class, UserDetailsService.class, AuthenticationManagerResolver.class},
    type = {"org.springframework.security.oauth2.jwt.JwtDecoder", "org.springframework.security.oauth2.server.resource.introspection.OpaqueTokenIntrospector", "org.springframework.security.oauth2.client.registration.ClientRegistrationRepository"}
)
public class UserDetailsServiceAutoConfiguration {
    private static final String NOOP_PASSWORD_PREFIX = "{noop}";
    private static final Pattern PASSWORD_ALGORITHM_PATTERN = Pattern.compile("^\\{.+}.*$");
    private static final Log logger = LogFactory.getLog(UserDetailsServiceAutoConfiguration.class);
    public UserDetailsServiceAutoConfiguration() {
    }

    @Bean
    @Lazy
    public InMemoryUserDetailsManager inMemoryUserDetailsManager(SecurityProperties properties, ObjectProvider<PasswordEncoder> passwordEncoder) {
        User user = properties.getUser();
        List<String> roles = user.getRoles();
        return new InMemoryUserDetailsManager(new UserDetails[]{org.springframework.security.core.userdetails.User.withUsername(user.getName()).password(this.getOrDeducePassword(user, (PasswordEncoder)passwordEncoder.getIfAvailable())).roles(StringUtils.toStringArray(roles)).build()});
    }

    private String getOrDeducePassword(User user, PasswordEncoder encoder) {
        String password = user.getPassword();
        //这就是默认输出的密码的地方,通过在属性中进行获取
        if (user.isPasswordGenerated()) {
            logger.warn(String.format("%n%nUsing generated security password: %s%n%nThis generated password is for development use only. Your security configuration must be updated before running your application in production.%n", user.getPassword()));
        }
        return encoder == null && !PASSWORD_ALGORITHM_PATTERN.matcher(password).matches() ? "{noop}" + password : password;
    }
}
- DefaultSecurityFilterChain(spring-security-web)默认的拦截器链
public final class DefaultSecurityFilterChain implements SecurityFilterChain {
    private static final Log logger = LogFactory.getLog(DefaultSecurityFilterChain.class);
    private final RequestMatcher requestMatcher;
    private final List<Filter> filters;
    public DefaultSecurityFilterChain(RequestMatcher requestMatcher, Filter... filters) {
        this(requestMatcher, Arrays.asList(filters));
    }
    public DefaultSecurityFilterChain(RequestMatcher requestMatcher, List<Filter> filters) {
        if (!filters.isEmpty()) {
            logger.info(LogMessage.format("Will not secure %s", requestMatcher));
        } else {
            logger.info(LogMessage.format("Will secure %s with %s", requestMatcher, filters));
        }

        this.requestMatcher = requestMatcher;
        this.filters = new ArrayList(filters);
    }

    public RequestMatcher getRequestMatcher() {
        return this.requestMatcher;
    }

    public List<Filter> getFilters() {
        return this.filters;
    }

    public boolean matches(HttpServletRequest request) {
        return this.requestMatcher.matches(request);
    }

    public String toString() {
        return this.getClass().getSimpleName() + " [RequestMatcher=" + this.requestMatcher + ", Filters=" + this.filters + "]";
    }
}
默认的拦截器链实现的security的拦截器SecurityFilterChain。
Security Filter是通过FilterChainProxy而不是DelegatingFilterProxy注册进SecurityFilterChain的。通过FilterChainProxy注册有很多优势:
- 为
spring security的Servlet提供了一个起点;比如你想对Servlet做故障排查,可以在FilterChainProxy打断点。 - 由于FilterChainProxy是Spring Security使用的中心,它可以执行那些额外的任务。例如,它清除SecurityContext以避免内存泄漏。它还应用了Spring Security的HttpFirewall来保护应用程序免受某些类型的攻击;
- FilterChainProxy在确定何时应该调用SecurityFilterChain方面提供了更大的灵活性。在Servlet容器中,仅根据URL调用过滤器。然而,FilterChainProxy可以通过利用RequestMatcher接口来决定基于HttpServletRequest中的任何调用;
- FilterChainProxy可以用来决定使用哪个SecurityFilterChain,这样可以为应用程序的不同部分提供完全独立的配置
获取登陆界面
这个登陆界面是通过LoginPageGeneratingWebFilter进行创建的,代码如下:
private String formLogin(MultiValueMap<String, String> queryParams, String contextPath, String csrfTokenHtmlInput) {
        if (!this.formLoginEnabled) {
            return "";
        } else {
            boolean isError = queryParams.containsKey("error");
            boolean isLogoutSuccess = queryParams.containsKey("logout");
            StringBuilder page = new StringBuilder();
            page.append("      <form class=\"form-signin\" method=\"post\" action=\"" + contextPath + "/login\">\n");
            page.append("        <h2 class=\"form-signin-heading\">Please sign in</h2>\n");
            page.append(createError(isError));
            page.append(createLogoutSuccess(isLogoutSuccess));
            page.append("        <p>\n");
            page.append("          <label for=\"username\" class=\"sr-only\">Username</label>\n");
            page.append("          <input type=\"text\" id=\"username\" name=\"username\" class=\"form-control\" placeholder=\"Username\" required autofocus>\n");
            page.append("        </p>\n        <p>\n");
            page.append("          <label for=\"password\" class=\"sr-only\">Password</label>\n");
            page.append("          <input type=\"password\" id=\"password\" name=\"password\" class=\"form-control\" placeholder=\"Password\" required>\n");
            page.append("        </p>\n");
            page.append(csrfTokenHtmlInput);
            page.append("        <button class=\"btn btn-lg btn-primary btn-block\" type=\"submit\">Sign in</button>\n");
            page.append("      </form>\n");
            return page.toString();
        }
    }
这里判断是否为formLoginEnabled标记,这个标记我们在SpringBootWebSecurityConfiguration中可以看到
@Bean
@Order(2147483642)
SecurityFilterChain defaultSecurityFilterChain(HttpSecurity http) throws Exception {
    ((HttpSecurity)((HttpSecurity)((AuthorizedUrl)http.authorizeRequests().anyRequest()).authenticated().and()).formLogin().and()).httpBasic();
    return (SecurityFilterChain)http.build();
}
通过上面的代码可以得到所使用的filter,通过HttpSecurity创建filter集合。
public HttpSecurity(ObjectPostProcessor<Object> objectPostProcessor, AuthenticationManagerBuilder authenticationBuilder, Map<Class<?>, Object> sharedObjects) {
        super(objectPostProcessor);
        this.requestMatcher = AnyRequestMatcher.INSTANCE;
        //获得拦截器
        this.filterOrders = new FilterOrderRegistration();
        Assert.notNull(authenticationBuilder, "authenticationBuilder cannot be null");
        this.setSharedObject(AuthenticationManagerBuilder.class, authenticationBuilder);
        Iterator var4 = sharedObjects.entrySet().iterator();

        while(var4.hasNext()) {
            Entry<Class<?>, Object> entry = (Entry)var4.next();
            this.setSharedObject((Class)entry.getKey(), entry.getValue());
        }

        ApplicationContext context = (ApplicationContext)sharedObjects.get(ApplicationContext.class);
        this.requestMatcherConfigurer = new HttpSecurity.RequestMatcherConfigurer(context);
    }
FilterOrderRegistration就是filter的注册
FilterOrderRegistration() {
        FilterOrderRegistration.Step order = new FilterOrderRegistration.Step(100, 100);
        this.put(ChannelProcessingFilter.class, order.next());
        order.next();
        this.put(WebAsyncManagerIntegrationFilter.class, order.next());
        this.put(SecurityContextPersistenceFilter.class, order.next());
        this.put(HeaderWriterFilter.class, order.next());
        this.put(CorsFilter.class, order.next());
        this.put(CsrfFilter.class, order.next());
        this.put(LogoutFilter.class, order.next());
        this.filterToOrder.put("org.springframework.security.oauth2.client.web.OAuth2AuthorizationRequestRedirectFilter", order.next());
        this.filterToOrder.put("org.springframework.security.saml2.provider.service.servlet.filter.Saml2WebSsoAuthenticationRequestFilter", order.next());
        this.put(X509AuthenticationFilter.class, order.next());
        this.put(AbstractPreAuthenticatedProcessingFilter.class, order.next());
        this.filterToOrder.put("org.springframework.security.cas.web.CasAuthenticationFilter", order.next());
        this.filterToOrder.put("org.springframework.security.oauth2.client.web.OAuth2LoginAuthenticationFilter", order.next());
        this.filterToOrder.put("org.springframework.security.saml2.provider.service.servlet.filter.Saml2WebSsoAuthenticationFilter", order.next());
        this.put(UsernamePasswordAuthenticationFilter.class, order.next());
        order.next();
        this.filterToOrder.put("org.springframework.security.openid.OpenIDAuthenticationFilter", order.next());
        this.put(DefaultLoginPageGeneratingFilter.class, order.next());
        this.put(DefaultLogoutPageGeneratingFilter.class, order.next());
        this.put(ConcurrentSessionFilter.class, order.next());
        this.put(DigestAuthenticationFilter.class, order.next());
        this.filterToOrder.put("org.springframework.security.oauth2.server.resource.web.BearerTokenAuthenticationFilter", order.next());
        this.put(BasicAuthenticationFilter.class, order.next());
        this.put(RequestCacheAwareFilter.class, order.next());
        this.put(SecurityContextHolderAwareRequestFilter.class, order.next());
        this.put(JaasApiIntegrationFilter.class, order.next());
        this.put(RememberMeAuthenticationFilter.class, order.next());
        this.put(AnonymousAuthenticationFilter.class, order.next());
        this.filterToOrder.put("org.springframework.security.oauth2.client.web.OAuth2AuthorizationCodeGrantFilter", order.next());
        this.put(SessionManagementFilter.class, order.next());
        this.put(ExceptionTranslationFilter.class, order.next());
        this.put(FilterSecurityInterceptor.class, order.next());
        this.put(AuthorizationFilter.class, order.next());
        this.put(SwitchUserFilter.class, order.next());
    }


 1523
1523


 被折叠的 条评论
为什么被折叠?
被折叠的 条评论
为什么被折叠?
 到【灌水乐园】发言


