工具选择
我们将会学习使用图片分类器和合适的GUI界面,GUI界面使用QT,选择一个camera 或者一个视频文件作为输入进行分类,这里是实时进行分类,qt本身是一个跨平台的GUI设计工具,同时我们使用Tensorflow 和 opencv 去进行分类工作。
opencv 本身具有一个深度学习推理模块,名字叫做dnn, 3.4.1 以上opencv版本, 使用dnn模块,我们可以加载和使用深度学习模型,这种模型来自于像tensorflow的第三方工具,当然他还支持caffe,darknet 等等,我们这里使用tensorflow 模型,使用 ssd_mobilenet_v1_coco
本身在windows 或者其他操作系统上应该都是可以的,我们以windows为例
需要的工具
• 1 Microsoft Visual Studio 2019
• Qt5 (https://www.qt.io)
• OpenCV 4 (https://opencv.org)
• CMake (https://cmake.org)
• Python 64-bit (https://www.python.org)
• TensorFlow2 (https://www.tensorflow.org)
创建 Qt GUI Project 选择CMake
我们将会创建一个QT GUI 应用程序,编译方式选择CMake,当然了,不是一定要选择这个了,读者自己可以选择其他方式。
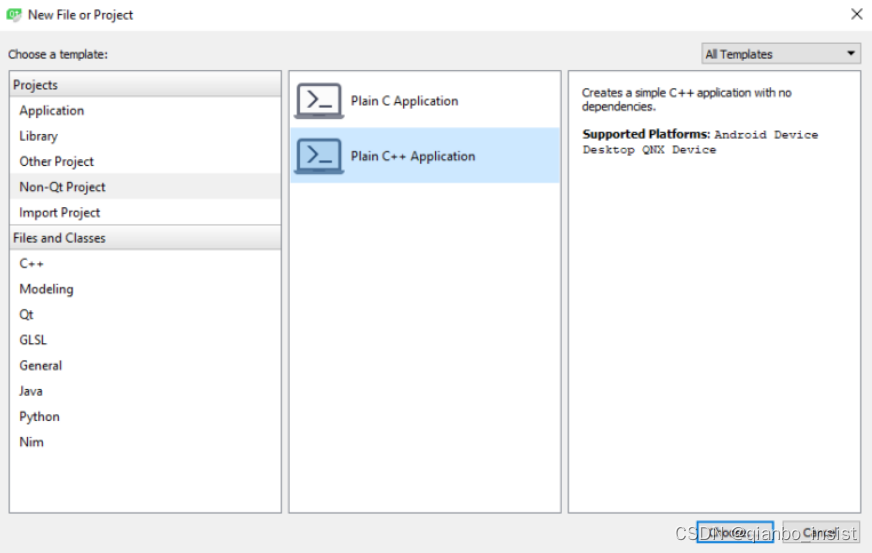
这一这里选择CMake

项目创建以后
After the project is created, replace all of the contents of CMakeLists.txt file with the following (the comments in the following code are meant as a description to why each line exists at all):
# Specify the minimum version of CMake(3.1 is currently recommended by Qt)
cmake_minimum_required(VERSION 3.1)

# Specify project title
project(ImageClassifier)

# To automatically run MOC when building(Meta Object Compiler)
set(CMAKE_AUTOMOC ON)

# To automatically run UIC when building(User Interface Compiler)
set(CMAKE_AUTOUIC ON)

# To automatically run RCC when building(Resource Compiler)
set(CMAKE_AUTORCC ON)

# Specify OpenCV folder, and take care of dependenciesand includes
set(OpenCV_DIR "path_to_opencv")
find_package(OpenCV REQUIRED)
include_directories(${ OpenCV_INCLUDE_DIRS })

# Take care of Qt dependencies
find_package(Qt5 COMPONENTS Core Gui Widgets REQUIRED)

# add required source, header, uiand resource files
add_executable(${ PROJECT_NAME } "main.cpp" "mainwindow.h" "mainwindow.cpp" "mainwindow.ui")

# link required libs
target_link_libraries(${PROJECT_NAME} Qt5::Core Qt5::Gui Qt5::Widgets ${OpenCV_LIBS})
把里面正确的地址写好,把main.cpp 里面开始mainwindow.cpp 。
写好main.cpp
#include "mainwindow.h"
#include <QApplication>

int main(int argc, char* argv[])
{
	QApplication a(argc, argv);
	MainWindow w;
	w.show();

	return a.exec();
}
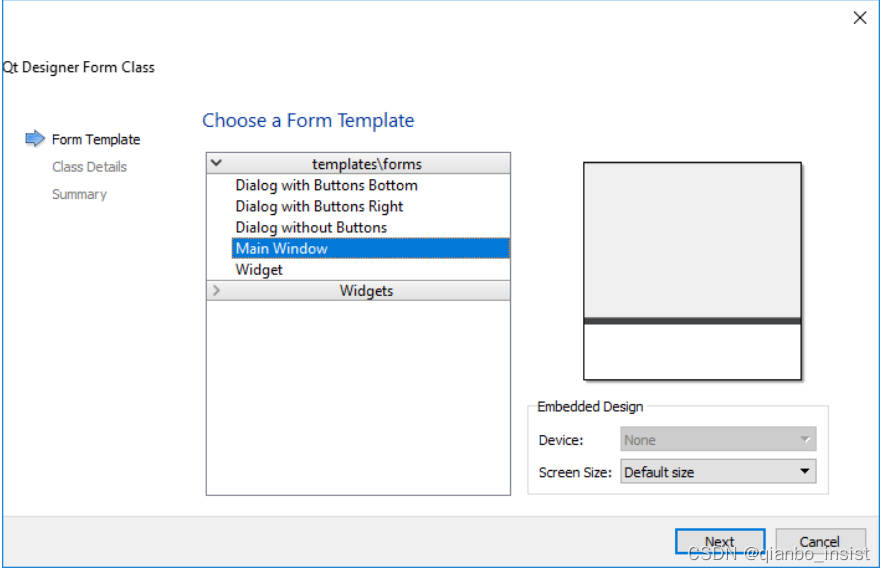
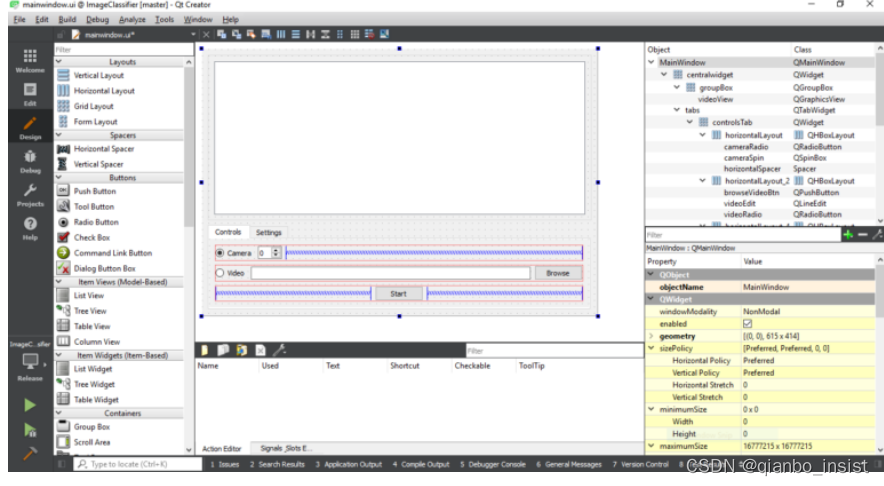
现在使用设计器加上一个窗体,
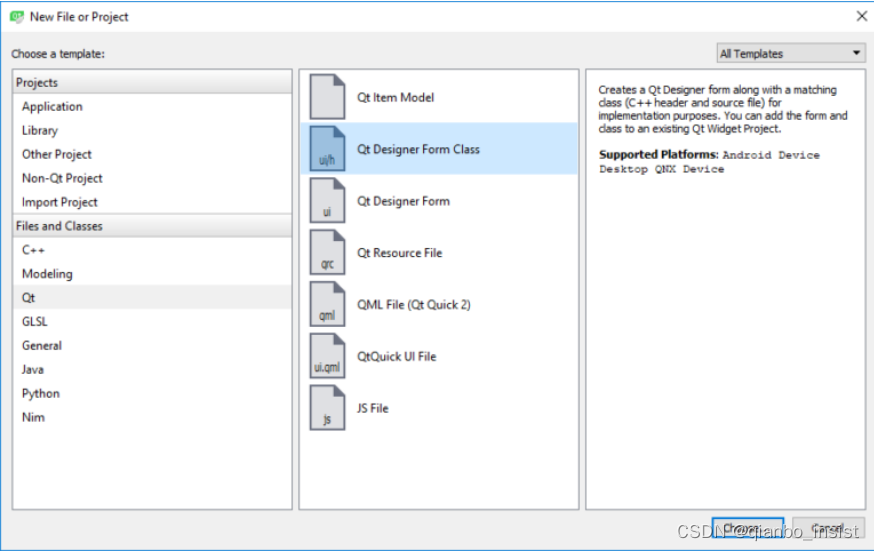
选择Main Window
像下面这样设计窗体就行了
“mainwindow.h” 文件代码如下
#include <QMainWindow>
#include <QMessageBox>
#include <QDebug>
#include <QFile>
#include <QElapsedTimer>
#include <QGraphicsScene>
#include <QGraphicsPixmapItem>
#include <QCloseEvent>
#include <QFileDialog>
#include <opencv2/opencv.hpp>
We will also need the following private members:

cv::dnn::Net tfNetwork;
QGraphicsScene scene;
QGraphicsPixmapItem pixmap;
bool videoStopped;
tfNetwork 是opencv的深度网络分类器,场景scene and pixmaps 用来显示,变量 videoStopped 作为一个标记去停止视频. 我们的代码如下所示.
#ifndef MAINWINDOW_H
#define MAINWINDOW_H

#include <QMainWindow>
#include <QMessageBox>
#include <QDebug>
#include <QFile>
#include <QElapsedTimer>
#include <QGraphicsScene>
#include <QGraphicsPixmapItem>
#include <QCloseEvent>
#include <QFileDialog>
#include <opencv2/opencv.hpp>

namespace Ui {
class MainWindow;
}

class MainWindow : public QMainWindow
{
    Q_OBJECT

public:
    explicit MainWindow(QWidget *parent = 0);
    ~MainWindow();

    void closeEvent(QCloseEvent *event);

private slots:
    void on_startBtn_pressed();

    void on_browseVideoBtn_pressed();

    void on_pbBrowseBtn_pressed();

    void on_pbtxtBrowseBtn_pressed();

    void on_classesBrowseBtn_pressed();

private:
    Ui::MainWindow *ui;

    cv::dnn::Net tfNetwork;

    QGraphicsScene scene;
    QGraphicsPixmapItem pixmap;

    bool videoStopped;

};

#endif // MAINWINDOW_H
“mainwindow.cpp” 包含一些方法去处理用户狡猾,并且加载TensorFlow 模型和配置,并且执行探测,也就是做推理,首先,我们需要把预先训练的模型加载到网络里面。
tfNetwork = readNetFromTensorflow(ui->pbFileEdit->text().toStdString(), ui->pbtxtFileEdit->text().toStdString());
pbFileEdit and pbtxtFileEdit 在代码里面是qt的 Line Edit widgets, 是所需要文件的地址路径,下一步,装载一个视频文件或者打开计算机的相机,使用两个 radio buttons, 让用户切换相机和视频文件,代码如下:
VideoCapture video;
if (ui->cameraRadio->isChecked())
	video.open(ui->cameraSpin->value());
else
	video.open(ui->videoEdit->text().toStdString());
cameraRadio 是一个 Radio Button, cameraSpin 是一个 Spin Box 并且 videoEdit 是一个 Line Edit widget. 下一步我们需要循环读取视频帧并且处理推理,一直到结束:
Mat image;

while (!videoStopped && video.isOpened())
{
	video >> image;

	// Detect objects ...

	qApp->processEvents();
}
有很多方法可以去同步GUI和处理任务,我们把部分代码放入到QThread里面,探测部分如下所示:首先创建一个BLOB 兼容的Tensorflow 模型
blobFromImage(InputArray image,
			  double scalefactor=1.0,
		      const Size& size = Size(),
			  const Scalar& mean = Scalar(),
			  bool swapRB = false,
			  bool crop = false,
			  int ddepth = CV_32F)
下面是解释:
0、image ,输入图片
1 、mean:需要将图片整体减去的平均值,如果我们需要对RGB图片的三个通道分别减去不同的值,那么可以使用3组平均值,如果只使用一组,那么就默认对三个通道减去一样的值。减去平均值(mean):为了消除同一场景下不同光照的图片,对我们最终的分类或者神经网络的影响,我们常常对图片的R、G、B通道的像素求一个平均值,然后将每个像素值减去我们的平均值,这样就可以得到像素之间的相对值,就可以排除光照的影响。
2、scalefactor:当我们将图片减去平均值之后,还可以对剩下的像素值进行一定的尺度缩放,它的默认值是1,如果希望减去平均像素之后的值,全部缩小一半,那么可以将scalefactor设为1/2。
3、size:这个参数是我们神经网络在训练的时候要求输入的图片尺寸。
4、swapRB:OpenCV中认为我们的图片通道顺序是BGR,但是我平均值假设的顺序是RGB,所以如果需要交换R和G,swapRB=true
调用:
Mat inputBlob = blobFromImage(image,
	inScaleFactor,
	Size(inWidth, inHeight),
	Scalar(meanVal, meanVal, meanVal),
	true,
	false);
The values provided to blobFromImage are defined as constants and must be provided by the network provider (see the references section at the bottom to peek into where they come from). Here’s what they are:
const int inWidth = 300;
const int inHeight = 300;
const float meanVal = 127.5; // 255 divided by 2
const float inScaleFactor = 1.0f / meanVal;
使用Opencv4 以上和Tensorflow 2.0 以上,让这个inScaleFactor值可以为0.95
让后进入网络,获取推理结果,像下面这样写就行:
tfNetwork.setInput(inputBlob);
Mat result = tfNetwork.forward();
Mat detections(result.size[2], result.size[3], CV_32F, result.ptr<float>());
处理代码里面比较简单就是为blob 设置 网络,使用forward()方法来计算结果,最后创建一个探测Mat 类, 有关参考opencv数组mat 可以查看一下链接
https://docs.opencv.org/3.4.1/d6/d0f/group__dnn.html#ga4051b5fa2ed5f54b76c059a8625df9f5
下一部分是使用detector后拿到识别的物体绑定矩形盒子,打印类名称,同时做显示
for (int i = 0; i < detections.rows; i++)
{
	float confidence = detections.at<float>(i, 2);

	if (confidence > confidenceThreshold)
	{
		using namespace cv;

		int objectClass = (int)(detections.at<float>(i, 1));

		int left = static_cast<int>(
			detections.at<float>(i, 3) * image.cols);
		int top = static_cast<int>(
			detections.at<float>(i, 4) * image.rows);
		int right = static_cast<int>(
			detections.at<float>(i, 5) * image.cols);
		int bottom = static_cast<int>(
			detections.at<float>(i, 6) * image.rows);

		rectangle(image, Point(left, top),
			Point(right, bottom), Scalar(0, 255, 0));
		String label = classNames[objectClass].toStdString();
		int baseLine = 0;
		Size labelSize = getTextSize(label, FONT_HERSHEY_SIMPLEX,
			0.5, 2, &baseLine);
		top = max(top, labelSize.height);
		rectangle(image, Point(left, top - labelSize.height),
			Point(left + labelSize.width, top + baseLine),
			Scalar(255, 255, 255), FILLED);
		putText(image, label, Point(left, top),
			FONT_HERSHEY_SIMPLEX, 0.5, Scalar(0, 0, 0));
	}
}

pixmap.setPixmap(
	QPixmap::fromImage(QImage(image.data,
		image.cols,
		image.rows,
		image.step,
		QImage::Format_RGB888).rgbSwapped()));
ui->videoView->fitInView(&pixmap, Qt::KeepAspectRatio);
这样我们的程序基本就完成了, 不过这里我们还是需要预备一个TensorFlow 网络,同时需要获取tensorflow 模型
Tensorflow模型获取
首先,我们下载预先训练好的Tensorflow 模型,从下面这个网址
https://github.com/tensorflow/models/blob/master/research/object_detection/g3doc/detection_model_zoo.md
然后使用ssd_mobilenet_v1_coco文件,可以从下面下载:
http://download.tensorflow.org/models/object_detection/ssd_mobilenet_v1_coco_2017_11_17.tar.gz
Extract it to get ssd_mobilenet_v1_coco_2017_11_17 folder with the pre-trained files.
我们必须拿到text graph 文件 ,模型,这些文件应该和opencv 兼容, 我们可以使用下面的ssd.py,从opencv的源代码的samples里面可以找到下面这个文件
opencv-source-files\samples\dnn\tf_text_graph_ssd.py
当然也可以从opencv的github源码下面去下载
https://github.com/opencv/opencv/blob/master/samples/dnn/tf_text_graph_ssd.py
拷贝ssd_mobilenet_v1_coco_2017_11_17 文件夹 并且像下面这样执行
Just copy it to ssd_mobilenet_v1_coco_2017_11_17 folder and execute the following:
tf_text_graph_ssd.py --input frozen_inference_graph.pb --output frozen_inference_graph.pbtxt
新版可以这样执行:
tf_text_graph_ssd.py --input frozen_inference_graph.pb --output frozen_inference_graph.pbtxt --config pipeline.config
分类文件和模型可以从下面下载
https://github.com/tensorflow/models/blob/master/research/object_detection/data/mscoco_label_map.pbtxt
This file won’t be of use for us the way it is, so here is a here’s a simpler (CSV) format that I’ve prepared to use to display class names when detecting them:
http://amin-ahmadi.com/downloadfiles/qt-opencv-tensorflow/class-names.txt
Now we have everything we need to run and test our classification app in actio
启动图片分类应用程序
从QT Creator 中切换lab, 输入这些文件,

现在切换回去,就可以开始探测了,
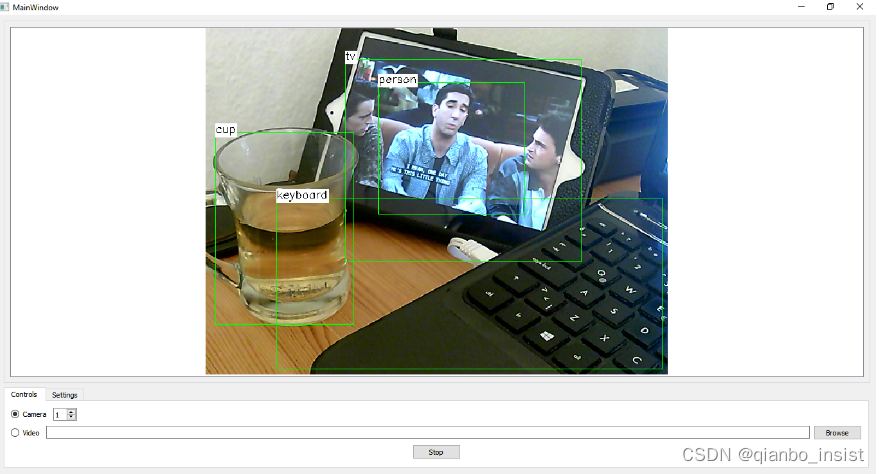
以下网页应该对我们有帮助:
https://github.com/opencv/opencv/tree/master/samples/dnn
https://www.tensorflow.org/tutorials/image_retraining


 290
290


 被折叠的 条评论
为什么被折叠?


