


看了很多关于ViewGroup事件分发的文章,也试了很多次,每次都是:恩,是这么回事,理解了也不是很麻烦。但是,每次都是过几天就莫名的心慌,是不是把ViewGroup的事件分发给忘了? 然后。。。
说了, 其实ViewGroup的事件分发并不麻烦。
可以用以下流程概括:
ViewGroup:dispatchTouchEvent->ViewGroup:onInterceptTouchEvent[拦截(1), 不拦截(2)]
(1):自己处理的事件,并且该事件以后的事件也交给自己处理
(2):交给子view处理,下次事件还会继续走ViewGroup:onInterceptTouchEvent
文字是生涩的, 总没有图来的直观些,下面以对话的实行走了一遍ViewGroup的事件分发流程,相信你可以“过目不忘”了。
先上我做测试的代码吧:
public class CustomView extends LinearLayout {
	public CustomView(Context context, AttributeSet attrs) {
		this(context, attrs, 0);
	}

	public CustomView(Context context, AttributeSet attrs, int defStyle) {
		super(context, attrs, defStyle);
	}

	@Override
	public boolean dispatchTouchEvent(MotionEvent ev) {
		System.out.println("dispatchTouchEvent...");
		System.out.println("...");
		return super.dispatchTouchEvent(ev);
	}

	@Override
	public boolean onInterceptTouchEvent(MotionEvent ev) {
		System.out.println("onInterceptTouchEvent...");
		System.out.println("...");

		if(MotionEvent.ACTION_UP == ev.getAction()) {
			System.out.println("action up...");
			System.out.println("...");
		}

		if(MotionEvent.ACTION_MOVE == ev.getAction()) {
			((Button) getChildAt(0)).setText("TOUCH");
			System.out.println("action move do something...");
			System.out.println("...");
			return true;
		}

		return super.onInterceptTouchEvent(ev);
	}

	@Override
	public boolean onTouchEvent(MotionEvent event) {
		System.out.println("touch...");
		System.out.println("...");
		return super.onTouchEvent(event);
	}
}
很简单,就是继承了LinearLayout,并且重写了关于事件的几个方法。
在layout中使用:
<LinearLayout xmlns:android="http://schemas.android.com/apk/res/android"
    xmlns:tools="http://schemas.android.com/tools"
    android:layout_width="match_parent"
    android:layout_height="match_parent"
    android:orientation="vertical"
    tools:context="org.loader.eventdispatch.MainActivity" >
    <org.loader.eventdispatch.CustomView
        android:layout_width="match_parent"
        android:layout_height="wrap_content"
        android:orientation="vertical" >
        <Button
            android:layout_width="match_parent"
            android:layout_height="wrap_content"
            android:onClick="click"
            android:text="CLICK" />
    </org.loader.eventdispatch.CustomView>
</LinearLayout>
public class MainActivity extends Activity {
	@Override
	protected void onCreate(Bundle savedInstanceState) {
		super.onCreate(savedInstanceState);
		setContentView(R.layout.activity_main);
	}
	public void click(View view) {
		System.out.println("button click...");
		System.out.println("...");
	}
}
先来个点击的, 即:ACTION_DOWN->ACTION_UP:

再来个滑动的:
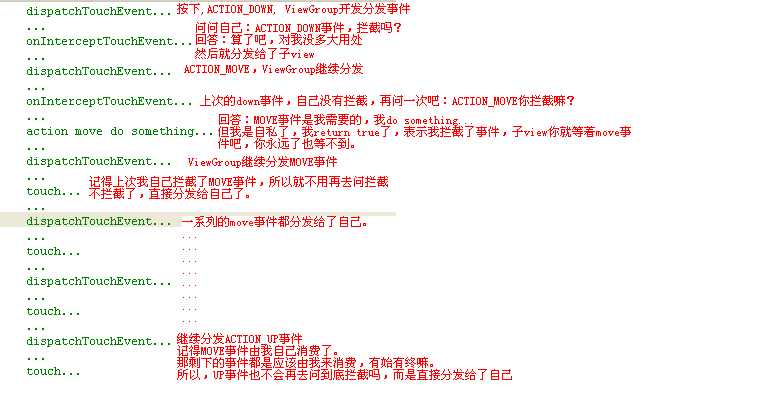
总结:不需要总结了吧。。 图片里面写的很清楚了。


 918
918


 被折叠的 条评论
为什么被折叠?
被折叠的 条评论
为什么被折叠?
 到【灌水乐园】发言


