


springboot重头再来 2 JSR303数据校验 多环境切换 自动配置原理 自定义Starter
文章目录
JSR303数据校验
通过@Validated标签校验数据,如果数据不符合要求就抛出异常
准备
需要添加依赖
<dependency>
    <groupId>org.springframework.boot</groupId>
    <artifactId>spring-boot-starter-validation</artifactId>
</dependency>
各式各样的数据校验
邮箱
PokemonTrainer.java
package com.example.springboottwo.po;


import org.springframework.beans.factory.annotation.Value;
import org.springframework.boot.context.properties.ConfigurationProperties;
import org.springframework.context.annotation.PropertySource;
import org.springframework.stereotype.Component;
import org.springframework.validation.annotation.Validated;

import javax.validation.constraints.Email;
import java.util.Arrays;


/**
 * @author BIANG
 * @Date 2021/7/6 19:07
 */
@Component
//通过改变prefix的值可以改变绑定的值
@ConfigurationProperties(prefix = "pokemon-trainer")
@Validated
public class PokemonTrainer {
    private String name;

    @Email(message = "邮箱格式有误")
    private String email;

    private Pokemon[] pokemons;

    public PokemonTrainer() {
    }

    public String getName() {
        return name;
    }

    public void setName(String name) {
        this.name = name;
    }

    public String getEmail() {
        return email;
    }

    public void setEmail(String email) {
        this.email = email;
    }

    public Pokemon[] getPokemons() {
        return pokemons;
    }

    public void setPokemons(Pokemon[] pokemons) {
        this.pokemons = pokemons;
    }

    @Override
    public String toString() {
        return "PokemonTrainer{" +
                "name='" + name + '\'' +
                ", email='" + email + '\'' +
                ", pokemons=" + Arrays.toString(pokemons) +
                '}';
    }
}
application.yml
pokemon-trainer:
  name: Ash
  pokemons:
    - {id: 25,name: Pikachu}
    - {id: 570,name: Zorua}
  email: 11012010086
测试类
package com.example.springbootone;

import com.example.springbootone.po.PokemonTrainer;
import org.junit.jupiter.api.Test;
import org.springframework.beans.factory.annotation.Autowired;
import org.springframework.boot.test.context.SpringBootTest;

@SpringBootTest
class SpringbootOneApplicationTests {
    @Autowired
    PokemonTrainer pokemonTrainer;

    @Test
    void contextLoads() {
        System.out.println(pokemonTrainer);
    }
}
运行测试类

空值相关
同样的用法,以下注解就能满足对空值校验的需求
- @Null 检验对象是否为null
- @NotNull 检验对象是否不为null
- @NotBlank 检验字符串是不是为null或者全为空格
- @NotEmpty 检验字符串是不是为null或者为EMPTY
布尔相关
- @AssertTrue 验证 Boolean 对象是否为 true
- @AssertFalse 验证 Boolean 对象是否为 false
长度相关
- @Size(min=, max=) 验证对象(Array数组,Collection,Map,String字符串)长度是否满足min<size<max
- @Length(min=, max=) 只对字符串检验的@Size,即判断字符串长度是否满足min<length<max
日期相关
- @Past 验证 Date 和 Calendar 对象是否在当前时间之前
- @Future 验证 Date 和 Calendar 对象是否在当前时间之后
正则表达式
@Pattern 验证 String 对象是否符合正则表达式的规则
最大值
@Max(value=) 验证对象的值是否满足最大值需求
@Max(value=100,message="分贝不应该超过100")
private int volume;
多环境切换
在我们配置文件编写的时候,测试时和开发时的环境配置往往不同,这个时候就环境切换就相对麻烦,这时候多环境切换就派上了用场。
properties的多个配置文件
- 测试环境配置 application-test.properties
- 开发环境配置 application-dev.properties
但是即使修改了这些文件名spring也不会主动去配置文件,它依然使用主配置文件,application.properties
这时候就需要一个配置来选择需要激活的环境:
#启动SpringBoot后,就可以发现用的是dev下的配置
spring.profiles.active=dev
yaml的多文档快
和properties配置文件一样,但是使用yml去实现不需要创建多个配置文件,更加方便
server:
  port: 8081
#选择要激活那个环境块
spring:
  profiles:
    active: prod #要激活的配置环境的名称

---
server:
  port: 8083
spring:
  profiles: dev #配置环境的名称


---

server:
  port: 8084
spring:
  profiles: prod  #配置环境的名称
补充:yml和properties同时配置
如果yml和properties同时都配置了端口,并且没有激活其他环境 , 默认会使用properties配置文件的
配置文件的加载位置
springboot 启动会扫描以下位置的application.properties或者application.yml文件作为Spring boot的默认配置文件:
- 项目路径下:config文件夹配置文件
- 项目路径下:配置文件
- 资源路径/java文件夹下:config文件夹配置文件
- 资源路径/java文件夹下:配置文件
高优先级的配置会覆盖低优先级的配置
还可以通过命令行运行来指定其他的配置文件
java -jar springboot-02.jar --spring.config.location=F:/application.properties
自动配置原理
我觉得这个视频讲的挺容易理解的
用他举的例子来分析
//表示这是一个配置类,和以前编写的配置文件一样,也可以给容器中添加组件;
@Configuration

//启动指定类的ConfigurationProperties功能;
  //进入这个HttpProperties查看,将配置文件中对应的值和HttpProperties绑定起来;
  //并把HttpProperties加入到ioc容器中
@EnableConfigurationProperties({HttpProperties.class})

//Spring底层@Conditional注解
  //根据不同的条件判断,如果满足指定的条件,整个配置类里面的配置就会生效;
  //这里的意思就是判断当前应用是否是web应用,如果是,当前配置类生效
@ConditionalOnWebApplication(
    type = Type.SERVLET
)

//判断当前项目有没有这个类CharacterEncodingFilter;SpringMVC中进行乱码解决的过滤器;
@ConditionalOnClass({CharacterEncodingFilter.class})

//判断配置文件中是否存在某个配置:spring.http.encoding.enabled;
  //如果不存在,判断也是成立的
  //即使我们配置文件中不配置pring.http.encoding.enabled=true,也是默认生效的;
@ConditionalOnProperty(
    prefix = "spring.http.encoding",
    value = {"enabled"},
    matchIfMissing = true
)

public class HttpEncodingAutoConfiguration {
    //他已经和SpringBoot的配置文件映射了
    private final Encoding properties;
    //只有一个有参构造器的情况下,参数的值就会从容器中拿
    public HttpEncodingAutoConfiguration(HttpProperties properties) {
        this.properties = properties.getEncoding();
    }

    //给容器中添加一个组件,这个组件的某些值需要从properties中获取
    @Bean
    @ConditionalOnMissingBean //判断容器没有这个组件?
    public CharacterEncodingFilter characterEncodingFilter() {
        CharacterEncodingFilter filter = new OrderedCharacterEncodingFilter();
        filter.setEncoding(this.properties.getCharset().name());
        filter.setForceRequestEncoding(this.properties.shouldForce(org.springframework.boot.autoconfigure.http.HttpProperties.Encoding.Type.REQUEST));
        filter.setForceResponseEncoding(this.properties.shouldForce(org.springframework.boot.autoconfigure.http.HttpProperties.Encoding.Type.RESPONSE));
        return filter;
    }
    //。。。。。。。
}
进入HttpProperties后,类上方会出现熟悉的@ConfigurationProperties注解,类的属性就是封装配置文件中相关属性
总结一下
- @Configuration 表示是一个配置文件
- @EnableConfigurationProperties 启动指定类的@ConfigurationProperties,具体绑定配置文件对应的值就看绑定的XXXProperties类中的@ConfigurationProperties注解,XXXProperties类中的属性就是配置文件中具体的属性
- @Conditional 表示什么情况下生效
自定义Starter
启动器命名规约
- 官方命名:
- 前缀:spring-boot-starter-xxx
- 例子:spring-boot-starter-web
- 自定义命名:
- xxx-spring-boot-starter
- 例子:mybatis-spring-boot-starter
编写启动器
按部就班一步一步照做试试看咯
-
在IDEA中新建一个空项目spring-boot-starter-diy
-
新建一个maven模块:biang-spring-boot-starter
-
新建一个spring-boot模块:biang-spring-boot-starter-autoconfigure
-
在我们starter中导入autoconfigure的依赖
<?xml version="1.0" encoding="UTF-8"?> <project xmlns="http://maven.apache.org/POM/4.0.0" xmlns:xsi="http://www.w3.org/2001/XMLSchema-instance" xsi:schemaLocation="http://maven.apache.org/POM/4.0.0 http://maven.apache.org/xsd/maven-4.0.0.xsd"> <modelVersion>4.0.0</modelVersion> <groupId>org.example</groupId> <artifactId>biang-spring-boot-starter</artifactId> <version>1.0-SNAPSHOT</version> <dependencies> <dependency> <groupId>com.example</groupId> <artifactId>biang-spring-boot-starter-autoconfigure</artifactId> <version>0.0.1-SNAPSHOT</version> </dependency> </dependencies> </project> -
将 autoconfigure 项目下多余的文件都删掉,并且Pom中依赖只留下一个 starter
(有时候后面install会出现问题,可以将插件什么的恢复加载后install再删除加载install)

- 我们编写一个自己的服务
HelloService.java
package com.example.biangspringbootstarterautoconfigure.service;

import com.example.biangspringbootstarterautoconfigure.properties.HelloProperties;
import org.springframework.stereotype.Service;

/**
 * @author BIANG
 * @Date 2021/7/9 13:26
 */

public interface HelloService {
    public HelloProperties getHelloProperties();

    public void setHelloProperties(HelloProperties helloProperties);

    public String sayHello(String name);
}
HelloServiceImpl.java
package com.example.biangspringbootstarterautoconfigure.service.impl;

import com.example.biangspringbootstarterautoconfigure.properties.HelloProperties;
import com.example.biangspringbootstarterautoconfigure.service.HelloService;
import org.springframework.stereotype.Service;

/**
 * @author BIANG
 * @Date 2021/7/9 15:06
 */
@Service
public class HelloServiceImpl implements HelloService {
    HelloProperties helloProperties;

    @Override
    public HelloProperties getHelloProperties() {
        return helloProperties;
    }

    @Override
    public void setHelloProperties(HelloProperties helloProperties) {
        this.helloProperties = helloProperties;
    }

    @Override
    public String sayHello(String name){
        return helloProperties.getPrefix() + name + helloProperties.getSuffix();
    }
}
-
编写HelloProperties 配置类
package com.example.biangspringbootstarterautoconfigure.properties; import org.springframework.boot.context.properties.ConfigurationProperties; /** * @author BIANG * @Date 2021/7/9 13:26 */ @ConfigurationProperties(prefix = "biang.hello") public class HelloProperties { private String prefix; private String suffix; public String getPrefix() { return prefix; } public void setPrefix(String prefix) { this.prefix = prefix; } public String getSuffix() { return suffix; } public void setSuffix(String suffix) { this.suffix = suffix; } } -
编写我们的自动配置类并注入bean
package com.example.biangspringbootstarterautoconfigure.config; /** * @author BIANG * @Date 2021/7/9 13:27 */ import com.example.biangspringbootstarterautoconfigure.properties.HelloProperties; import com.example.biangspringbootstarterautoconfigure.service.HelloService; import com.example.biangspringbootstarterautoconfigure.service.impl.HelloServiceImpl; import org.springframework.beans.factory.annotation.Autowired; import org.springframework.boot.autoconfigure.condition.ConditionalOnWebApplication; import org.springframework.boot.context.properties.EnableConfigurationProperties; import org.springframework.context.annotation.Bean; import org.springframework.context.annotation.Configuration; @Configuration @ConditionalOnWebApplication //web应用生效 @EnableConfigurationProperties(HelloProperties.class) public class HelloServiceAutoConfiguration { @Autowired HelloProperties helloProperties; @Bean public HelloService helloService(){ HelloService service = new HelloServiceImpl(); service.setHelloProperties(helloProperties); return service; } } -
在resources编写一个自己的 META-INF\spring.factories
# Auto Configure org.springframework.boot.autoconfigure.EnableAutoConfiguration=\ com.example.biangspringbootstarterautoconfigure.config.HelloServiceAutoConfiguration -
安装到maven仓库中

测试启动器
-
开一个新的项目,导入自定义的启动器
<dependency> <groupId>org.example</groupId> <artifactId>biang-spring-boot-starter</artifactId> <version>1.0-SNAPSHOT</version></dependency> -
编写一个 HelloController 进行测试我们自己的写的接口
package com.example.springbootthree.controller;import com.example.biangspringbootstarterautoconfigure.service.HelloService;import org.springframework.beans.factory.annotation.Autowired;import org.springframework.web.bind.annotation.RequestMapping;import org.springframework.web.bind.annotation.RestController;/** * @author BIANG * @Date 2021/7/9 13:52 */@RestControllerpublic class HelloController { @Autowired HelloService helloService; @RequestMapping("/hello") public String hello(){ return helloService.sayHello("biang"); }} -
编写配置文件 application.properties
# 应用名称spring.application.name=springboot-03server.port=8090biang.hello.prefix=你好呀,biang.hello.suffix=,吃过饭了吗 -
运行程序,访问
[localhost:8090/hello](http://localhost:8090/hello)
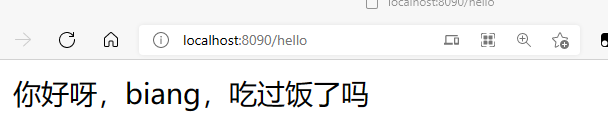
测试成功


 1126
1126


 被折叠的 条评论
为什么被折叠?
被折叠的 条评论
为什么被折叠?
 到【灌水乐园】发言


