


一个bound服务是客户端服务器接口里的服务器。一个bound服务允许组件(比如活动)绑定到这个服务上,发送请求,接收响应,甚至执行进程间通信。一个绑定服务通常仅在他服务另一个应用组件的时候存活,不会再后台无限得运行。
这个文档展示如何创建一个绑定服务,包括如何从另一个应用组件绑定到这个服务上。然后,还需要参考Service文档,比如如何从一个服务方通知,设置服务在最前端运行(set the service to run in the foreground)。
The Basics
一个绑定服务是一个Service类的实现,允许其他应用绑定他和他进行交互。提供绑定到一个服务,我们必须实现onBind回调方法。这个方法返回一个IBinder对象,这个对象定义了客户端可以用来和服务交互的程序接口。
Binding to a Started Service
正如在Service文档讨论,可以创建一个被启动和绑定的服务。就是说,服务可以通过调用startService启动,允许服务无限期的运行,同时也允许一个客户端通过调用bindService绑定到这个服务上。
如果允许服务同时被启动和被绑定,然后当服务被启动,所有的客户端解绑的时候系统不会销毁这个服务,我们必须显示的停止服务,通过调用stopSelf或StopService。
虽然通常应该实现要么onBind要么onStartCommand,有时候需要同时实现。举例来说,一个音乐播放器可能发现允许他的服务无限期运行和提供绑定是有用的。这样,一个活动可以启动这个服务播放音乐,音乐继续播放及时用户离开这个应用。然后,当用户返回这个应用,活动可以重新绑定到这个服务重新获得播放控制。
确保阅读 Managing the Lifecycle of a Bound Service,关于当添加绑定到一个开启服务上。
一个客户端可以通过调用bindService绑定到服务。当这样做,他必须提供一个ServiceConnection的实现,监控和服务的连接。bindService方法立刻返回没有值,但是当系统创建了客户端和服务的联系,系统调用onServiceConnected在ServiceConection上,去传送一个客户端用来和服务通信的IBinder。
在bindService参数里会有这个ServiceConnection吧
A client can bind to the service by calling bindService(). When it does, it must provide an implementation of ServiceConnection, which monitors the connection with the service. The bindService() method returns immediately without a value, but when the Android system creates the connection between the client and service, it calls onServiceConnected() on the ServiceConnection, to deliver the IBinder that the client can use to communicate with the service.
多个客户端可以同时连接到服务上。然后,系统仅仅当第一个客户端绑定到服务的时候,调用服务的onBind方法去获得IBinder。系统然后传送这个IBinder给任何其他绑定的客户端,不用再次调用onBind。
当最后一个客户端从服务解绑,系统销毁这个服务(除非服务还被调用startService启动)。
当我们实现我们的绑定服务,最重要的部分是定义onBind回调方法返回的接口。下面有几个不同的方法定义服务的IBinder接口,下面部分讨论每一个技巧。
Creating a Bound Servic
一个绑定服务是一个服务允许应用组件通过调用bindService绑定到他上面创建一个长期存在的关系(通常不允许组件调用startService启动他)。
当我们想和来自程序中的活动或者其他组件的服务交互或者通过进程通信暴露一些应用程序的功能给其他应用,应该创建一个绑定服务。
(1)要创建一个绑定服务,必须实现onBind方法,返回一个定义和服务通信的接口的IBinder(2)其他应用组件然后可以调用bindService(这个方法有个ServiceConnection参数,需要设置一些)方法获得这个接口,开始调用服务上的方法。
要创建一个绑定服务,第一件要做的事就是定义指定客户端如何跟服务通信的接口。(一般我们的是不在服务中创建一个Binder(实现IBinder接口)的实例)。这个接口必须是一个IBinder的实现,同时是服务必须在onBind回调方法返回的。一旦客户端收到这个IBinder,可以通过那个接口和服务交互。
多个客户端可以同时绑定到一个服务。当一个客户端和服务执行完交互,调用unBindService去解绑。一旦没有客户端绑定到服务上,系统销毁这个服务。
(以上是service文档中的一些说明)
当创建一个服务提供绑定,必须提供一个IBinder,提供客户端用来和服务交互的程序接口。三种方式定义这个接口:
Extending the Binder class
如果我们的服务在程序中私有,和客户端运行在同一个进程(很常见??),我们应该通过继承Binder类创建接口并且从onBind返回一个他的实例。客户端接收这个Binder,可以用它直接到达Binder的实现甚至服务的可用公共方法。
这是一个优选技巧当服务仅仅是一个为我们自己的程序的后台工人。唯一不这样创建接口是因为我们的服务被其他程序使用或者跨进程。(不就是ALDL讨论的吧)
Extending the Binder class
如果我们的服务仅仅由当前应用,不需要跨进程通信,我们可以实现Binder类,提供客户端直接访问服务公共方法。
Note:这个仅仅工作在客户端和服务在同一个程序和进程,这是最常见的。举例,这个对于一个需要绑定活动到自己的在后台播放音乐的服务上的音乐程序工作良好。
下面是如何设置:
1. 在服务中,创建一个Binder实例,要么包含客户端可以调用的公关方法,返回有客户端可以调用的公共方法的当前服务实例,要么返回另一个被服务持有,有公关方法客户端可以调用的类的实例,
In your service, create an instance of Binder that either:
o contains public methods that the client can call
o returns the current Service instance, which has public methods the client can call
o or, returns an instance of another class hosted by the service with public methods the client can call
2. 从 onBind()回调方法返回这个Binder实例 (1和2是服务要做的事)
3. 在客户端从onServiceConnected回调方法接收Binder,使用提供的方法调用绑定的服务。(这是客户端(比如活动要做的事,onServiceConnecten是ServiceConnection的一个方法)
Note: 服务和客户端必须在同一程序的原因是客户端可以cast返回的对象,适当的调用他的API。服务和客户端必须也在同一个进程,因为这个机器不执行任何集成跨进程(any marshalling across processes.)。
下面是一个服务提供客户端到访问服务的方法通过一个Binder实现。
public class LocalService extends Service {
// Binder given to clients
private final IBinder mBinder = new LocalBinder();
// Random number generator
private final Random mGenerator = new Random();
/**
* Class used for the client Binder. Because we know this service always
* runs in the same process as its clients, we don't need to deal with IPC.
*/
public class LocalBinder extends Binder {
LocalService getService() {
// Return this instance of LocalService so clients can call public methods
return LocalService.this;
}
}
@Override
public IBinder onBind(Intent intent) {
return mBinder;
}
/** method for clients */
public int getRandomNumber() {
return mGenerator.nextInt(100);
}
}
LocalBinder为客户端获取LocalService实例提供了一个getService方法,这允许客户端调用服务中的公共方法。举例,客户端可以从服务调用getRandowNumber方法。
下面是一个活动绑定到LocalService,当按钮点击,调用getRandomNumber:
public class BindingActivity extends Activity {
LocalService mService;
boolean mBound = false;
@Override
protected void onCreate(Bundle savedInstanceState) {
super.onCreate(savedInstanceState);
setContentView(R.layout.main);
}
@Override
protected void onStart() {
super.onStart();
// Bind to LocalService
Intent intent = new Intent(this, LocalService.class);
bindService(intent, mConnection, Context.BIND_AUTO_CREATE);
}
@Override
protected void onStop() {
super.onStop();
// Unbind from the service
if (mBound) {
unbindService(mConnection);
mBound = false;
}
}
/** Called when a button is clicked (the button in the layout file attaches to
* this method with the android:onClick attribute) */
public void onButtonClick(View v) {
if (mBound) {
// Call a method from the LocalService.
// However, if this call were something that might hang, then this request should
// occur in a separate thread to avoid slowing down the activity performance.
int num = mService.getRandomNumber();
Toast.makeText(this, "number: " + num, Toast.LENGTH_SHORT).show();
}
}
/** Defines callbacks for service binding, passed to bindService() */
private ServiceConnection mConnection = new ServiceConnection() {
@Override
public void onServiceConnected(ComponentName className,
IBinder service) {
// We've bound to LocalService, cast the IBinder and get LocalService instance
LocalBinder binder = (LocalBinder) service;
mService = binder.getService();
mBound = true;
}
@Override
public void onServiceDisconnected(ComponentName arg0) {
mBound = false;
}
};
}
这个的例子展示了客户端如何绑定到服务上使用ServiceConnection的一个实现和onServiceConnected回调方法。
Note: 这个例子没有显式解除绑定,但是所有的服务端需要在合适的时间解除绑定(比如,活动暂停)。
For more sample code, see the LocalService.java class and the LocalServiceActivities.java class in ApiDemos.
Using a Messenger
如果需要接口能够跨进程工作,可以使用一个Messenger为服务创建接口(这和AIDL有什么区别)。在这种方式,服务定义了一个可以响应不同类型的Message对象的Handler,这个Handler是可以然后和客户端分享一个IBinder的Messenger的基础,允许客户端使用Message对象给服务发送命令。此外,客户端可以定义他自己的Messenger,这样服务可以发送返回消息。
这是执行进程间通信最简单的方式,因为Messenger队列请求一个单独的线程这样就不用设计我们服务为线程安全了。
This is the simplest way to perform interprocess communication (IPC), because the Messenger queues all requests into a single thread so that you don't have to design your service to be thread-safe.
Using a Messenger
Compared to AIDL
当我们需要执行进程间通信,为我们的接口使用Messenger比实现AIDL简单,因为Messenger队列调用给服务,然而,一个纯正的AIDL接口给服务发送同时请求,必须多线程处理。
对于大多数应用,服务不需要执行多线程,所以使用Messenger允许服务一次处理一个请求。如果服务多线程很重要,应该使用AIDL定义接口。
下面开始说如何使用Messenger
如果我们需要服务和远程进程通信,然后我们可以使用Messenger为服务提供接口。这个技巧允许我们不使用AIDL执行进程间通信。
使用Messenger的总结:
(1) 服务实现一个Handler,为一个客户端每次的调用接收一个回调
(2) Handler是用来创建一个Messenger对象(是一个Handler的reference)
(3) Messenger创建一个IBinder,服务从onBind返回给客户端
(4) 客户端使用IBinder去实例化Mssenger(指向服务的Handler),客户端用来给服务发送Message对象
(5) 服务在自己的Handler中接收每一个消息,特别的,在handleMessage方法。
• The service implements a Handler that receives a callback for each call from a client.
• The Handler is used to create a Messenger object (which is a reference to the Handler).
• The Messenger creates an IBinder that the service returns to clients from onBind().
• Clients use the IBinder to instantiate the Messenger (that references the service's Handler), which the client uses to send Message objects to the service.
• The service receives each Message in its Handler—specifically, in the handleMessage() method.
在这种方式,“没有方法”给客户端请求服务。相反,客户端传送服务在自己 的Handler中接收的“message”(Message对象)
In this way, there are no "methods" for the client to call on the service. Instead, the client delivers "messages" (Message objects) that the service receives in its Handler.
下面是使用Messenger接口的一个简单示例。
public class MessengerService extends Service {
/** Command to the service to display a message */
static final int MSG_SAY_HELLO = 1;
/**
* Handler of incoming messages from clients.
*/
class IncomingHandler extends Handler {
@Override
public void handleMessage(Message msg) {
switch (msg.what) {
case MSG_SAY_HELLO:
Toast.makeText(getApplicationContext(), "hello!", Toast.LENGTH_SHORT).show();
break;
default:
super.handleMessage(msg);
}
}
}
/**
* Target we publish for clients to send messages to IncomingHandler.
*/
final Messenger mMessenger = new Messenger(new IncomingHandler());
/**
* When binding to the service, we return an interface to our messenger
* for sending messages to the service.
*/
@Override
public IBinder onBind(Intent intent) {
Toast.makeText(getApplicationContext(), "binding", Toast.LENGTH_SHORT).show();
return mMessenger.getBinder();
}
}
注意到,Handler中的handleMessage方法是服务接收要到来的Message并且根据what 成员决定下一步要做什么的地方。
所有的客户端需要做的就是创建一个Messenger,以服务返回的IBinder为基础,然后使用send方法发送一个消息。举例,下面是一个简单的活动绑定到这个服务,传送MSG_SAY_HELLO消息给服务。
public class ActivityMessenger extends Activity {
/** Messenger for communicating with the service. */
Messenger mService = null;
/** Flag indicating whether we have called bind on the service. */
boolean mBound;
/**
* Class for interacting with the main interface of the service.
*/
private ServiceConnection mConnection = new ServiceConnection() {
public void onServiceConnected(ComponentName className, IBinder service) {
// This is called when the connection with the service has been
// established, giving us the object we can use to
// interact with the service. We are communicating with the
// service using a Messenger, so here we get a client-side
// representation of that from the raw IBinder object.
mService = new Messenger(service);
mBound = true;
}
public void onServiceDisconnected(ComponentName className) {
// This is called when the connection with the service has been
// unexpectedly disconnected -- that is, its process crashed.
mService = null;
mBound = false;
}
};
public void sayHello(View v) {
if (!mBound) return;
// Create and send a message to the service, using a supported 'what' value
Message msg = Message.obtain(null, MessengerService.MSG_SAY_HELLO, 0, 0);
try {
mService.send(msg);
} catch (RemoteException e) {
e.printStackTrace();
}
}
@Override
protected void onCreate(Bundle savedInstanceState) {
super.onCreate(savedInstanceState);
setContentView(R.layout.main);
}
@Override
protected void onStart() {
super.onStart();
// Bind to the service
bindService(new Intent(this, MessengerService.class), mConnection,
Context.BIND_AUTO_CREATE);
}
@Override
protected void onStop() {
super.onStop();
// Unbind from the service
if (mBound) {
unbindService(mConnection);
mBound = false;
}
}
}
Notice that this example does not show how the service can respond to the client. If you want the service to respond, then you need to also create a Messenger in the client. Then when the client receives the onServiceConnected() callback, it sends a Message to the service that includes the client's Messenger in the replyTo parameter of the send() method.
You can see an example of how to provide two-way messaging in the MessengerService.java (service) and MessengerServiceActivities.java (client) samples.
Binding to a Service
应用组件(客户端)可以通过调用bindService绑定到一个服务上。安卓系统然后调用服务的onBind方法,这个方法返回和服务交互的IBinder。(这个IBinder要在服务中实现?)
绑定是异步的。bindService立马返回,并且不返回IBinder给客户端。为了得到这个IBinder,客户端必须创建一个ServiceConnection的实例,把他传递给bindService(作为函数的一个参数)。ServiceConnection包括一个回调方法(是onServiceConnected)系统用来调用传送IBinder。
注意:只有活动、服务、内容提供器可以绑定到一个服务上,不能从广播绑定服务。
Note: Only activities, services, and content providers can bind to a service—you cannot bind to a service from a broadcast receiver.
所以,从客户端绑定一个服务,必须:
1. 实现 ServiceConnection.
必须重写两个回调方法:
onServiceConnected()
系统调用他来传送由服务onBind方法返回的IBinder。
The system calls this to deliver the IBinder returned by the service's onBind() method.
onServiceDisconnected()
当跟服务的连接意味丢失,系统调用这个方法,比如,当服务崩溃或被杀死。当客户端解绑这个方法不被调用。
2. 调用 bindService(),传递 ServiceConnection实现
3. 当西调用onServiceConnected()回调方法,可以使用接口定义的方法(IBinder定义的方法),调用服务的方法,
4. 取消连接时,调用 unbindService().
当客户端被销毁,他会从服务解绑,但是当我们跟服务交互完成之后后者活动暂停这样服务可以被关闭因为没有使用,我们应该总是解绑。(下面会讲在合适的时间绑定和解绑)。
For example, the following snippet connects the client to the service created above by extending the Binder class, so all it must do is cast the returned IBinder to the LocalService class and request the LocalService instance:
LocalService mService;
private ServiceConnection mConnection = new ServiceConnection() {
// Called when the connection with the service is established
public void onServiceConnected(ComponentName className, IBinder service) {
// Because we have bound to an explicit
// service that is running in our own process, we can
// cast its IBinder to a concrete class and directly access it.
LocalBinder binder = (LocalBinder) service;
mService = binder.getService();
mBound = true;
}
// Called when the connection with the service disconnects unexpectedly
public void onServiceDisconnected(ComponentName className) {
Log.e(TAG, "onServiceDisconnected");
mBound = false;
}
};
有了ServiceConnection,客户端可以通过把它传递给bindService绑定到服务上。举例:
Intent intent = new Intent(this, LocalService.class);
bindService(intent, mConnection, Context.BIND_AUTO_CREATE);
• The first parameter of bindService() is an Intent that explicitly names the service to bind (thought the intent could be implicit).
• The second parameter is the ServiceConnection object.
• The third parameter is a flag indicating options for the binding. It should usually be BIND_AUTO_CREATE in order to create the service if its not already alive. Other possible values are BIND_DEBUG_UNBIND and BIND_NOT_FOREGROUND, or 0 for none.
Additional notes
下面是关于绑定到一个服务的重要的note:
• You should always trap DeadObjectException exceptions, which are thrown when the connection has broken. This is the only exception thrown by remote methods.
• Objects are reference counted across processes.
• You should usually pair the binding and unbinding during matching bring-up and tear-down moments of the client's lifecycle. For example:
o If you only need to interact with the service while your activity is visible, you should bind during onStart() and unbind during onStop().
o If you want your activity to receive responses even while it is stopped in the background, then you can bind during onCreate() and unbind during onDestroy(). Beware that this implies that your activity needs to use the service the entire time it's running (even in the background), so if the service is in another process, then you increase the weight of the process and it becomes more likely that the system will kill it.
Note: 通常不应该在
You should usually not bind and unbind during your activity's onResume() and onPause(), because these callbacks occur at every lifecycle transition and you should keep the processing that occurs at these transitions to a minimum. Also, if multiple activities in your application bind to the same service and there is a transition between two of those activities, the service may be destroyed and recreated as the current activity unbinds (during pause) before the next one binds (during resume). (This activity transition for how activities coordinate their lifecycles is described in the Activities document.)
For more sample code, showing how to bind to a service, see the RemoteService.java class in ApiDemos.
Managing the Lifecycle of a Bound Service
服务仅仅是一个绑定不服务不用管理他的生命周期,系统根据绑定他的客户端还处理。
然而如果选择实现onStartCommand回调方法,必须显示关闭(自己调用stopSelf或者其他组件调用stopService)。
However, if you choose to implement the onStartCommand() callback method, then you must explicitly stop the service, because the service is now considered to be started. In this case, the service runs until the service stops itself with stopSelf() or another component calls stopService(), regardless of whether it is bound to any clients.
Additionally, if your service is started and accepts binding, then when the system calls your onUnbind() method, you can optionally return true if you would like to receive a call to onRebind() the next time a client binds to the service. onRebind() returns void, but the client still receives the IBinder in its onServiceConnected() callback. Below, figure 1 illustrates the logic for this kind of lifecycle.
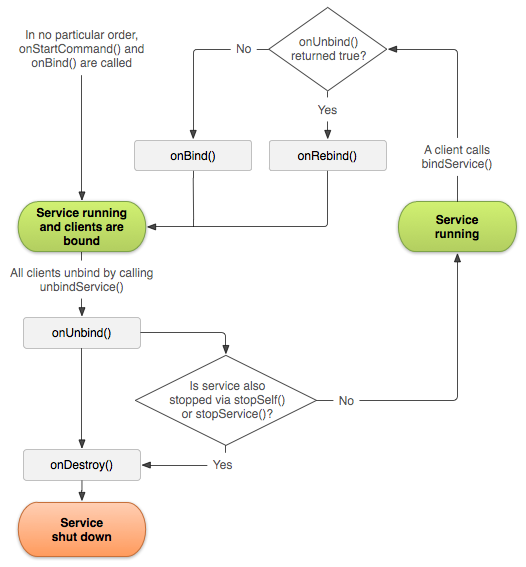
Figure 1. The lifecycle for a service that is started and also allows binding.
这个有需要再说吧,下面主要是看代码,学习service的使用了
Using AIDL
AIDL(Android Interface Definition Language)执行所有分解对象为操作系统可以理解的,执行他们执行IPC的元素的任务。上一个技巧,使用一个Messenger,实际上以AIDL为基础作为他的基本框架。上文提到的,Messenger在一个单独的进程创建所有客户端请求的一个队列,所以服务一次接收一个请求。如果,然而,我们想让服务同时处理多个请求,然后可以直接使用AIDL。在这种情况下,服务必须能多线程运行,并且是线程安全的。
If, however, you want your service to handle multiple requests simultaneously, then you can use AIDL directly. In this case, your service must be capable of multi-threading and be built thread-safe.
要直接使用AIDL,必须创建一个.aidl文件,定义程序接口。Android SDK工具使用这个文件去产生一个我们可以在自己的服务中继承的抽象类实现了这个接口,并且处理IPC,
Note:大多数程序不应该使用AIDL创建一个绑定服务。因为它要求多线程并且会导致一个复制的实现。一次,AIDL对大多数程序不适用,这个文档不讨论如何使用它。如果非常确认需要直接使用AIDL,看AIDL文档。
Most applications should not use AIDL to create a bound service, because it may require multithreading capabilities and can result in a more complicated implementation. As such, AIDL is not suitable for most applications and this document does not discuss how to use it for your service. If you're certain that you need to use AIDL directly, see the AIDL document.
这个文档展示如何创建一个绑定服务,包括如何从另一个应用组件绑定到这个服务上。然后,还需要参考Service文档,比如如何从一个服务方通知,设置服务在最前端运行(set the service to run in the foreground)。
The Basics
一个绑定服务是一个Service类的实现,允许其他应用绑定他和他进行交互。提供绑定到一个服务,我们必须实现onBind回调方法。这个方法返回一个IBinder对象,这个对象定义了客户端可以用来和服务交互的程序接口。
Binding to a Started Service
正如在Service文档讨论,可以创建一个被启动和绑定的服务。就是说,服务可以通过调用startService启动,允许服务无限期的运行,同时也允许一个客户端通过调用bindService绑定到这个服务上。
如果允许服务同时被启动和被绑定,然后当服务被启动,所有的客户端解绑的时候系统不会销毁这个服务,我们必须显示的停止服务,通过调用stopSelf或StopService。
虽然通常应该实现要么onBind要么onStartCommand,有时候需要同时实现。举例来说,一个音乐播放器可能发现允许他的服务无限期运行和提供绑定是有用的。这样,一个活动可以启动这个服务播放音乐,音乐继续播放及时用户离开这个应用。然后,当用户返回这个应用,活动可以重新绑定到这个服务重新获得播放控制。
确保阅读 Managing the Lifecycle of a Bound Service,关于当添加绑定到一个开启服务上。
一个客户端可以通过调用bindService绑定到服务。当这样做,他必须提供一个ServiceConnection的实现,监控和服务的连接。bindService方法立刻返回没有值,但是当系统创建了客户端和服务的联系,系统调用onServiceConnected在ServiceConection上,去传送一个客户端用来和服务通信的IBinder。
在bindService参数里会有这个ServiceConnection吧
A client can bind to the service by calling bindService(). When it does, it must provide an implementation of ServiceConnection, which monitors the connection with the service. The bindService() method returns immediately without a value, but when the Android system creates the connection between the client and service, it calls onServiceConnected() on the ServiceConnection, to deliver the IBinder that the client can use to communicate with the service.
多个客户端可以同时连接到服务上。然后,系统仅仅当第一个客户端绑定到服务的时候,调用服务的onBind方法去获得IBinder。系统然后传送这个IBinder给任何其他绑定的客户端,不用再次调用onBind。
当最后一个客户端从服务解绑,系统销毁这个服务(除非服务还被调用startService启动)。
当我们实现我们的绑定服务,最重要的部分是定义onBind回调方法返回的接口。下面有几个不同的方法定义服务的IBinder接口,下面部分讨论每一个技巧。
Creating a Bound Servic
一个绑定服务是一个服务允许应用组件通过调用bindService绑定到他上面创建一个长期存在的关系(通常不允许组件调用startService启动他)。
当我们想和来自程序中的活动或者其他组件的服务交互或者通过进程通信暴露一些应用程序的功能给其他应用,应该创建一个绑定服务。
(1)要创建一个绑定服务,必须实现onBind方法,返回一个定义和服务通信的接口的IBinder(2)其他应用组件然后可以调用bindService(这个方法有个ServiceConnection参数,需要设置一些)方法获得这个接口,开始调用服务上的方法。
要创建一个绑定服务,第一件要做的事就是定义指定客户端如何跟服务通信的接口。(一般我们的是不在服务中创建一个Binder(实现IBinder接口)的实例)。这个接口必须是一个IBinder的实现,同时是服务必须在onBind回调方法返回的。一旦客户端收到这个IBinder,可以通过那个接口和服务交互。
多个客户端可以同时绑定到一个服务。当一个客户端和服务执行完交互,调用unBindService去解绑。一旦没有客户端绑定到服务上,系统销毁这个服务。
(以上是service文档中的一些说明)
当创建一个服务提供绑定,必须提供一个IBinder,提供客户端用来和服务交互的程序接口。三种方式定义这个接口:
Extending the Binder class
如果我们的服务在程序中私有,和客户端运行在同一个进程(很常见??),我们应该通过继承Binder类创建接口并且从onBind返回一个他的实例。客户端接收这个Binder,可以用它直接到达Binder的实现甚至服务的可用公共方法。
这是一个优选技巧当服务仅仅是一个为我们自己的程序的后台工人。唯一不这样创建接口是因为我们的服务被其他程序使用或者跨进程。(不就是ALDL讨论的吧)
Extending the Binder class
如果我们的服务仅仅由当前应用,不需要跨进程通信,我们可以实现Binder类,提供客户端直接访问服务公共方法。
Note:这个仅仅工作在客户端和服务在同一个程序和进程,这是最常见的。举例,这个对于一个需要绑定活动到自己的在后台播放音乐的服务上的音乐程序工作良好。
下面是如何设置:
1. 在服务中,创建一个Binder实例,要么包含客户端可以调用的公关方法,返回有客户端可以调用的公共方法的当前服务实例,要么返回另一个被服务持有,有公关方法客户端可以调用的类的实例,
In your service, create an instance of Binder that either:
o contains public methods that the client can call
o returns the current Service instance, which has public methods the client can call
o or, returns an instance of another class hosted by the service with public methods the client can call
2. 从 onBind()回调方法返回这个Binder实例 (1和2是服务要做的事)
3. 在客户端从onServiceConnected回调方法接收Binder,使用提供的方法调用绑定的服务。(这是客户端(比如活动要做的事,onServiceConnecten是ServiceConnection的一个方法)
Note: 服务和客户端必须在同一程序的原因是客户端可以cast返回的对象,适当的调用他的API。服务和客户端必须也在同一个进程,因为这个机器不执行任何集成跨进程(any marshalling across processes.)。
下面是一个服务提供客户端到访问服务的方法通过一个Binder实现。
public class LocalService extends Service {
// Binder given to clients
private final IBinder mBinder = new LocalBinder();
// Random number generator
private final Random mGenerator = new Random();
/**
* Class used for the client Binder. Because we know this service always
* runs in the same process as its clients, we don't need to deal with IPC.
*/
public class LocalBinder extends Binder {
LocalService getService() {
// Return this instance of LocalService so clients can call public methods
return LocalService.this;
}
}
@Override
public IBinder onBind(Intent intent) {
return mBinder;
}
/** method for clients */
public int getRandomNumber() {
return mGenerator.nextInt(100);
}
}
LocalBinder为客户端获取LocalService实例提供了一个getService方法,这允许客户端调用服务中的公共方法。举例,客户端可以从服务调用getRandowNumber方法。
下面是一个活动绑定到LocalService,当按钮点击,调用getRandomNumber:
public class BindingActivity extends Activity {
LocalService mService;
boolean mBound = false;
@Override
protected void onCreate(Bundle savedInstanceState) {
super.onCreate(savedInstanceState);
setContentView(R.layout.main);
}
@Override
protected void onStart() {
super.onStart();
// Bind to LocalService
Intent intent = new Intent(this, LocalService.class);
bindService(intent, mConnection, Context.BIND_AUTO_CREATE);
}
@Override
protected void onStop() {
super.onStop();
// Unbind from the service
if (mBound) {
unbindService(mConnection);
mBound = false;
}
}
/** Called when a button is clicked (the button in the layout file attaches to
* this method with the android:onClick attribute) */
public void onButtonClick(View v) {
if (mBound) {
// Call a method from the LocalService.
// However, if this call were something that might hang, then this request should
// occur in a separate thread to avoid slowing down the activity performance.
int num = mService.getRandomNumber();
Toast.makeText(this, "number: " + num, Toast.LENGTH_SHORT).show();
}
}
/** Defines callbacks for service binding, passed to bindService() */
private ServiceConnection mConnection = new ServiceConnection() {
@Override
public void onServiceConnected(ComponentName className,
IBinder service) {
// We've bound to LocalService, cast the IBinder and get LocalService instance
LocalBinder binder = (LocalBinder) service;
mService = binder.getService();
mBound = true;
}
@Override
public void onServiceDisconnected(ComponentName arg0) {
mBound = false;
}
};
}
这个的例子展示了客户端如何绑定到服务上使用ServiceConnection的一个实现和onServiceConnected回调方法。
Note: 这个例子没有显式解除绑定,但是所有的服务端需要在合适的时间解除绑定(比如,活动暂停)。
For more sample code, see the LocalService.java class and the LocalServiceActivities.java class in ApiDemos.
Using a Messenger
如果需要接口能够跨进程工作,可以使用一个Messenger为服务创建接口(这和AIDL有什么区别)。在这种方式,服务定义了一个可以响应不同类型的Message对象的Handler,这个Handler是可以然后和客户端分享一个IBinder的Messenger的基础,允许客户端使用Message对象给服务发送命令。此外,客户端可以定义他自己的Messenger,这样服务可以发送返回消息。
这是执行进程间通信最简单的方式,因为Messenger队列请求一个单独的线程这样就不用设计我们服务为线程安全了。
This is the simplest way to perform interprocess communication (IPC), because the Messenger queues all requests into a single thread so that you don't have to design your service to be thread-safe.
Using a Messenger
Compared to AIDL
当我们需要执行进程间通信,为我们的接口使用Messenger比实现AIDL简单,因为Messenger队列调用给服务,然而,一个纯正的AIDL接口给服务发送同时请求,必须多线程处理。
对于大多数应用,服务不需要执行多线程,所以使用Messenger允许服务一次处理一个请求。如果服务多线程很重要,应该使用AIDL定义接口。
下面开始说如何使用Messenger
如果我们需要服务和远程进程通信,然后我们可以使用Messenger为服务提供接口。这个技巧允许我们不使用AIDL执行进程间通信。
使用Messenger的总结:
(1) 服务实现一个Handler,为一个客户端每次的调用接收一个回调
(2) Handler是用来创建一个Messenger对象(是一个Handler的reference)
(3) Messenger创建一个IBinder,服务从onBind返回给客户端
(4) 客户端使用IBinder去实例化Mssenger(指向服务的Handler),客户端用来给服务发送Message对象
(5) 服务在自己的Handler中接收每一个消息,特别的,在handleMessage方法。
• The service implements a Handler that receives a callback for each call from a client.
• The Handler is used to create a Messenger object (which is a reference to the Handler).
• The Messenger creates an IBinder that the service returns to clients from onBind().
• Clients use the IBinder to instantiate the Messenger (that references the service's Handler), which the client uses to send Message objects to the service.
• The service receives each Message in its Handler—specifically, in the handleMessage() method.
在这种方式,“没有方法”给客户端请求服务。相反,客户端传送服务在自己 的Handler中接收的“message”(Message对象)
In this way, there are no "methods" for the client to call on the service. Instead, the client delivers "messages" (Message objects) that the service receives in its Handler.
下面是使用Messenger接口的一个简单示例。
public class MessengerService extends Service {
/** Command to the service to display a message */
static final int MSG_SAY_HELLO = 1;
/**
* Handler of incoming messages from clients.
*/
class IncomingHandler extends Handler {
@Override
public void handleMessage(Message msg) {
switch (msg.what) {
case MSG_SAY_HELLO:
Toast.makeText(getApplicationContext(), "hello!", Toast.LENGTH_SHORT).show();
break;
default:
super.handleMessage(msg);
}
}
}
/**
* Target we publish for clients to send messages to IncomingHandler.
*/
final Messenger mMessenger = new Messenger(new IncomingHandler());
/**
* When binding to the service, we return an interface to our messenger
* for sending messages to the service.
*/
@Override
public IBinder onBind(Intent intent) {
Toast.makeText(getApplicationContext(), "binding", Toast.LENGTH_SHORT).show();
return mMessenger.getBinder();
}
}
注意到,Handler中的handleMessage方法是服务接收要到来的Message并且根据what 成员决定下一步要做什么的地方。
所有的客户端需要做的就是创建一个Messenger,以服务返回的IBinder为基础,然后使用send方法发送一个消息。举例,下面是一个简单的活动绑定到这个服务,传送MSG_SAY_HELLO消息给服务。
public class ActivityMessenger extends Activity {
/** Messenger for communicating with the service. */
Messenger mService = null;
/** Flag indicating whether we have called bind on the service. */
boolean mBound;
/**
* Class for interacting with the main interface of the service.
*/
private ServiceConnection mConnection = new ServiceConnection() {
public void onServiceConnected(ComponentName className, IBinder service) {
// This is called when the connection with the service has been
// established, giving us the object we can use to
// interact with the service. We are communicating with the
// service using a Messenger, so here we get a client-side
// representation of that from the raw IBinder object.
mService = new Messenger(service);
mBound = true;
}
public void onServiceDisconnected(ComponentName className) {
// This is called when the connection with the service has been
// unexpectedly disconnected -- that is, its process crashed.
mService = null;
mBound = false;
}
};
public void sayHello(View v) {
if (!mBound) return;
// Create and send a message to the service, using a supported 'what' value
Message msg = Message.obtain(null, MessengerService.MSG_SAY_HELLO, 0, 0);
try {
mService.send(msg);
} catch (RemoteException e) {
e.printStackTrace();
}
}
@Override
protected void onCreate(Bundle savedInstanceState) {
super.onCreate(savedInstanceState);
setContentView(R.layout.main);
}
@Override
protected void onStart() {
super.onStart();
// Bind to the service
bindService(new Intent(this, MessengerService.class), mConnection,
Context.BIND_AUTO_CREATE);
}
@Override
protected void onStop() {
super.onStop();
// Unbind from the service
if (mBound) {
unbindService(mConnection);
mBound = false;
}
}
}
Notice that this example does not show how the service can respond to the client. If you want the service to respond, then you need to also create a Messenger in the client. Then when the client receives the onServiceConnected() callback, it sends a Message to the service that includes the client's Messenger in the replyTo parameter of the send() method.
You can see an example of how to provide two-way messaging in the MessengerService.java (service) and MessengerServiceActivities.java (client) samples.
Binding to a Service
应用组件(客户端)可以通过调用bindService绑定到一个服务上。安卓系统然后调用服务的onBind方法,这个方法返回和服务交互的IBinder。(这个IBinder要在服务中实现?)
绑定是异步的。bindService立马返回,并且不返回IBinder给客户端。为了得到这个IBinder,客户端必须创建一个ServiceConnection的实例,把他传递给bindService(作为函数的一个参数)。ServiceConnection包括一个回调方法(是onServiceConnected)系统用来调用传送IBinder。
注意:只有活动、服务、内容提供器可以绑定到一个服务上,不能从广播绑定服务。
Note: Only activities, services, and content providers can bind to a service—you cannot bind to a service from a broadcast receiver.
所以,从客户端绑定一个服务,必须:
1. 实现 ServiceConnection.
必须重写两个回调方法:
onServiceConnected()
系统调用他来传送由服务onBind方法返回的IBinder。
The system calls this to deliver the IBinder returned by the service's onBind() method.
onServiceDisconnected()
当跟服务的连接意味丢失,系统调用这个方法,比如,当服务崩溃或被杀死。当客户端解绑这个方法不被调用。
2. 调用 bindService(),传递 ServiceConnection实现
3. 当西调用onServiceConnected()回调方法,可以使用接口定义的方法(IBinder定义的方法),调用服务的方法,
4. 取消连接时,调用 unbindService().
当客户端被销毁,他会从服务解绑,但是当我们跟服务交互完成之后后者活动暂停这样服务可以被关闭因为没有使用,我们应该总是解绑。(下面会讲在合适的时间绑定和解绑)。
For example, the following snippet connects the client to the service created above by extending the Binder class, so all it must do is cast the returned IBinder to the LocalService class and request the LocalService instance:
LocalService mService;
private ServiceConnection mConnection = new ServiceConnection() {
// Called when the connection with the service is established
public void onServiceConnected(ComponentName className, IBinder service) {
// Because we have bound to an explicit
// service that is running in our own process, we can
// cast its IBinder to a concrete class and directly access it.
LocalBinder binder = (LocalBinder) service;
mService = binder.getService();
mBound = true;
}
// Called when the connection with the service disconnects unexpectedly
public void onServiceDisconnected(ComponentName className) {
Log.e(TAG, "onServiceDisconnected");
mBound = false;
}
};
有了ServiceConnection,客户端可以通过把它传递给bindService绑定到服务上。举例:
Intent intent = new Intent(this, LocalService.class);
bindService(intent, mConnection, Context.BIND_AUTO_CREATE);
• The first parameter of bindService() is an Intent that explicitly names the service to bind (thought the intent could be implicit).
• The second parameter is the ServiceConnection object.
• The third parameter is a flag indicating options for the binding. It should usually be BIND_AUTO_CREATE in order to create the service if its not already alive. Other possible values are BIND_DEBUG_UNBIND and BIND_NOT_FOREGROUND, or 0 for none.
Additional notes
下面是关于绑定到一个服务的重要的note:
• You should always trap DeadObjectException exceptions, which are thrown when the connection has broken. This is the only exception thrown by remote methods.
• Objects are reference counted across processes.
• You should usually pair the binding and unbinding during matching bring-up and tear-down moments of the client's lifecycle. For example:
o If you only need to interact with the service while your activity is visible, you should bind during onStart() and unbind during onStop().
o If you want your activity to receive responses even while it is stopped in the background, then you can bind during onCreate() and unbind during onDestroy(). Beware that this implies that your activity needs to use the service the entire time it's running (even in the background), so if the service is in another process, then you increase the weight of the process and it becomes more likely that the system will kill it.
Note: 通常不应该在
You should usually not bind and unbind during your activity's onResume() and onPause(), because these callbacks occur at every lifecycle transition and you should keep the processing that occurs at these transitions to a minimum. Also, if multiple activities in your application bind to the same service and there is a transition between two of those activities, the service may be destroyed and recreated as the current activity unbinds (during pause) before the next one binds (during resume). (This activity transition for how activities coordinate their lifecycles is described in the Activities document.)
For more sample code, showing how to bind to a service, see the RemoteService.java class in ApiDemos.
Managing the Lifecycle of a Bound Service
服务仅仅是一个绑定不服务不用管理他的生命周期,系统根据绑定他的客户端还处理。
然而如果选择实现onStartCommand回调方法,必须显示关闭(自己调用stopSelf或者其他组件调用stopService)。
However, if you choose to implement the onStartCommand() callback method, then you must explicitly stop the service, because the service is now considered to be started. In this case, the service runs until the service stops itself with stopSelf() or another component calls stopService(), regardless of whether it is bound to any clients.
Additionally, if your service is started and accepts binding, then when the system calls your onUnbind() method, you can optionally return true if you would like to receive a call to onRebind() the next time a client binds to the service. onRebind() returns void, but the client still receives the IBinder in its onServiceConnected() callback. Below, figure 1 illustrates the logic for this kind of lifecycle.
Figure 1. The lifecycle for a service that is started and also allows binding.
这个有需要再说吧,下面主要是看代码,学习service的使用了
Using AIDL
AIDL(Android Interface Definition Language)执行所有分解对象为操作系统可以理解的,执行他们执行IPC的元素的任务。上一个技巧,使用一个Messenger,实际上以AIDL为基础作为他的基本框架。上文提到的,Messenger在一个单独的进程创建所有客户端请求的一个队列,所以服务一次接收一个请求。如果,然而,我们想让服务同时处理多个请求,然后可以直接使用AIDL。在这种情况下,服务必须能多线程运行,并且是线程安全的。
If, however, you want your service to handle multiple requests simultaneously, then you can use AIDL directly. In this case, your service must be capable of multi-threading and be built thread-safe.
要直接使用AIDL,必须创建一个.aidl文件,定义程序接口。Android SDK工具使用这个文件去产生一个我们可以在自己的服务中继承的抽象类实现了这个接口,并且处理IPC,
Note:大多数程序不应该使用AIDL创建一个绑定服务。因为它要求多线程并且会导致一个复制的实现。一次,AIDL对大多数程序不适用,这个文档不讨论如何使用它。如果非常确认需要直接使用AIDL,看AIDL文档。
Most applications should not use AIDL to create a bound service, because it may require multithreading capabilities and can result in a more complicated implementation. As such, AIDL is not suitable for most applications and this document does not discuss how to use it for your service. If you're certain that you need to use AIDL directly, see the AIDL document.


 1320
1320

 被折叠的 条评论
为什么被折叠?
被折叠的 条评论
为什么被折叠?
 到【灌水乐园】发言


