


LinearLayout(线性布局):
“LinearLayout”翻译成中文是:“线性布局”,线性布局指的是在该标签下的所有子元素会根据其orientation属性的值来决定是按行或者是按列逐个显示。
Linear_layout.xml布局文件如下:
<?xml version="1.0" encoding="utf-8"?>
<LinearLayout xmlns:android="http://schemas.android.com/apk/res/android"
android:layout_width="fill_parent"
android:layout_height="fill_parent"
android:orientation="vertical" >
<TextView
android:layout_width="fill_parent"
android:layout_height="wrap_content"
android:text="@string/name_text" />
<EditText
android:layout_width="fill_parent"
android:layout_height="wrap_content"
/>
<Button
android:layout_width="wrap_content"
android:layout_height="wrap_content"
android:text="@string/ok_text"
/>
<Button
android:layout_width="wrap_content"
android:layout_height="wrap_content"
android:text="@string/cancel_text"
/>
</LinearLayout>
对应的strings.xml内容为:
<?xml version="1.0" encoding="utf-8"?>
<?xml version="1.0" encoding="utf-8"?>
<resources>
<string name="app_name">布局演示</string>
<string name="name_text">请输入您的用户名</string>
<string name="ok_text">确定</string>
<string name="cancel_text">取消</string>
</resources>
显示效果如下:
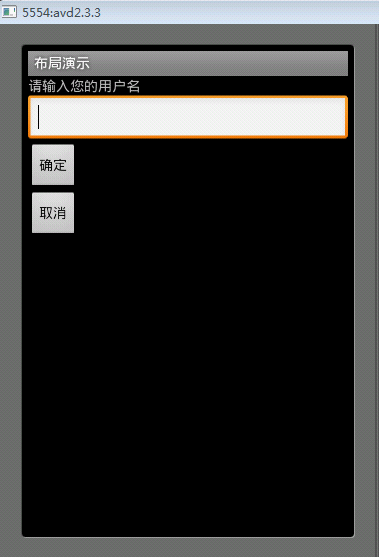
图为 垂直排列元素示意
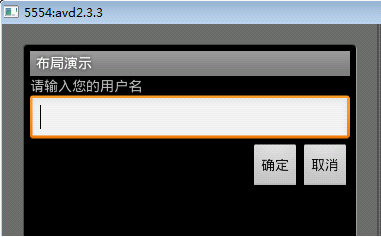
RelativeLayout(相对布局):
相对布局中的视图组件是按相互之间的相对位置来确定的,与线性布局中的不同,线性布局中必须按行或者按列单个显示,相对布局文件如下:
<?xml version="1.0" encoding="utf-8"?>
<RelativeLayout xmlns:android="http://schemas.android.com/apk/res/android"
android:layout_width="match_parent"
android:layout_height="match_parent"
android:orientation="vertical" >
<TextView
android:layout_width="fill_parent"
android:layout_height="wrap_content"
android:text="@string/name_text"
android:id="@+id/name_info"
/>
<EditText
android:layout_width="fill_parent"
android:layout_height="wrap_content"
android:layout_below="@id/name_info"
android:id="@+id/username"
/>
<Button
android:layout_width="wrap_content"
android:layout_height="wrap_content"
android:text="@string/cancel_text"
android:layout_alignParentRight="true"
android:layout_below="@id/username"
android:id="@+id/cancel_button"
/>
<Button
android:layout_width="wrap_content"
android:layout_height="wrap_content"
android:text="@string/ok_text"
android:layout_below="@id/username"
android:layout_toLeftOf="@id/cancel_button"
/>
</RelativeLayout>
说明:
android:layout_below="@id/name_info":将该元素放到id为name_info的元素的下面
显示效果为:
线性布局与相对布局嵌套使用:
布局之间可以相互嵌套使用,以完成更为复杂的布局效果。举个例子:下面是一个线性布局当中包含了相对布局的界面:
<?xml version="1.0" encoding="utf-8"?>
<LinearLayout xmlns:android="http://schemas.android.com/apk/res/android"
android:layout_width="match_parent"
android:layout_height="match_parent"
android:orientation="vertical" >
<TextView
android:layout_width="wrap_content"
android:layout_height="wrap_content"
android:text="@string/name_text"
/>
<EditText
android:layout_width="fill_parent"
android:layout_height="wrap_content"
/>
<RelativeLayout
android:layout_width="fill_parent"
android:layout_height="wrap_content"
>
<Button
android:layout_width="wrap_content"
android:layout_height="wrap_content"
android:text="@string/cancel_text"
android:id="@+id/cancel_button"
android:layout_alignParentRight="true"
/>
<Button
android:layout_width="wrap_content"
android:layout_height="wrap_content"
android:text="@string/ok_text"
android:layout_toLeftOf="@id/cancel_button"
/>
</RelativeLayout>
</LinearLayout>

其所对应的Strings.xml文件内容一样,运行后效果图和相对布局的效果是一样的。
TableLayout(表格布局)
表格布局的风格跟HTML中的表格比较接近,只是采用的表签不一样。
<TableLayout> 是顶级元素,说明采用的是表格布局;
<TableRow> 定义一个行
<TextView> 定义一个单元格的内容
表格布局文件内容如下:
<?xml version="1.0" encoding="utf-8"?>
<TableLayout xmlns:android="http://schemas.android.com/apk/res/android"
android:layout_width="match_parent"
android:layout_height="match_parent"
android:stretchColumns="*"
>
<TableRow >
<TextView
android:layout_width="wrap_content"
android:layout_height="wrap_content"
android:text="@string/name"
/>
<TextView
android:layout_width="wrap_content"
android:layout_height="wrap_content"
android:text="@string/gender"
/>
<TextView
android:layout_width="wrap_content"
android:layout_height="wrap_content"
android:text="@string/age"
/>
<TextView
android:layout_width="wrap_content"
android:layout_height="wrap_content"
android:text="@string/phonenumber"
/>
</TableRow>
<TableRow >
<TextView
android:layout_width="wrap_content"
android:layout_height="wrap_content"
android:text="@string/namez3"
/>
<TextView
android:layout_width="wrap_content"
android:layout_height="wrap_content"
android:text="@string/genderz3"
/>
<TextView
android:layout_width="wrap_content"
android:layout_height="wrap_content"
android:text="@string/agez3"
/>
<TextView
android:layout_width="wrap_content"
android:layout_height="wrap_content"
android:text="@string/phonez3"
/>
</TableRow>
<TableRow >
<TextView
android:layout_width="wrap_content"
android:layout_height="wrap_content"
android:text="@string/namel4"
/>
<TextView
android:layout_width="wrap_content"
android:layout_height="wrap_content"
android:text="@string/genderl4"
/>
<TextView
android:layout_width="wrap_content"
android:layout_height="wrap_content"
android:text="@string/agel4"
/>
<TextView
android:layout_width="wrap_content"
android:layout_height="wrap_content"
android:text="@string/phonel4"
/>
</TableRow>
</TableLayout>
对应的strings.xml文件内容如下:
<?xml version="1.0" encoding="utf-8"?>
<resources>
<string name="name">姓名</string>
<string name="gender">性别</string>
<string name="age">年龄</string>
<string name="phonenumber">电话</string>
<string name="namez3">张三</string>
<string name="genderz3">男</string>
<string name="agez3">25</string>
<string name="phonez3">12345</string>
<string name="namel4">李四</string>
<string name="genderl4">女</string>
<string name="agel4">27</string>
<string name="phonel4">23456345</string>
</resources>
显示效果图为:

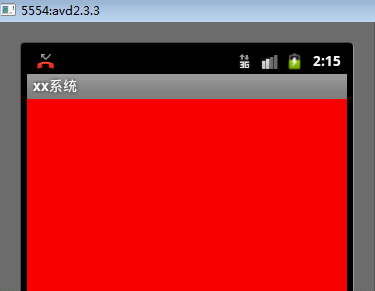
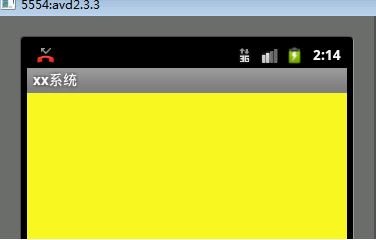
帧布局的实现:
package cn.class3g.activity;
import android.app.Activity;
import android.graphics.drawable.Drawable;
import android.os.Bundle;
import android.os.Handler;
import android.os.Message;
import android.util.Log;
import android.view.View;
import android.view.View.OnClickListener;
import android.widget.FrameLayout;
public class UserLayoutTextActivity extends Activity {
FrameLayout frame=null;
boolean flag=true;
public void onCreate(Bundle savedInstanceState) {
super.onCreate(savedInstanceState);
setContentView(R.layout.framelayout);
findViews();
class MyHandler extends Handler{
int i=0;
public void handleMessage(Message msg) {
i++;
show(i%4); //设置frame前景图片
sleep(100);
}
private void sleep(long delayMillis) {
if(flag){
this.sendMessageDelayed(this.obtainMessage(0), delayMillis);
Log.d("tag", "sleep");
}
}
}
final MyHandler myHandler= new MyHandler();
frame.setOnClickListener(new OnClickListener(){
public void onClick(View v) {
flag=!flag;
myHandler.sleep(1000);
}
});
}
private void findViews(){
frame=(FrameLayout)this.findViewById(R.id.frame);
}
void show(int idx){
Drawable[] pic = new Drawable[4];
pic[0]=this.getResources().getDrawable(R.drawable.a1);
pic[1]=this.getResources().getDrawable(R.drawable.a2);
pic[2]=this.getResources().getDrawable(R.drawable.a3);
pic[3]=this.getResources().getDrawable(R.drawable.a4);
frame.setForeground(pic[idx]);
}
}
帧布局的framelayout.xml文件中的内容:
<?xml version="1.0" encoding="utf-8"?>
<FrameLayout xmlns:android="http://schemas.android.com/apk/res/android"
android:layout_width="match_parent"
android:layout_height="match_parent"
android:orientation="vertical"
android:id="@+id/frame">
</FrameLayout>
显示的效果为:


 741
741


 被折叠的 条评论
为什么被折叠?
被折叠的 条评论
为什么被折叠?
 到【灌水乐园】发言


