


功能简介
UWP提供了功能强大的数据绑定,假设你有一个集合,数据绑定可以将集合中的数据绑定到xaml的控件上,而且通过模板,你可以只书写一次DataTemplate(数据模板),程序就会自动为你生成多个控件。
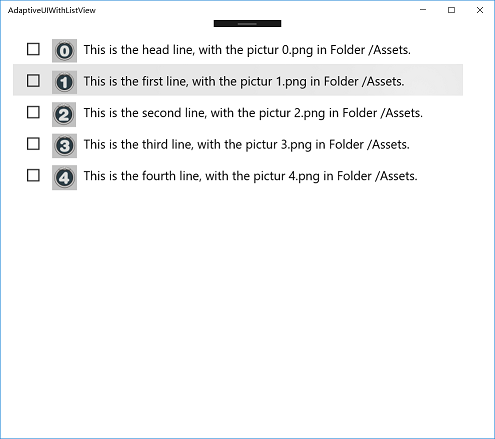
示例项目将使用ListView和 ObservableCollection,通过编写DataTemplate,即可实现将集合内的数据自动绑定到ListView中。
实现效果
实现过程
添加自定义类Item.cs
namespace SimpleDataBinding
{
    /*
     * Item是我们自定义的一个类型,其包含两个属性:content和source(内容和图片地址)
     */
    public class Item
    {
        private string _content;
        private string _source;
        //封装
        public string Content { get => _content; }
        public string Source { get => _source; }

        public Item(string content, string source)
        {
            this._content = content;
            this._source = source;
        }
    }
}
在MainPage.xam中添加控件
<Grid Background="{ThemeResource ApplicationPageBackgroundThemeBrush}">
    <!--
        ItemSource用于指定ListView的数据源,这里的Array为MainPage.xml.cs中MainPage类的一个集合
        ItemsSource="{x:Bind Array}"将指定ListView的数据源指向MainPage对象的属性Array
        该属性为ObservableCollection<Item>
   -->
    <ListView Margin="20,20,50,20" ItemsSource="{x:Bind Array}">
        <ListView.ItemTemplate>
            <!-- DataType指定Array中对象的类型,这里的Item为我们自定义的一个类 -->
            <DataTemplate x:DataType="local:Item">
                <RelativePanel>
                    <CheckBox  HorizontalAlignment="Left" VerticalAlignment="Top" Margin="10,10,0,0"></CheckBox>
                    <Grid Width="90" x:Name="Space"></Grid>
                    <!-- Source="{x:Bind Source}"指定Image图片控件的图片源 -->
                    <Image  Source="{x:Bind Source}" HorizontalAlignment="Left" Height="40" Margin="50,10,0,0" VerticalAlignment="Top" Width="40"></Image>
                    <!-- Text="{x:Bind Content}"指定文本块的内容,Source和Content都是Item的属性 -->
                    <TextBlock Text="{x:Bind Content}"  RelativePanel.RightOf="Space" VerticalAlignment="Top" HorizontalAlignment="Left" FontSize="20" Margin="10,12,0,0"></TextBlock>
                </RelativePanel>
            </DataTemplate>
        </ListView.ItemTemplate>
    </ListView>
</Grid>
需要注意的地方:
- 设置ListView的ItemSource
- 设置DataTemplate的x:DataType
- 为你想要添加的控件属性设置绑定,如Image控件的Source=”{x:Bind Source}”
在MainPage.xaml.cs中添加代码
public sealed partial class MainPage : Page
    {
        //ObservableCollection表示一个动态数据集合,它可在添加、删除项目或刷新整个列表时提供通知
        //用于数据绑定的对象一般存放在ObservableCollection集合中
        public ObservableCollection<Item> Array = new ObservableCollection<Item>();

        public MainPage()
        {
            //往集合中添加对象
            Array.Add(new Item("This is the head line, with the pictur 0.png in Folder /Assets.", "Assets/0.png"));
            Array.Add(new Item("This is the first line, with the pictur 1.png in Folder /Assets.", "Assets/1.png"));
            Array.Add(new Item("This is the second line, with the pictur 2.png in Folder /Assets.", "Assets/2.png"));
            Array.Add(new Item("This is the third line, with the pictur 3.png in Folder /Assets.", "Assets/3.png"));
            Array.Add(new Item("This is the fourth line, with the pictur 4.png in Folder /Assets.", "Assets/4.png"));
            this.InitializeComponent();
        }
    }
需要注意的地方:
- 声明ObservableCollection
- 在构造函数中往ObservableCollection中添加元素
FYI
项目下载:SimpleDataBinding
项目下载之后记住把Debug模式从ARM换成X86或X64(根据你自己的机型选择),之前一开始学习的时候不知道这一点,从网上下载下来的项目都运行不了,纠结的一逼(╥╯^╰╥)


 239
239

 被折叠的 条评论
为什么被折叠?
被折叠的 条评论
为什么被折叠?
 到【灌水乐园】发言


