C# 上位机学习之简单粗暴法2_TcpClient的心跳程序

        我在开发一款能源监测上位机时,使用一款国产串口服务器连接20多台RS485智能电表,串口服务器通过轮询方式每10秒把数据打包,传输至设置好的网络通道上(串口服务器为TCP_server模式),c#上位机程序收到数据后,再把数据截取、变换出来即可实现电能数据的传输和处理了。

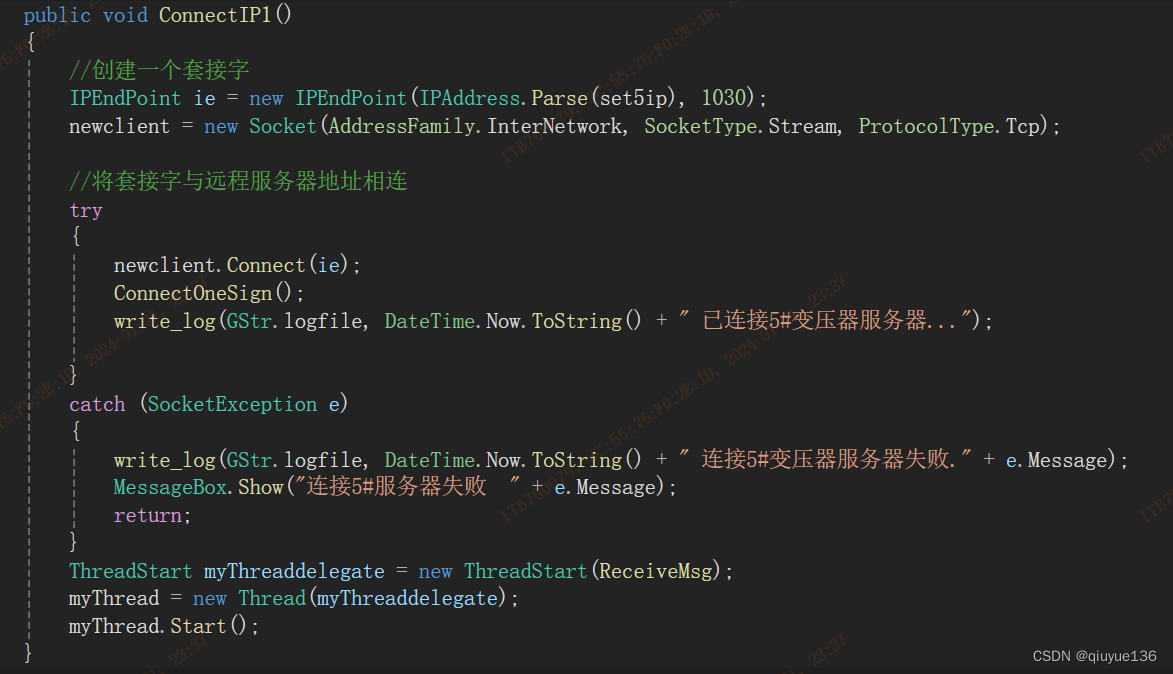
       C#上位机使用套接字的方式与串口服务器通信,如下图:

监控端口,数据过来读入DataFromTCP1数组中。

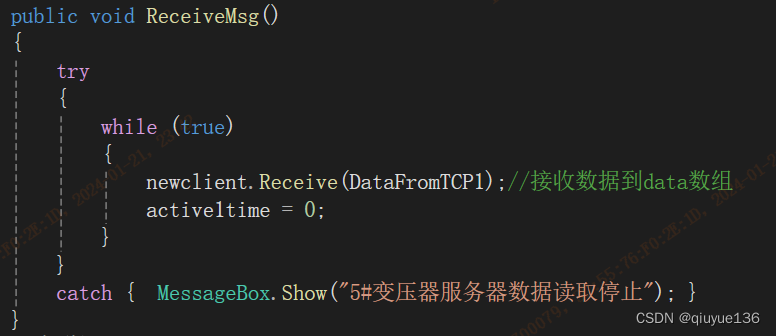
简单编写以上程序就可接收到串口服务器打包过来的数据了,然后显示到UI上及记录入数据库。

        在实际使用以上TcpClient连接过程中,发现网络时有各种原因掉线,因此就增加自动重连功能,想当然使用client.Connected属性判断是否断网,断线后重连。

        经过实际使用后发现断网后并不能实现重连功能,在CSDN上查找资料:

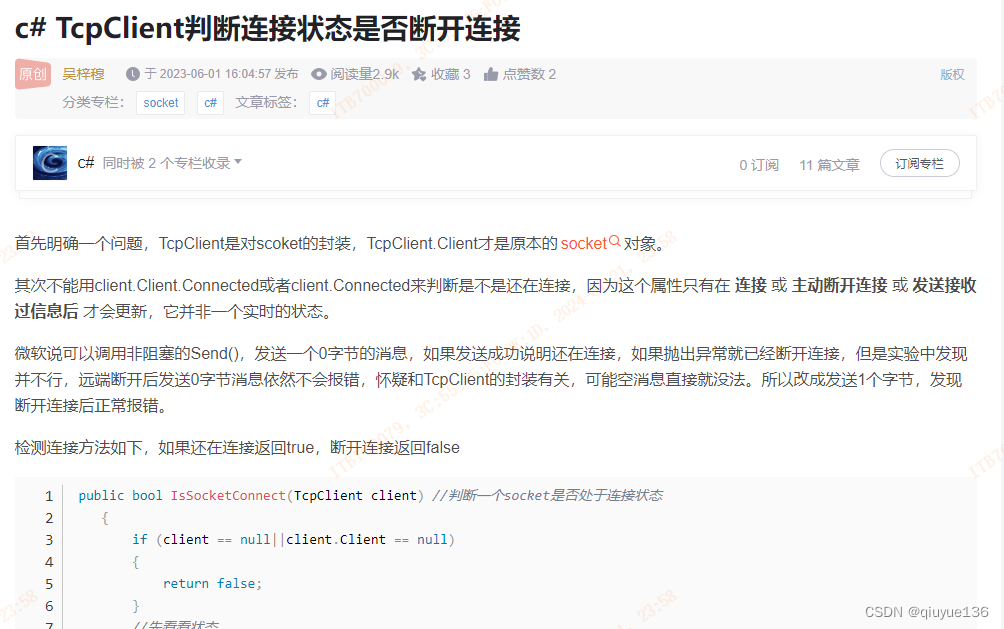
     “ 不能用client.Client.Connected或者client.Connected来判断是不是还在连接,因为这个属性只有在 连接 或 主动断开连接 或 发送接收过信息后 才会更新,它并非一个实时的状态。”

        那好吧,可以使用定时发送字节的程序根据返回值来判断,也就是常说的心跳信号。

       在编写增加心跳程序后,还需要编写PC端的Client.Send( );语句并发送至串口服务器,有点麻烦,回头再看看我们程序实际的工作流程:每10秒接受串口服务器数据,那么我们上位机60秒没收到数据不是就可判断网络故障了吗?

        1、timer2(1000ms)里增加  active1time++;,每秒自加一。 


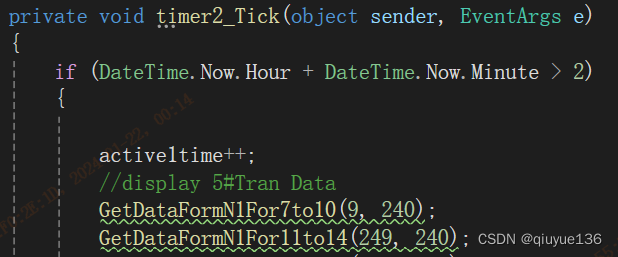
       2、ReceiveMsg()方法里增加  active1time=0;,收到数据后active1time置0,重新计时。 

       3、如60秒后未收到数据,IP1Active()为false,同时开始延时3分钟后重连_ReconnetIP1()。 

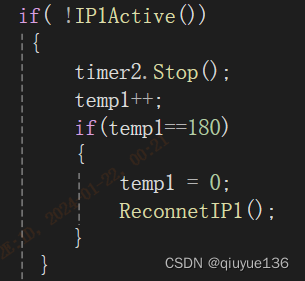
  以上方法实际测试有效,我们在数采时一般使用定时发送数据或数据变化时发送两种方式,前者使用这个方法比较简单了,笔者长期与PLC 打交道,这也算是用PLC的思路解决上位机的问题,简单粗暴了。

  • 6
    点赞
  • 7
    收藏
    觉得还不错? 一键收藏
  • 1
    评论
下面是一个 C# 上位机与 PLC 基于 Modbus TCP 通讯的程序示例: ```csharp using System; using System.Net.Sockets; using System.Threading; namespace ModbusTcp { class Program { static void Main(string[] args) { // PLC IP地址和端口号 string ip = "192.168.1.100"; int port = 502; // 创建TCP连接 TcpClient client = new TcpClient(ip, port); // 创建Modbus协议对象 ModbusTcpProtocol protocol = new ModbusTcpProtocol(client); // 连接到PLC protocol.Connect(); // 读取PLC寄存器值 ushort[] values = protocol.ReadHoldingRegisters(0, 10); // 输出读取到的值 for (int i = 0; i < values.Length; i++) { Console.WriteLine("Register {0}: {1}", i, values[i]); } // 关闭连接 protocol.Disconnect(); client.Close(); } } // Modbus TCP 协议类 class ModbusTcpProtocol { TcpClient client; // TCP客户端对象 NetworkStream stream; // 网络流对象 // 构造函数 public ModbusTcpProtocol(TcpClient client) { this.client = client; this.stream = client.GetStream(); } // 连接到PLC public void Connect() { // 发送连接请求 byte[] connectRequest = new byte[] { 0x00, 0x00, 0x00, 0x00, 0x00, 0x06, 0x01, 0x03, 0x00, 0x00, 0x00, 0x0A }; stream.Write(connectRequest, 0, connectRequest.Length); // 读取响应 byte[] response = new byte[12]; stream.Read(response, 0, response.Length); // 检查响应是否为连接确认 if (response[7] != 0x03 || response[8] != 0x00 || response[9] != 0x00 || response[10] != 0x00 || response[11] != 0x0A) { throw new Exception("Failed to connect to PLC"); } } // 关闭连接 public void Disconnect() { // 发送断开连接请求 byte[] disconnectRequest = new byte[] { 0x00, 0x00, 0x00, 0x00, 0x00, 0x06, 0x01, 0x03, 0x00, 0x00, 0x00, 0x0A }; stream.Write(disconnectRequest, 0, disconnectRequest.Length); } // 读取保持寄存器 public ushort[] ReadHoldingRegisters(ushort startAddress, ushort numRegisters) { // 发送读取请求 byte[] request = new byte[] { 0x00, 0x00, 0x00, 0x00, 0x00, 0x06, 0x01, 0x03, (byte)(startAddress >> 8), (byte)startAddress, (byte)(numRegisters >> 8), (byte)numRegisters }; stream.Write(request, 0, request.Length); // 读取响应 byte[] response = new byte[9 + numRegisters * 2]; stream.Read(response, 0, response.Length); // 解析响应 ushort[] values = new ushort[numRegisters]; for (int i = 0; i < numRegisters; i++) { values[i] = (ushort)(response[9 + i * 2] << 8 | response[10 + i * 2]); } return values; } } } ``` 需要注意的是,这只是一个简单的示例程序,实际应用中需要根据具体的设备和通讯方式进行修改和调试。

“相关推荐”对你有帮助么?

  • 非常没帮助
  • 没帮助
  • 一般
  • 有帮助
  • 非常有帮助
提交
评论 1
添加红包

请填写红包祝福语或标题

红包个数最小为10个

红包金额最低5元

当前余额3.43前往充值 >
需支付:10.00
成就一亿技术人!
领取后你会自动成为博主和红包主的粉丝 规则
hope_wisdom
发出的红包
实付
使用余额支付
点击重新获取
扫码支付
钱包余额 0

抵扣说明:

1.余额是钱包充值的虚拟货币,按照1:1的比例进行支付金额的抵扣。
2.余额无法直接购买下载,可以购买VIP、付费专栏及课程。

余额充值