1 前言
Scroller是一个专门用于处理滚动效果的工具类,一般在我们自定义View时,要实现滚动或者滑动效果,除了使用动画之外,我们往往会使用Scroller来帮我们完成。在android中如ViewPager、ListView等,内部也是使用了Scroller来实现的。
2 View的Scroll
在介绍Scroller之前,我们知道,在View中自带scroll属性,那就是View中有两个方法,可以完成view的滚动。他们是:
void    scrollBy(int x, int y)//滚动x,y
Move the scrolled position of your view.

void    scrollTo(int x, int y) //滚动到x y
Set the scrolled position of your view.
需要说明的的两点
1 根据android的坐标体系,当x为负时,向右滚动,为正时向左滚动,y为负向下滚动,y为正,向上滚动
2 以上两个滚动只是滚动的View的内容,并没有滚动View本身,需要滚动view本身时,可以考虑布局属性LayoutParams及属性动画。
因此,针对这一点:我们队某个View做scroll往往并无太大的意义,但是对于ViewGroup来说,其内容往往就是某个子View,对ViewGroup做scroll就有意义!
3 以上滚动是瞬间完成,并没有过渡过程。
另外,以下两个API也是需要注意的,分别返回滚动时的x,y
final int getScrollX() //返回滚动时的left位置 x
Return the scrolled left position of this view.

final int getScrollY()  //返回滚动时的top 位置 y
Return the scrolled top position of this view.
下面来看一个View使用scroll的例子
<?xml version="1.0" encoding="utf-8"?>
<LinearLayout xmlns:android="http://schemas.android.com/apk/res/android"
    xmlns:tools="http://schemas.android.com/tools"
    android:id="@+id/layout"
    android:layout_width="match_parent"
    android:layout_height="match_parent"
    android:orientation="vertical"
    tools:context="com.example.guolin.scrollertest.MainActivity">

    <Button
        android:id="@+id/scroll_to_btn"
        android:layout_width="wrap_content"
        android:layout_height="wrap_content"
        android:text="scrollTo"/>

    <Button
        android:id="@+id/scroll_by_btn"
        android:layout_width="wrap_content"
        android:layout_height="wrap_content"
        android:text="scrollBy"/>

</LinearLayout>
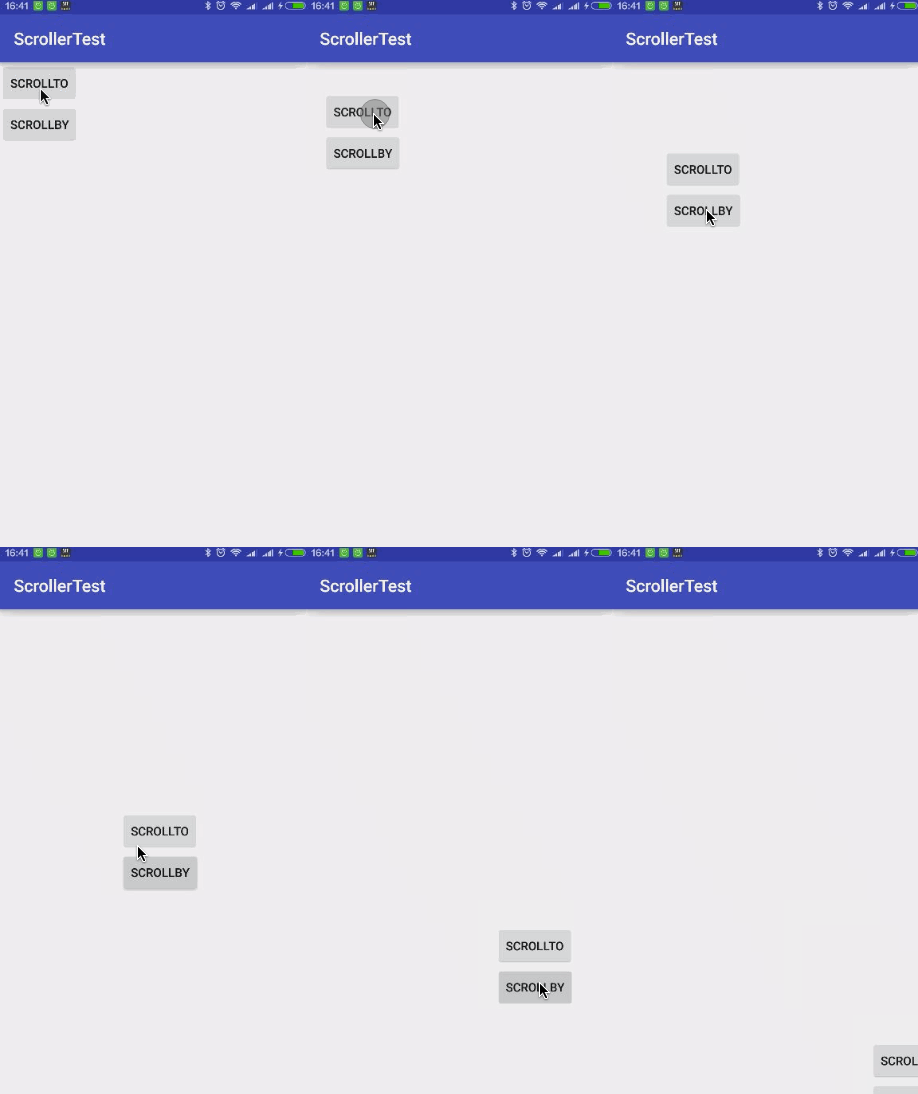
外层我们使用了一个LinearLayout,然后在里面包含了两个按钮,一个用于触发scrollTo逻辑,一个用于触发scrollBy逻辑。
接着修改MainActivity中的代码,如下所示:
public class MainActivity extends AppCompatActivity {

    private LinearLayout layout;

    private Button scrollToBtn;

    private Button scrollByBtn;

    @Override
    protected void onCreate(Bundle savedInstanceState) {
        super.onCreate(savedInstanceState);
        setContentView(R.layout.activity_main);
        layout = (LinearLayout) findViewById(R.id.layout);
        scrollToBtn = (Button) findViewById(R.id.scroll_to_btn);
        scrollByBtn = (Button) findViewById(R.id.scroll_by_btn);
        scrollToBtn.setOnClickListener(new View.OnClickListener() {
            @Override
            public void onClick(View v) {
                layout.scrollTo(-60, -100);
            }
        });
        scrollByBtn.setOnClickListener(new View.OnClickListener() {
            @Override
            public void onClick(View v) {
                layout.scrollBy(-60, -100);
            }
        });
    }
}
效果如下:
3 Scroller API
一般来说,我们使用Scroller主要涉及到以下几个api
final int   getCurrX()  //获取当前的x偏移
Returns the current X offset in the scroll.

final int   getCurrY()  //获取当前的y偏移
Returns the current Y offset in the scroll.

final int   getDuration()   //获取持续时间
Returns how long the scroll event will take, in milliseconds.

//开始滚动
void    startScroll(int startX, int startY, int dx, int dy, int duration)
Start scrolling by providing a starting point, the distance to travel, and the duration of the scroll.

//开始滚动
void    startScroll(int startX, int startY, int dx, int dy)
Start scrolling by providing a starting point and the distance to travel.

//判断滚动是否完成,true表示没有完成
boolean     computeScrollOffset()
Call this when you want to know the new location.
4 Scroller使用
Scroller的基本用法分为以下几个步骤
1 创建Scroller的实例
2 调用Scroller#startScroll()方法来初始化滚动数据并调用invalidate()刷新界面
3 重写View#computeScroll()方法,并在其内部完成平滑滚动的逻辑,在滚动时,会不断的调用这个方法。由于默认的View的computeScroll()方法为空,我们需要自己实现,不过一般代码也固定
例子如下:
我们自定义一个ViewGroup,仿照ViewPager的类似效果,水平布局
/**
 * Created by qiyei2015 on 17/6/19.
 */
public class ScrollerLayout extends ViewGroup {

    /**
     * 用于完成滚动操作的实例
     */
    private Scroller mScroller;

    /**
     * 判定为拖动的最小移动像素数
     */
    private int mTouchSlop;

    /**
     * 手机按下时的屏幕坐标
     */
    private float mXDown;

    /**
     * 手机当时所处的屏幕坐标
     */
    private float mXMove;

    /**
     * 上次触发ACTION_MOVE事件时的屏幕坐标
     */
    private float mXLastMove;

    /**
     * 界面可滚动的左边界
     */
    private int leftBorder;

    /**
     * 界面可滚动的右边界
     */
    private int rightBorder;

    public ScrollerLayout(Context context, AttributeSet attrs) {
        super(context, attrs);
        // 第一步,创建Scroller的实例
        mScroller = new Scroller(context);
        ViewConfiguration configuration = ViewConfiguration.get(context);
        // 获取TouchSlop值
        mTouchSlop = ViewConfigurationCompat.getScaledPagingTouchSlop(configuration);
    }

    @Override
    protected void onMeasure(int widthMeasureSpec, int heightMeasureSpec) {
        super.onMeasure(widthMeasureSpec, heightMeasureSpec);
        int childCount = getChildCount();
        for (int i = 0; i < childCount; i++) {
            View childView = getChildAt(i);
            // 为ScrollerLayout中的每一个子控件测量大小
            measureChild(childView, widthMeasureSpec, heightMeasureSpec);
        }
    }

    @Override
    protected void onLayout(boolean changed, int l, int t, int r, int b) {
        if (changed) {
            int childCount = getChildCount();
            for (int i = 0; i < childCount; i++) {
                View childView = getChildAt(i);
                // 为ScrollerLayout中的每一个子控件在水平方向上进行布局
                childView.layout(i * childView.getMeasuredWidth(), 0, (i + 1) * childView.getMeasuredWidth(), childView.getMeasuredHeight());
            }
            // 初始化左右边界值
            leftBorder = getChildAt(0).getLeft();
            rightBorder = getChildAt(getChildCount() - 1).getRight();
        }
    }

    @Override
    public boolean onInterceptTouchEvent(MotionEvent ev) {
        switch (ev.getAction()) {
            case MotionEvent.ACTION_DOWN:
                mXDown = ev.getRawX();
                mXLastMove = mXDown;
                break;
            case MotionEvent.ACTION_MOVE:
                mXMove = ev.getRawX();
                float diff = Math.abs(mXMove - mXDown);
                mXLastMove = mXMove;
                // 当手指拖动值大于TouchSlop值时,认为应该进行滚动,拦截子控件的事件
                if (diff > mTouchSlop) {
                    return true;
                }
                break;
        }
        return super.onInterceptTouchEvent(ev);
    }

    @Override
    public boolean onTouchEvent(MotionEvent event) {
        switch (event.getAction()) {
            case MotionEvent.ACTION_MOVE:
                mXMove = event.getRawX();
                int scrolledX = (int) (mXLastMove - mXMove);
                if (getScrollX() + scrolledX < leftBorder) {
                    scrollTo(leftBorder, 0);
                    return true;
                } else if (getScrollX() + getWidth() + scrolledX > rightBorder) {
                    scrollTo(rightBorder - getWidth(), 0);
                    return true;
                }
                scrollBy(scrolledX, 0);
                mXLastMove = mXMove;
                break;
            case MotionEvent.ACTION_UP:
                // 当手指抬起时,根据当前的滚动值来判定应该滚动到哪个子控件的界面
                int targetIndex = (getScrollX() + getWidth() / 2) / getWidth();
                int dx = targetIndex * getWidth() - getScrollX();
                // 第二步,调用startScroll()方法来初始化滚动数据并刷新界面
                mScroller.startScroll(getScrollX(), 0, dx, 0);
                invalidate();
                break;
        }
        return super.onTouchEvent(event);
    }

    @Override
    public void computeScroll() {
        // 第三步,重写computeScroll()方法,并在其内部完成平滑滚动的逻辑
        if (mScroller.computeScrollOffset()) {
            scrollTo(mScroller.getCurrX(), mScroller.getCurrY());
            invalidate();
        }
    }
}
注意:在重写computeScroll()时,当中的代码往往是固定的,就是判断滚动有没有完成,没有完成就调用View的scrollTo()滚动到指定位置,然后invalidate()刷新界面。
<?xml version="1.0" encoding="utf-8"?>
<com.example.scrollertest.ScrollerLayout xmlns:android="http://schemas.android.com/apk/res/android"
    android:layout_width="match_parent"
    android:layout_height="match_parent"
    >

    <Button
        android:layout_width="match_parent"
        android:layout_height="100dp"
        android:text="This is first child view"/>

    <Button
        android:layout_width="match_parent"
        android:layout_height="100dp"
        android:text="This is second child view"/>

    <Button
        android:layout_width="match_parent"
        android:layout_height="100dp"
        android:text="This is third child view"/>

</com.example.scrollertest.ScrollerLayout>
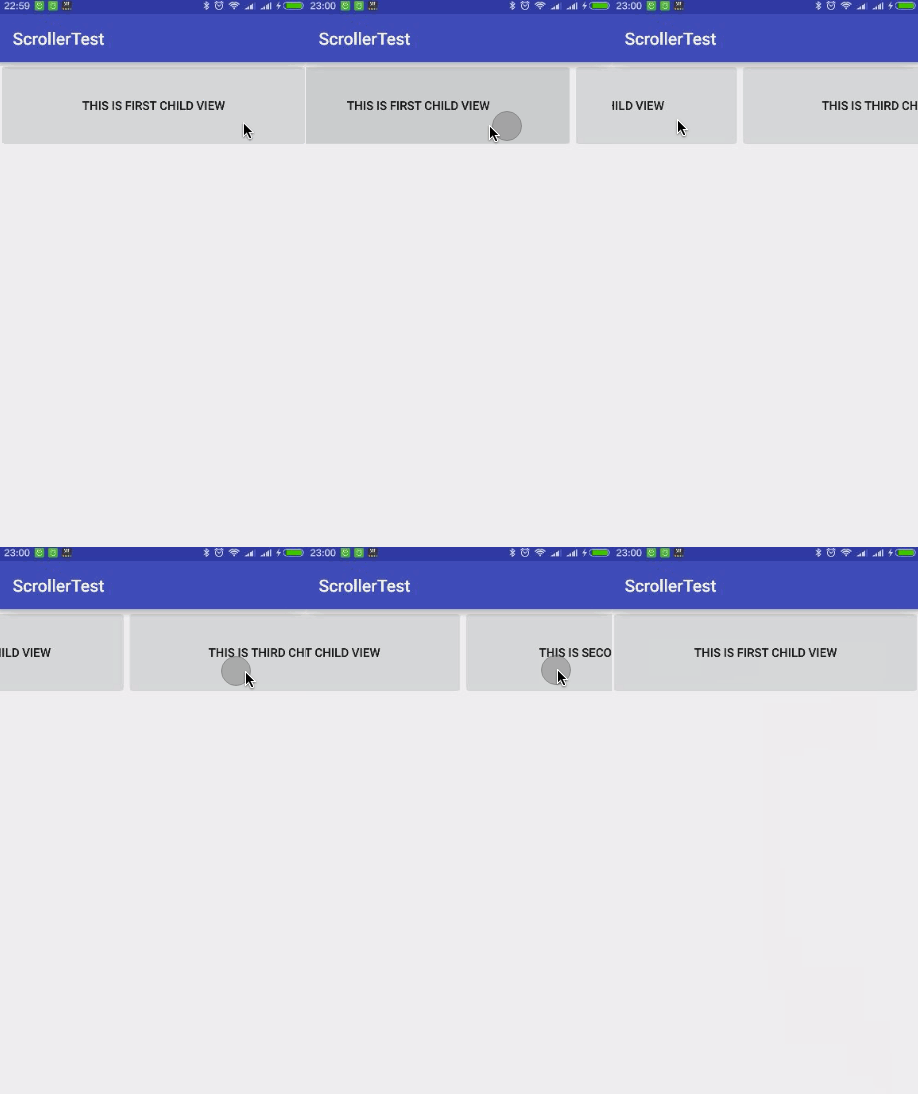
可以看到,这里我们在ScrollerLayout中放置了三个按钮用来进行测试,其实这里不仅可以放置按钮,放置任何控件都是没问题的。
效果如下:


 965
965

 被折叠的 条评论
为什么被折叠?


