


转载请标明出处:http://blog.csdn.net/h_zhang/article/details/51045045
仔细算一下,学习android开发已经有一年时间了。大概就是读了两本书以及看一些牛人牛博。我自认为我的语言组织以及表达能力是相当差的,有很多时候自己想明白的东西就是说不出来。所以我写微博的目的就是想把一些知识点加以记录顺便锻炼一下自己的语言组织能力。如果有一些讲的不好的地方欢迎拍砖。那么下面就进入正题,介绍本文的主角—Scroller。
View中scrollBy()和scrollTo()方法
首先需要了解Android系统框架中View是支持移动操作的,从Android官方文档可以看到View类提供了如下两个方法:
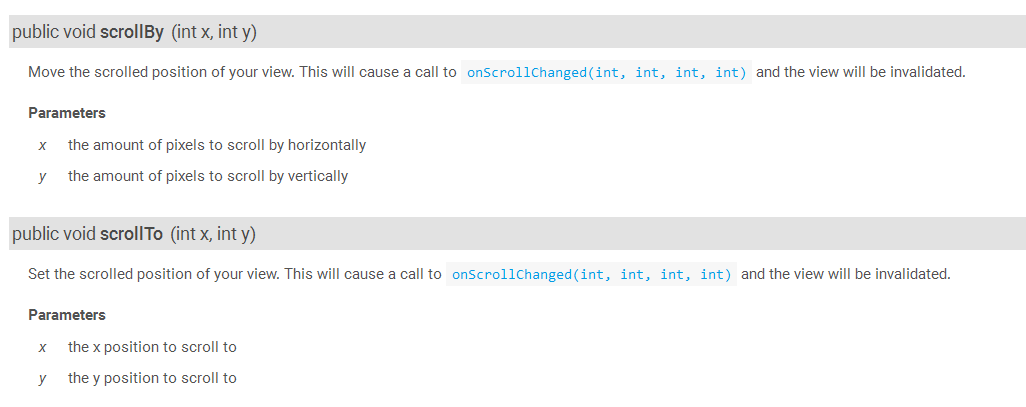
那么调用这两个方法之后的View会出现什么效果呢?其实,通过阅读文档中方法说明之后大家也能猜出个一二。我写了一个示例代码,让大家对View中的这两个方法有个更加直观的认识。代码如下所示:
布局文件activity_main.xml:
<?xml version="1.0" encoding="utf-8"?>
<LinearLayout
    xmlns:android="http://schemas.android.com/apk/res/android"
    xmlns:tools="http://schemas.android.com/tools"
    android:layout_width="match_parent"
    android:layout_height="match_parent"
    android:orientation="vertical"
    tools:context="cn.hebut.testscroller.MainActivity"
    tools:showIn="@layout/activity_main">

    <LinearLayout
        android:layout_width="match_parent"
        android:layout_height="wrap_content"
        android:orientation="horizontal">
        <Button
            android:id="@+id/id_scrollby"
            android:layout_width="0dp"
            android:layout_height="wrap_content"
            android:layout_weight="1"
            android:text="scrollBy"
            android:onClick="scrollBy"/>
        <Button
            android:id="@+id/id_scrollto"
            android:layout_width="0dp"
            android:layout_height="wrap_content"
            android:layout_weight="1"
            android:text="scrollTo"
            android:onClick="scrollTo"/>
    </LinearLayout>

    <LinearLayout
        android:id="@+id/id_tv_container"
        android:layout_width="match_parent"
        android:layout_height="0dp"
        android:layout_weight="1"
        android:gravity="center"
        android:background="#66ff0000">
        <TextView
            android:id="@+id/id_tv"
            android:layout_width="120dp"
            android:layout_height="120dp"
            android:background="#6600ff00"
            android:text="hello world"
            />
    </LinearLayout>

</LinearLayout>
布局文件很简单,根布局是一个LinearLayout,里面有两个LinearLayout垂直排列,第一个LinearLayout里面包含两个Button,第二个LinearLayout里面有一个TextView。
下面就是MainActivity代码:
public class MainActivity extends AppCompatActivity
{
    private LinearLayout mTextContainer;
    @Override
    protected void onCreate(Bundle savedInstanceState)
    {
        super.onCreate(savedInstanceState);
        setContentView(R.layout.activity_main);

        mTextContainer = (LinearLayout) findViewById(R.id.id_tv_container);
    }

    public void scrollBy(View view)
    {
        mTextContainer.scrollBy(-30, -50);
    }

    public void scrollTo(View view)
    {
        mTextContainer.scrollTo(-30, -50);
    }
}在onCreate()函数中获得TextView的父布局实例mTextContainer,然后在按钮点击的回调函数:scrollBy()和scrollTo()中分别调用mTextContainer的scrollBy(-30, -50)和scrollTo(-30, -50)方法。其中-30表示水平方向向右移动,-50表示垂直方向向下移动。
程序运行效果如下所示:
OK,从程序运行效果来看,每点击一次SCROLLBY按钮,TextView都会在水平方向和垂直方向上发生30px和50px的偏移;但是,只要点击了SCROLLTO按钮,TextView都会回到固定的位置,之后继续点击SCROLLTO按钮,TextView也不会发生偏移。
我从源码的角度解释这一现象,首先看ScrollTo(x,y)源码:
public void scrollTo(int x, int y) {
    if (mScrollX != x || mScrollY != y) {
        int oldX = mScrollX;
        int oldY = mScrollY;
        mScrollX = x;
        mScrollY = y;
        invalidateParentCaches();
        onScrollChanged(mScrollX, mScrollY, oldX, oldY);
        if (!awakenScrollBars()) {
            postInvalidateOnAnimation();
        }
    }
}程序进来先判断x和mScrollX以及y和mScrollY是否相等,只要有一个不相等就进行执行if代码块,里面先用两个局部变量保存了View的成员变量mScrollX和mScrollY,再将新的偏移值赋值给mScrollX和mScrollY,所以mScrollX和mScrollY就是保存了当前View在水平和垂直方向上的偏移量;然后回调onScrollChanged(mScrollX, mScrollY, oldX, oldY)函数来通知View的位置发生了变化;最后进行View的重绘。
下面查看scrollBy(x, y)源码:
public void scrollBy(int x, int y) {
    scrollTo(mScrollX + x, mScrollY + y);
}
可以看到scrollBy()方法中就是调用了scrollTo()方法,但是传递给scrollTo()方法的参数是在当前View的偏移量的基础上增加了x,y;这样scrollTo()方法中的if条件语句肯定是true,然后对View进行新的偏移。这也就解释了为什么每次点击SCROLLBY按钮TextView都会发生一段偏移,而点击SCROLLTO按钮只会偏移一次。
还有一点需要注意:我们想对TextView进行移动,必须调用其父布局的scrollBy()或者scrollTo()方法,因为这两个方法是对View的内容进行偏移,并不是对View本身进行偏移,这一点官方文档也都说明:
The framework provides basic support for views that wish to internally scroll their content. This includes keeping track of the X and Y scroll offset as well as mechanisms for drawing scrollbars. See scrollBy(int, int), scrollTo(int, int), and awakenScrollBars() for more details.
所以说,如果你通过TextView实例调用其scrollBy()或者scrollTo()方法就会得到如下效果:
Android Scroller工具类
虽然View中的scrollBy()或者scrollTo()可以对View中的内容进行移动,但是可以发现移动是瞬间完成,没有平滑移动的效果。那如果想要平滑移动的效果,该怎么实现呢?这就需要借助Scroller类来帮忙了。先来看一下官方文档对Scroller的解释:
This class encapsulates scrolling. You can use scrollers (Scroller or OverScroller) to collect the data you need to produce a scrolling animation—for example, in response to a fling gesture. Scrollers track scroll offsets for you over time, but they don’t automatically apply those positions to your view. It’s your responsibility to get and apply new coordinates at a rate that will make the scrolling animation look smooth.
大致意思就是:Scroller类对移动进行了封装,它可以在移动过程中跟踪移动的信息,比如:水平方向和垂直方向的偏移量。我们只要按照一定的速率获取移动过程中的坐标值,利用这些坐标值不断改变View的位置,这样就可让View的移动效果变得很平滑。
下面介绍一下Scroller类常用方法:
public boolean computeScrollOffset (),当你想要知道当前移动的最新位置就调用该方法,如果移动过程正在进行返回true,否则返回falsepublic void startScroll (int startX, int startY, int dx, int dy, int duration),开始一次移动;参数startX和startY表示起始点的坐标;dx和dy表示水平方向和垂直方向的移动距离,dx<0向右移动,dy<0向下移动;duration整个移动过程所花的时间,以毫秒为单位public final boolean isFinished (),判断移动是否结束;结束返回true,否则返回false
Scroller的使用一般情况还是很固定的,可按如下步骤使用Scroller:
- new出Scroller实例
- 调用Scroller的
public void startScroll (int startX, int startY, int dx, int dy, int duration)方法 - 重写View的
public void computeScroll() {}方法
OK,最后就按照上述步骤,我使用Scroller实现一个类似浮动小广告的功能;为了给大家一个直观的认识先贴出程序运行效果:
下面贴出代码,首先是布局文件:
<?xml version="1.0" encoding="utf-8"?>
<LinearLayout
    xmlns:android="http://schemas.android.com/apk/res/android"
    xmlns:tools="http://schemas.android.com/tools"
    android:layout_width="match_parent"
    android:layout_height="match_parent"
    android:orientation="vertical"
    tools:context="cn.hebut.testscroller.MainActivity"
    tools:showIn="@layout/activity_main">

    <LinearLayout
        android:layout_width="match_parent"
        android:layout_height="wrap_content"
        android:orientation="horizontal">
        <Button
            android:id="@+id/id_start"
            android:layout_width="match_parent"
            android:layout_height="wrap_content"
            android:layout_weight="1"
            android:text="start"
            android:onClick="start"/>
    </LinearLayout>

    <cn.hebut.testscroller.AdView
        android:id="@+id/id_ad"
        android:layout_width="match_parent"
        android:layout_height="0dp"
        android:layout_weight="1"
        android:gravity="center"
        android:background="#66ff0000">
        <TextView
            android:id="@+id/id_tv"
            android:layout_width="match_parent"
            android:layout_height="match_parent"
            android:background="#6600ff00"
            android:gravity="center"
            android:text="我是广告"
            />
    </cn.hebut.testscroller.AdView>

</LinearLayout>
布局文件没什么好说的了,下面给出自定义ViewGroup代码
AdView.java:
public class AdView extends ViewGroup
{
    private Scroller mScroller;
    private View mChild;
    private boolean mIsLeftEdge = true;
    private Boolean mIsStart = false;

    //AdView的宽高
    private int mWidth;
    private int mHeight;
    //子view
    private int mChildWidht;

    public AdView(Context context, AttributeSet attrs)
    {
        super(context, attrs);

        //初始化mScroller
        mScroller = new Scroller(context);
    }

    //将子view摆放在左上角
    @Override
    protected void onLayout(boolean changed, int l, int t, int r, int b)
    {
        if (mChild != null && changed)
        {
            mChild.layout(0, 0, mChild.getMeasuredWidth(), mChild.getMeasuredHeight());
        }
    }

    //测量自己以及子view
    @Override
    protected void onMeasure(int widthMeasureSpec, int heightMeasureSpec)
    {
        int widthSize = MeasureSpec.getSize(widthMeasureSpec);
        int heightSize = MeasureSpec.getSize(heightMeasureSpec);
        setMeasuredDimension(widthSize, heightSize);

        int width = Math.min(widthSize, heightSize);

        mChild = getChildAt(0);

        if (mChild != null)
        {
            LayoutParams lp = mChild.getLayoutParams();
            // 如果是MATCH_PARENT 或者
            // size大于width的1/4
            // 就对子view的大小进行控制
            if (lp.width == -1 || lp.height == -1 ||
                    lp.width > width / 4 || lp.height > width / 4)
            {
                int wMeasureSpec = MeasureSpec.makeMeasureSpec(width / 4, MeasureSpec.EXACTLY);
                int hMeasureSpec = MeasureSpec.makeMeasureSpec(width / 4, MeasureSpec.EXACTLY);

                measureChild(mChild, wMeasureSpec, hMeasureSpec);
            } else
            {
                //设置子view的width=height
                int w = Math.min(lp.width, lp.height);
                int wMeasureSpec = MeasureSpec.makeMeasureSpec(w, MeasureSpec.EXACTLY);
                int hMeasureSpec = MeasureSpec.makeMeasureSpec(w, MeasureSpec.EXACTLY);

                measureChild(mChild, wMeasureSpec, hMeasureSpec);
            }
        }
    }

    @Override
    protected void onSizeChanged(int w, int h, int oldw, int oldh)
    {
        super.onSizeChanged(w, h, oldw, oldh);

        //初始化与尺寸相关的成员变量
        mWidth = w;
        mHeight = h;
        mChildWidht = mChild.getMeasuredWidth();
    }

    @Override
    public void computeScroll()
    {
        super.computeScroll();

        if (mScroller.computeScrollOffset())
        {
            scrollTo(mScroller.getCurrX(), mScroller.getCurrY());
            //强制重绘
            invalidate();
        }

        //点击了start按钮并且上一轮移动结束
        if (mIsStart && mScroller.isFinished())
        {
            scrollContent();
        }
    }

    //开始scroll content
    public void startScroll()
    {
        if(mIsStart) return;
        mIsStart = true;
        scrollContent();
    }

    private void scrollContent()
    {
        int deltaX = mIsLeftEdge ?
                -Math.abs(mWidth - mChildWidht) :
                Math.abs(mWidth - mChildWidht);

        //在垂直方向上随机计算出一个偏移量
        int deltaY = calcDeltaY();
        mIsLeftEdge = !mIsLeftEdge;
        mScroller.startScroll(getScrollX(), getScrollY(), deltaX, deltaY, 2000);
        invalidate();
    }

    private int calcDeltaY()
    {
        //当前在垂直方向上的偏移量
        int scrollY = mScroller.getCurrY();
        //-mHeight < deltaY + scrollY < 0
        //-scrollY - mHeight < deltaY < -scrollY
        int deltaY = -new Random().nextInt(mHeight - mChildWidht) - scrollY;

        return deltaY;
    }
}
简单解释一下:AdView的构造方法,在里面new出一个Scroller实例;在onMeasure()方法中对自己以及子view进行了简单的测量;在onLayout()方法中,对子view进行布局,我直接将子view摆放在左上角;在onSizeChanged()方法中,初始化了与尺寸相关的成员变量,包括自己的width和height,以及子view的width;对外公布了startScroll()方法,让Activity可以控制广告何时开始移动;最后我们看scrollContent()方法,首先计算出水平和垂直方向上的偏移量,然后我们调用mScroller.startScroll()开始对content进行移动,接着调用invalidate()强制重绘,这样computeScroll()方法就会被回调,在这个方法中,我们不断从Scroller中获得最新的偏移量,接着调用scrollTo()方法不断更新View的位置,然后invalidate(),这样就实现View的平滑移动的效果。为了让View的移动不断进行,我们在第93行判断上一次移动是否已经结束,如果结束,我们继续调用scrollContent()来开启一次新的移动。
最后贴上Activity的代码:
public class MainActivity extends AppCompatActivity
{
    private AdView mAdView;

    @Override
    protected void onCreate(Bundle savedInstanceState)
    {
        super.onCreate(savedInstanceState);
        setContentView(R.layout.activity_main);

        mAdView = (AdView) findViewById(R.id.id_ad);
    }

    public void start(View view)
    {
        mAdView.startScroll();
    }
}
OK,activity的代码非常简答,没什么好说的。这样关于Scroller的例子就说完了。其实Scroller还可以用在很多地方,比如类似淘宝app的图片轮播功能,Android中ViewPager也是借助Scroller实现的。
OK,本篇文章就到此为止了。关于Scroller就说这么多,希望大家通过对这篇文章的学习,能够熟练使用Scroller。


 949
949

 被折叠的 条评论
为什么被折叠?
被折叠的 条评论
为什么被折叠?
 到【灌水乐园】发言


