


Android消息机制之Looper、Handler、MessageQueue
转载自:http://blog.csdn.net/qq_30379689/article/details/53394061
本篇文章包括以下内容:
前言
Android消息机制可以说是我们android工程师面试题中的必考题,弄懂它的原理是我们避不开的任务,所以长痛不如短痛,花点时间干掉他,废话不多说,开车啦
Android消息机制的简介
在安卓开发中,常常会遇到获取数据后更新UI的问题,比如:在获取网络信息后,需要弹出一个Toast
- 1
- 2
- 3
- 4
- 5
- 6
- 7
- 8
- 9
- 10
- 11
- 1
- 2
- 3
- 4
- 5
- 6
- 7
- 8
- 9
- 10
- 11
这个时候程序就会报以下的错误
- 1
- 1
这是因为Android规定了只允许UI线程修改Activity里的UI组件,而我们刚才的操作在子线程中修改Activity里的UI组件,才会导致UI操作的线程不安全,并报出错误。为了保证Android的UI操作是线程安全的,Android提供了Handler消息传递机制来解决这个问题
Android消息机制的使用
在获取网络信息后,需要弹出一个Toast,正确做法是
- 1
- 2
- 3
- 4
- 5
- 6
- 7
- 8
- 9
- 10
- 11
- 12
- 13
- 14
- 15
- 16
- 17
- 18
- 19
- 20
- 21
- 22
- 23
- 24
- 25
- 26
- 27
- 28
- 29
- 30
- 1
- 2
- 3
- 4
- 5
- 6
- 7
- 8
- 9
- 10
- 11
- 12
- 13
- 14
- 15
- 16
- 17
- 18
- 19
- 20
- 21
- 22
- 23
- 24
- 25
- 26
- 27
- 28
- 29
- 30
在子线程中通过Handler发送消息,该消息会在Hanlder中的handleMessage()中被解析,并进行相对应的UI组件更新
Android消息机制的相关概念
一、相关概念的解释
- 主线程(UI线程)
- 定义:当程序第一次启动时,Android会同时启动一条主线程(Main Thread)
- 作用:主线程主要负责处理与UI相关的事件
- Message(消息)
- 定义:Handler接收和处理的消息对象(Bean对象)
- 作用:通信时相关信息的存放和传递
- ThreadLocal
- 定义:线程内部的数据存储类
- 作用:负责存储和获取本线程的Looper
- Message Queue(消息队列)
- 定义:采用单链表的数据结构来存储消息列表
- 作用:用来存放通过Handler发过来的Message,按照先进先出执行
- Handler(处理者)
- 定义:Message的主要处理者
- 作用:负责发送Message到消息队列&处理Looper分派过来的Message
- Looper(循环器)
- 定义:扮演Message Queue和Handler之间桥梁的角色
- 作用:
消息循环:循环取出Message Queue的Message
消息派发:将取出的Message交付给相应的Handler
二、图片解读它们之间的关系
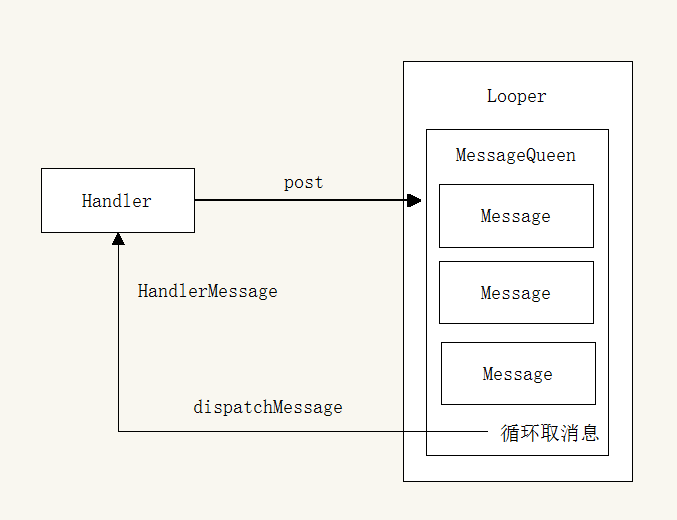
三、文字解读它们之间的关系
Looper中存放有MessageQueue,MessageQueue中又有很多Message,当我们的Handler发送消息的时候,会获取当前的Looper,并在当前的Looper的MessageQueue当中存放我们发送的消息,而我们的MessageQueue也会在Looper的带动下,一直循环的读取Message信息,并将Message信息发送给Handler,并执行HandlerMessage()方法
其实这是一个循环的过程,读懂这句话和看懂图解很重要,会给我们下面的源码分析带来很大的帮助,所以建议大家先读懂前面的内容
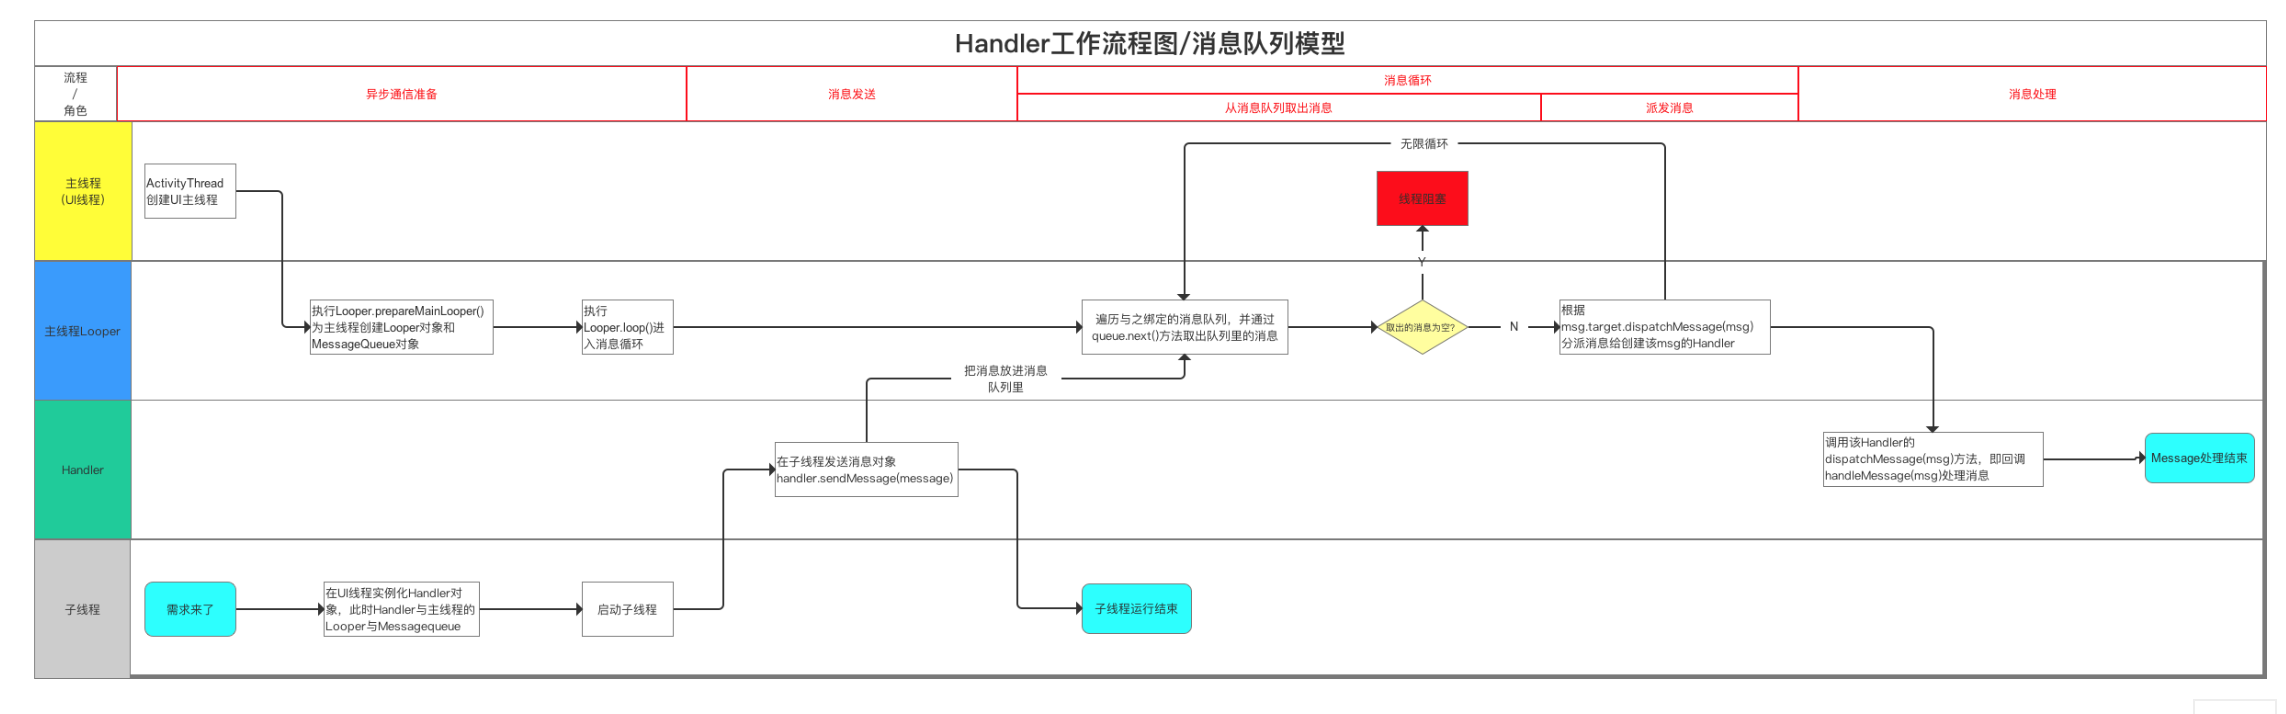
Android消息机制的通信流程
这里采用网上的一张图进行说明,个人感觉图片概括得很好,就没必要再去造同样的轮子了,在新窗口打开可浏览大图
Looper源码分析
一、根据上面的例子,为什么Handler可以在主线程中直接可以使用呢?
因为主线程(UI线程)的Looper在应用程序开启时创建好了,即在ActivityThread.main方法中创建的,该函数为Android应用程序的入口
- 1
- 2
- 3
- 4
- 5
- 6
- 7
- 8
- 9
- 10
- 11
- 12
- 13
- 14
- 15
- 16
- 17
- 1
- 2
- 3
- 4
- 5
- 6
- 7
- 8
- 9
- 10
- 11
- 12
- 13
- 14
- 15
- 16
- 17
Looper中最为重要的两个方法:
- Looper.prepareMainLooper():该方法是Looper对象的初始化
- Looper.loop():该方法会循环取出Message Queue的Message,将取出的Message交付给相应的Handler(Looper的作用就体现在这里)
二、Looper.prepareMainLooper()
- 1
- 2
- 3
- 4
- 5
- 6
- 7
- 8
- 9
- 10
- 11
- 12
- 13
- 14
- 15
- 16
- 17
- 18
- 19
- 20
- 21
- 22
- 23
- 24
- 25
- 26
- 27
- 28
- 29
- 30
- 31
- 1
- 2
- 3
- 4
- 5
- 6
- 7
- 8
- 9
- 10
- 11
- 12
- 13
- 14
- 15
- 16
- 17
- 18
- 19
- 20
- 21
- 22
- 23
- 24
- 25
- 26
- 27
- 28
- 29
- 30
- 31
整个Looper的初始化准备工作就完了,这里做了哪几件事:
- Looper的创建会关联一个MessageQueue的创建
- Looper对象只能被创建一次
- Looper对象创建后被存放在sThreadLocal中
三、Looper.loop()
- 1
- 2
- 3
- 4
- 5
- 6
- 7
- 8
- 9
- 10
- 11
- 12
- 13
- 14
- 15
- 16
- 17
- 18
- 19
- 20
- 21
- 22
- 23
- 24
- 25
- 26
- 27
- 28
- 29
- 30
- 31
- 32
- 33
- 34
- 35
- 36
- 37
- 38
- 39
- 40
- 41
- 42
- 43
- 44
- 45
- 46
- 47
- 48
- 49
- 50
- 51
- 52
- 53
- 54
- 55
- 56
- 57
- 58
- 59
- 1
- 2
- 3
- 4
- 5
- 6
- 7
- 8
- 9
- 10
- 11
- 12
- 13
- 14
- 15
- 16
- 17
- 18
- 19
- 20
- 21
- 22
- 23
- 24
- 25
- 26
- 27
- 28
- 29
- 30
- 31
- 32
- 33
- 34
- 35
- 36
- 37
- 38
- 39
- 40
- 41
- 42
- 43
- 44
- 45
- 46
- 47
- 48
- 49
- 50
- 51
- 52
- 53
- 54
- 55
- 56
- 57
- 58
- 59
整个Looper的循环过程就完了,这里做了哪几件事:
- 取出Looper和MessageQueue
- 进入消息循环,有消息则分发出去
- 消息资源的回收
四、Looper的退出
当然Looper也提供了两个方法可以退出一个Looper:
- quit():quit会直接退出Looper
- quitSafety():quitSafety只是设定一个退出标记,然后把消息队列中的已有消息处理完毕后退出Looper
MessageQueue源码分析
一、由于MessageQueue是用来存放Message的,那么是如何存储Message的呢?
由于Handler使用Post()方法将Message传递到MessageQueue中,在MessageQueue中会使用enqueueMessage()方法存储Message,其实现的方式是通过单链表的数据结构来存储消息列表
- 1
- 2
- 3
- 4
- 5
- 6
- 7
- 8
- 9
- 10
- 11
- 12
- 13
- 14
- 15
- 16
- 17
- 18
- 19
- 20
- 21
- 22
- 23
- 24
- 25
- 26
- 27
- 28
- 29
- 30
- 31
- 32
- 33
- 34
- 35
- 1
- 2
- 3
- 4
- 5
- 6
- 7
- 8
- 9
- 10
- 11
- 12
- 13
- 14
- 15
- 16
- 17
- 18
- 19
- 20
- 21
- 22
- 23
- 24
- 25
- 26
- 27
- 28
- 29
- 30
- 31
- 32
- 33
- 34
- 35
整个进队列的过程就完了,这里做了哪几件事:
- 首先判断消息队列里有没有消息,没有的话则将当前插入的消息作为队头,并且这时消息队列如果处于等待状态的话则将其唤醒
- 若是在中间插入,则根据Message创建的时间进行插入
二、既然MessageQueue存了消息之后,是如何提供取出来的方法的呢?
我们知道存消息是Handler存进来的,那么取消息就应该是Looper中取了,从Looper的源码可以看出,消息就是在Looper中取出的,其实现是用MessageQueue里面的next()方法
- 1
- 2
- 3
- 4
- 5
- 6
- 7
- 8
- 9
- 10
- 11
- 12
- 13
- 14
- 15
- 16
- 17
- 18
- 19
- 20
- 21
- 22
- 23
- 24
- 25
- 26
- 27
- 28
- 29
- 30
- 31
- 32
- 33
- 34
- 35
- 36
- 37
- 38
- 39
- 40
- 41
- 42
- 43
- 44
- 45
- 46
- 47
- 48
- 49
- 50
- 51
- 52
- 1
- 2
- 3
- 4
- 5
- 6
- 7
- 8
- 9
- 10
- 11
- 12
- 13
- 14
- 15
- 16
- 17
- 18
- 19
- 20
- 21
- 22
- 23
- 24
- 25
- 26
- 27
- 28
- 29
- 30
- 31
- 32
- 33
- 34
- 35
- 36
- 37
- 38
- 39
- 40
- 41
- 42
- 43
- 44
- 45
- 46
- 47
- 48
- 49
- 50
- 51
- 52
三、在MessageQueue存消息的媒介当然是通过Message对象啦,那这个Message对象又是什么呢?
其实这个Message就是用来存储Message中各种信息的Bean对象,从源码中可以其属性,这里例举我们常用的几个
- 1
- 2
- 3
- 4
- 5
- 6
- 7
- 8
- 9
- 10
- 1
- 2
- 3
- 4
- 5
- 6
- 7
- 8
- 9
- 10
Handler源码分析
一、Handler的创建
Handler的创建会关联一个Looper对象,而Looper对象是关联着MessageQueue对象,所以在Handler创建时候,取出Looper和MessageQueue
- 1
- 2
- 3
- 4
- 5
- 6
- 7
- 8
- 9
- 10
- 11
- 12
- 13
- 1
- 2
- 3
- 4
- 5
- 6
- 7
- 8
- 9
- 10
- 11
- 12
- 13
前面我们也说过了Looper是存放在ThreadLocal里面的,可以看到下面的源码就知道了
- 1
- 2
- 3
- 1
- 2
- 3
整个创建的过程就完了,这里做了哪几件事:
- 取出Looper
- 取出Looper中的MessageQueue
二、Handler发送消息
第一种方式:sendMessage(Message msg)
- 1
- 2
- 3
- 4
- 5
- 6
- 7
- 8
- 9
- 10
- 11
- 12
- 13
- 14
- 15
- 16
- 17
- 18
- 19
- 20
- 21
- 22
- 23
- 24
- 25
- 26
- 27
- 28
- 29
- 30
- 31
- 32
- 33
- 34
- 35
- 36
- 37
- 38
- 39
- 40
- 41
- 42
- 43
- 44
- 45
- 46
- 1
- 2
- 3
- 4
- 5
- 6
- 7
- 8
- 9
- 10
- 11
- 12
- 13
- 14
- 15
- 16
- 17
- 18
- 19
- 20
- 21
- 22
- 23
- 24
- 25
- 26
- 27
- 28
- 29
- 30
- 31
- 32
- 33
- 34
- 35
- 36
- 37
- 38
- 39
- 40
- 41
- 42
- 43
- 44
- 45
- 46
第二种方式:post(Ruunable r)
- 1
- 2
- 3
- 4
- 1
- 2
- 3
- 4
其实post()方法最终也会保存到消息队列中去,和上面不同的是它传进来的一个Runnable对象,执行了getPostMessage()方法,我们往下追踪
- 1
- 2
- 3
- 4
- 5
- 1
- 2
- 3
- 4
- 5
实质上就是将这个Runnable保存在Message的变量中,这就导致了我们下面处理消息的时候有两种不同方案
三、Handler处理消息
你还记得前面所说Looper中msg.target.dispatchMessage()方法吗?这个方法就是调用Handler的dispatchMessage()
- 1
- 2
- 3
- 4
- 5
- 6
- 7
- 8
- 9
- 10
- 11
- 12
- 13
- 14
- 15
- 16
- 17
- 18
- 19
- 20
- 21
- 22
- 23
- 1
- 2
- 3
- 4
- 5
- 6
- 7
- 8
- 9
- 10
- 11
- 12
- 13
- 14
- 15
- 16
- 17
- 18
- 19
- 20
- 21
- 22
- 23
整个处理的过程就完了,这里做了哪几件事:
- post()方法的处理方法就是将传进来的Runnable执行run()方法
- sendMessage()方法的处理方法就是执行handleMessage()空方法,这也是我们为什么要在Handler重写这个方法的原因
面试题
一、请解释下Android通信机制中Message、Handler、MessageQueue、Looper的之间的关系?
首先,是这个MessageQueue,MessageQueue是一个消息队列,它可以存储Handler发送过来的消息,其内部提供了进队和出队的方法来管理这个消息队列,其出队和进队的原理是采用单链表的数据结构进行插入和删除的,即enqueueMessage()方法和next()方法。这里提到的Message,其实就是一个Bean对象,里面的属性用来记录Message的各种信息。
然后,是这个Looper,Looper是一个循环器,它可以循环的取出MessageQueue中的Message,其内部提供了Looper的初始化和循环出去Message的方法,即prepare()方法和loop()方法。在prepare()方法中,Looper会关联一个MessageQueue,而且将Looper存进一个ThreadLocal中,在loop()方法中,通过ThreadLocal取出Looper,使用MessageQueue的next()方法取出Message后,判断Message是否为空,如果是则Looper阻塞,如果不是,则通过dispatchMessage()方法分发该Message到Handler中,而Handler执行handlerMessage()方法,由于handlerMessage()方法是个空方法,这也是为什么需要在Handler中重写handlerMessage()方法的原因。这里要注意的是Looper只能在一个线程中只能存在一个。这里提到的ThreadLocal,其实就是一个对象,用来在不同线程中存放对应线程的Looper。
最后,是这个Handler,Handler是Looper和MessageQueue的桥梁,Handler内部提供了发送Message的一系列方法,最终会通过MessageQueue的enqueueMessage()方法将Message存进MessageQueue中。我们平时可以直接在主线程中使用Handler,那是因为在应用程序启动时,在入口的main方法中已经默认为我们创建好了Looper。
这段面试题答案是自己写的,如果有什么不妥,欢迎留言一起学习
结语
学习完了消息机制,回过头来看还是挺简单的。由于每个人都有惧怕困难的天性,一开始我也是看不懂,很怕看源码,但是我还是坚持了2天时间,借助书本知识和网上的知识,将这个消息机制给克服了。慢慢的,我们会将养成这种习惯,那么你离大神的脚步就不远了,加油吧


 3442
3442


 被折叠的 条评论
为什么被折叠?
被折叠的 条评论
为什么被折叠?
 到【灌水乐园】发言


