


spring boot 整合了所有的框架
(1)为所有 Spring 开发提供一个更快更广泛的入门体验。
(2)零配置。无冗余代码生成和XML 强制配置,遵循“约定大于配置” 。
(3)集成了大量常用的第三方库的配置, Spring Boot 应用为这些第三方库提供了几乎可以零配置的开箱即用的能力。
(4)提供一系列大型项目常用的非功能性特征,如嵌入服务器等。
1.2.3 SpringBoot的核心功能
起步依赖
起步依赖本质上是一个Maven项目对象模型(Project Object Model,POM),定义了对其他库的传递依赖,这些东西加在一起即支持某项功能。
简单的说,起步依赖就是将具备某种功能的坐标打包到一起,并提供一些默认的功能。
自动配置
Spring Boot的自动配置是一个运行时(更准确地说,是应用程序启动时)的过程,考虑了众多因素,才决定Spring配置应该用哪个,不该用哪个。该过程是Spring自动完成的。
2.1 代码实现
2.1.1 创建Maven工程
2.1.2 添加SpringBoot的起步依赖
<?xml version="1.0" encoding="UTF-8"?>
<project xmlns="http://maven.apache.org/POM/4.0.0"
         xmlns:xsi="http://www.w3.org/2001/XMLSchema-instance"
         xsi:schemaLocation="http://maven.apache.org/POM/4.0.0 http://maven.apache.org/xsd/maven-4.0.0.xsd">
    <modelVersion>4.0.0</modelVersion>

    <groupId>com.atguigu</groupId>
    <artifactId>springboot_demo01</artifactId>
    <version>1.0-SNAPSHOT</version>

    <!--父工程-->
    <parent>
        <groupId>org.springframework.boot</groupId>
        <artifactId>spring-boot-starter-parent</artifactId>
        <version>2.1.6.RELEASE</version>
    </parent>

    <dependencies>
        <!--web起步包
         注意:虽然是web工程,但不需要打war包,直接打jar就行
        -->
        <dependency>
            <groupId>org.springframework.boot</groupId>
            <artifactId>spring-boot-starter-web</artifactId>
        </dependency>
    </dependencies>
</project>
2.1.3 编写SpringBoot引导类
package com.maweiqi;

import org.springframework.boot.SpringApplication;
import org.springframework.boot.autoconfigure.SpringBootApplication;

/**
 * MySpringBootApplication
 *
 * @Author: 马伟奇
 * @Description:
 */
// 声明该类是一个SpringBoot引导类
@SpringBootApplication
public class MySpringBootApplication {
    // main是java程序的入口
    public static void main(String[] args) {
        // run方法 表示运行SpringBoot的引导类 run参数就是SpringBoot引导类的字节码对象
        SpringApplication.run(MySpringBootApplication.class,args);
    }
}
2.1.4 编写Controller
在引导类MySpringBootApplication同级包或者子级包中创建QuickStartController
package com.atguigu.controller;

import org.springframework.web.bind.annotation.RequestMapping;
import org.springframework.web.bind.annotation.RestController;

/**
 * QuickStartController
 *
 * @Author: 马伟奇
 * @Description:
 */
@RestController
@RequestMapping
public class QuickStartController {

    @RequestMapping("/quick")
    public String quick(){
        return "springboot 访问成功!";
    }
}
2.1.5 测试
执行SpringBoot起步类的主方法,控制台打印日志如下:
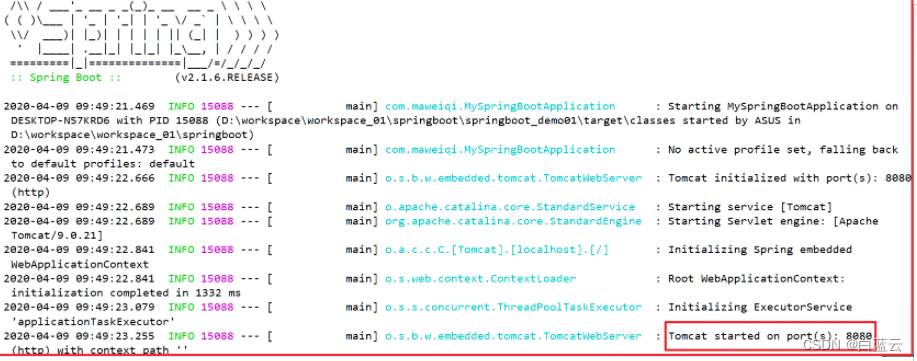
通过日志发现,Tomcat started on port(s): 8080 (http) with context path ’’
tomcat已经起步,端口监听8080,web应用的虚拟工程名称为空(默认“/”)
打开浏览器访问url地址为:http://localhost:8080/quick
可以发现我们省去了springmvc.xml的配置。


 1455
1455


 被折叠的 条评论
为什么被折叠?
被折叠的 条评论
为什么被折叠?
 到【灌水乐园】发言


