


 本文详细介绍如何在Android应用中创建自定义的Preference布局,并通过代码实现一个包含文本显示和按钮点击功能的具体实例。
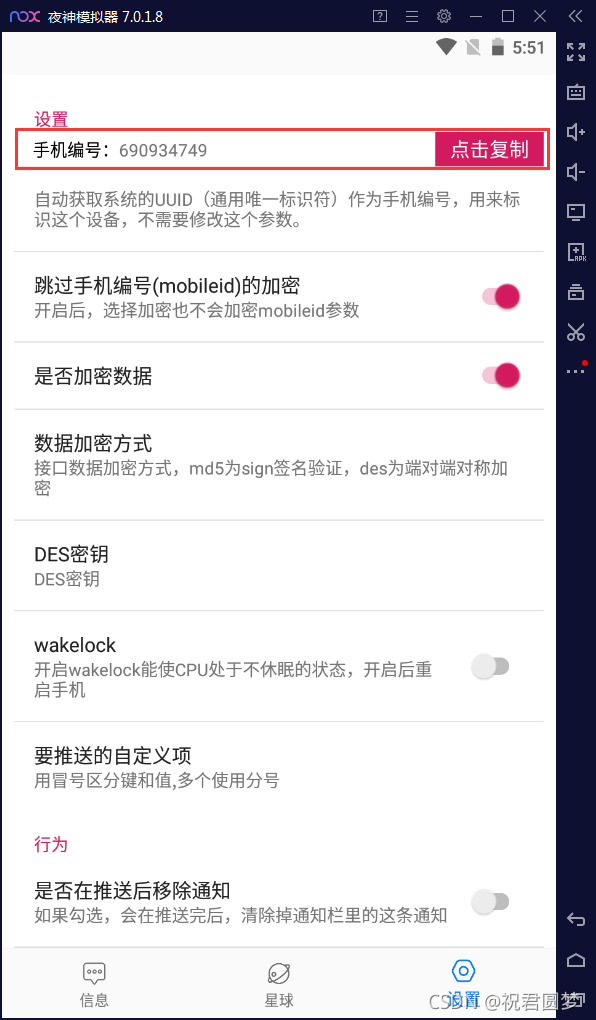
先说一下需求,要在<PreferenceScreen>里添加一个自定义的Layout,实现如下效果:
操作步骤:
1、在res/layout目录创建一个xml文件,名为my_preference_layout.xml,代码如下:
<?xml version="1.0" encoding="utf-8"?>
<LinearLayout xmlns:android="http://schemas.android.com/apk/res/android"
    android:layout_width="match_parent"
    android:layout_height="wrap_content"
    android:orientation="vertical">
    <LinearLayout
        android:layout_width="match_parent"
        android:layout_height="wrap_content"
        android:orientation="horizontal">
        <TextView
            android:layout_width="wrap_content"
            android:layout_height="wrap_content"
            android:layout_marginLeft="15dp"
            android:textColor="#000000"
            android:text="手机编号:" />
        <TextView
            android:id="@+id/mobileid"
            android:layout_width="0dp"
            android:layout_height="wrap_content"
            android:inputType="textPersonName"
            android:cursorVisible="false"
            android:text=""
            android:layout_weight="1"/>
        <Button
            android:id="@+id/btnCopyMobileid"
            android:layout_width="wrap_content"
            android:layout_height="wrap_content"
            android:layout_marginLeft="0dp"
            android:layout_marginRight="0dp"
            android:layout_centerHorizontal="true"
            android:layout_marginTop="0dp"
            android:minHeight="28dp"
            android:text="点击复制"
            android:textColor="#fff"
            android:background="#D41A5E"
            android:textSize="16sp" />
    </LinearLayout>
</LinearLayout>
2、创建一个自定义控件myPreference.java,继承自android.preference.Preference,代码如下:
package net.zy13.skhelper.view;

import android.content.ClipData;
import android.content.ClipboardManager;
import android.content.Context;
import android.preference.Preference;
import android.util.AttributeSet;
import android.view.LayoutInflater;
import android.view.View;
import android.view.ViewGroup;
import android.widget.Button;
import android.widget.TextView;
import android.widget.Toast;

import net.zy13.skhelper.MainApplication;
import net.zy13.skhelper.R;
import net.zy13.skhelper.utils.PreferenceUtil;

public class MyPreference extends Preference {

    private Context mContext;
    private TextView mTextViewMobileid;
    private Button mButtonCopyMobileid;

    public MyPreference(Context context) {
        this(context, null);
    }
    public MyPreference(Context context, AttributeSet attrs) {
        //这里构造方法也很重要,不加这个很多属性不能再XML里面定义
        this(context, attrs, android.R.attr.editTextStyle);
    }

    public MyPreference(Context context, AttributeSet attrs, int defStyle) {
        super(context, attrs, defStyle);
        //获取上下文
        mContext=context;
    }

    protected View onCreateView(ViewGroup parent) {
        // TODO Auto-generated method stub
        super.onCreateView(parent);
        LayoutInflater inflater=(LayoutInflater)mContext.getSystemService(Context.LAYOUT_INFLATER_SERVICE);
        View view = inflater.inflate(R.layout.preference_mobileid_layout, null);
        //获取控件
        mButtonCopyMobileid=view.findViewById(R.id.btnCopyMobileid);
        mTextViewMobileid = (TextView)view.findViewById(R.id.mobileid);
        //监听点击事件(匿名类方式,或叫内部类方式)
        mButtonCopyMobileid.setOnClickListener(new View.OnClickListener() {
            @Override
            public void onClick(View arg0) {
                // TODO Auto-generated method stub

            }

        });
        return view;
    }
}
我们创建这个myPreference.java自定义控件的作用:
- 用来读取我们添加layout布局文件my_preference_layout.xml,同时操作布局里的控件;
- 这个myPreference.java类最重要的就是重写父类的onCreateView方法;
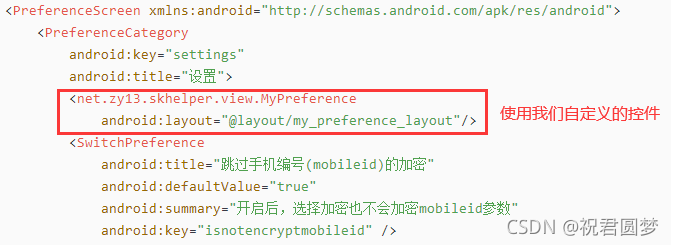
3、在PreferenceScreen的xml里使用我们自定义的控件,如下图:
具体代码:
<?xml version="1.0" encoding="utf-8"?>
<PreferenceScreen xmlns:android="http://schemas.android.com/apk/res/android">
    <PreferenceCategory
        android:key="settings"
        android:title="设置">
        <net.zy13.skhelper.view.MyPreference
            android:layout="@layout/my_preference_layout"/>
        <SwitchPreference
            android:title="跳过手机编号(mobileid)的加密"
            android:defaultValue="true"
            android:summary="开启后,选择加密也不会加密mobileid参数"
            android:key="isnotencryptmobileid" />
        <SwitchPreference
            android:title="是否加密数据"
            android:key="isencrypt"
            android:defaultValue="true" />
        <ListPreference
            android:title="数据加密方式"
            android:key="encryptmethod"
            android:summary="接口数据加密方式,md5为sign签名验证,des为端对端对称加密"
            android:defaultValue="md5"
            android:entries="@array/api_encrypt_method"
            android:entryValues="@array/api_encrypt_method_value" />
    </PreferenceCategory>
</PreferenceScreen>
这样就ok了,网上有很多类似的教程,但是都不详细,所以我写了一个完整的分享给大家。


 4002
4002

 被折叠的 条评论
为什么被折叠?
被折叠的 条评论
为什么被折叠?
 到【灌水乐园】发言


