


菜单管理是一套系统中最常见最核心的系统管理模块之一,我把菜单管理分成了2个部分,左边可以管理维护菜单,在菜单的最右侧可以维护每个菜单按钮权限配置

使用element-plus el-tree组件快速开发树形菜单结构,el-tree组件中filter-node-method事件便可以实现树形菜单筛选过滤功能

<template>
  <div class="common-tree">
    <el-tree
      :ref="treeRef"
      :data="treeData"
      :check-strictly="checkStrictly"
      show-checkbox
      :accordion="false"
      node-key="id"
      default-expand-all
      :highlight-current="true"
      :expand-on-click-node="false"
      @node-click="nodeClick"
      :filter-node-method="filterNode"
      empty-text="暂无数据"
    >
     <template #default="{ node, data }">
        <span class="custom-tree-node">
          <span style="margin-right: 15px;">{{ data.name }}</span>
           <slot
            :data="data"
            :node="node"
          />
        </span>
      </template>
    </el-tree>
  </div>
</template>
<script>
import { ref, reactive } from 'vue'
import { returnStatement } from '@babel/types';

export default {
  name: 'CommonTree',
  props: {
    treeRef: {
      type: String,
      default: "treeRef"
    },
    treeData: {
      type: Array,
      required: true,
      default () {
        return []
      }
    },
    checkStrictly: {
      type: Boolean,
      default () {
        return true
      }
    }
  },
  setup(props, { emit }) {
    const nodeClick = (data, node, tree) => {
      emit('nodeClick', data, node, tree)
    }
    const filterNode = (value, data) => {
      if (!value) return true
      return data.label.includes(value)
    }

    return { nodeClick, filterNode }
  }
}
</script>
使用element-plus el-dialog、el-icon、el-form组件实现菜单新增编辑
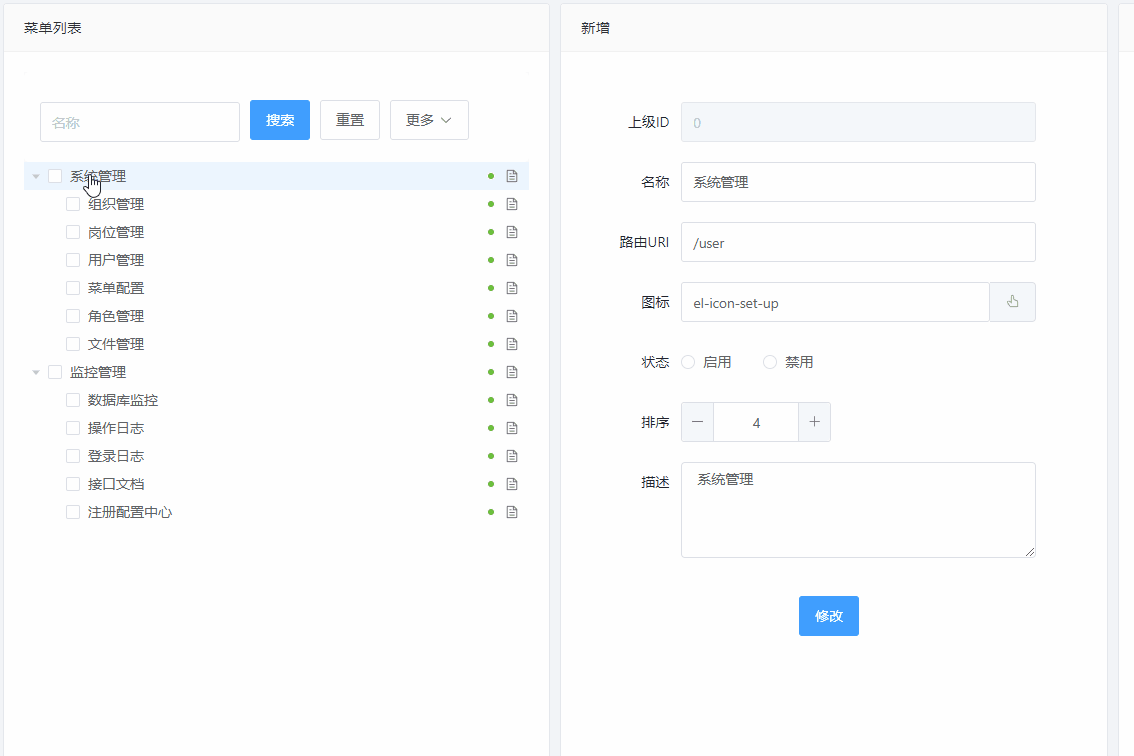
el-dialog组件实现弹窗,选择图标功能,父组件通过v-model绑定变量,子组件通过emit('update语法糖实现父子组件属性快速传递
子组件代码:
<template>
  <el-dialog width="800px" v-model="visible" title="图标" :before-close="handleClose" >
    <ul class="iconUl">
      <li v-for="icon in iconList" :key="icon">
        <span :class="{'active':choosedIcon === icon}"
          @click="chooseIcon(icon)"
          @dblclick="confirm(icon)"
        >
            <el-icon style="width:48px;height: 48px;"><component class="icon" :is="icon" /></el-icon>
        </span>
        <p>{{ icon }}</p>
      </li>
    </ul>
    <template #footer>
      <span class="dialog-footer">
        <el-button type="primary" @click="confirm(choosedIcon)">确认</el-button>
        <el-button @click="this.$emit('update:visible', false)">取消</el-button>
      </span>
    </template>
  </el-dialog>
</template>
<script>
import { ref, reactive } from 'vue'
import * as IconsModule from '@element-plus/icons-vue'

export default {
  name: 'Icons',
  props: {
    visible: {
      type: Boolean,
      default: false
    }
  },
  setup(props, { emit }) {
    const iconList = ref([])
    const choosedIcon = ref(null)

    for (var key in IconsModule) {
      iconList.value.push(IconsModule[key].name)
    }
    const chooseIcon = (icon) => {
      choosedIcon.value = icon
    }
    const confirm = (icon) => {
      emit('update:icon', icon)
      emit('update:visible', false)
    }
    const handleClose = (done) => {
      emit('update:visible', false)
    }
    return { iconList, choosedIcon, chooseIcon, confirm, handleClose }
  }
}
父组件代码:
<icons v-model:visible="dialogIconVisible" v-model:icon="menu.icon" />使用element-plus el-table组件实现菜单按钮权限配置
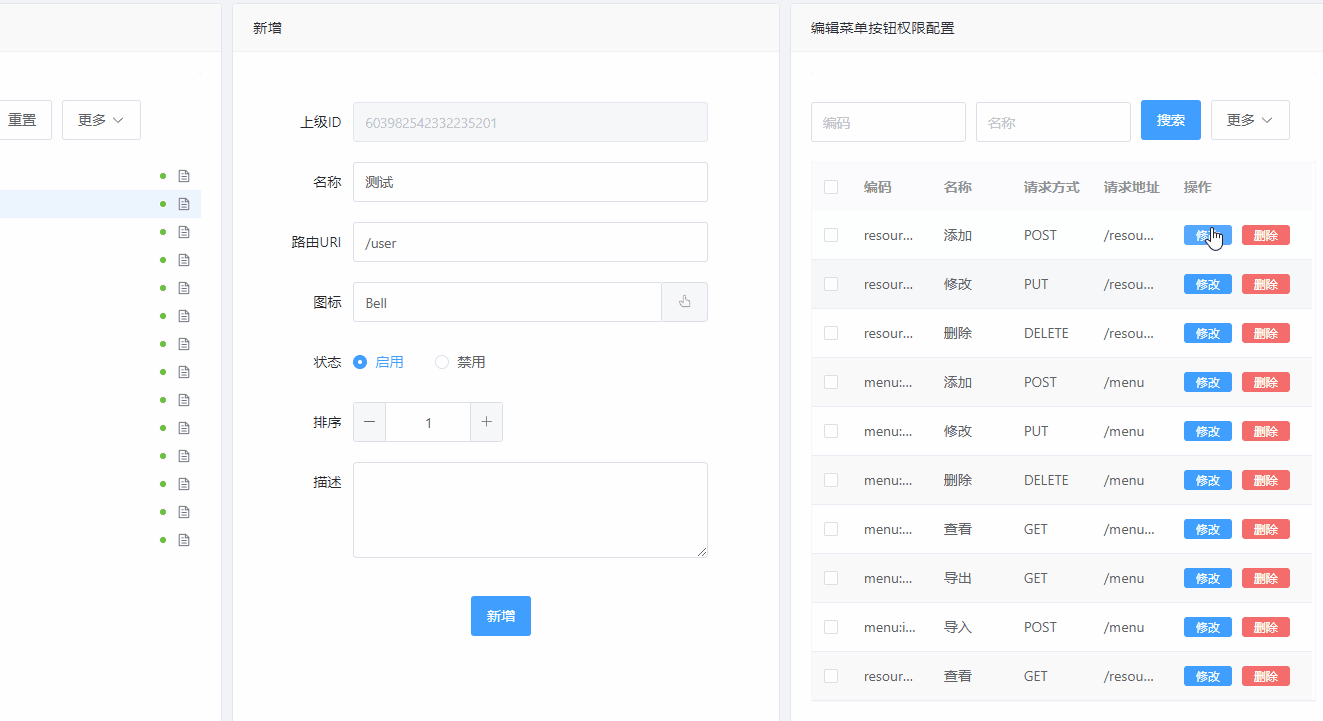
菜单按钮权限配置表格部分代码:
 <el-table
  ref="resourceTableKey"
  :data="resource.tableData.records"
  stripe
  empty-text="暂无数据"
  :header-cell-style="{background:'#FCFBFF',border:'0'}"
  style="width: 100%"
  @selection-change="resourceSelectChange"
>
  <el-table-column type="selection" width="40" />
  <el-table-column label="编码" width="80" show-overflow-tooltip>
    <template #default="scope">{{ scope.row.code }}</template>
  </el-table-column>
  <el-table-column label="名称" width="80" show-overflow-tooltip>
    <template #default="scope">{{ scope.row.name }}</template>
  </el-table-column>
  <el-table-column label="请求方式" width="80" show-overflow-tooltip>
    <template #default="scope">{{ scope.row.method }}</template>
  </el-table-column>
  <el-table-column label="请求地址" width="80" show-overflow-tooltip>
    <template #default="scope">{{ scope.row.url }}</template>
  </el-table-column>
  <el-table-column label="操作" width="140">
    <template #default="scope">
      <el-button type="primary" size="small" @click="resourceEdit(scope.$index, scope.row)"
        >修改</el-button
      >
      <el-button
        type="danger"
        size="small"
        @click="resourceSingleDelete(scope.$index, scope.row)"
        >删除</el-button
      >
    </template>
  </el-table-column>
</el-table>

// ----------------------编辑菜单按钮权限配置----------------------------
<script>
const resourceTableKey = ref(null)

const resource = reactive({
  queryParams: {
    code: null,
    name: null,
    menuId: null
  },
  tableData: {
    total: 2,
    records: []
  },
  pagination: {
    size: 10,
    current: 1
  },
  formData: {},
  selection: []
})

const resourceSearch = () => {
  getResourceList().then(data => {
    resource.tableData.records = data.data
  })
}

const resourceAdd = () => {
  dialogEditVisible.value = true
  resource.formData = {}
}

const resourceEdit = (index, row) => {
  dialogEditVisible.value = true
  resource.formData = row
}

const resourceSingleDelete = (index, row) => {
  ElMessageBox.confirm('确认删除?',
  '确认删除',
  {
    confirmButtonText: '确认',
    cancelButtonText: '取消',
    confirmButtonClass: 'confirmButton',
    type: 'warning',
  })
  .then(() => {
    resource.tableData.records.splice(index, 1)
  })
  .catch(() => { })
}

const resourceSelectChange = (selection) => {
  resource.selection = selection
}

const resourceBatchDelete = () => {
  if (!resource.selection.length) {
    ElMessageBox.alert('请选择要删除项!', '提示', { confirmButtonText: '确认', type: 'warning' })
    return
  }
  ElMessageBox.confirm('确认删除?',
  '确认删除',
  {
    confirmButtonText: '确认',
    cancelButtonText: '取消',
    type: 'warning',
  })
  .then(() => {
    resource.tableData.records = resource.tableData.records.filter(function(items){
      return (resource.selection.filter(function(selectionItems){
        return selectionItems.id == items.id
      })).length == 0
    })
  })
  .catch(() => { })
}

const resourceReturn = { resourceTableKey, resource, resourceEdit, resourceAdd, resourceSingleDelete, resourceSelectChange, resourceBatchDelete }
</script>
// ----------------------编辑菜单按钮权限配置----------------------------
菜单按钮权限配置表单部分代码:
<template>
  <el-dialog width="800px" v-model="visible" title="修改" :before-close="handleClose" >
    <el-form ref="form" :model="fromData" label-position="right" label-width="100px">
      <el-form-item label="编码" prop="code">
        <el-input v-model="fromData.code" />
        <p class="note">建议使用:作为分隔符,并以view、add、update、delete、export、import、download、upload等关键词结尾</p>
        <p class="note">如:menu:add、 resource:view、 file:upload</p>
      </el-form-item>
      <el-form-item label="名称" prop="name">
        <el-input v-model="fromData.name" />
      </el-form-item>
      <el-form-item label="请求方式" prop="describe" >
        <el-input v-model="fromData.method" />
      </el-form-item>
      <el-form-item label="请求地址" prop="describe" >
        <el-input v-model="fromData.url" />
      </el-form-item>
      <el-form-item label="描述" prop="describe" >
        <el-input v-model="fromData.describe" />
      </el-form-item>
    </el-form>
    <template #footer>
      <span class="dialog-footer">
        <el-button type="primary" @click="confirm()">确认</el-button>
        <el-button @click="this.$emit('update:visible', false)" >取消</el-button>
      </span>
    </template>
  </el-dialog>
</template>
<script>
import { ref, reactive, watch } from 'vue'
import { returnStatement } from '@babel/types';

export default {
  name: 'edit',
  props: {
    visible: {
      type: Boolean,
      default: false
    },
    resource: {
      type: Object,
      default: () => ({})
    }
  },
  setup(props, { emit }) {
    const fromData = reactive({})

    watch(() => props.resource, (newResource) => {
        for (const key in fromData) {
          fromData[key] = ''
        }
        for (const key in newResource) {
          fromData[key] = newResource[key]
        }
    }, { immediate: true })

    const confirm = () => {
      for (const key in fromData) {
        props.resource[key] = fromData[key]
      }
      emit('update:visible', false)
    }
    const handleClose = (done) => {
      emit('update:visible', false)
    }

    return { confirm, handleClose, fromData }
  }
}
</script>


 4105
4105


 被折叠的 条评论
为什么被折叠?
被折叠的 条评论
为什么被折叠?
 到【灌水乐园】发言


