


【实验环境】
某公司根据其信息化建设要求,需要构建一台独立配置的网站服务器。考虑到站点的运行效率,稳定性及可扩展性等因素,要求在Centos 7系统中构建httpd服务器,并使用httpd-2.4.25源码版本进行编译安装。
【实验要求】
编译安装httpd服务器,要求支持动态模块扩展,地址重写,多字符集。
网站名称设置为www.bdqn.com,默认首页设置为index.html和index.php。
将/usr/share/doc/HTML/zh-CN/目录下的index.html复制到网站根目录下并改名为redhat。
在浏览器中分别访问http://www.bdqn.com/redhat与http://www.bdqn.com/,查看不同的测试页面。
【实验步骤】
1.将CentOS01配置为Web服务器,编译安装httpd软件包。
①使用Linux.iso镜像文件。
②挂载光盘并查看挂载目录数据。
[root@centos01 ~]# mount /dev/cdrom /mnt/
[root@centos01 ~]# ls /mnt/
③将源码程序包解压到指定目录中“/usr/src/”并进入httpd-2.2.17目录。
[root@centos01 ~]# tar zxvf /mnt/httpd-2.2.17.tar.gz -C /usr/src/
[root@centos01 ~]# cd /usr/src/httpd-2.2.17/
④配置Apache。
[root@centos01 httpd-2.2.17]#./configure --prefix=/usr/local/httpd --enable-so --enable-rewrite --enable-charset-lite --enable-cgi
⑤编译安装。
[root@centos01 httpd-2.2.17]# make && make install
2.查看是否安装成功,存在创建目录证明成功。

3.配置并启动httpd服务器。
①优化Apache
[root@centos01 ~]# ln -s /usr/local/httpd/bin/* /usr/local/bin/
②检查配置文件的完成性,显示OK成功。
[root@centos01 ~]# apachectl -t
③生成Apache服务器控制文件添加执行权限。
[root@centos01 ~]# cp /usr/local/httpd/bin/apachectl /etc/init.d/httpd
[root@centos01 ~]# chmod +x /etc/init.d/httpd
④修改Apache服务控制文件。
[root@centos01 ~]# vim /etc/init.d/httpd
#!/bin/sh
#chkconfig:35 80 21
#description:Apache Server
⑤添加系统服务设置开机自启。
[root@centos01 ~]# chkconfig --add httpd
[root@centos01 ~]# chkconfig --level 35 httpd on
[root@centos01 ~]# systemctl start httpd
⑥设置网站域名
[root@centos01~]#cp /usr/local/httpd/conf/httpd.conf /usr/local/httpd/conf/httpd.conf.bak
[root@centos01 ~]# mkdir /var/www
⑦配置网站根目录与网页
[root@centos01 ~]# mkdir /var/www
[root@centos01 ~]# echo “www.benet.com” > /var/www/index.html
⑧修改相关配置文件。


4.检查端口号是否启动。

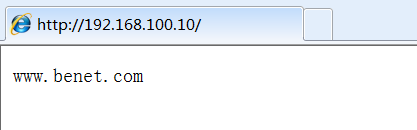
5.验证:可以通过IP访问。不能通过域名访问
二、配置DNS服务器,使客户端可以用域名访问网页。或使用host文件。
1.将CentOS02配置为DNS服务器。
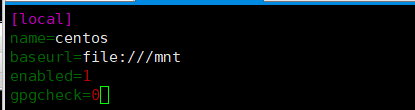
①使用系统盘,配置local.repo
[root@centos02 ~]# mount /dev/cdrom /mnt/
[root@centos02 ~]# rm -rf /etc/yum.repos.d/CentOS-*
[root@centos02 ~]# vim /etc/yum.repos.d/local.repo
②安装DNS。
[root@centos02 ~]# yum -y install bind bind-utils bind-chroot
③编辑配置文件
[root@centos02 ~]# cp /etc/named.conf /etc/named.conf.bak 备份配置文件
[root@centos02 ~]# echo “” > /etc/named.conf 将配置文件清空
[root@centos02 ~]# vim /etc/named.conf 编辑配置文件

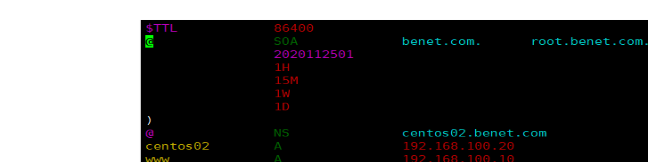
④配置benet.com区域文件
[root@centos02 ~]# vim /var/named/benet.com.zone
【实验结果】
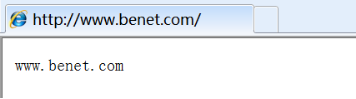
验证:使用客户端用域名访问网页


 1266
1266


 被折叠的 条评论
为什么被折叠?
被折叠的 条评论
为什么被折叠?
 到【灌水乐园】发言


