


在iOS中, 动画效果无处不在, 但这些都是系统自己设定好的, 有时候我们想自定义一个动画就有些难度了, 现在让我们来一起看看, 怎么在iOS中使用好Animation.
PS: 已更新到Swift 2.0, 支持Xcode 7, iOS 9
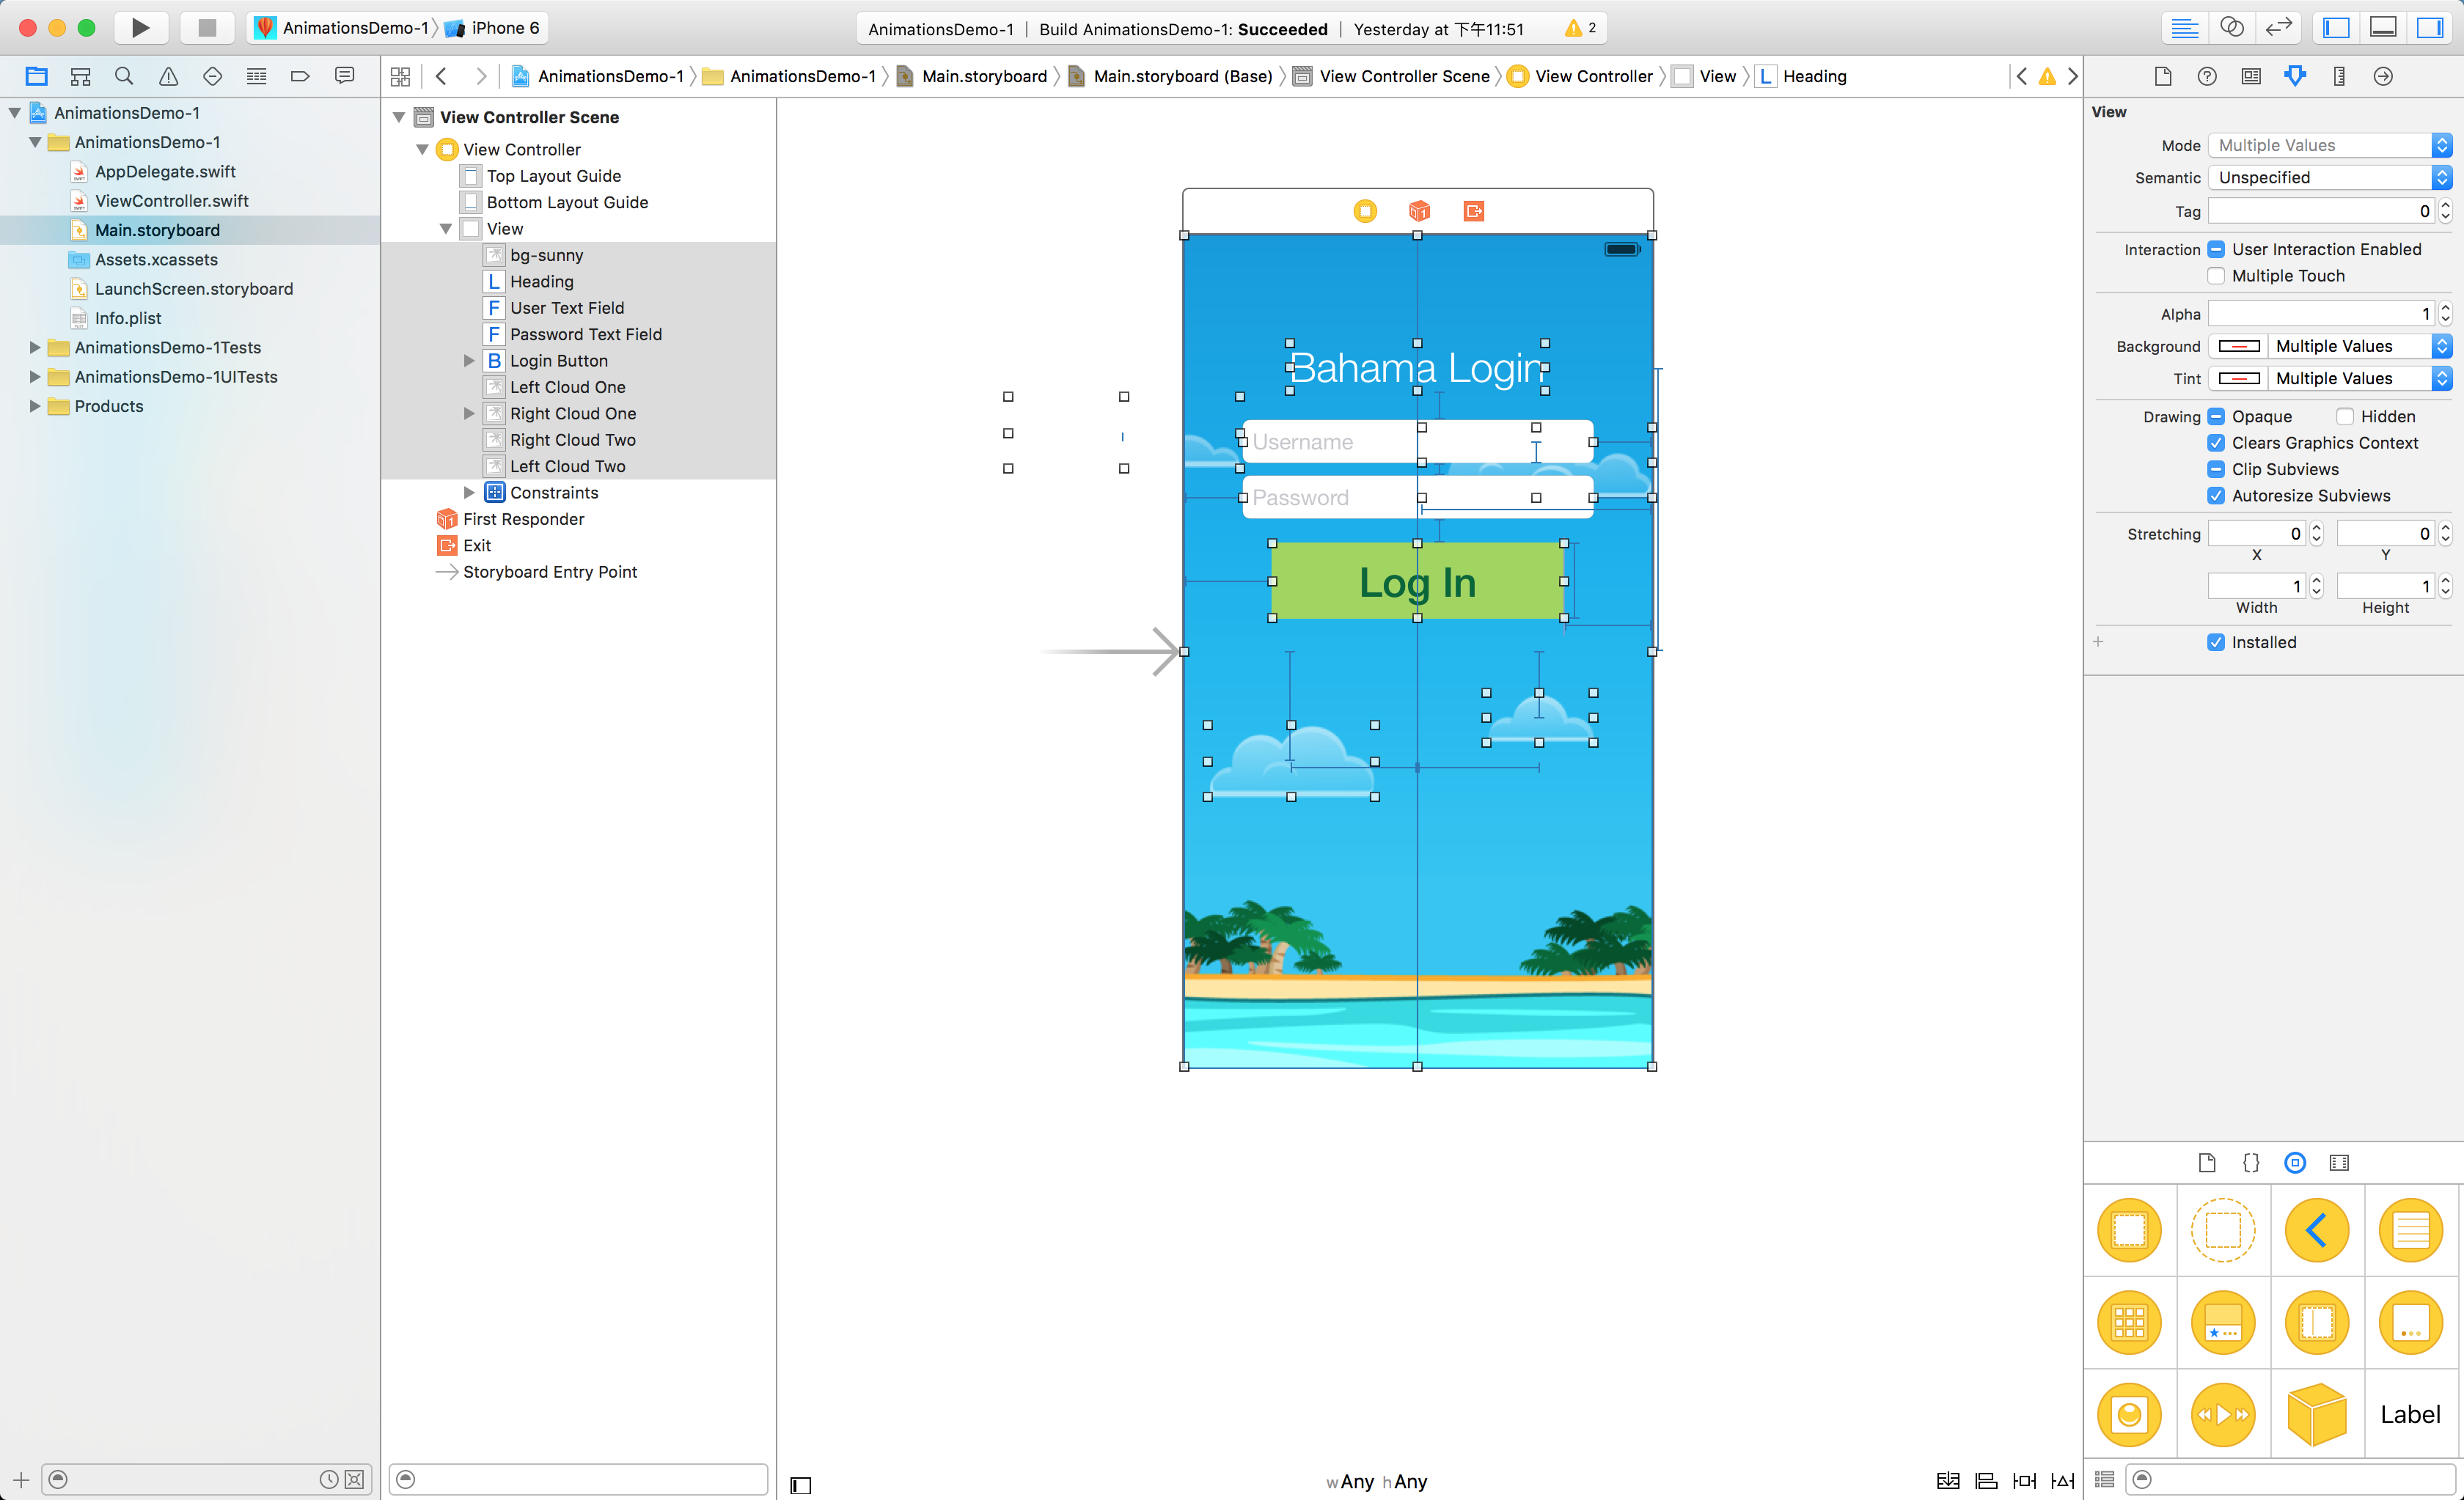
1.界面布局
PS: 在这里, 我使用的是AutoLayout, 关于AutoLayout的资料, 就需要大家自行去查找了.
2.实现代码
绑定控件
class ViewController: UIViewController {

    // 1.关联控件
    @IBOutlet var heading: UILabel!

    @IBOutlet var userTextField: UITextField!
    @IBOutlet var passwordTextField: UITextField!

    @IBOutlet var leftCloudOne: UIImageView!
    @IBOutlet var leftCloudTwo: UIImageView!

    @IBOutlet var rightCloudOne: UIImageView!
    @IBOutlet var rightCloudTwo: UIImageView!

    @IBOutlet var loginButton: UIButton!

    @IBOutlet weak var spinner: UIActivityIndicatorView!
}
实例化几个必备东西
     // 2.实例化messagesLabel
    var messages = UILabel()

    // 3.实例化statusImageView
    var status = UIImageView(image: UIImage(named: "banner"))

    // 4.初始中心点
    var statusPosition = CGPoint.zeroPoint

    // 5.初始messageArray
    var messagesArray = ["Connecting ...", "Authorizing ...", "Sending credentials ...", "Failed"]
设置viewDidLoad方法
    // 6.设置viewDidLoad方法
    override func viewDidLoad() {
        super.viewDidLoad()

        // 6.1.隐藏status
        status.hidden = true

        // 6.2.设置status的位置
        status.center = CGPointMake(self.view.center.x, self.view.center.y - self.loginButton.frame.height)

        // 6.3.把status添加到self.view上
        view.addSubview(status)

        // 6.4.初始化messagesLabel的位置
        messages.frame = CGRect(x: 0.0, y: 0.0, width: status.frame.size.width, height: status.frame.size.height)

        // 6.5.设置messageLabel的文字类型, 以及文字大小
        messages.font = UIFont(name: "HelveticaNeue", size: 18.0)

        // 6.6.设置messageLabel的文字颜色
        messages.textColor = UIColor(red: 0.89, green: 0.38, blue: 0.0, alpha: 1.0)

        // 6.7.设置messageLabel的文字位置为居中
        messages.textAlignment = .Center

        // 6.8.把message添加到status中
        status.addSubview(messages)

        // 6.9.设置加载器的透明度
        self.spinner.alpha = 0.0

        // 6.10.设置loginButton的透明度
        self.loginButton.alpha = 0.0

        // 6.11.设置statusPosition等于status的中心点
        self.statusPosition = status.center
    }
重写两个方法
// 7.重写即将显示View时的方法
override func viewWillAppear(animated: Bool) {
    // 7.1.国际惯例, 要先调用super的viewWillAppear方法
    super.viewWillAppear(animated)

    // 7.2.调用自定义的方法, 把对应的UI控件, 以及动画事件, 延迟事件, 以及动画的执行样式等参数填入
    viewAnimations(0.5, delay: 0.2, options: [], animations:{ self.heading.center.x += self.view.bounds.width }, completion: nil)
    viewAnimations(0.5, delay: 0.3, options: [], animations:{ self.userTextField.center.x += self.view.bounds.width }, completion: nil)
    viewAnimations(0.5, delay: 0.4, options: [], animations:{ self.passwordTextField.center.x += self.view.bounds.width }, completion: nil)

    // 7.3.把四朵云都设置为透明
    leftCloudOne.alpha = 0.0
    rightCloudOne.alpha = 0.0
    leftCloudTwo.alpha = 0.0
    rightCloudTwo.alpha = 0.0

    // 7.4调用系统自带的animate方法, 设置持续时间, 延迟时间, 弹簧的阻尼度, 弹簧的初始速度
    UIView.animateWithDuration(0.5, delay: 0.5, usingSpringWithDamping: 0.5, initialSpringVelocity: 0.0, options: [], animations: { () -> Void in
        // 7.5.设置loginButton的y轴
        self.loginButton.center.y -= 30
        // 7.6.设置loginButton的透明度
        self.loginButton.alpha = 1.0
        }, completion: nil)
}

// 8.重写完全显示View时的方法
override func viewDidAppear(animated: Bool) {
    // 8.1.国际惯例, 要先调用super的viewDidAppear方法
    super.viewDidAppear(animated)

    // 8.2.调用自定义的方法, 把对应的UI控件, 以及动画事件, 延迟事件, 动画的执行样式, 以及透明度等参数填入
    viewAnimations(0.5, delay: 0.5, options: [], animations:{ self.leftCloudOne.alpha = 1.0 }, completion: nil)
    viewAnimations(0.5, delay: 0.7, options: [], animations:{ self.rightCloudOne.alpha = 1.0 }, completion: nil)
    viewAnimations(0.5, delay: 0.9, options: [], animations:{ self.leftCloudTwo.alpha = 1.0 }, completion: nil)
    viewAnimations(0.5, delay: 1.1, options: [], animations:{ self.rightCloudTwo.alpha = 1.0 }, completion: nil)

    // 8.3.调用自定义好的animateCloud方法, 把对应的UI控件传入
    animateCloud(leftCloudOne)
    animateCloud(leftCloudTwo)
    animateCloud(rightCloudOne)
    animateCloud(rightCloudTwo)
}
自定义动画方法
// 9.自定义UIView动画方法func viewAnimations(duration: NSTimeInterval, delay: NSTimeInterval, options: UIViewAnimationOptions, animations:( () -> Void), completion: ((Bool) -> Void)?) {
    UIView.animateWithDuration(duration, delay: delay, options: options, animations: animations, completion: completion)
}

// 10.自定义usingSpring动画func usingSpringAnimate(duration: NSTimeInterval, delay: NSTimeInterval, damping: CGFloat, velocity: CGFloat, option: UIViewAnimationOptions, animation: (() -> Void), completion: ((Bool) -> Void)?) {
    UIView.animateWithDuration(duration, delay: delay, usingSpringWithDamping: damping, initialSpringVelocity: velocity, options: option, animations: animation, completion: completion)
}
绑定loginButton的点击事件
// 11.绑定UIButton点击事件
@IBAction func loginButton(sender: UIButton) {
    // 11.1.调用自定义好的usingSpringAnimate动画, 把对应的持续时间, 延迟时间, 速度, 动画的类型, 以及对应的UI控件的动画填入
    usingSpringAnimate(1.5, delay: 0.0, damping: 0.2, velocity: 0.0, option: [], animation: {
        // 11.2.设置loginButton的宽度
        self.loginButton.bounds.size.width += 80.0
        }, completion: nil)

    // 11.3.调用自定义好的usingSpringAnimate动画, 把对应的持续时间, 延迟时间, 速度, 动画的类型, 以及对应的UI控件的动画, 完成后的操作填入
    usingSpringAnimate(0.33, delay: 0.0, damping: 0.7, velocity: 0.0, option: [], animation: {
        // 11.4.设置loginButton的y轴
        self.loginButton.center.y += 60.0
        // 11.5.设置loginButton的背景色
        self.loginButton.backgroundColor = UIColor(red: 0.85, green: 0.83, blue: 0.45, alpha: 1.0)
        // 11.6.设置加载控件的位置
        self.spinner.center = CGPoint(x: self.loginButton.frame.size.width / 4, y: self.loginButton.center.y)
        // 11.7.设置加载控件的透明度
        self.spinner.alpha = 1.0
        }, completion: {_ in
            // 11.8.调用自定义好的显示文字的方法, 并且传入的index为0
            self.showMessage(index: 0)
    })
}
优化操作体验
// 12.体验优化, 点击屏幕的事件
override func touchesBegan(touches: Set<UITouch>, withEvent event: UIEvent?) {
    // 12.1.每当点击屏幕, 就结束self.view的编辑状态
    self.view.endEditing(true)
}
自定义显示文字的方法
    // 13.自定义显示文字的方法
    func showMessage(index index: Int) {

        // 13.1.设置Lable的文字等于messagesArray里的某个元素
        self.messages.text = messagesArray[index]

        // 13.2.开始transition动画, 设置UI控件为status, 持续时间为0.33, 设置动画类型为[.CurveEaseOut, .TransitionCurlDown]
        UIView.transitionWithView(status, duration: 0.33, options: [.CurveEaseOut, .TransitionCurlDown], animations: { () -> Void in

            // 13.3.显示状态栏
            self.status.hidden = false
        }, completion: {_ in
            // 13.4.调用自定义好的延迟方法, 并且设置时间
            self.delay(seconds: 2.0, completion: {

                // 13.5.判断, 如果index是小于messagesArray - 1, 就执行下面的方法
                if index < self.messagesArray.count - 1 {
                    // 13.6.调用自定义切换文字的方法, 并且把index传入进去
                    self.removeMessage(index: index)
                }
        })
    })
}
自定义切换文字的方法
    // 14.自定义切换文字的方法
    func removeMessage(index index: Int) {

        // 14.1.开始animate动画, 设置时间为0.33, 延迟为0, 没有动画类型
        UIView.animateWithDuration(0.33, delay: 0.0, options: [], animations: {
            // 14.2.动画开始之后, Label就会移出整个屏幕
            self.status.center.x += self.view.frame.size.width
        }, completion: {_ in
            // 14.3.完成之后, 状态栏就隐藏
            self.status.hidden = true

            // 14.4.重置状态栏的位置
            self.status.center = self.statusPosition

            // 14.5.并且切换文字
            self.showMessage(index: index+1)
    })
}
自定义一个延迟的方法
    // 15.自定义一个延迟的方法
    func delay(seconds seconds: Double, completion:()->()) {
        // 15.1.创建一个默认的时间值
        let popTime = dispatch_time(DISPATCH_TIME_NOW, Int64( Double(NSEC_PER_SEC) * seconds ))

        // 15.2.在主线程中使用创建好的默认时间值
        dispatch_after(popTime, dispatch_get_main_queue()) {
        completion()
    }
}
自定义云的动画
    // 16.自定义云动画
    func animateCloud(cloud: UIImageView) {
        // 16.1.定义云每分钟的所行走的速度
        let cloudSpeed = 60.0 / view.frame.size.width

        // 16.2.定义动画的持续时间
    let duration = (view.frame.size.width - cloud.frame.origin.x) * cloudSpeed

    // 16.3.开始animate动画
    UIView.animateWithDuration(NSTimeInterval(duration), delay: 0.0, options: .CurveLinear, animations: {
        // 16.4.设置云的x轴等于整个屏幕的宽度, 那么云就会根据设定好的速度走出整个屏幕
        cloud.frame.origin.x = self.view.frame.size.width
        }, completion: {_ in

            // 16.5.一旦云的动画结束了, 那么就会重置云的位置
            cloud.frame.origin.x = -cloud.frame.size.width

            // 16.6.并且重新执行动画
            self.animateCloud(cloud)
    })
}
3.最终效果
项目地址: 链接: http://pan.baidu.com/s/1kTH1i7d 密码: rpa1


 9478
9478

 被折叠的 条评论
为什么被折叠?
被折叠的 条评论
为什么被折叠?
 到【灌水乐园】发言


