


log4cplus是C++编写的开源的日志系统很有名也很强大,但网上大多的资料都是讲如何配置使用。关于编译过程一笔带过,尤其是windows下的编译过程少之又少。得先有编译这个提才有后续的使用,里面的坑也少有提及。以下对详细的编译过程和使用做个完整总结。
一、log4cplus介绍
log4cplus是C++编写的开源的日志系统,前身是java编写的log4j系统,受Apache Software License保护,作者是Tad E. Smith。
log4cplus具有线程安全、灵活、以及多粒度控制的特点,通过将日志划分优先级使其可以面向程序调试、运行、测试、和维护等全生命周期。你可以选择将日志输出到屏幕、文件、NT event log、甚至是远程服务器;通过指定策略对日志进行定期备份等等。
二、log4cplus下载
下载链接:https://sourceforge.net/projects/log4cplus/files/log4cplus-stable/2.0.7/
最新稳定版2.0.8(2022.8.15)
官方文档:https://sourceforge.net/p/log4cplus/wiki/Home/
github地址:https://github.com/log4cplus/log4cplus
国内镜像地址:mirrors / log4cplus / log4cplus · GitCode
最新版可能需要C++2017(不一定哦,实测vs2015编译2.0.8通过。官方介绍是3.0以后的才需要c++2017),这里也给个低版本的,支持用C++11的一个tag版本: GitHub - log4cplus/log4cplus at REL_2_0_4
三、编译生成库
Linux下编译
linux下的编译稍微简单些.
1- 解压: gzip -cd log4cplus-x.x.x.tar.gz | tar -xf -
2- 进入log4cplus根目录: cd log4cplus-x.x.x
3- 产生Makefile: ./configure --prefix=/where/to/install -enable-threads=no
如果需要指定安装路径可使用--prefix参数, 否则将缺省安装到/usr/local目录下。另外,如果需要单线程版本可通过参数-enable-threads=no指定, 否则默认将安装多线程版本。
另外需要注意的是,--enable-static这个参数是编译静态库的选项,默认是没打开的。需要静态库的话需要开启此选项。
windows下编译
windows下的编译稍麻烦些。
可以选择的编译方式有:Visual Studio,cmake,vcpkg等. 其中使用vcpkg是最简单省事的。
方式一、Visual Studio环境编译
On Windows, the primary build system is Visual Studio 2015 solution and projects (msvc14/log4cplus.sln).
有windows下的Visual Studio环境的,可以打开Visual Studio,进入 log4cplus-2.x\msvc14目录下,运行log4cplus.sln解决方案。
1.选择log4cplus项目,属性里面的字符集和目标程序一致。右键——>属性——>配置属性——>常规——>字符集,选择Unicode字符集。
2.解决方案的平台与目标程序一致,这里选择的是x64。
3.版本也要与目标程序一致,这里选择的是release版本。
编译完成后,会在log4cplus-2.x\msvc14\x64\bin.Release文件夹下生成我们需要的log4cplus.lib和log4cplus.dll两个文件。
将log4cplus-2.0.x目录下的include文件夹拷贝到我们的目标程序文件夹中,这里面是我们需要的头文件。
简单的测试:
#include <log4cplus/log4cplus.h>

//#pragma comment(lib, "log4cplus.lib")

int main()
{
	//初始化
	log4cplus::Initializer initializer;

	log4cplus::BasicConfigurator config;
	config.configure();

	log4cplus::Logger logger = log4cplus::Logger::getInstance(
		LOG4CPLUS_TEXT("main"));
	LOG4CPLUS_WARN(logger, LOG4CPLUS_TEXT("Hello, World!"));

	system("pause");
	return 0;
}
异步模式需要开启,不然多线程同时写日志会有问题。
以下是旧版本的才需要的。
旧版本的需要到 https://github.com/log4cplus/ThreadPool
把.h和.cpp文件下载下来,放到\log4cplus\log4cplus-REL_2_0_4\threadpool 目录里。
Catch-master
下载:Catch-master.zip 解压后,把文件夹中的内容复制到 log4cplus-REL_2_0_4\catch中。
新版本的不用这些操作,新版源码里已经包含了。
方式二、vcpkg环境
依赖包安装
1.使用神器vcpkg
2.vcpkg install log4cplus[core, unicode]:x86-windows, 安装匹配项目的包(64位的是:x64-windows)
方式三、cmake环境编译
在下载的源码根目录下建个build_msvc文件夹,进入该文件夹,执行:
log4cplus-2.0.8\build_msvc> cmake ../
vc的工程
以上如果不指定生成的makefile类型,则默认生成的是vc的工程。
gcc工具链
若不需要vs的工程,则需额外指定生成的makefile文件类型如:
log4cplus-2.0.8\build_msvc>cmake ../ -G"Unix Makefiles"但以上生成的默认是使用的gcc工具链。
MinGW工具链
若使用MinGW编译器 ,则需指定
cmake -G "MinGW Makefiles"生成的是MinGW Makefiles,而不是生成 MSVC 的工程文件。
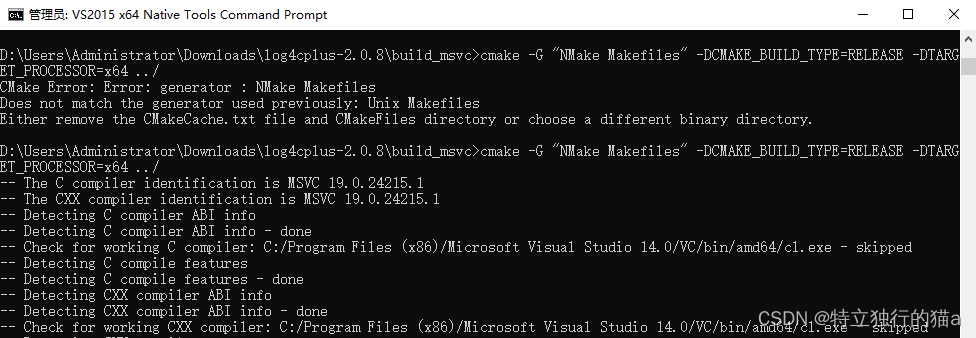
若想使用msvc的工具链和vc的nmake,怎么办呢?
msvc的工具链(nmake)
cmake -G "NMake Makefiles" -DCMAKE_BUILD_TYPE=RELEASE -DTARGET_PROCESSOR=x64 ../这个操作的前提是需要工具链和nmake在环境变量里能找到。
手工编译
手工编译的话,最简单的办法是直接进入vs自带的dos环境窗口:

以上是手工编译的详细过程。
自动化ps脚本编译
若要写成windows下的powershell脚本,则复用性更强些,可以写为:
$VcpkgPath = "E:/vcpkg/scripts/buildsystems/vcpkg.cmake"
# Write-Host "`nVcpkgPath: $VcpkgPath" -ForegroundColor Yellow

$QtPath = "D:\Qt5.12.11\Qt5.12.11\5.12.11\msvc2015_64\bin"
$QtLibPATH = "D:\Qt5.12.11\Qt5.12.11\5.12.11\msvc2015_64\lib\cmake"
# Write-Host "`nQtPath: $QtPath" -ForegroundColor Yellow

function RemoveBuildDirectory {
    Set-Location ..

    if (Test-Path build_for_log4cplus) {
        Remove-Item build_for_log4cplus -Recurse
    }

    Set-Location script_build
}
function MakeEnvForBuildProject {
  Push-Location 'C:\Program Files (x86)\Microsoft Visual Studio 14.0\VC\bin\amd64'
  cmd /c "vcvars64.bat&set" |
  ForEach-Object {
    if ($_ -match "=") {
      $v = $_.split("="); set-item -force -path "ENV:\$($v[0])"  -value "$($v[1])"
    }
  }
  Pop-Location
  # write-host "`nVisual Studio 2015 Command Prompt variables set." -ForegroundColor Yellow

  Push-Location $QtPath
  cmd /c "qtenv2.bat&set" |
  ForEach-Object {
    if ($_ -match "=") {
      $v = $_.split("="); set-item -force -path "ENV:\$($v[0])"  -value "$($v[1])"
    }
  }
  Pop-Location
}

function ConfigCMakeProject {
  Set-Location ../
  cmake . -B Release_build -DCMAKE_BUILD_TYPE=RelWithDebInfo  -DCMAKE_PREFIX_PATH="$QtLibPATH" -Wno-dev -G "NMake Makefiles"
  if ($?) {
    Write-Host "Config CMake Project Success." -ForegroundColor Green

    Set-Location script_build
  }
  else {
    Write-Host "Config CMake Project Failed." -ForegroundColor Red

    Remove-Item Release_build -Recurse

    Set-Location script_build
    Exit 2
  }
}

function BuildCMakeProject {
  Write-Host "compiling for project. Debug" -ForegroundColor Green

  Set-Location ../Release_build
  $Env:NINJA_STATUS = "[%f/%t %e/sec]"
  nmake
  if ($?) {
    Write-Host "compiled for service project success." -ForegroundColor Green

    Set-Location ..
    Remove-Item Release_build -Recurse
    Set-Location script_build
  }
  else {
    Write-Host "compiled for service project failed." -ForegroundColor Red

    Set-Location ..
    Remove-Item Release_build -Recurse
    Set-Location script_build

    Exit 3
  }
}

RemoveBuildDirectory

MakeEnvForBuildProject

ConfigCMakeProject
BuildCMakeProject
经过以上操作,就输出了我们想要的log4cplusU.dll了,不过静态库竟然没生成。(其实是有生成的,在src文件夹里,没和动态库所在的bin文件夹一块儿)。使用时别忘把头文件也拷贝进自己的项目工程。
四、log4cplus库使用
加载库到工程
把需要的头文件放在工程目录下。把需要的log4cplusU.dll和log4cplusU.lib库也添加到工程项目里。
注意,虽然使用的是静态库,但是那个动态库也得放进去。否则虽然编译通过,但是跑不起来,会报找不到og4cplusU.dll的错误。
这里以cmake的工程为例,介绍下静态库的使用。CMakeLists.txt文件片段如下:
#find_library(LibConfig libconfig++)
#message(STATUS ${LibConfig})
#find_package(unofficial-breakpad CONFIG REQUIRED)

set(LOGGING_LIB ${LIB_DIR}/lib/log4cplusU${LIB_FIX}.lib)
set(THIRD_LIBS
        ${LOGGING_LIB}
        #unofficial::breakpad::libbreakpad
        #unofficial::breakpad::libbreakpad_client
        )
#target_link_options(${PROJECT_NAME} PRIVATE -mwindows)
target_link_libraries(${PROJECT_NAME} PRIVATE ${THIRD_LIBS})
基本使用步骤
使用log4cplus有六个基本步骤:
1、实例化一个封装了输出介质的appender对象。
2、实例化一个封装了输出格式的layout对象。
3、将layout对象绑定(attach)到appender对象,如省略此步骤,简单布局器SimpleLayout(参见5.1小节)对象会绑定到logger。
4、实例化一个封装了日志输出logger对象,并调用其静态函数getInstance()获得实例,log4cplus::Logger::getInstance(“logger_name”)。
5、将appender对象绑定(attach)到logger对象。
6、设置logger的优先级,如省略此步骤,各种有限级的日志都将被输出。
代码示例
#include <log4cplus/log4cplus.h>

int main()
{
	//用Initializer类进行初始化
	log4cplus::Initializer initializer;

	//第1步:创建ConsoleAppender(实例化一个appender对象)
	log4cplus::SharedAppenderPtr appender(new log4cplus::ConsoleAppender());

	//第2步:设置Appender的名称和输出格式(SimpleLayout)
	appender->setName(LOG4CPLUS_TEXT("console"));

	//第3步:实例化一个layout对象,将layout对象绑定到appender对象
	appender->setLayout(std::unique_ptr<log4cplus::Layout>(new log4cplus::SimpleLayout));

	//第4步:实例化一个封装了日志输出的Logger对象,并设置其日志输出等级阈值
	log4cplus::Logger logger = log4cplus::Logger::getInstance(LOG4CPLUS_TEXT("test"));

	//第5步:将appender对象绑定到logger对象
	logger.addAppender(appender);

	//第6步:设置日志log的优先级
	logger.setLogLevel(log4cplus::INFO_LOG_LEVEL);

	//使用宏将日志输出
	LOG4CPLUS_INFO(logger, LOG4CPLUS_TEXT("Hello world"));

	return 0;
}
以上示例,使用了简单的Simplelayout布局器。输出格式可能不是我们想要的输出格式。一般常使用PatternLayout格式,示例如下:
#include <log4cplus/log4cplus.h>

int main()
{
	//用Initializer类进行初始化
	log4cplus::Initializer initializer;

	//第1步:建立ConsoleAppender
	log4cplus::SharedAppenderPtr appender(new log4cplus::ConsoleAppender());

	//第2步:设置Appender的名称和输出格式(SimpleLayout)
	appender->setName(LOG4CPLUS_TEXT("console"));

	log4cplus::tstring pattern = LOG4CPLUS_TEXT("%D{%m/%d/%y %H:%M:%S,%Q} [%t] %-5p %c - %m [%l]%n");
	appender->setLayout(std::unique_ptr<log4cplus::Layout>(new log4cplus::PatternLayout(pattern)));

	//第3步:得到一个Logger实例,并设置其日志输出等级阈值
	log4cplus::Logger logger = log4cplus::Logger::getInstance(LOG4CPLUS_TEXT("test"));
	logger.setLogLevel(log4cplus::INFO_LOG_LEVEL);

	//第4步:为Logger实例添加ConsoleAppender
	logger.addAppender(appender);

	//第5步:使用宏将日志输出
	LOG4CPLUS_INFO(logger, LOG4CPLUS_TEXT("Hello world"));

	return 0;
}
遇到的坑
最后,本以为顺顺利利,结果竟出现了恼人的链接错误,大致内容为:
main.cpp.obj : error LNK2019: unresolved external symbol "public: __thiscall log4cplus::PatternLayout::PatternLayout(class std::basic_string<char,struct std::char_traits<char>,class std::allocator<char> > const &)" (??0PatternLayout@log4cplus@@QAE@ABV?$basic_string@DU?$char_traits@D@std@@V?$allocator@D@2@@std@@@Z) referenced in function "int __cdecl test_log4plus(void)" (?test_log4plus@@YAHXZ)
main.cpp.obj : error LNK2019: unresolved external symbol "public: static class log4cplus::Logger __cdecl log4cplus::Logger::getInstance(class std::basic_string<char,struct std::char_traits<char>,class std::allocator<char> > const &)" (?getInstance@Logger@log4cplus@@SA?AV12@ABV?$basic_string@DU?$char_traits@D@std@@V?$allocator@D@2@@std@@@Z) referenced in function "int __cdecl test_log4plus(void)" (?test_log4plus@@YAHXZ)
main.cpp.obj : error LNK2019: unresolved external symbol "class std::basic_ostringstream<char,struct std::char_traits<char>,class std::allocator<char> > & __cdecl log4cplus::detail::get_macro_body_oss(void)" (?get_macro_body_oss@detail@log4cplus@@YAAAV?$basic_ostringstream@DU?$char_traits@D@std@@V?$allocator@D@2@@std@@XZ) referenced in function "int __cdecl test_log4plus(void)" (?test_log4plus@@YAHXZ)
main.cpp.obj : error LNK2019: unresolved external symbol "void __cdecl log4cplus::detail::macro_forced_log(class log4cplus::Logger const &,int,class std::basic_string<char,struct std::char_traits<char>,class std::allocator<char> > const &,char const *,int,char const *)" (?macro_forced_log@detail@log4cplus@@YAXABVLogger@2@HABV?$basic_string@DU?$char_traits@D@std@@V?$allocator@D@2@@std@@PBDH2@Z) referenced in function "int __cdecl test_log4plus(void)" (?test_log4plus@@YAHXZ)
..\build\Release\lib\mywincom.exe : fatal error LNK1120: 4 unresolved externals
猜测原因难道是调用约定不一致?还是字符集问题?
关于调用约定
microsoft的vc默认的是__cdecl方式,而windows API则是__stdcall,如果用vc开发dll给其他语言用,则应该指定__stdcall方式。
1.__cdecl
所谓的C调用规则。按从右至左的顺序压参数入栈,由调用者把参数弹出栈。切记:对于传送参数的内存栈是由调用者来维护的。返回值在EAX中因此,对于象printf这样变参数的函数必须用这种规则。编译器在编译的时候对这种调用规则的函数生成修饰名的饿时候,仅在输出函数名前加上一个下划线前缀,格式为_functionname。
2.__stdcall
按从右至左的顺序压参数入栈,由被调用者把参数弹出栈。_stdcall是Pascal程序的缺省调用方式,通常用于Win32 Api中,切记:函数自己在退出时清空堆栈,返回值在EAX中。 __stdcall调用约定在输出函数名前加上一个下划线前缀,后面加上一个“@”符号和其参数的字节数,格式为_functionname@number。如函数int func(int a, double b)的修饰名是_func@12。
如何解决?
在编译库时首选要明确和统一调用方式。若是stdcall则在cmake中可尝试使用以下参数:
set(CMAKE_SHARED_LINKER_FLAGS "-Wl,--add-stdcall-alias")
经验证非此问题,那么最终原因最可能是字符集问题了。难怪编译的库都带个U,说明库本身是Unicode字符集的,那么代码里必须也得使用Unicode字符集。仅代码文件格式为utf-8行吗?
答案是不行的,需要代码文件里指定:#define UNICODE这个宏定义。猜测可能是log4plus的头文件里判断了这个宏来提供不同的接口。
字符集问题
由于我的导入库lib,以及动态库dll都是正确加载的,所以不是库没正确加载的问题,也不是release加载了debug版本的问题。
最可能是当前工程项目的“字符集”设置与log4plus所用的“字符集”不一致所导致的,log4cplus是使用的Unicode 符集,当前工程需要检查下是否是使用的Unicode字符集。这里面有个概念需要搞清楚啊,文件的编码格式为utf-8不代表使用的Unicode字符集!
- Unicode 是「字符集」
- UTF-8 是「编码规则」
最后果然成功啦,这时候激动的泪儿都要出来了,这坑有点儿深啊。
在main函数所在的代码文件的最上方定义:#define UNICODE 搞定。
注意:
#define UNICODE 必须是在文件的最上方,放在log4cplus下方不行!
还有其他的一些注意事项,网上的介绍少有提及,比如:
Linking on Windows
If you are linking your application with DLL variant of log4cplus, define LOG4CPLUS_BUILD_DLL preprocessor symbol. This changes definition of LOG4CPLUS_EXPORT symbol to __declspec(dllimport).
--with-qt5
This option is disabled by default. It enables compilation of a separate shared library (liblog4cplusqt5debugappender) that implements Qt5DebugAppender. It requires Qt5 and pkg-config to be available.
Threads and signals
log4cplus is not safe to be used from asynchronous signals' handlers. This is a property of most threaded programmes in general. If you are going to use log4cplus in threaded application and if you want to use log4cplus from signal handlers then your only option is to block signals in all threads but one that will handle all signals. On POSIX platforms, this is possible using the sigwait() call. log4cplus enables this approach by blocking all signals in any threads created through its threads helpers.
还是要好好多读以下官方的readme.md文档。
地址在这里:README.md · master · mirrors / log4cplus / log4cplus · GitCode
主进程无法退出问题
构造函数调用log4cplus::initialize(),析构函数调用log4cplus::Logger::shutdown()
log4cplus::Initializer m_initializer;//构造函数调用log4cplus::initialize(),析构函数调用log4cplus::Logger::shutdown()。
还没完:当你使用了ThreadPool之后,log4cplus总是会在main函数执行之前使用static机制初始化,并创建线程池。如果你在main函数退出的时候没有调用log4cplus::deinitialize();
则线程池中的线程不会退出。导致main函数无法退出。所以要在main函数退出之前调用这句话,如果不调用,那个log4cplus::Initializer m_initializer;只负责调用shutdown,而不负责调用clearThreadPool。只有log4cplus::deinitialize();才会既clearThreadPool又shutdown。
为何必须先调用log4cplus::initialize(),文档上有个解释如下:

还需要注意的是log4cplus::Initializer m_initializer;如果放到单独封装的单例类里的构造函数中是不行的,It will initialize the library and deinitialize it at the end of the constructor. The initializer object must live throughout the use of the library.
可以单独封装一个接口,类似如下:
void close()
{
   log4cplus::deinitialize();
}
然后在主程序main函数return之前调用该函数。
封装使用
最后介绍下封装使用。新建两个文件,logger.h和logger.cpp.
#define UNICODE
#include <log4cplus/logger.h>
#include <log4cplus/layout.h>
#include <log4cplus/configurator.h>

#include "logger.h"

Logger logger = Logger::getInstance(LOG4CPLUS_TEXT("logmain"));

void initLogger(bool isDebug) {
    if (isDebug) {
        PropertyConfigurator::doConfigure(LOG4CPLUS_TEXT("./log4cplus_d.conf"));
    } else {
        PropertyConfigurator::doConfigure(LOG4CPLUS_TEXT("./log4cplus.conf"));
    }
}

void shutDown(){
    log4cplus::Logger::shutdown();
}

void close()
{
    log4cplus::deinitialize();
}
#pragma once
#include <log4cplus/logger.h>
#include <log4cplus/loggingmacros.h>

using namespace log4cplus;
using namespace log4cplus::helpers;

// global object
extern Logger logger;

// define some macros for simplicity
#define LOG_TRACE(logEvent)			LOG4CPLUS_TRACE(logger, logEvent)
#define LOG_DEBUG(logEvent)			LOG4CPLUS_DEBUG(logger, logEvent)
#define LOG_DEBUG_F(...)            LOG4CPLUS_DEBUG_FMT(logger, __VA_ARGS__)
#define LOG_INFO(logEvent)			LOG4CPLUS_INFO(logger, logEvent)
#define LOG_WARN(logEvent)			LOG4CPLUS_WARN(logger, logEvent)
#define LOG_ERROR(logEvent)			LOG4CPLUS_ERROR(logger, logEvent)
#define LOG_FATAL(logEvent)			LOG4CPLUS_FATAL(logger, logEvent)

extern void initLogger(bool isDebug);

extern void shutDown();

extern void close();
日志的配置文件log4cplus.conf如下:
##debug可以如下配置
log4cplus.logger.logmain = TRACE, console
log4cplus.appender.console = log4cplus::ConsoleAppender
log4cplus.appender.console.layout = log4cplus::PatternLayout
log4cplus.appender.console.layout.ConversionPattern = [%D{%m/%d/%y %H:%M:%S,%q} %-5p] - %m%n

##正式生成文件的可以如下配置:
log4cplus.logger.logmain = INFO, file
log4cplus.appender.file = log4cplus::FileAppender
log4cplus.appender.file.File = ./log/myapp.log
log4cplus.appender.file.MaxFileSize = 10M
log4cplus.appender.file.Append = true
log4cplus.appender.file.layout = log4cplus::PatternLayout
log4cplus.appender.file.layout.ConversionPattern = [%D{%m/%d/%y %H:%M:%S,%q} %-5p] - %m%n
测试
int main(){

    std::cout << "hello test "<< std::endl;
    //test_log4plus();
    initLogger(true);
    LOG_DEBUG("this is debug");
    LOG_INFO("this is info");
    LOG_TRACE("this is trace");
    LOG_WARN("this is warn");
    LOG_ERROR("this is error");
    LOG_FATAL("this is fatal");

    LOG_DEBUG("this is:" << 666);
    LOG_DEBUG_F(LOG4CPLUS_TEXT("this is %.2f"),5.333);
    shutDown();

    close();
	return 0;

}
单例封装
#ifndef MYLOGGER_H
#define MYLOGGER_H
#define UNICODE
#include <iostream>
#include <string>
#include <mutex>
#include <log4cplus/helpers/loglog.h>
#include <log4cplus/logger.h>
#include <log4cplus/initializer.h>
#include <log4cplus/log4cplus.h>
#include <log4cplus/fileappender.h>
#include <log4cplus/consoleappender.h>
#include <log4cplus/layout.h>
#include <log4cplus/tchar.h>
#include <log4Cplus/configurator.h>
#include <log4Cplus/loggingmacros.h>
#include <log4Cplus/helpers/stringhelper.h>

#define MY_LOG_FILE "log.properties"

using namespace log4cplus;
using namespace log4cplus::helpers;
//单列模式
class MyLogger
{
public:
    static MyLogger* getInstace();
    //static void deleteInstance();
    Logger logger;
    Logger console;
    void shutDown();
    void closeLog();
private:
    MyLogger();
    ~MyLogger(){
        std::cout << "Destory singleton for log4cplus!!" <<std::endl;
    }
    static MyLogger *m_logger;
    static std::mutex myMutex;
private:
    //内部类来删除对象
    class Garbo{
    public:
        Garbo(){}
        ~Garbo(){
            if(m_logger != NULL){
                delete m_logger;
                m_logger = nullptr;
            }
        }
    };
    static Garbo _garbo;
};

#endif // MYLOGGER_H
#include "mylogger.h"

using namespace std;
MyLogger *MyLogger::m_logger = NULL;
mutex MyLogger::myMutex;
MyLogger::Garbo MyLogger::_garbo;

MyLogger *MyLogger::getInstace() {
    if (NULL == m_logger) {
        lock_guard<mutex> mg(myMutex);
        if (NULL == m_logger) {
            m_logger = new MyLogger;//在堆上建立
        }
    }
    return m_logger;
}

MyLogger::MyLogger() {
    log4cplus::initialize();
    PropertyConfigurator::doConfigure(LOG4CPLUS_TEXT(MY_LOG_FILE));
    logger = Logger::getRoot();
    console = Logger::getInstance(LOG4CPLUS_TEXT("logConsole"));
    cout << "Create Singleton for log4cplus!" << endl;
}

void MyLogger::shutDown() {
    log4cplus::Logger::shutdown();
}
void MyLogger::closeLog() {
    log4cplus::deinitialize();
}
# ALL TRACE  DEBUG  INFO  WARN  ERROR  FATAL  OFF
log4cplus.rootLogger = TRACE,SA
log4cplus.logger.logConsole = TRACE,LC

#For database stuff, I don't need to logging everything, it's enough printing only errors!
#log4cplus.logger.DatabaseOperations=ERROR
#log4cplus.additivity.file=false

log4cplus.appender.LC=log4cplus::ConsoleAppender
log4cplus.appender.LC.EnCoding=utf-8
log4cplus.appender.LC.layout=log4cplus::PatternLayout
log4cplus.appender.LC.layout.ConversionPattern=[%D{%Y-%m-%d %H:%M:%S}] %m [%l]%n

#设置日志追加到文件尾
log4cplus.appender.SA=log4cplus::TimeBasedRollingFileAppender
log4cplus.appender.SA.File = Mylogger.log
# 必须要先手动创建好log目录;否则无法创建文件
log4cplus.appender.SA.FilenamePattern= ./log/%d{yyyy-MM-dd_HH-mm}.log
log4cplus.appender.SA.Schedule = MINUTELY
log4cplus.appender.SA.CreateDirs = true
log4cplus.appender.SA.MaxHistory = 9999
log4cplus.appender.SA.RollOnClose = false
#设置日志文件大小
log4cplus.appender.SA.MaxFileSize = 100MB
#设置生成日志最大个数
log4cplus.appender.SA.MaxBackupIndex = 100
log4cplus.appender.SA.Append = true
log4cplus.appender.SA.layout=log4cplus::PatternLayout
log4cplus.appender.SA.layout.ConversionPattern=[%-5p][%D{%m/%d/%y %H:%M:%S:%Q}] [%t] %c - %m [%l]%n

#设置日志级别范围
log4cplus.appender.SA.filters.1=log4cplus::spi::LogLevelRangeFilter
log4cplus.appender.SA.filters.1.LogLevelMin=DEBUG
log4cplus.appender.SA.filters.1.LogLevelMax=FATAL
log4cplus.appender.SA.filters.1.AcceptOnMatch=true
log4cplus.appender.SA.filters.2=log4cplus::spi::DenyAllFilter
用于QT 项目
在qt项目中使用,把log4cplus的头文件拷入项目中,比如我的是根目录的includes文件夹。
在项目的.pro文件中,增加头文件的包含和链接库的脚本。
QT  += core gui concurrent sql printsupport

greaterThan(QT_MAJOR_VERSION, 4): QT += widgets

CONFIG += c++11

DESTDIR = $$PWD/./bin
TARGET = log4cplus_test

LOG4CPLUSPATH = $$PWD/includes

INCLUDEPATH += -L $$LOG4CPLUSPATH \

SOURCES += \
        main.cpp \
        mainwindow.cpp \
        logger.cpp


HEADERS += \
        mainwindow.h \
        logger.h

# Default rules for deployment.
qnx: target.path = /tmp/$${TARGET}/bin
else: unix:!android: target.path = /opt/$${TARGET}/bin
!isEmpty(target.path): INSTALLS += target

LIBS += -L$$PWD/./bin -llog4cplusU
关于字符集,qt默认就是unicode字符集。为了保险起见,我在.pro文件中又设置了字符集如下:DEFINES += UNICODE _UNICODE
最后的最后,顺利的在qt项目中跑了起来。
引用
C++第三方日志库log4cplus的安装与使用超详解_wendy_ya的博客-CSDN博客_log4cplus
C++第三方日志库log4cplus基本语法介绍_wendy_ya的博客-CSDN博客_c++ log4cplus
C/C++ 开源日志库log4cplus的编译和使用_much0726的博客-CSDN博客_log4cplus编译
Windows C++ log4cplus编译开发配置详细步骤_make_it_simple888的博客-CSDN博客
CMake 编译 Log4cplus - 阿Hai - 博客园
Qt中第三方日志库log4cplus的基本配置和使用详解_wendy_ya的博客-CSDN博客_log4cplus配置文件
log4cplus 使用方法 配置_lx_shudong的博客-CSDN博客
Visual Studio 2019 C++使用log4cplus_mb6054360584d89的技术博客_51CTO博客
error LNK2019 【unresolved external symbol】 解决方法_lcyw的博客-CSDN博客
【CMake】构建和链接静态库和动态库 - 禅元天道 - 博客园
_cdecl与_stdcall - freden - 博客园
VS2019 中使用log4cplus,报错link2019处理_Sen-Lee的博客-CSDN博客
【log4】c++日志工具之——log4cpp - bandaoyu - 博客园
log4cplus导致主进程不能退出问题解决_荆楚闲人的博客-CSDN博客
log4cplus 使用方法 配置_lx_shudong的博客-CSDN博客
MFC log4cplus日志库的简单例子_Genven_Liang的博客-CSDN博客
我个人的log4cplus-1.2.1的编译与测试使用,CentOS环境 - 掘金
关于Log4Ccpp的引入使用,不是基础介绍,是项目中使用的方式 - 码农教程
QT 5.15.2 配置log4cplus-2.0.7_Bigfish_k的博客-CSDN博客_cmake log4cplus
c++ - How to use log4cplus in a custom singleton class - Stack Overflow


 1260
1260


 被折叠的 条评论
为什么被折叠?
被折叠的 条评论
为什么被折叠?
 到【灌水乐园】发言


