


一、什么是CALayer
根据CA的前缀就可以知道,这个属于Core Animation的,简单说就是呈现内容和动画的层。
二、UIView与CALayer的区别和选择
UIView:用于管理绘画层的容器
CALayer:实际具备显示能力的层,以bitmap保存的,不具备事件响应能力。
两者具有相互依赖的关系,每一个UIView至少有一个Layer,而UIView上内容的显示依靠Layer.
最简单的区别:UIView具有事件响应能力。
由于CALayer具备更好的性能,资源消耗小,从优化角度,如果只做显示可以使用CALayer或其子类,比如只显示一张图片时,直接添加一张content为目标图片的CALayer.
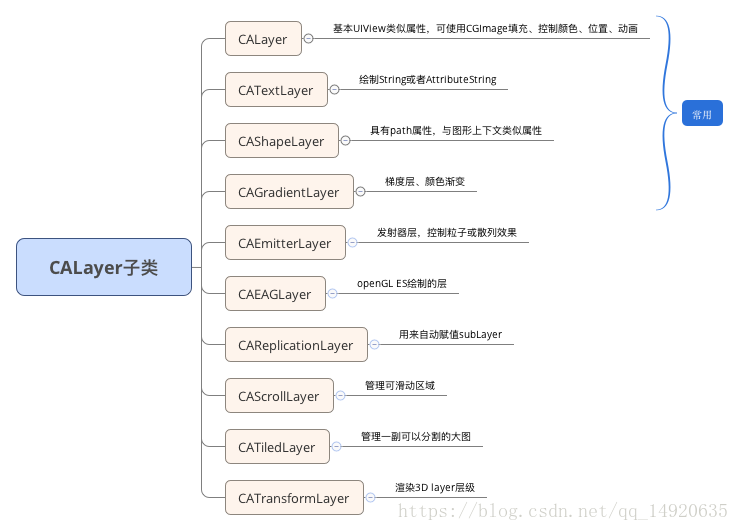
三、CALayer及其子类
CALayer提供一些特殊的子类layer
最好的Layer使用实例:GitHub - scotteg/LayerPlayer: Layer Player explores the capabilities of Apple's Core Animation API
四、实例练习
使用CALayer显示图像,使用CATextLayer显示文本
效果图如下:

如果使用UIView层级关系,创建一个UIImageView对象和UILabel对象完成布局就可以了。
如果使用CALayer和CATextLayer,如下代码所示。
CALayer添加方式:
 /// 通过layer 和 textLayer 添加图片和文字层
    func addImageTitleLayer(to view:UIView) -> Void {

        let groupImg = UIImage(named: "icon_group")
        let layer  = CALayer() //只适合填充Image.cgImage(相当于UIImageView) 颜色 或者自定义绘制的
        layer.frame = CGRect(x: (100-16)/2, y: 10, width: 16, height: 16)
        layer.contents =   groupImg?.cgImage
        layer.contentsScale = UIScreen.main.scale  // 避免图片模糊

        let text = CATextLayer()  //主要填充文字 相当于UILabel
        text.contents = groupImg?.cgImage
        text.string = "群组"
        text.contentsScale = UIScreen.main.scale // 避免文字模糊
        // 设置字体,与UILabel不一样
        let uiFont = UIFont.systemFont(ofSize: 12)
        layer.font = CGFont(uiFont.fontName as CFString)  // 这里设置的是字体名字
        text.fontSize = 12    //设置字体大小
        text.foregroundColor = UIColor.black.cgColor
        text.alignmentMode = kCAAlignmentCenter //对齐方式
        text.frame = CGRect(x: 35, y: 30, width: 30, height: 30)
        //将图层添加到目标View上
        view.layer.addSublayer(layer)
        view.layer.addSublayer(text)

    }
重点:
1. 使用Layer需要设置contentScale,这样内容才会根据不同屏幕适配,避免模糊问题。
2. 使用CALayer设置字体,需要分两步。设置字体名字和字体大小。
使用CAShapeLayer绘制虚线
效果图:

/// 绘制虚线
    func createDashLineLayer(width:CGFloat,color:UIColor = UIColor.black, dash:Array<Int>=[8,4]) -> CALayer {
        let lineLayer = CAShapeLayer()
        lineLayer.bounds = CGRect(x: 0, y: 0, width: width, height: 1)
        lineLayer.position = CGPoint(x: 50, y: 99)  //中心点
        lineLayer.strokeColor = color.cgColor // 路径颜色
        lineLayer.lineWidth = 1
        lineLayer.lineJoin = kCALineJoinRound
        lineLayer.lineDashPattern = dash as [NSNumber]  //这个数组表示 先绘制前一个数字个点,再空白后面数字个点,然后重复绘制

        //设置路径
        let path = CGMutablePath()
        path.move(to: CGPoint(x: 0, y: 0))
        path.addLine(to: CGPoint(x: width, y: 0))
        //将路径添加到layar上
        lineLayer.path = path
        return lineLayer
    }
关于DashPattern数组说明:会按照数组顺序先绘制在留白再绘制的方式进行,然后重复。
比如:假设填充颜色为黑色
[8,4] 先绘制8个点,留白4个点 依次重复。
[8,4,1] 8黑、4白、1黑、8白、4黑、1白 依次
[8,4,20,10] 8黑、4白、20黑、10白 依次
同样的也可以绘制圆边的虚线。
使用 CAShapeLayer绘制虚线(OC)
/**
 *  通过 CAShapeLayer 方式绘制虚线 ( 注意调用的时候需要是确定的LineView bounds,否则在 LineView Bounds更新后需要重新绘制)
 *
 *  param lineView:       需要绘制成虚线的view
 *  param lineLength:     虚线的宽度
 *  param lineSpacing:    虚线的间距
 *  param lineColor:      虚线的颜色
 *  param lineDirection   虚线的方向  YES 为水平方向, NO 为垂直方向
 **/
- (void)drawLineOfDashByCAShapeLayer:(UIView *)lineView lineLength:(int)lineLength lineSpacing:(int)lineSpacing lineColor:(UIColor *)lineColor lineDirection:(BOOL)isHorizontal {
    if (lineColor == nil) {
        return ;
    }
    NSArray<CALayer *> *filterArray = [lineView.layer.sublayers filter:^BOOL(__kindof CALayer * _Nonnull obj) {
        return [obj.name isEqualToString:kDashLineLayerName];
    }];
    for (CALayer *layer in filterArray) {
        [layer removeFromSuperlayer];
    }

    CAShapeLayer *shapeLayer = [CAShapeLayer layer];
    shapeLayer.name = kDashLineLayerName;

    [shapeLayer setBounds:lineView.bounds];

    if (isHorizontal) {

        [shapeLayer setPosition:CGPointMake(CGRectGetWidth(lineView.frame) / 2, CGRectGetHeight(lineView.frame))];

    } else{
        [shapeLayer setPosition:CGPointMake(CGRectGetWidth(lineView.frame) / 2, CGRectGetHeight(lineView.frame)/2)];
    }

    [shapeLayer setFillColor:[UIColor clearColor].CGColor];
    //  设置虚线颜色为blackColor
    [shapeLayer setStrokeColor:lineColor.CGColor];
    //  设置虚线宽度
    if (isHorizontal) {
        [shapeLayer setLineWidth:CGRectGetHeight(lineView.frame)];
    } else {

        [shapeLayer setLineWidth:CGRectGetWidth(lineView.frame)];
    }
    [shapeLayer setLineJoin:kCALineJoinRound];
    //  设置线宽,线间距
    [shapeLayer setLineDashPattern:[NSArray arrayWithObjects:[NSNumber numberWithInt:lineLength], [NSNumber numberWithInt:lineSpacing], nil]];
    //  设置路径
    CGMutablePathRef path = CGPathCreateMutable();
    CGPathMoveToPoint(path, NULL, 0, 0);

    if (isHorizontal) {
        CGPathAddLineToPoint(path, NULL,CGRectGetWidth(lineView.frame), 0);
    } else {
        CGPathAddLineToPoint(path, NULL, 0, CGRectGetHeight(lineView.frame));
    }

    [shapeLayer setPath:path];
    CGPathRelease(path);
    //  把绘制好的虚线添加上来
    [lineView.layer addSublayer:shapeLayer];
}
博客参考:CALayer绘制


 8740
8740

 被折叠的 条评论
为什么被折叠?
被折叠的 条评论
为什么被折叠?
 到【灌水乐园】发言


