


c链表
首先通俗地解释一下:链表是一种特殊的结构体,创建链表只需要下面这些代码:
struct node
{
	int num;
	struct node *next;
};
到此就成功建立了一个链表。next指针,指向另一个结构,而这个结构同样拥有一个指向其他结构的指针,就构成了这样一个关系:

循环下去,就会产生一条“链”,链表分为单向链表,双向链表以及循环链表。单链表是最简单的一种链表,但是在查找结点时只能查找后继结点;双向链表可以查找前驱结点和后继结点;在循环链表中则可以查找任意位置的结点,因为循环链表是一个环形的链表,由任意结点都可以遍历到所有结点。
下面是一个单链表操作模板。函数顺序依次为单链表的创建(头插和尾插法),初始化,判空,遍历,求链表长等,详细可见备注
#include <stdio.h>
#include <stdlib.h>

typedef int DataType;          //用DataType 替代 int方便修改数据类型
typedef struct Node{
    DataType data;           //数据域
    struct Node *next;      //指针域
}Node;

//链表初始化, 创建空链表
Node *InitList(){
    Node *head = (Node *)malloc(sizeof(Node));
    head->next = NULL;
    return head;
}

//建立单链表(尾插法)
//比如说数据1 2 3 4 5
//链表中从头指针开始数据顺序为1 2 3 4 5
//每次从链表末尾插入
Node *CreatTailList(DataType a[], int n, Node *head){
    Node *p = head, *pnew = NULL;
    int i;

    for(i = 0; i < n; i++){
        pnew = (Node *)malloc(sizeof(Node));
        pnew -> data = a[i];
        p->next = pnew;			// pnew所指节点连接到表尾
        p = pnew;              // p指向表尾
    }
    p -> next = NULL;       //终端结点指针指向NULL
    return head;
}


//建立单链表(头插法)
//比如说数据1 2 3 4 5
//链表中从头指针开始数据顺序为5 4 3 2 1
//每次从链表头部插入
Node *CreatHeadList(DataType a[], int n, Node *head){
    Node *pnew = NULL;
    int i;

    for(i = 0; i < n; i++){
        pnew = (Node*)malloc(sizeof(Node));
        pnew -> data = a[i];
        pnew -> next = head -> next;
        head-> next = pnew;
    }
    return head;


}

//求链表长度
int Length(Node*head){
    Node *p = head->next;
    int cnt = 0;
    while(p != NULL){
        cnt++;
        p = p -> next;
    }
    return cnt;
}

//判断空是否为空链表
int Empty(Node *head){
    if(head->next == NULL)
        return 1;
    return 0;
}


//遍历打印
void PrintList(Node *head){
    Node *p = head -> next; //ps:head没存数据
    while(p != NULL){
        printf("%d ",p->data);
        p = p->next;
    }
}

//删除某一位置的结点
int Delete(Node *head, int i, DataType *ptr){ //i为要删除的数据,ptr取得删除的值
    Node *p = head, *q = NULL;

    while(p != NULL && p->data != i){
        q = p;  //q作为中间变量,存储要删除的结点之前的一个结点
        p = p->next;
    }

    if(p == NULL || p-> next == NULL){
        return 0;                  //删除失败
    }

    *ptr = p->data;
    q->next = p->next; //将要删除的结点排除到链表之外
    free(p);
    p = NULL;

    return 1;
}

//插入
int Insert(Node *head,int x,DataType t){ //x 为插入位置,t为要插入的数据
    Node *s = NULL,*p = head;
    int pos = 0;
    while (p != NULL && pos < x) {
        p = p -> next;
        pos++;
    }

    if(p == NULL){
        return 0; // 插入位置错误返回0
    }

    s = (Node*)malloc(sizeof(Node));//请求分配空间 .
    s -> data = t;                  //申请一个结点,数据域为x
    s -> next = p -> next;          //将结点S插入到结点P之后
    p -> next = s;
    return 1;
}

//销毁
void DestroyList(Node *head){
    Node *p = head, *q = head; //p、q作为临时变量,记录要删除的结点
    while (p != NULL){          //依次释放储存空间
        p = p->next;  //先指向下个位置再释放
        free(q);
        q = p;
    }
    head->next = NULL;
}

int main()
{
    Node *head = NULL;
    DataType data[] = {1,2,3,4,5};
    DataType n = sizeof(data)/sizeof(data[0]);//求出数组data中元素个数
    DataType x = 0;

	head = InitList(); //创建一个空链表, ps: head不存数据
    CreatTailList(data, n, head);//尾插
    // CreatHeadList(data, n, head);//头插
    printf("After Creat,the data is:  ");
    PrintList(head);
    printf("\n");

    if(Delete(head,3,&x)){
        printf("After Delete,the data is:  ");
        PrintList(head);
        printf("   Delete %d\n",x);
    } else {
        printf("Delete Defult\n");
    }

	if(Insert(head,2,7)){
        printf("After Insert,the data is:  ");
        PrintList(head);
        printf("\n");
    } else {
    	printf("Insert Defult\n");
    }

    printf("the List Length is: %d\n",Length(head));
	DestroyList(head);
	if(Empty(head)) {
		printf("the List is Empty\n");
	} else {
		printf("the List is not Empty\n");
	}

    return 0;
}
输出如下:

理解了打印链表的逻辑,这里补充一个gdb中打印链表的方法:
编辑~/.gdbinit:
define plist
  set var $n = $arg0
  while $n
    printf "%d ", $n->data
    set var $n = $n->next
  end
end
调试过程如下:
(gdb) b PrintList
Breakpoint 1 at 0x80485d9: file list.c, line 76.
(gdb) r
Starting program: /home/workSpace/a.out

Breakpoint 1, PrintList (head=0x804b008) at list.c:76
76	    Node *p = head -> next; //ps:head没存数据
(gdb) plist head
0 1 2 3 4 5 (gdb)
Cmap
映射(Map),又称为字典(Dictionary),是由关键字(Key)及其对应的元素值(Value)所组成的元素单元 (Element)的表单式集合。
从数据结构的角度分析,有关Map的典型操作有:
1、向Map中插入具有给定关键字的元素单元。
2、在Map中查找具有给定关键字的元素单元。
3、在Map中删除具有给定关键字的元素单元。
4、枚举(遍历)Map中的所有元素单元。
有了上面的基础,我们就可以自己实现一个简单的map了:
#include <stdio.h>

typedef struct cmap{
    long key;
    float value;
    struct cmap *next;
} cmap;
int n = 0;

//map赋值, 从屏幕读取,以0 0结束
void cmap_init(cmap **head){ //修改的*head需要传入指针**,来指向首节点
    cmap *pnew, *p;
    p = pnew =(struct cmap *)malloc(sizeof(struct cmap));
    scanf("%d %f",&pnew->key,&pnew->value);
    while(pnew->key != 0){  //以0结束
        n++;
        if(n==1) *head=pnew;  // head指向第一个节点
        else p->next=pnew;  // pnew所指节点连接到表尾
        p = pnew;             // p指向表尾
        pnew=(struct cmap *)malloc(sizeof(struct cmap));
        scanf("%d %f",&pnew->key,&pnew->value);
    }
    p->next=NULL;

}

//map打印
void cmap_print(struct cmap *p)
{
    printf("These %d records are:\n",n);
    while(p!=NULL){
        printf("%d %5.1f\n",p->key,p->value);
        p=p->next;
    }
}

//map查找
int find=0;
void cmap_search(struct cmap *p,long num,float *score){ //修改的score值需要传入指针*
    while(p!=NULL){
        if(p->key==num){
            *score=p->value;
            find=1;
			break;
        }
        p=p->next;
    }
}

int main()
{
    long num=2; //查找的key值
    float score=0;
    int ret;
    struct cmap *p = NULL;

    cmap_init(&p);
    cmap_print(p);
    cmap_search(p,num,&score);

    if(0 == find){
        printf(">> no result!\n");
    }else{
        printf("find key:%d, value is %f\n",num,score);
    }

    return 0;
}
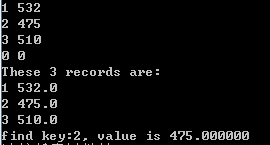
输出如下:
通常,对于Map而言,使用给定的Key,需要迅速地从单元集合中检索到相应的元素。因此,在需要对大量数据进行查找操作而查找的性能又占据重要地位 的场合,Map无疑是一种较理想的容器,而上面用单链表实现了一个map,显然性能上还很不理想。下面我们就引出了hashmap。
Hashmap
hash含义就是散列,就是把我们本来想查找的一大群结构体数据分散开,更容易查找。hash是以空间换时间的结构,现在空间越来越大,而且对性能要求越来越高的年代,这绝对是值得的。
首先,通个某种hash函数,可以把我们传入过来的key(由我们的数据中一个或者多个结构体成员的成员来作为key)来得到一个返回值,这个返回值就是我们的hash值
哈希桶,使用一个顺序表来存放具有相同哈希值的key的链表的头节点,利用这个头节点可以找到其它的key。因此,哈希桶就是为了解决哈希冲突的,同一个桶下保存的就是具有相同hash值的所有key。
当然,在冲突的时候,特别是冲突率比较高的时候,桶内的链表就会很长,使得查找效率比较低,而在最坏的情况下,所有的key都对应同一个hashvalue,当然这种情况不会出现,这样的哈希函数选取的也没有意义了,假设这种情况出现,那么哈希表就退化成了单链表,其他桶内存浪费,且将查找效率从O(1)直接降到了O(N),因此,哈希函数的选择也是很关键的。
关于hash更详细的介绍:
https://blog.csdn.net/qq_15437629/article/details/79275255
为了理解HashMap的底层原理,下面使用C语言实现了HashMap的创建(CreateHashMap)、取键值对(Get)、插入键值对(Put)、输出(PrintHashMap)以及销毁(DestoryHashMap),具体程序如下:
#include <stdio.h>
#include <stdlib.h>
#include <limits.h>

typedef struct DataType{
	int key;  //键
	int val;  //值
}DataType; //对基本数据类型进行封装,类似泛型

typedef struct HashNode{
	DataType data;
	struct HashNode *next;  //key冲突时,通过next指针进行连接
}HashNode;

typedef struct HashMap{
	int size;
	HashNode *table;
}HashMap;

//将给定的整形数组构建为HashMap,size为数组长度
HashMap *Create_HashMap(int *nums,int size){

	HashMap *hashmap=(HashMap*)malloc(sizeof(HashMap)); //分配内存空间
	hashmap->size = 2*size; //这里涉及到hash表的装填因子,为在 "冲突的机会"与"空间利用率"之间寻找一种平衡
	hashmap->table=(HashNode *)malloc(sizeof(HashNode)*hashmap->size);	//hash表分配空间
	int j=0;
	for(j=0;j<hashmap->size;j++){
		hashmap->table[j].data.val=INT_MIN;
		hashmap->table[j].next=NULL;
	}

	//建立HashMap
	int i=0;
	while(i<size){
		int pos=abs(nums[i])%hashmap->size;//根据数组元素的值计算其在hashMap中的位置,取余

		if(hashmap->table[pos].data.val==INT_MIN){
		    //不冲突,把元素在数组中的索引作为key,把元素值作为value
			hashmap->table[pos].data.key=i;
			hashmap->table[pos].data.val=nums[i];
		}else{
		    //冲突,给当前元素分配一个结点,并为结点复制
			HashNode *lnode=(HashNode*)malloc(sizeof(HashNode));
			lnode->data.key=i;
			lnode->data.val=nums[i];
			lnode->next=NULL;
			//从冲突位置开始,遍历链表,直到链表尾部,插入当前结点
			HashNode *hashnode=&(hashmap->table[pos]);
			while(hashnode->next!=NULL){
				hashnode=hashnode->next;
			}
			hashnode->next=lnode;
		}
		i++;
	}
	//处理完成,返回HashMap
	return hashmap;
}

//与建立HashMap时插入元素的方法相同
int Put(HashMap hashmap,int key,int value){
     int pos=abs(value)%hashmap.size;
     HashNode *pointer=&(hashmap.table[pos]);
     if(pointer->data.val==INT_MIN){
         pointer->data.val=value;
         pointer->data.key=key;
     }else{
        while(pointer->next!=NULL) {
        	pointer=pointer->next;
        }
        HashNode *hnode=(HashNode *)malloc(sizeof(HashNode));
        hnode->data.key=key;
        hnode->data.val=value;
        hnode->next=NULL;
        pointer->next=hnode;
   }
   return 1;
}

int Get(HashMap hashmap, int value){
    //根据元素值,计算其位置
    int pos=abs(value)%hashmap.size;
 	HashNode *pointer=&(hashmap.table[pos]);
	//在当前链表遍历查找该结点
	while(pointer!=NULL){
		if(pointer->data.val==value)
            return pointer->data.key;
        else
        	pointer=pointer->next;
	}
	return -1;
}

void Print_HashMap(HashMap* hashmap){
    printf("===========PrintHashMap==========\n");
	int i=0;
	HashNode *pointer;
	while(i<hashmap->size){
		pointer=&(hashmap->table[i]);
		printf("   table[%d]", i);
		while(pointer!=NULL){
            if(pointer->data.val!=INT_MIN)
              printf("%5d",pointer->data.val);
			else
              printf(" ");
			  pointer=pointer->next;
		}
        printf("\n---------------------------------");
		i++;
		printf("\n");
	}
    printf("===============End===============\n");
}

int main()
{
 	int nums[]={12,13,32,44};
 	int n=sizeof(nums)/sizeof(nums[0]);
	//创建HashMap
 	HashMap *hashmap=Create_HashMap(nums,n);

 	//插入
 	Put(*hashmap, 4, 45);
	Print_HashMap(hashmap);

	//查找
	int value=32;
	int key=Get(*hashmap, value);
	printf("key is %d, value is %d\n", key, value);
    return 0;
}
输出结果如下:

同样地,也可以通过修改~/.gdbinit 在gdb时打印每个table的list:
define pmap
  set $map = $arg0
  set $idx = 0
  set $table_num = $map->size

  while $idx < $table_num
    printf "table[%d]:\n", $idx
    set $n = &($map->table[$idx])
    while $n
      p $n->data
      set $n = $n->next
    end
    set $idx++
  end
end
调试过程如下:
(gdb) b Print_HashMap
Breakpoint 1 at 0x804871c: file hashmap.c, line 94.
(gdb) r
Starting program: /home/workSpace/a.out

Breakpoint 1, Print_HashMap (hashmap=0x804b008) at hashmap.c:94
94	    printf("===========PrintHashMap==========\n");
(gdb) p *hashmap
$2 = {size = 8, table = 0x804b018}
(gdb) pmap hashmap
table[0]:
$3 = {key = 2, val = 32}
table[1]:
$4 = {key = 0, val = -2147483648}
table[2]:
$5 = {key = 0, val = -2147483648}
table[3]:
$6 = {key = 0, val = -2147483648}
table[4]:
$7 = {key = 0, val = 12}
$8 = {key = 3, val = 44}
table[5]:
$9 = {key = 1, val = 13}
$10 = {key = 4, val = 45}
table[6]:
$11 = {key = 0, val = -2147483648}
table[7]:
$12 = {key = 0, val = -2147483648}
(gdb)
UT_Hashmap
ut_hash是为C程序员编写的,根据关键码值(Key value)而直接进行访问的数据结构,通过把关键码值映射到表中一个位置来访问记录,以加快查找的速度。ut_hash代码行数少,且使用简单,并在leetcode官网上都可以使用,需包含#include "uthash.h"头文件
下面以Leetcode中的原题,进行介绍
https://leetcode-cn.com/problems/two-sum/
/*
* 定义对应的map结构体如下
* 其中:
*   key 是 键;
*   value是此键对应用的值;
*   hh是uthash的结构成员,所定义的数据结构中必不可少的;
*   利用此结构体定义好*g_hashTable变量,在对应的接口函数中一定要初始化为NULL
*/
struct hashTable {
    int key;
    int value;
    UT_hash_handle hh;
}*g_hashTable;

/*
* 调用宏函数HASH_FIND_INT,确定该ikey在已有的map是否存在,
* 对不存在的情况,要分配内存,调用宏函数HASH_ADD_INT加入新成员;
* 对存在的情况,可以更新其value值,也可以根据题意做相应操作
*/
void add_user(int ikey, int ivalue) {
    struct hashTable *tmp;
    HASH_FIND_INT(g_hashTable, &ikey, tmp);
    if ( tmp == NULL) {
        tmp = (struct hashTable*)malloc(sizeof(*tmp));
        tmp->key = ikey;
        tmp->value = ivalue;
        HASH_ADD_INT(g_hashTable,key,tmp);
    }else {
        tmp->value = ivalue;
    }
}

struct hashTable *find_user(int ikey) {
    struct hashTable *tmp;
    HASH_FIND_INT(g_hashTable, &ikey, tmp);
    return tmp;
}

void delete_user(int ikey) {
    struct hashTable *tmp;
    HASH_FIND_INT(g_hashTable, &ikey, tmp);
    if (tmp != NULL) {
      HASH_DEL(g_hashTable, tmp);
      free(tmp);
    }
}


 2171
2171


 被折叠的 条评论
为什么被折叠?
被折叠的 条评论
为什么被折叠?
 到【灌水乐园】发言


