


环境配置
要编译和调试 ARM64 环境,必须安装交叉编译工具链和gdb
sudo apt-get install gcc-aarch64-linux-gnu
sudo apt-get install libncurses5-dev  build-essential git bison flex libssl-dev
sudo apt install gdb-multiarch
和上个实验一样制作根文件系统
wget  https://busybox.net/downloads/busybox-1.33.1.tar.bz2

extract busybox-1.33.1.tar.bz2

cd busybox-1.33.1
配置编译选项
make menuconfig
===============
Kernel hacking  --->
    Compile-time checks and compiler options  --->
        [*] Compile the kernel with debug info
        [*]   Provide GDB scripts for kernel debugging
    [*] Kernel debugging
Kernel Features ---->
    [] Randomize the address of the kernel image
=============
export ARCH=arm64
export CROSS_COMPILE=aarch64-linux-gnu-

make
make install
编译完成,在busybox目录下生成_install目录
为了init进程能正常启动, 需要再额外进行一些配置
cd _install
mkdir etc dev lib
tog@ubuntu:~/Desktop/lab4/busybox-1.33.1/_install$ cd etc
tog@ubuntu:~/Desktop/lab4/busybox-1.33.1/_install/etc$ code profile
tog@ubuntu:~/Desktop/lab4/busybox-1.33.1/_install/etc$ cat profile
cat: profile: No such file or directory
tog@ubuntu:~/Desktop/lab4/busybox-1.33.1/_install/etc$ code profile
tog@ubuntu:~/Desktop/lab4/busybox-1.33.1/_install/etc$ cat profile
#!/bin/sh
export HOSTNAME=imingz
export USER=root
export HOME=/home
export PS1="[$USER@$HOSTNAME \W]\# "
PATH=/bin:/sbin:/usr/bin:/usr/sbin
LD_LIBRARY_PATH=/lib:/usr/lib:$LD_LIBRARY_PATH
export PATH LD_LIBRARY_PATH
tog@ubuntu:~/Desktop/lab4/busybox-1.33.1/_install/etc$ code inittab
tog@ubuntu:~/Desktop/lab4/busybox-1.33.1/_install/etc$ cat inittab
::sysinit:/etc/init.d/rcS
::respawn:-/bin/sh
::askfirst:-/bin/sh
::ctrlaltdel:/bin/umount -a -r
tog@ubuntu:~/Desktop/lab4/busybox-1.33.1/_install/etc$ code fstab
tog@ubuntu:~/Desktop/lab4/busybox-1.33.1/_install/etc$ cat fstab
#device  mount-point    type     options   dump   fsck order
proc /proc proc defaults 0 0
tmpfs /tmp tmpfs defaults 0 0
sysfs /sys sysfs defaults 0 0
tmpfs /dev tmpfs defaults 0 0
debugfs /sys/kernel/debug debugfs defaults 0 0
kmod_mount /mnt 9p trans=virtio 0 0
tog@ubuntu:~/Desktop/lab4/busybox-1.33.1/_install/etc$ mkdir -p init.d
tog@ubuntu:~/Desktop/lab4/busybox-1.33.1/_install/etc$ code init.d/rcS
tog@ubuntu:~/Desktop/lab4/busybox-1.33.1/_install/etc$ cat init.d/rcS
mkdir -p /sys
mkdir -p /tmp
mkdir -p /proc
mkdir -p /mnt
/bin/mount -a
mkdir -p /dev/pts
mount -t devpts devpts /dev/pts
echo /sbin/mdev > /proc/sys/kernel/hotplug
mdev -s
1、busybox 作为linuxrc启动后, 会读取/etc/profile, 这里面设置了一些环境变量和shell的属性
2、根据/etc/fstab提供的挂载信息, 进行文件系统的挂载
3、busybox 会从 /etc/inittab中读取sysinit并执行, 这里sysinit指向了/etc/init.d/rcS
4、/etc/init.d/rcS 中 ,mdev -s 这条命令很重要, 它会扫描/sys目录,查找字符设备和块设备,并在/dev下mknod
tog@ubuntu:~/Desktop/lab4/busybox-1.33.1/_install/etc$ cd ..
tog@ubuntu:~/Desktop/lab4/busybox-1.33.1/_install$ cd dev/
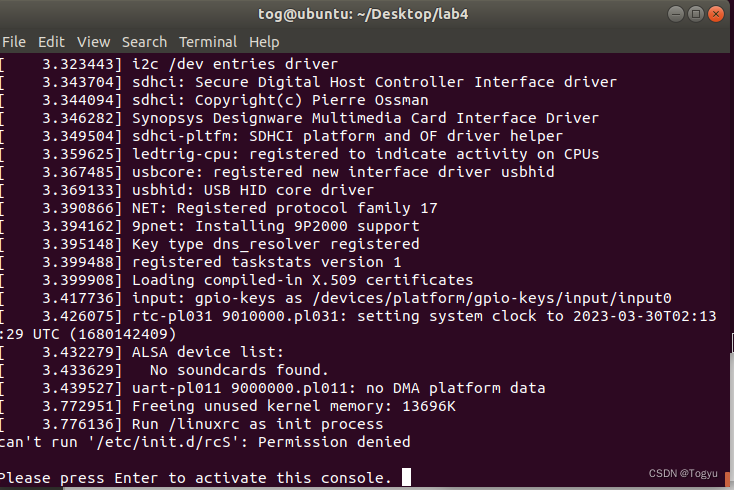
tog@ubuntu:~/Desktop/lab4/busybox-1.33.1/_install/dev$ sudo mknod console c 5 1
没有console这个文件, 用户态的输出没法打印到串口上
[sudo] password for tog:
tog@ubuntu:~/Desktop/lab4/busybox-1.33.1/_install/dev$ cd ..
tog@ubuntu:~/Desktop/lab4/busybox-1.33.1/_install$ cd lib/
tog@ubuntu:~/Desktop/lab4/busybox-1.33.1/_install/lib$ cp /usr/aarch64-linux-gnu/lib/*.so*  -a .
tog@ubuntu:~/Desktop/lab4/busybox-1.33.1/_install/lib$
编译内核
使用之前的内核
cd ~/linux_lab/lab4/linux-5.4.34
make defconfig ARCH=arm64
code .config
CONFIG_DEBUG_INFO=y
CONFIG_INITRAMFS_SOURCE="./root"
CONFIG_INITRAMFS_ROOT_UID=0
CONFIG_INITRAMFS_ROOT_GID=0
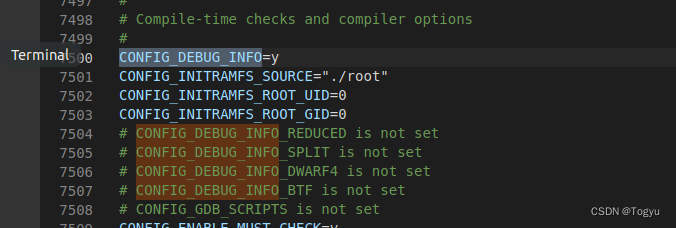
CONFIG_DEBUG_INFO 是为了方便调试
CONFIG_INITRAMFS_SOURCE 是指定 kernel ramdisk 的位置,这样指定之后 ramdisk 会直接被编译到 kernel 镜像中。
将之前制作好的根文件系统cp到root目录下
sudo cp -r ../busybox-1.33.1/_install root
sudo mknod root/dev/console c 5 1
指定 target 为 Image 增加编译速度, 这样会只编译 kernel, 不会编译 modules。
make ARCH=arm64 Image -j8 CROSS_COMPILE=aarch64-linux-gnu-
配置qemu
使用 4.2.1 版本的 qemu
sudo apt install build-essential zlib1g-dev pkg-config libglib2.0-dev binutils-dev libboost-all-dev autoconf libtool libssl-dev libpixman-1-dev libpython-dev python-pip python-capstone virtualenv

wget https://download.qemu.org/qemu-4.2.1.tar.xz

extract qemu-4.2.1.tar.xz

cd qemu-4.2.1

./configure --target-list=x86_64-softmmu,x86_64-linux-user,arm-softmmu,arm-linux-user,aarch64-softmmu,aarch64-linux-user --enable-kvm

make

sudo make install
编译完成之后,查看qemu版本

启动内核
/usr/local/bin/qemu-system-aarch64 -m 512M -smp 4 -cpu cortex-a57 -machine virt -kernel ~/Desktop/lab4/linux-5.4.34/arch/arm64/boot/Image -append "rdinit=/linuxrc nokaslr console=ttyAMA0 loglevel=8" -nographic -s
-m 512M 内存为512M
-smp 4 4核
-cpu cortex-a57cpu 为cortex-a57
-kernel kernel镜像文件
-append传给kernel 的cmdline参数。其中rdinit指定了init进程;nokaslr 禁止内核起始地址随机化,这个很重要, 否则GDB调试可能有问题;console=ttyAMA0指定了串口,没有这一步就看不到linux的输出;
-nographic禁止图形输出
-s监听gdb端口, gdb程序可以通过1234这个端口连上来。
构造代码
#include <stdio.h>
#include <time.h>
#include <sys/time.h>

int main()
{
      time_t tt;
      struct timeval tv;
      struct tm *t;
#if 0
      gettimeofday(&tv,NULL); // 使用库函数的方式触发系统调用
#else
      asm volatile( // 使用内嵌汇编的方式触发系统调用
          "add   x0, x29, 16\n\t"  //X0寄存器用于传递参数&tv
          "mov   x1, #0x0\n\t"     //X1寄存器用于传递参数NULL
          "mov   x8, #0xa9\n\t"   //使用X8传递系统调用号169
          "svc   #0x0\n\t"            //触发系统调用
      );
#endif
      tt = tv.tv_sec;                    //tv是保存获取时间结果的结构体
      t = localtime(&tt);                //将世纪秒转换成对应的年月日时分秒
      printf("time: %d/%d/%d %d:%d:%d\n",
             t->tm_year + 1900,
             t->tm_mon,
             t->tm_mday,
             t->tm_hour,
             t->tm_min,
             t->tm_sec);
      return 0;
}
把test.c进行交叉编译:`
aarch64-linux-gnu-gcc -o test test.c -static
然后把test移动到根文件系统中重新编译下:
make ARCH=arm64 Image -j8 CROSS_COMPILE=aarch64-linux-gnu-
使用vscode打开项目,进行和上次一样的配置
修改 launch.json 和 tasks.json
{
  // launch.json
  // Use IntelliSense to learn about possible attributes.
  // Hover to view descriptions of existing attributes.
  // For more information, visit: https://go.microsoft.com/fwlink/?linkid=830387
  "version": "0.2.0",
  "configurations": [
    {
      "name": "(gdb) linux",
      "type": "cppdbg",
      "request": "launch",
      "preLaunchTask": "vm",
      "program": "${workspaceRoot}/vmlinux",
      "miDebuggerPath":"/usr/bin/gdb-multiarch",
      "miDebuggerServerAddress": "localhost:1234",
      "args": [],
      "stopAtEntry": true,
      "cwd": "${workspaceFolder}",
      "environment": [],
      "externalConsole": false,
      "MIMode": "gdb",
      "miDebuggerArgs": "-n",
      "targetArchitecture": "x64",
      "setupCommands": [
        {
          "text": "dir .",
          "ignoreFailures": false
        },
        {
          "text": "add-auto-load-safe-path ./",
          "ignoreFailures": false
        },
        {
          "text": "-enable-pretty-printing",
          "ignoreFailures": true
        }
      ]
    }
  ]
}
=====tasks.json===
{
    // tasks.json
    // See https://go.microsoft.com/fwlink/?LinkId=733558
    // for the documentation about the tasks.json format
    "version": "2.0.0",
    "tasks": [
      {
        "label": "vm",
        "type": "shell",
        "command": "qemu-system-aarch64 -m 128M -smp 1 -cpu cortex-a57 -machine virt -kernel arch/arm64/boot/Image -initrd ../rootfs-arm.cpio.gz -append \"rdinit=/init console=ttyAMA0 loglevel=8\" -nographic -s",
        "presentation": {
          "echo": true,
          "clear": true,
          "group": "vm"
        },
        "isBackground": true,
        "problemMatcher": [
          {
            "pattern": [
              {
                "regexp": ".",
                "file": 1,
                "location": 2,
                "message": 3
              }
            ],
            "background": {
              "activeOnStart": true,
              "beginsPattern": ".",
              "endsPattern": ".",
            }
          }
        ]
      },
      {
        "label": "build linux",
        "type": "shell",
        "command": "make",
        "group": {
          "kind": "build",
          "isDefault": true
        },
        "presentation": {
          "echo": false,
          "group": "build"
        }
      }
    ]
}
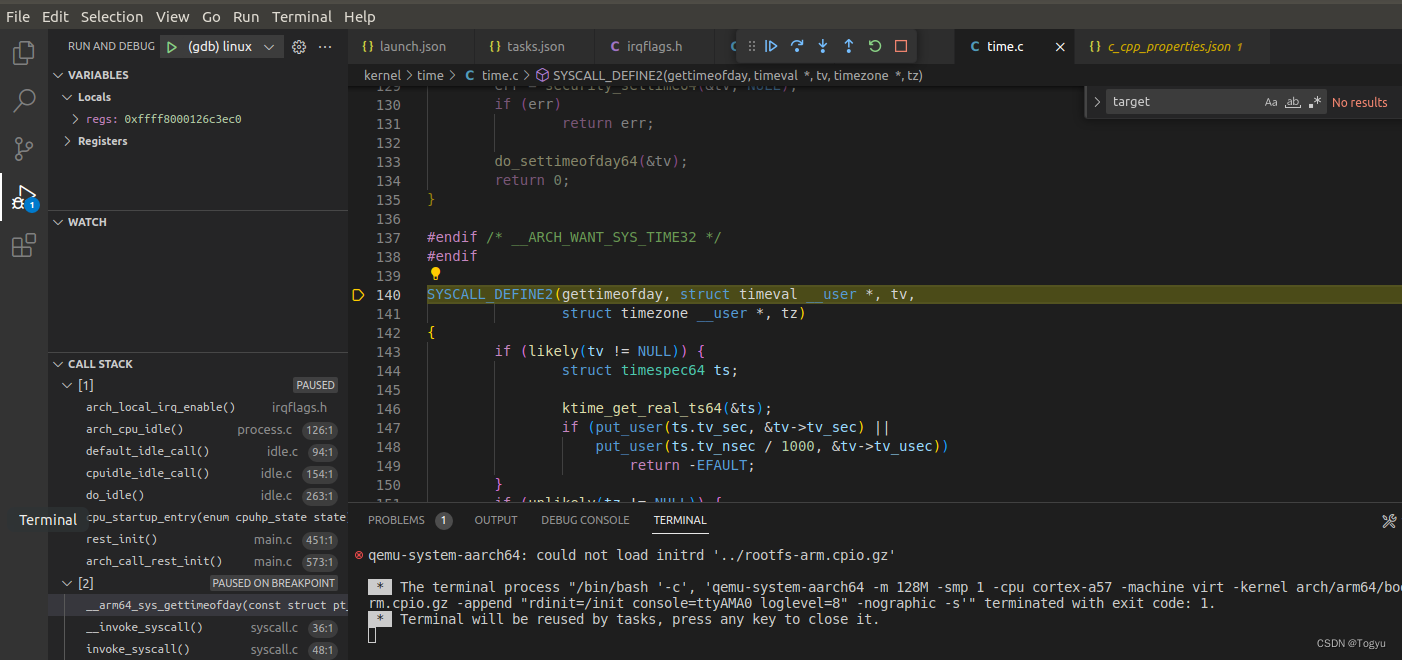
打断点
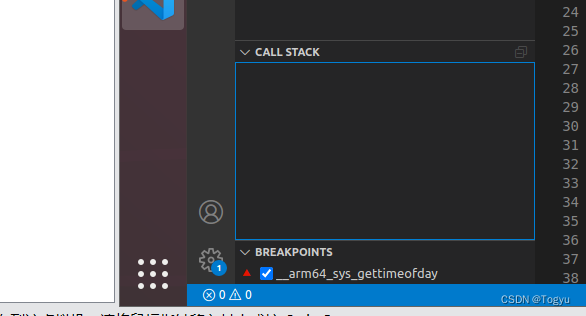
先打开内核
qemu-system-aarch64 -m 512M -smp 4 -cpu cortex-a57 -machine virt -kernel arch/arm64/boot/Image -append "rdinit=/linuxrc nokaslr console=ttyAMA0 loglevel=8" -nographic -s
开始调试
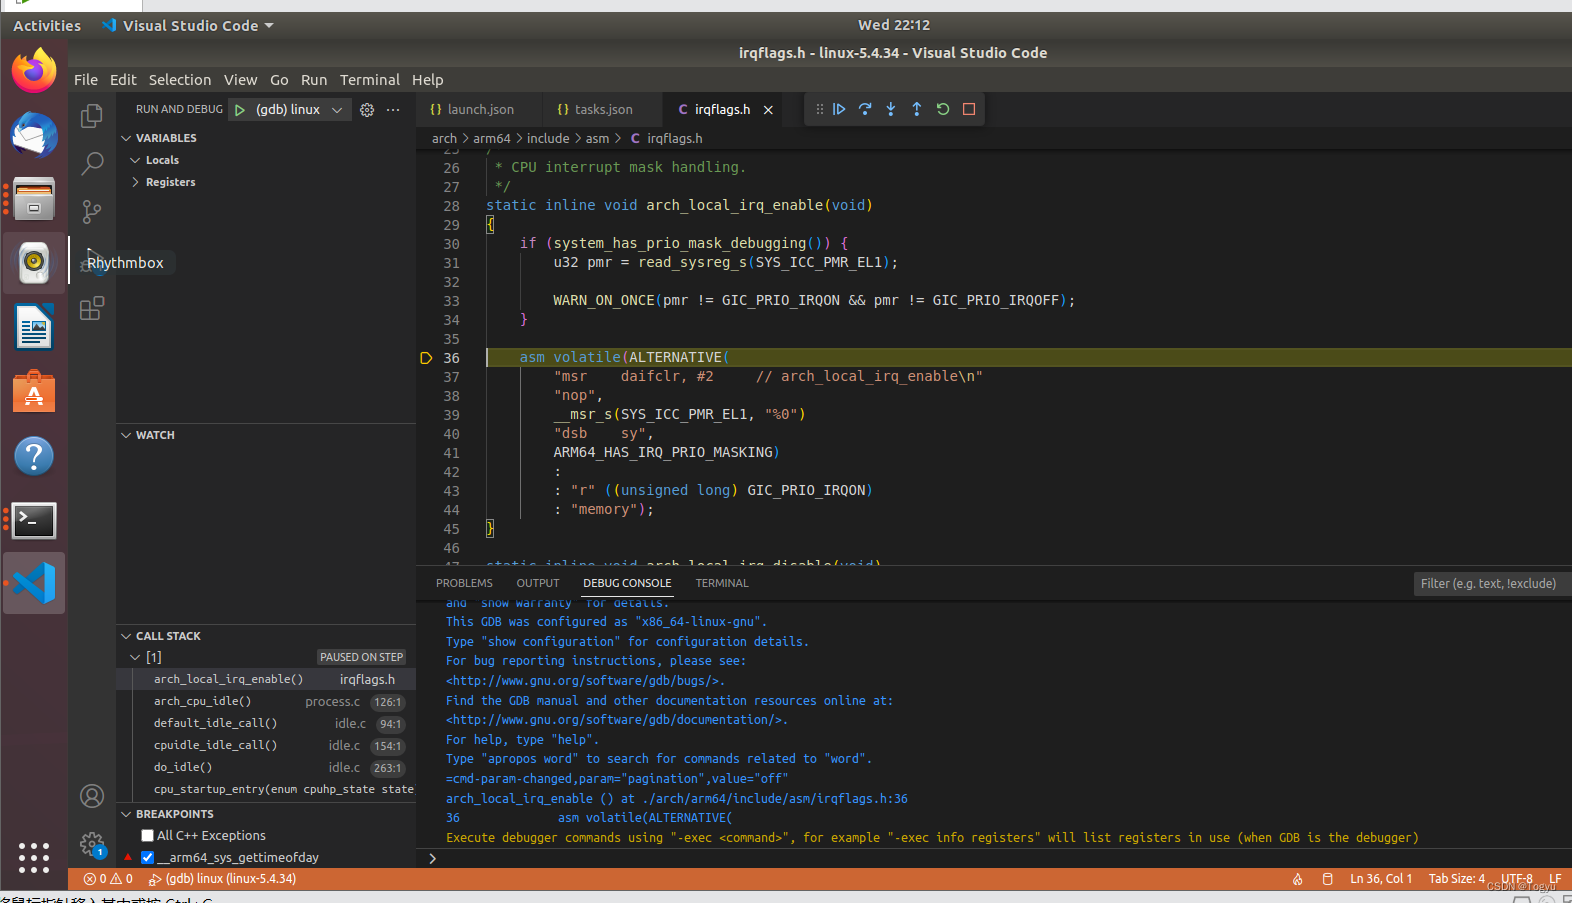
结合ppt内容分析
(1)用户态程序执行svc指令,CPU会把当前程序指针寄存器PC放入ELR_EL1寄存器里,把PSTATE放入SPSR_EL1寄存器里,把异常产生的原因(这里是调用了svc指令触发系统调用)放在ESR_EL1寄存器里。这时CPU是知道异常类型和异常向量表的起始地址的,所以可以自动把VBAR_EL1寄存器的值(vectors),和第3组Synchronous的偏移量0x400相加,即vectors + 0x400,得出该异常向量空间的入口地址,然后跳转到那里执行异常向量空间里面的指令。每个异常向量空间仅有128个字节,最多可以存储32条指令(每条指令4字节),而且异常向量空间最后一条指令是b指令,对于系统调用来说会跳转到el0_sync,这样就从异常向量空间跳转同步异常处理程序的入口。
// arch/arm64/kernel/entry.S
/*
 * EL0 mode handlers.
 */
el0_sync:
	kernel_entry 0
	mrs	x25, esr_el1			// read the syndrome register
	lsr	x24, x25, #ESR_ELx_EC_SHIFT	// exception class
	cmp	x24, #ESR_ELx_EC_SVC64		// SVC in 64-bit state
	b.eq	el0_svc
	...
ENDPROC(el0_sync)
el0_sync 在完成保存现场的工作之后,会根据 ESR_EL1 寄存器确定同步异常产生的原因,同步异常产生的原因很多,在 ARM64 Linux 中最常见的原因是 svc 指令触发了系统调用,所以排在最前面的就是条件判断跳转到 el0_svc , el0_svc 中主要负责调用C代码的 el0_svc_handler 处理系统调用和 ret_to_user 系统调用返回。
SYSCALL_DEFINE2 宏定义是将 gettimeofday 系统调用转换为 sys_gettimeofday。这是由一组非常复杂的宏定义实现的。


在 Linux 系统中系统调用发生时,CPU 会把当前程序指针寄存器 PC 放入 ELR_EL1 寄存器里,把 PSTATE 放入 SPSR_EL1 寄存器里,同时 Linux 系统从用户态切换到内核态(从 EL0 切换到 EL1 ),这时 SP 指的是 SP_EL1 寄存器,用户态堆栈的栈顶地址依然保存在 SP_EL0 寄存器中。也就是说异常(这里是指系统调用)发生时 CPU 的关键状态 sp、pc 和 pstate 分别保存在 SP_EL0 、ELR_EL1 和 SPSR_EL1 寄存器中。保存现场的主要工作是保存 x0-x30 及 sp 、pc 和 pstate,这和 struct pt_regs 数据结构的起始部分正好一一对应
// arch/arm64/include/asm/ptrace.h
/*
 * This struct defines the way the registers are stored on the stack during an
 * exception. Note that sizeof(struct pt_regs) has to be a multiple of 16 (for
 * stack alignment). struct user_pt_regs must form a prefix of struct pt_regs.
 */
struct pt_regs {
	union {
		struct user_pt_regs user_regs;
		struct {
			u64 regs[31];
			u64 sp;
			u64 pc;
			u64 pstate;
		};
	};
	u64 orig_x0;
#ifdef __AARCH64EB__
	u32 unused2;
	s32 syscallno;
#else
	s32 syscallno;
	u32 unused2;
#endif

	u64 orig_addr_limit;
	/* Only valid when ARM64_HAS_IRQ_PRIO_MASKING is enabled. */
	u64 pmr_save;
	u64 stackframe[2];
};
系统调用返回
// arch/arm64/kernel/entry.S
/*
 * Ok, we need to do extra processing, enter the slow path.
 */
work_pending:
	mov	x0, sp				// 'regs'
	bl	do_notify_resume
#ifdef CONFIG_TRACE_IRQFLAGS
	bl	trace_hardirqs_on		// enabled while in userspace
#endif
	ldr	x1, [tsk, #TSK_TI_FLAGS]	// re-check for single-step
	b	finish_ret_to_user
/*
 * "slow" syscall return path.
 */
ret_to_user:
	disable_daif
	gic_prio_kentry_setup tmp=x3
	ldr	x1, [tsk, #TSK_TI_FLAGS]
	and	x2, x1, #_TIF_WORK_MASK
	cbnz	x2, work_pending
finish_ret_to_user:
	enable_step_tsk x1, x2
#ifdef CONFIG_GCC_PLUGIN_STACKLEAK
	bl	stackleak_erase
#endif
	kernel_exit 0
ENDPROC(ret_to_user)
恢复现场
.macro	kernel_exit, el
	...
	msr	sp_el0, x23
	msr	elr_el1, x21			// set up the return data
	msr	spsr_el1, x22
	ldp	x0, x1, [sp, #16 * 0]
	ldp	x2, x3, [sp, #16 * 1]
	ldp	x4, x5, [sp, #16 * 2]
	ldp	x6, x7, [sp, #16 * 3]
	...
	ldp	x24, x25, [sp, #16 * 12]
	ldp	x26, x27, [sp, #16 * 13]
	ldp	x28, x29, [sp, #16 * 14]
	ldr	lr, [sp, #S_LR]
	...
	eret


 2987
2987


 被折叠的 条评论
为什么被折叠?
被折叠的 条评论
为什么被折叠?
 到【灌水乐园】发言


