


目录
1. 缓存区Buffer
用来处理Channel中数据的一种数据结构, 与Channel一致都是双向的, 可读可写
1.1 分类
- ByteBuffer: 存储字节
- ShortBuffer:存储短整型
- IntBuffer:存储整形
- LongBuffer:存储长整型
- CharBuffer:存储字符类型
- FloatBuffer:存储浮点类型
- DoubleBuffer:存储双精度
因为数据都是用字节的方式传播, 使用最多的是ByteBuffer
1.2 Buffer常用的方法
- allocate(int length): 创建一个buffer, 长度为length
- put:
- put(int i): 存放数据, 并将指针指向下一节点
- put(int index, int i): 存放数据, 指定存放的下标, 指针不变
- put(int[] src): 存放一个数组, 将数组的数据按顺序放入buffer中, 指针指向结尾
- put(int[] src, int offset, int length): 存放数据, 存放指定的长度
- put(IntBuffer src): 存放另一个buffer中的内容
- get:
- get(): 获取数据,并将指针指向下一节点
- get(int index): 获取指定下标数据
- public abstract int get(int index); - 获取指定位置的数据,也是子类实现
- get(int[] dst): 将数据读取到指定的数组中
- get(int[] dst, int offset, int length): 将buffer中的一定长度的数据读取到指定的数组中
- array(): 直接拿出buffer中的所有数据, 返回一个数组
- rewind(): 将buffer倒带, 相当于清楚buffer中的数据(具体是将position设置为0, mark作废)
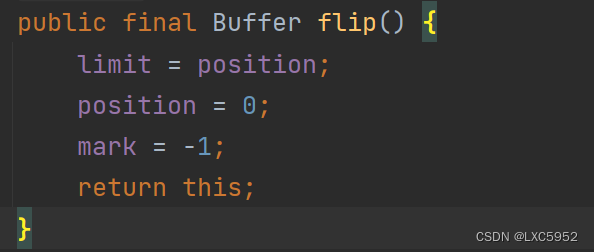
- flip(): buffer的读写转换, 原理是修改指针位置, 修改可读buffer长度, 每次写完buffer, 要进行读buffer, 必须执行flip()
1.3 举例IntBuffer
- Buffer的创建
// 通过allocate创建一个 长度为5的buffer, 意为可以存放5个int IntBuffer buffer = IntBuffer.allocate(5); - 使用Buffer-存放数据
- 通过循环存放数据
IntBuffer buffer = IntBuffer.allocate(5); for (int i = 0; i < 5; i++) { // 存放数据,如果使用put(int i)方法, 那么buffer指针会自动+1 // 每次存放数据不用选定下标位置 buffer.put(i); }- 通过下标存放数据
// 如果使用put(int index,int i)规定了数据存放的下标, 那么buffer指针不会自动+1 buffer.put(i, j);- 通过存放数组
// 通过数组存放数据 buffer.put(intArray); - 使用Buffer-读取数据
- 使用循环读取数据
	for (int i = 0; i < 5; i++) {
        // 存放数据,如果使用get()方法, 那么buffer指针会自动+1
        // 每次存放数据不用选定下标位置
        buffer.get(i);
        // 如果使用下标获取数据, 怎么指针不会变化
    }
1.4 ByteBuffer
- 读写常见的方法
- 存放数据
- putInt(int) 当前阶段存放int数据
- putLong(long) 当前节点存放long数据
- putShort(short) 当前阶段存放short数据
- putDouble(double) 当前节点存放double数
- 取出数据, 数据类型为对应类型正常取出, 不对应类型报异常BufferUnderflowException(出现隐式转换则不会报异常)
- getInt() 取出当前节点的数据,
- getLong() 同上, 数据类型为Long
- getShort() 同上, 数据类型为short
- getDouble() 同上, 数据类型为Double
- 针对byteBuffer可存放不同数据类型, 当数据需要进行get的时候也需要get对应的数据
    ByteBuffer byteBf = ByteBuffer.allocate(5);
    byteBf.putInt(1);
    byteBf.putLong(2L);
    byteBf.putShort((short) 3);
    byteBf.putDouble(4D);
    // 如果需要get也要安装对饮顺序get, 否则会出现BufferUnderflowException异常
    byteBf.flip();
    int anInt = byteBf.getInt();
    long aLong = byteBf.getLong();
    short aShort = byteBf.getShort();
    double aDouble = byteBf.getDouble();
1.5 只读Buffer
- 可以将我们的读写buffer, 转换成只读buffer, 防止我们存放是数据被修改
- 如果我们写入数据那么会出现ReadOnlyBufferException
// 将我们的byteBuffer转换成readOnlyBuffer(只读buffer), 只允许get, 不允许put
ByteBuffer readOnlyBuffer = buffer.asReadOnlyBuffer();
1.6 MappedByteBuffer(文件直接在堆外内存修改)
- 是nio引入的文件内存映射方案
- 即可以让文件直接在堆外内存进行修改, 不通过系统的数据拷贝到我们的堆中
- 避免了一次数据拷贝, 提高了性能
        /**
         * 创建一个RandomAccessFile对象
         * RandomAccessFile支持"随机访问"的方式, 不同于流需要一个一个的执行
         * 可以直接跳转到文件的任意位置进行修改
         * 这里通过RandomAccessFile直接获取Channel对象
         */
        RandomAccessFile file = new RandomAccessFile("1.txt", "rw");
        FileChannel channel = file.getChannel();
        /**
         * 参数1: 使用什么模式, 读写
         * 参数2: 可以修改的起始位置
         * 参数3: 映射到虚拟内存的大小
         * 这里是读写模式创建buffer,起始位置为0, 大小为5, 一共可修改5个字节
         */
        MappedByteBuffer map = channel.map(FileChannel.MapMode.READ_WRITE, 0, 5);
        map.put(0, (byte) 'L');
        map.put(1, (byte) 'X');
        // index不可为5, 大小设置为5, index最大值为4, 否则会出现越界异常
        map.put(4, (byte) 'C');
1.7 Buffer的分散聚合
- 分散Scattering
- 将数据写入到buffer中, 我们可以创建一个buffer数组, 依次写入, 就行一个buffer写满了, 再写另一个buffer
- 聚合Gathering
- 从buffer中数据数据, 采用buffer数组, 依次读取, 就行一个buffer读完了, 再读另一个buffer
	    // 创建一个ByteBuffer数组, 并初始化大小为5
        ByteBuffer[] buffers = new ByteBuffer[2];
        Arrays.stream(buffers).forEach(buffer -> buffer = ByteBuffer.allocate(5));
        // 将channel中的数据读取到buffer数组中(分散)
        channel.read(buffers);
        // 将buffer数组中的数据写入到channel中(聚合)
        // 注: 先反转buffer
        Arrays.stream(buffers).forEach(ByteBuffer::flip);
        channel.write(buffers);
1.8 Buffer的四个属性
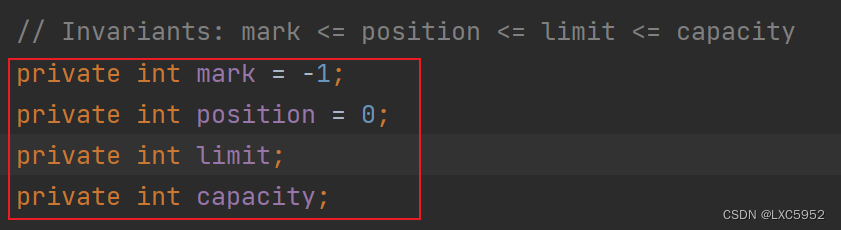
- mark: 标志
- 就是在我们正常读取或者写入流程中, 在读/写某个节点的时候, 将当前节点标记
- 标记: 通过buffer.mark(), 方法标记当前节点, 设置mark = position
- 恢复: 通过buffer.reset() , 将指针位置恢复到标记节点, 设置position = mark
- position: 本次要读/写的位置, 可以理解为指针, 当本次读/写完成后, 会指向下一节点
- limit: buffer的可读终点, 就是我们最多能读/写多少个数据, 可在操作中进行修改, position只能读到limit-1的位置
- capacity: 容量, 指当前buffer能存放的最大数据量, 只有在创建buffer的时候给定
buffer的创建,读,写,flip操作对4个属性的修改
- 创建buffer
- buffer会将我们的容量capacity设置为给定的值
- 并将limit设置为容量大小
- 向buffer中写入数据
- 会修改position的值, 将position的值设置为下一节点的下标
- flip操作
- 将position的值赋值给limit, 表示读buffer的时候最多能读到上次写入buffer的最末position位置
- 修改position的值, 将其设置为0
- 设置mark值为-1, 就是没标记的意思
- 从buffer中读取数据
- 此时position为0
- 会修改position的值, 将position的值设置为下一节点的下标
2. 通道Channel
channel可以看做是一个socket连接, 可以看做是一个流, 与流不同的是channel是双向的
- 通道可以同时进行读写, 而流只能读或者写
- 通道可以实现异步读写数据
- 通道可以读buffer中的数据, 也可以写数据到buffer中
- Channel是NIO包里的一个接口
2.1 常用的Channel类
- FileChannel
- 常用与文件的读写, 实现类是FileChannelImpl
- 通过FileChannel.open()创建FileChannel, 或者通过file流对象获取Channel(getChannel())
- open创建
/** * FileChannel.open(Path path, OpenOption... options) * 参数1: Path对象, 定义一个文件地址信息 * 参数2: 可变参数, 指定文件读写模式, 常用StandardOpenOption指定 * 这里指定读写模式 */ FileChannel channel = FileChannel.open(Paths.get("D://1.txt"), StandardOpenOption.READ, StandardOpenOption.WRITE);- 通过流对象获取
/** * 通过流对象获取的Channel只有读或者写的模式 * - 输入流只有读模式 * - 输出流只有写模式 * - 注意: 写模式会出现替换和追加的方式, * 可在流对象的第二个参数boolean append指定(true/false) */ // 通过输入流创建Channel FileInputStream in = new FileInputStream("D://1.txt"); FileChannel inChannel = in.getChannel(); // 通过输出流创建Channel FileOutputStream out = new FileOutputStream("D://1.txt"); FileChannel outChannel = out.getChannel(); - FileChannel创建时会指定对当前文件是读模式/写模式/读写模式
- DatagramChannel
- 常用语UPD数据的读写
- ServerSockerChannel
- 用于TCP数据的读写, ServerSocketChannel主要用于监听获取SocketChannel
- SocketChannel
- 用于TCP数据的读写, socketChannel主要是对数据进行读写
2.2 FileChannel文件通道
- 常用的方法
- read(Buffer buffer): 将通道中的数据读到buffer中
- write(Buffer buffer): 将buffer中的数据写入到通道中
- transferFrom(ReadableByteChannel src, long position, long count)
- 从目标通道(参数1)复制数据到当前通道
- 指定从哪个位置开始position, 指定读多少数据(count)
- 零拷贝, 性能高, 在windwos中每次只能发送8M, 需要循环发送
- transferTo(long position, long count, WritableByteChannel target)
- 从当前通道复制数据到目标通道(参数3), 数据长度同上
- 零拷贝, 性能高, 在windwos中每次只能发送8M, 需要循环发送
- 读取数据及写入数据
        // 通过输入流创建Channel
        FileInputStream in = new FileInputStream("D://1.txt");
        FileChannel inChannel = in.getChannel();
        // 通过输出流创建Channel
        FileOutputStream out = new FileOutputStream("D://2.txt");
        FileChannel outChannel = out.getChannel();
        ByteBuffer buffer = ByteBuffer.allocate(10);
        // 循环操作
        while (true) {
            // 将数据从1.txt中读出到buffer中
            int read = inChannel.read(buffer);
            // read返回值为-1 表示读完了
            if (read == -1) {
                break;
            }
            // 将buffer中的数据写入到2.txt中
            buffer.flip();
            outChannel.write(buffer);
        }
        // 最后关闭Channel对象/流对象
        ...
- 拷贝文件,使用transferFrom/transferTo
        // 通过输入流创建Channel
        FileInputStream in = new FileInputStream("D://1.txt");
        FileChannel inChannel = in.getChannel();
        // 通过输出流创建Channel
        FileOutputStream out = new FileOutputStream("D://3.txt");
        FileChannel outChannel = out.getChannel();
		// 从inChannel中把数据拷贝到outChannel中
        outChannel.transferFrom(inChannel, 0, inChannel.size());
        // 最后关闭Channel对象/流对象
        ...
2.3 ServerSocketChannel,SocketChannel
- ServerSocketChannel 可以理解为ServerSocket, 具体是监听新的客户端
- 通过ServerSocketChannel监听是否有连接,并获取连接SocketChannel
- 处理SocketChannel数据
- 常用的API
- open(): 获得一个ServerSocketChannel通道
- bind(SocketAddress address): 绑定要监听的端口
- configureBlocking(): 设置阻塞模式, false非阻塞, true阻塞
- accept(): 接收一个连接, 并返回, 设置非阻塞后, 没有连接将返回空
- register(Selector sel, int ops): 将当前通道注册到一个选择器上, 并指定监听时事件(这里常用OP_ACCEP事件)
- SokcerChannel可以理解为Socket, 具体是做读写数据用的
- 通过Channel的方法, 读写其中的数据
- 将缓存区buffer中的数据写入到通道, 或者将通道中的数据写入到buffer缓存区
- 常用的API:
- open(): 得到一个SocketChannel通道
- configureBlocking(): 设置阻塞模式, false非阻塞, true阻塞
- connect(SocketAddress address): 连接服务器, 一般通过accept的方法是已经连接成功的
- finishConnect(): 如果connect()连接失败, 就要通过该方法连接
- write(Buffer buffer): 将缓存区的数据写入通道
- read(Buffer buffer): 将通道中的数据写入缓存区
- register(Selector sel, int ops): 将当前通道注册到一个选择器上, 并指定监听时事件(常用读写事件, OP_WRITE|OP_READ)
		// 获得一个serverSocketChannel, 注册功能在后面使用
        ServerSocketChannel serverSocketChannel = ServerSocketChannel.open();
        // 绑定要监听的端口
        serverSocketChannel.bind(new InetSocketAddress(9090));
        // 设置非阻塞, 如果accept没有连接, 返回null
        serverSocketChannel.configureBlocking(false);
        // 循环处理获取socket
        while (true) {
            SocketChannel socketChannel = serverSocketChannel.accept();
            if (socketChannel == null){
                break;
            }
            // 设置socketChannel非阻塞
            socketChannel.configureBlocking(false);
            // 定义一个buffer
            ByteBuffer buffer = ByteBuffer.allocate(1024);
            // 循环读取数据, 如果1024能装下数据 只有一次循环, 否则循环拿出所有数据
            while (true) {
                int read = socketChannel.read(buffer);
                // read == -1 表示读完了
                if (read == -1) {
                    break;
                }
                // buffer反转
                buffer.flip();
                // 数据处理, 这里做打印
                System.out.println(new String(buffer.array(),0,buffer.limit()));
            }

        }
3. 选择器Selector
- NIO基于事件驱动, Selector可以检测注册到Selector上的连接是否有事件发生
- 如果有事件发生, 就可以获取事件, 然后对每个事件进行处理
- 这样就形成了一个线程管理多个通道(IO多路复用)
- 只有事件发生才进行读写, 这样大大降低了性能开销
- 而且使用一个线程管理多个连接(区别于BIO), 就不用维护多个线程了
- 一个线程对应一个Selector, 一个Selector对应多个连接
3.1 Selector常用方法
- open(): 获得一个Selector对象
- select():
- 监控所有注册的通道上是否有事件发生, 返回事件数目, 这是阻塞方法
- 如果有事件发生, 则将对应的连接key存入到我们Selector对象的内部集合中
- 可以使用提供的非阻塞方法
- select(long timeout): 指定超过时间, 超过时间没有事件返回一个0
- selectNow(): 马上返回, 如果没有事件发生立马返回0
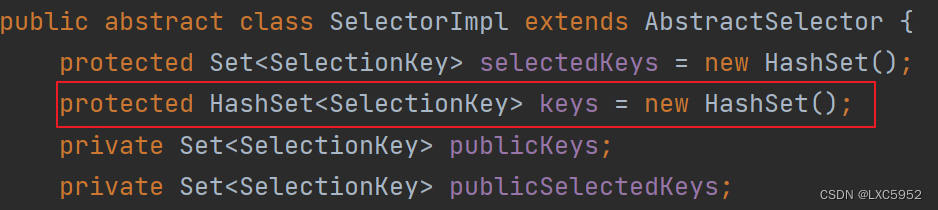
- selectedKeys():
- 获取有事件发生的集合, 通过select(), 将发生事件的连接加入到了selectedKeys中
- 通过selectorKey可以反向获取SocketChannel
3.2 SelectorKey
- 表示Selector和SocketChannel的一种注册关系, 共4种
- OP_ACCEPT: 表示有新的连接, 可以进行accpet, 值为16
- OP_CONNECT: 表示连接成功, 值为8
- OP_WRITE: 表示读操作, 值为4
- OP_READ: 表示写操作, 值为1
- keys存放的就是注册的key值, 通过keys()方法获取
- publicSelectedKeys存放的就是我们有事件发生的key, 通过selectedKeys()方法获取
- 通过拿到selectedKey(), 获得我们的连接, 然后进行数据处理


 332
332


 被折叠的 条评论
为什么被折叠?
被折叠的 条评论
为什么被折叠?
 到【灌水乐园】发言


