


Object Detection Demo
Welcome to the object detection inference walkthrough! This notebook will walk you step by step through the process of using a pre-trained model to detect objects in an image. Make sure to follow the installation instructions before you start.
安装
依赖
Tensorflow Object Detection API depends on the following libraries:
- Protobuf 2.6
- Python-tk
- Pillow 1.0
- lxml
- tf Slim (which is included in the “tensorflow/models/research/” checkout)
- Jupyter notebook
- Matplotlib
- Tensorflow
- cocoapi
后来在运行测试时:
python object_detection/builders/model_builder_test.py出现了ImportError: No module named nets错误。原来是因为我没有装slim!
在tensorflow/models/research/slim/安装slim后,成功通过测试:
python setup.py build
python setup.py install
安装COCO API
参考https://www.jianshu.com/p/de455d653301
安装Protobuf
Tensorflow对象检测API使用Protobufs来配置模型和训练参数。在可以使用框架之前,必须编译Protobuf库。可以在https://github.com/google/protobuf/releases 下载编译好的protoc-3.5.1-win32.zip解压并添加到环境变量,然后再tensorflow/models/research/目录打开git,输入:
protoc object_detection/protos/*.proto --python_out=.将库添加到PYTHONPATH
在本地运行时,tensorflow / models / research /和slim目录应附加到PYTHONPATH中。当系统为linux时,这可以通过从tensorflow / models / research /运行以下内容来完成:
export PYTHONPATH=$PYTHONPATH:`pwd`:`pwd`/slim当系统为windows时,在tensorflow / models / research/目录打开cmd,运行以下内容:
SET PYTHONPATH=%cd%;%cd%\slimImports
import numpy as np
import os
import six.moves.urllib as urllib
import sys
import tarfile
import tensorflow as tf
import zipfile

from collections import defaultdict
from io import StringIO
from matplotlib import pyplot as plt
from PIL import Image

# This is needed since the notebook is stored in the object_detection folder.
sys.path.append("..")
from object_detection.utils import ops as utils_ops

if tf.__version__ < '1.4.0':
  raise ImportError('Please upgrade your tensorflow installation to v1.4.* or later!')
d:\program files\python36\lib\site-packages\h5py\__init__.py:36: FutureWarning: Conversion of the second argument of issubdtype from `float` to `np.floating` is deprecated. In future, it will be treated as `np.float64 == np.dtype(float).type`.
from ._conv import register_converters as _register_converters
Env setup
# This is needed to display the images.
%matplotlib inline
Object detection imports
Here are the imports from the object detection module.
from utils import label_map_util

from utils import visualization_utils as vis_util
模型准备
变量
任何模型可以使用 export_inference_graph.py 工具通过改变PATH_TO_CKPT 到一个新的.pb文件能简单的加载到程序中
这里我们使用”SSD with Mobilenet”. 更多模型见 detection model zoo
# What model to download.
MODEL_NAME = 'ssd_mobilenet_v1_coco_2017_11_17'
MODEL_FILE = MODEL_NAME + '.tar.gz'
DOWNLOAD_BASE = 'http://download.tensorflow.org/models/object_detection/'

# Path to frozen detection graph. This is the actual model that is used for the object detection.
PATH_TO_CKPT = MODEL_NAME + '/frozen_inference_graph.pb'

# List of the strings that is used to add correct label for each box.
PATH_TO_LABELS = os.path.join('data', 'mscoco_label_map.pbtxt')

NUM_CLASSES = 90
下载模型
opener = urllib.request.URLopener()
opener.retrieve(DOWNLOAD_BASE + MODEL_FILE, MODEL_FILE)
tar_file = tarfile.open(MODEL_FILE)
for file in tar_file.getmembers():
  file_name = os.path.basename(file.name)
  if 'frozen_inference_graph.pb' in file_name:
    tar_file.extract(file, os.getcwd())
Load a (frozen) Tensorflow model into memory.
加载模型到内存中
detection_graph = tf.Graph()
with detection_graph.as_default():
  od_graph_def = tf.GraphDef()
  with tf.gfile.GFile(PATH_TO_CKPT, 'rb') as fid:
    serialized_graph = fid.read()
    od_graph_def.ParseFromString(serialized_graph)
    tf.import_graph_def(od_graph_def, name='')
加载 label map
标签映射将索引映射到类别名称,以便当我们的卷积网络预测’5’时,我们知道这对应于’飞机’。这里我们使用内部实用函数,但任何返回映射整数到适当的字符串标签的字典的东西都可以
label_map = label_map_util.load_labelmap(PATH_TO_LABELS)
categories = label_map_util.convert_label_map_to_categories(label_map, max_num_classes=NUM_CLASSES, use_display_name=True)
category_index = label_map_util.create_category_index(categories)
Helper code
def load_image_into_numpy_array(image):
  (im_width, im_height) = image.size
  return np.array(image.getdata()).reshape(
      (im_height, im_width, 3)).astype(np.uint8)
Detection
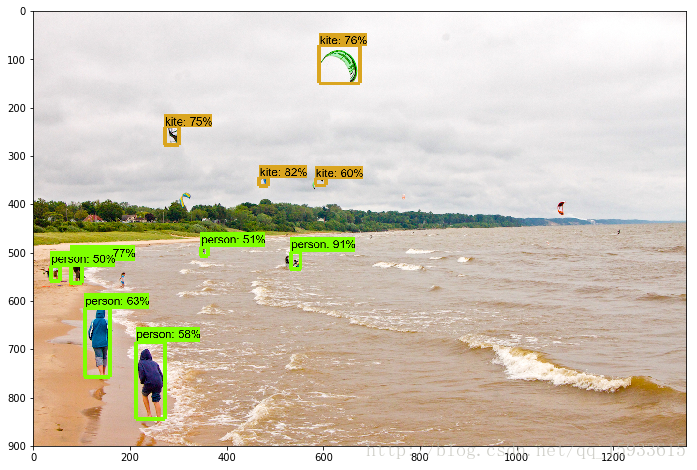
# For the sake of simplicity we will use only 2 images:
# image1.jpg
# image2.jpg
# If you want to test the code with your images, just add path to the images to the TEST_IMAGE_PATHS.
PATH_TO_TEST_IMAGES_DIR = 'test_images'
TEST_IMAGE_PATHS = [ os.path.join(PATH_TO_TEST_IMAGES_DIR, 'image{}.jpg'.format(i)) for i in range(1, 3) ]

# Size, in inches, of the output images.
IMAGE_SIZE = (12, 8)
def run_inference_for_single_image(image, graph):
with graph.as_default():
with tf.Session() as sess:
# Get handles to input and output tensors
ops = tf.get_default_graph().get_operations()
all_tensor_names = {output.name for op in ops for output in op.outputs}
tensor_dict = {}
for key in [
'num_detections', 'detection_boxes', 'detection_scores',
'detection_classes', 'detection_masks'
]:
tensor_name = key + ':0'
if tensor_name in all_tensor_names:
tensor_dict[key] = tf.get_default_graph().get_tensor_by_name(
tensor_name)
if 'detection_masks' in tensor_dict:
# The following processing is only for single image
detection_boxes = tf.squeeze(tensor_dict['detection_boxes'], [0])
detection_masks = tf.squeeze(tensor_dict['detection_masks'], [0])
# Reframe is required to translate mask from box coordinates to image coordinates and fit the image size.
real_num_detection = tf.cast(tensor_dict['num_detections'][0], tf.int32)
detection_boxes = tf.slice(detection_boxes, [0, 0], [real_num_detection, -1])
detection_masks = tf.slice(detection_masks, [0, 0, 0], [real_num_detection, -1, -1])
detection_masks_reframed = utils_ops.reframe_box_masks_to_image_masks(
detection_masks, detection_boxes, image.shape[0], image.shape[1])
detection_masks_reframed = tf.cast(
tf.greater(detection_masks_reframed, 0.5), tf.uint8)
# Follow the convention by adding back the batch dimension
tensor_dict['detection_masks'] = tf.expand_dims(
detection_masks_reframed, 0)
image_tensor = tf.get_default_graph().get_tensor_by_name('image_tensor:0')
# Run inference
output_dict = sess.run(tensor_dict,
feed_dict={image_tensor: np.expand_dims(image, 0)})
# all outputs are float32 numpy arrays, so convert types as appropriate
output_dict['num_detections'] = int(output_dict['num_detections'][0])
output_dict['detection_classes'] = output_dict[
'detection_classes'][0].astype(np.uint8)
output_dict['detection_boxes'] = output_dict['detection_boxes'][0]
output_dict['detection_scores'] = output_dict['detection_scores'][0]
if 'detection_masks' in output_dict:
output_dict['detection_masks'] = output_dict['detection_masks'][0]
return output_dictfor image_path in TEST_IMAGE_PATHS:
image = Image.open(image_path)
# the array based representation of the image will be used later in order to prepare the
# result image with boxes and labels on it.
image_np = load_image_into_numpy_array(image)
# Expand dimensions since the model expects images to have shape: [1, None, None, 3]
image_np_expanded = np.expand_dims(image_np, axis=0)
# Actual detection.
output_dict = run_inference_for_single_image(image_np, detection_graph)
# Visualization of the results of a detection.
vis_util.visualize_boxes_and_labels_on_image_array(
image_np,
output_dict['detection_boxes'],
output_dict['detection_classes'],
output_dict['detection_scores'],
category_index,
instance_masks=output_dict.get('detection_masks'),
use_normalized_coordinates=True,
line_thickness=8)
plt.figure(figsize=IMAGE_SIZE)
plt.imshow(image_np)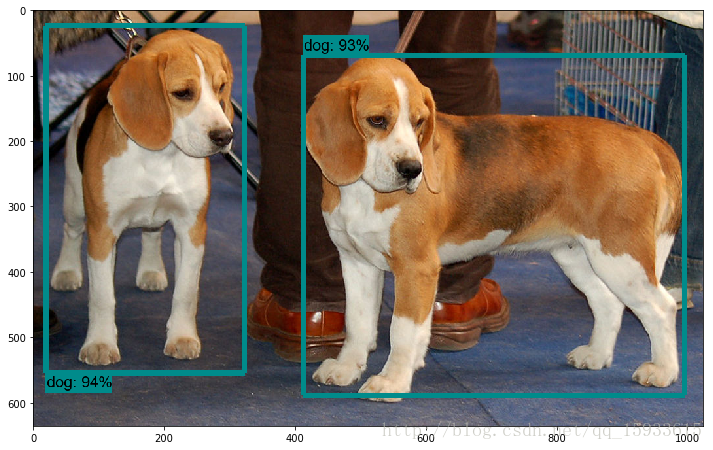


 290
290


 被折叠的 条评论
为什么被折叠?
被折叠的 条评论
为什么被折叠?
 到【灌水乐园】发言


