前面已经个大家介绍Picasso图片缓存机制,大家不熟悉请看上一篇文章http://blog.csdn.net/qq_15950325/article/details/52809380,其实Picasso优点首先是占用内存小,代码效率高相比较于Volley异步框架而言,它而且支持本地缓存,而Volley不可以。
listview分为以下几步
1.需要下载Picasso.jar参考上一篇文章点击这里首先创建PicassoActivity,ListView2Activity用来显示ListView以及布局文件里面的图片信息
2.创建一个接口CropSquareTransformation实现Transformation
3.创建一个Model News用来存放新闻标题、内容、图片地址等
4.创建适配器用来将标题以及加载网络数据显示在ListView对应的TextView和ImageView中
5.通过调用Adapter将数据与ListView绑定然后条用Adapter. adapter.notifyDataSetChanged();刷新数据。
6.千万不要忘记在AndroidMainfest.xml文件中添加网络权限
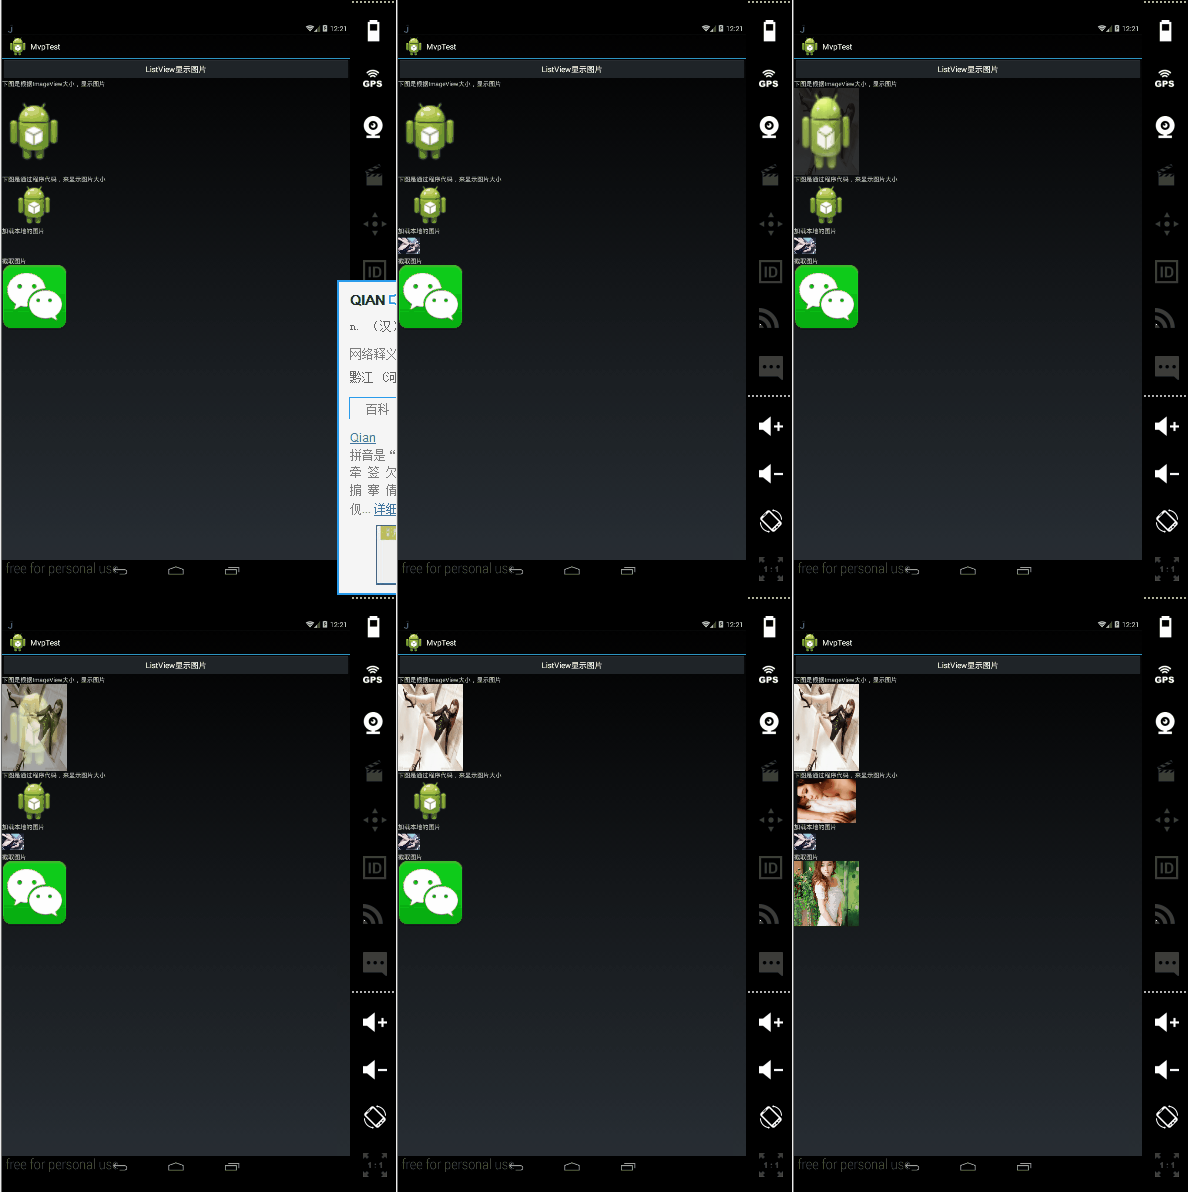
下面给大家讲解过程请大家跟着我的思路来,废话不多说先上效果图!

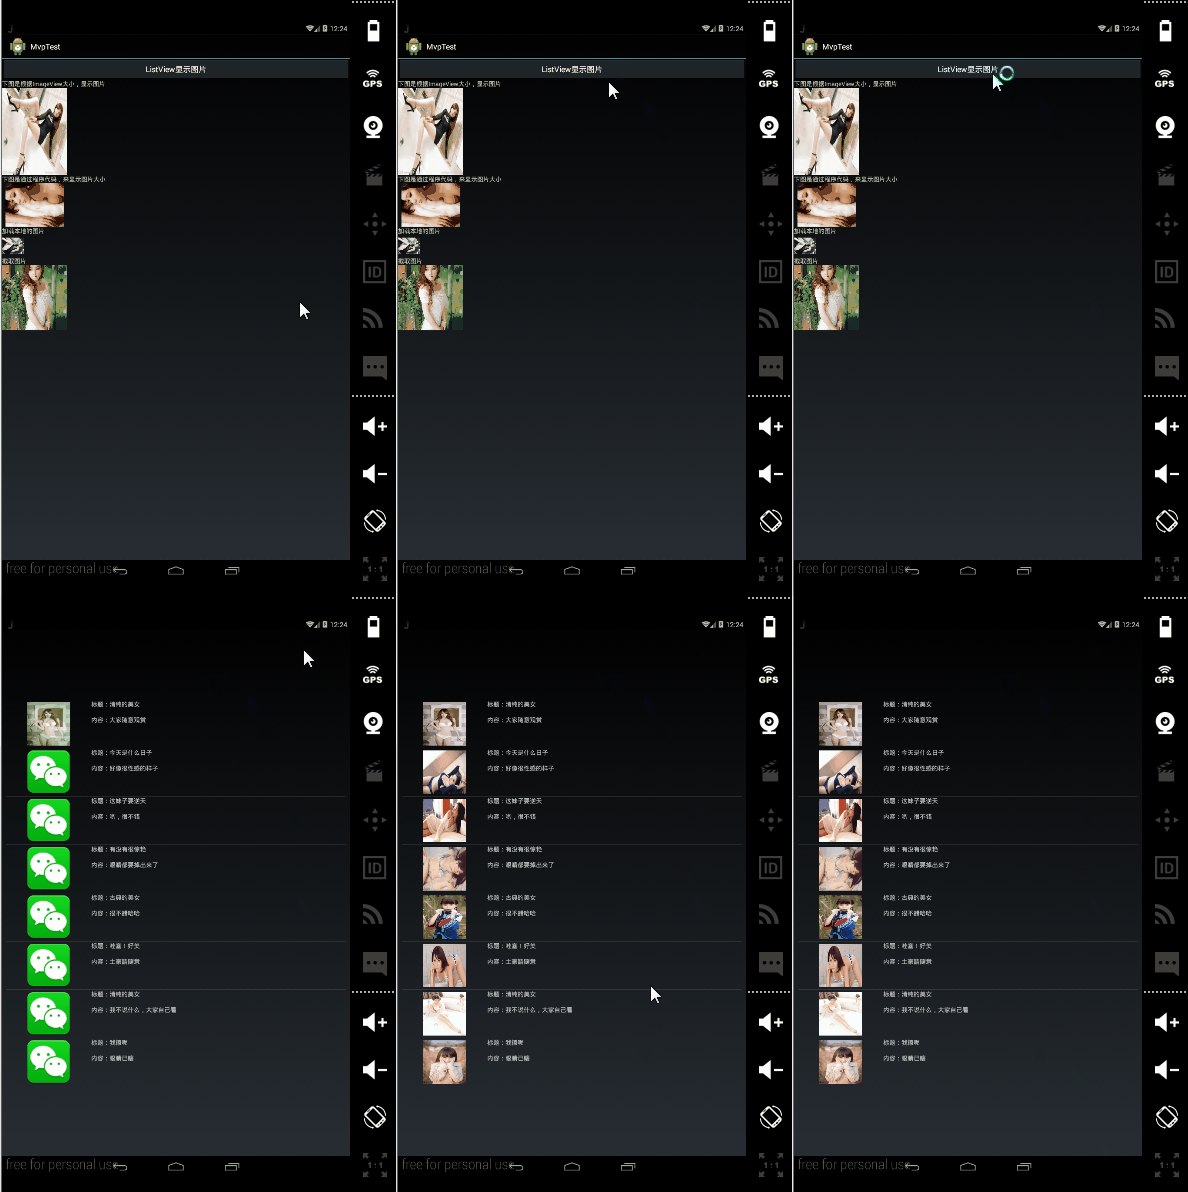
然后点击按钮加载另外几条数据并刷新效果!

下面分思路讲解
private void initData() {
        /**
         * 加载四张图片的Url并显示
         * 根据ImageView大小 设置fit不能设置resize负责会报非法状态异常
         */
        com.squareup.picasso.Picasso.with(PicassoListViewActivity.this).load("http://img03.sogoucdn.com/app/a/100520093/ac75323d6b6de243-cbe931c159ab22f1-8c6da232e0ff4ab2291a3366fa8bf620.jpg").fit().placeholder(R.drawable.ic_launcher).error(R.drawable.wechat_icon).into(iv_first);

        com.squareup.picasso.Picasso.with(PicassoListViewActivity.this).load("http://img02.sogoucdn.com/app/a/100520021/1fc067f754a527eda87714c36b8ae16f").resize(200, 150).centerCrop().placeholder(R.drawable.ic_launcher).error(R.drawable.wechat_icon).into(iv_second);

        com.squareup.picasso.Picasso.with(PicassoListViewActivity.this).load("http://img1.cheshi-img.com/201212/775849/50bec447585f1.jpg").into(iv_three);
        com.squareup.picasso.Picasso.with(PicassoListViewActivity.this).load("http://g.hiphotos.baidu.com/image/pic/item/6c224f4a20a446230761b9b79c22720e0df3d7bf.jpg")
         .transform(new CropSquareTransformation())
         .placeholder(R.drawable.wechat_icon)
         .error(R.drawable.ic_launcher)
         .into(iv_four);

    }
初始化UI组件代码如下
private void initView() {
        // 初始化UI组件
        iv_first=(ImageView) findViewById(R.id.img_one);
        iv_second=(ImageView) findViewById(R.id.img_two);
        iv_three=(ImageView) findViewById(R.id.img_three);
        iv_four=(ImageView) findViewById(R.id.img_four);

    }
给按钮添加监听事件并跳转到ListView2Activity代码如下
    public void Picasso(View v){
        /**点击按钮监听事件跳转到ListView2Activity**/
              ListView2Activity.ListView(PicassoListViewActivity.this);
    }
在ListView2Activity添加listview方法代码如下
public static void ListView(Context cxt){
        Intent intent=new Intent(cxt, ListView2Activity.class);
        cxt.startActivity(intent);
    }
然后创建ListView2Activity代码如下首先加载数据
    private void initData() {
        // 加载数据
//      for (int i = 0; i <8; i++) {
//          news.setTitle(str_title[i]);
//          news.setContent(str_content[i]);
//          news.setPicUrl(imgUrl[i]);
//          list.clear();
//          list.add(news);
//      }
          News news1=new News();
            news1.setTitle("清纯的美女");
            news1.setContent("大家随意观赏");
            news1.setPicUrl("http://img03.sogoucdn.com/app/a/100520093/e142041c58faafbd-c05947525eb7535f-812b0ddf9ae976af8ca24ee47d8a22b9.jpg");
            //添加新聞一
           list.add(news1);
           News news2=new News();
           news2.setTitle("今天是什么日子");
           news2.setContent("好像很性感的样子");
           news2.setPicUrl("http://pic1.win4000.com/wallpaper/a/5191aabc83326.jpg");
                //添加新聞二
                 list.add(news2);
                 News news3=new News();
                    news3.setTitle("这妹子要逆天");
                    news3.setContent("哟,很不错");
                    news3.setPicUrl("http://gimage2.itcpn.net/files/allimg/2012_01_16/178-1201161A543.jpg");
                    //添加新聞三
                     list.add(news3);
                 News news4=new News();
                      news4.setTitle("有没有很惊艳");
                      news4.setContent("眼睛都要掉出来了");
                      news4.setPicUrl("http://images.china.cn/attachement/jpg/site1000/20111215/002564bb1f431053900233.jpg");
                      //添加新聞四
                         list.add(news4);
                         News news5 = new News();
                            news5.setTitle("古典的美女");
                            news5.setContent("很不錯哈哈");
                            news5.setPicUrl("http://c.hiphotos.baidu.com/image/pic/item/342ac65c10385343498219169613b07eca8088bc.jpg");
                            //添加新聞五
                            list.add(news5);
                            News news6 = new News();
                            news6.setTitle("哇塞!好美");
                            news6.setContent("土豪請隨意");
                            news6.setPicUrl("http://c.hiphotos.baidu.com/image/pic/item/a044ad345982b2b7a2f0f7cd33adcbef76099b48.jpg");
                            //添加新聞六
                            list.add(news6);
                            //添加新聞
                            News news7 = new News();
                            news7.setTitle("清纯的美女");
                            news7.setContent("我不说什么,大家自己看");
                            news7.setPicUrl("http://e.hiphotos.baidu.com/image/pic/item/8b13632762d0f7031db73fdc0afa513d2697c5ad.jpg");
                            list.add(news7);

                            News news8 = new News();
                            news8.setTitle("我擦呢");
                            news8.setContent("眼睛已瞎");
                            news8.setPicUrl("http://b.hiphotos.baidu.com/image/pic/item/9825bc315c6034a857770337ce134954082376ea.jpg");
                            list.add(news8);
                            //刷新数据
                            adapter.notifyDataSetChanged();

    }
初始化UI操作并绑定适配器
private void initView() {
        // 初始化UI
        list=new ArrayList<News>();
        lv_list=(android.widget.ListView) findViewById(R.id.lv);
        adapter=new NewsAdapter(ListView2Activity.this,list);
        lv_list.setAdapter(adapter);

    }
创建bean类News实体如下
public class News {
     /**新闻标题**/
    private String title;
     /**新闻内容**/
    private String content;
     /**新闻图片地址**/
    private String picUrl;
    public String getTitle() {
        return title;
    }
    public void setTitle(String title) {
        this.title = title;
    }
    public String getContent() {
        return content;
    }
    public void setContent(String content) {
        this.content = content;
    }
    public String getPicUrl() {
        return picUrl;
    }
    public void setPicUrl(String picUrl) {
        this.picUrl = picUrl;
    }
然后就是创建CropSquareTransformation接口代码如下
public class CropSquareTransformation implements Transformation {

    @Override
    public String key() {
        return "square()";
    }

    /**
     * 截取宽度最小的宽高 最为bitmap宽高
     */
    @Override
    public Bitmap transform(Bitmap bitmap) {
        int size=Math.min(bitmap.getWidth(), bitmap.getHeight());
        /**水平方向**/
        int x=(bitmap.getWidth()-size)/2;
        /**垂直方向**/
        int y=(bitmap.getHeight()-size)/2;
        /**Bitmap初始化**/
        Bitmap result=Bitmap.createBitmap(bitmap, x, y, size, size);
        if(result!=bitmap){
            /**释放bitmap资源**/
            bitmap.recycle();
        }
        return result;
    }
然后创建适配器NewsAdapter继承BaseAdapter代码如下
public class NewsAdapter extends BaseAdapter {
     /**上下文对象**/
    private Context mContext;
      /**新闻列表集合**/
    private List<News> list;
     /**布局初始化**/
    private LayoutInflater mInflater;
    public NewsAdapter(Context mContext,List<News> list) {
        // 初始化数据
        this.mContext=mContext;
        this.list=list;
        mInflater=LayoutInflater.from(mContext);
    }

    @Override
    public int getCount() {
         /**获取list条目**/
        return list.size();
    }

    @Override
    public Object getItem(int position) {
        /** 获取每个item位置**/
        return list.get(position);
    }

    @Override
    public long getItemId(int position) {
        /** 获取每个子item id**/
        return position;
    }

    @Override
    public View getView(int position, View convertView, ViewGroup parent) {
        /**
        复用convertView 然后使用ViewHolder异步加载数据然后再刷新列表内容将新闻标题、内容、以及图片地址设置到对应的UI控件进行显示**/
        ViewHolder holder=null;
        /**判断convertView是否为空**/
        if(convertView==null){
             /**创建一个ViewHolder对象**/
            holder=new ViewHolder();
             /**将布局文件添加到View中**/convertView=mInflater.inflate(R.layout.lv_item, null);
            /**UI控件的初始化操作 **/
            holder.tv_title=(TextView) convertView.findViewById(R.id.txt_title);
            holder.tv_content=(TextView) convertView.findViewById(R.id.txt_content);
            holder.iv_picurl=(ImageView) convertView.findViewById(R.id.item_pic);
                /**设置一个Tag标记 **/
            convertView.setTag(holder);
        }else{
              /**获取Tag标记 **/
            holder=(ViewHolder) convertView.getTag();
        }

        holder.tv_title.setText("标题:"+list.get(position).getTitle());
        holder.tv_content.setText("内容:"+list.get(position).getContent());
        //holder.iv_picurl.setImageResource(position);
        /**利用Picasso加载图片的不会出现事件冲突**/Picasso.with(mContext).load(list.get(position).getPicUrl()).fit().placeholder(R.drawable.wechat_icon).error(R.drawable.ic_launcher).into(holder.iv_picurl);
        return convertView;
    }
    /**创建ViewHolder缓存类**/
    public static class ViewHolder{
        public TextView tv_title;
        public TextView tv_content;
        public ImageView iv_picurl;
    }
布局文件main.xml和lv_item.xml和activity_picasso2.xml如下代码所示
<LinearLayout xmlns:android="http://schemas.android.com/apk/res/android"
    xmlns:tools="http://schemas.android.com/tools"
    android:layout_width="match_parent"
    android:layout_height="match_parent"
    tools:context=".MainActivity"
    android:orientation="vertical">
    <ScrollView
        android:layout_width="match_parent"
        android:layout_height="match_parent">
        <LinearLayout
            android:layout_width="match_parent"
            android:layout_height="wrap_content"
            android:orientation="vertical">
            <Button
                android:id="@+id/btn_listView"
                android:layout_width="match_parent"
                android:layout_height="wrap_content"
                android:gravity="center"
                android:onClick="Picasso"
                android:text="ListView显示图片"/>
            <TextView
                android:layout_width="match_parent"
                android:layout_height="wrap_content"
                android:text="下图是根据ImageView大小,显示图片"/>
            <ImageView
                android:id="@+id/img_one"
                android:layout_width="150dp"
                android:layout_height="200dp" />
            <TextView
                android:layout_width="match_parent"
                android:layout_height="wrap_content"
                android:text="下图是通过程序代码,来显示图片大小"/>
            <ImageView
                android:id="@+id/img_two"
                android:layout_width="150dp"
                android:layout_height="100dp" />
            <TextView
            android:layout_width="match_parent"
            android:layout_height="wrap_content"
            android:text="加载本地的图片"/>
            <ImageView
                android:id="@+id/img_three"
                android:layout_width="50dp"
                android:layout_height="50dp" />
            <TextView
                android:layout_width="match_parent"
                android:layout_height="wrap_content"
                android:text="截取图片"/>
            <ImageView
                android:id="@+id/img_four"
                android:layout_width="150dp"
                android:layout_height="150dp" />
        </LinearLayout>
    </ScrollView>

</LinearLayout>
<?xml version="1.0" encoding="utf-8"?>
<LinearLayout xmlns:android="http://schemas.android.com/apk/res/android"
android:layout_width="match_parent"
android:layout_height="match_parent"
android:orientation="horizontal">
<LinearLayout
android:layout_width="0dp"
android:layout_height="110dp"
android:layout_weight="1"
android:gravity="center">
<ImageView
android:id="@+id/item_pic"
android:layout_width="100dp"
android:layout_height="100dp" />
</LinearLayout>
<LinearLayout
android:layout_width="0dp"
android:layout_height="110dp"
android:layout_weight="3"
android:orientation="vertical">
<TextView
android:id="@+id/txt_title"
android:layout_width="match_parent"
android:layout_height="0dp"
android:layout_weight="1"/>
<TextView
android:id="@+id/txt_content"
android:layout_width="match_parent"
android:layout_height="0dp"
android:layout_weight="2"/>
</LinearLayout>
</LinearLayout> <?xml version="1.0" encoding="utf-8"?>
<LinearLayout xmlns:android="http://schemas.android.com/apk/res/android"
android:layout_width="match_parent"
android:layout_height="match_parent"
android:orientation="vertical"
android:gravity="center"
android:padding="10dp" >
<ListView
android:id="@+id/lv"
android:layout_width="match_parent"
android:layout_height="wrap_content"
/>
</LinearLayout>
添加网络权限在AndroidMainfest.xml中
<uses-permission android:name="android.permission.INTERNET">
到这里基本结束了!
转载请注明出处!欢迎转载同时希望有兴趣的加入我们的群进行讨论工作中遇到的问题!欢迎大家加群哈哈!


 1876
1876


 被折叠的 条评论
为什么被折叠?


