


首先跟大家说声抱歉,由于最近鄙人感冒身体欠安,所以博客很久没更新了,我觉得是时候不玩捉迷臧了,废话不多说,还是老套路,上效果图!

其实实现原理很简单首先我们看一张图,画的少不喜随便喷哈哈!
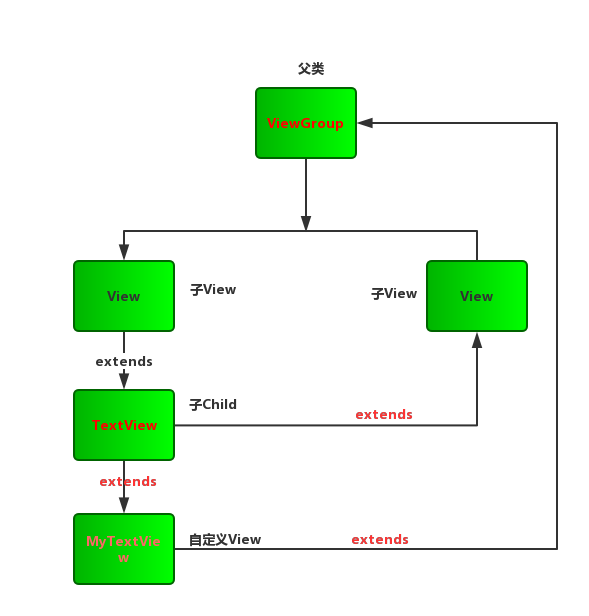
其实说白了就是继承ViewGroup然后重新计算屏幕的宽高
然后在Activity中使用MyTextView.setText(String text,final Animation animation,int duration),参数的含义分别是文本内容,动画类型以及id,然后多久播放一次TextView。
代码如下
`tv=(MyTextView) findViewById(R.id.cTextView);
       /** 找到控件**/tv.setText("HelloWorld",AnimationUtils.loadAnimation(TvActivity.this,R.anim.myanim),1000);
       /**然后将MyTextView中的内容按照动画的顺序1秒一次显示在Texview中**/
        tv.setText("My ScrollingView",AnimationUtils.loadAnimation(TvActivity.this, R.anim.anim_right_into), 1000);`
然后在MyTextView中重写setText方法代码如下
public void setText(String text,final Animation animation,int duration){
        int time=0;
        if(text!=null&&!text.isEmpty()){
            char[] characters=text.toCharArray();
            for (char c : characters) {
                final TextView tv=new TextView(cxt);
                /**遍历每个字符串的每个字符,生成一个TextView并设置他动画**/
                tv.setText(String.valueOf(c));
                /**设置字体大小**/
                tv.setTextSize(30);
                /**设置字体颜色**/
                tv.setTextColor(Color.RED);
                /**创建一个Handler实例**/
                Handler handler=new Handler();
                //每隔多少秒播放下一个TextView的动画
                handler.postDelayed(new Runnable() {

                    @Override
                    public void run() {
                        /**将tv添加到view中然后设置动画**/
                        addView(tv);
                        tv.setAnimation(animation);
                    }
                }, time);
                /**设置时间间隔**/
                time+=duration;
            }
        }

    }
再覆写onLayout方法首先遍历所有的子视图,然后再获取onMeassure尺寸,然后让他们从左往右排列,代码如下:
`
@Override
    protected void onLayout(boolean changed, int l, int t, int r, int b) {
        // TODO Auto-generated method stub
        int childLeft=0;
        //遍历所有子视图
        int childCount=getChildCount();
        for (int i = 0; i < childCount; i++) {
            View childView=getChildAt(i);
            //获取在onMeassure计算的尺寸
            int measureW=childView.getMeasuredWidth();
            int  measureH=childView.getMeasuredHeight();
        //将他们横向排列
            childView.layout(childLeft, 0, childLeft+measureW, measureH);
            childLeft+=measureW;
        }

    }`
然后重新计算measureH和measureW代码如下
private int measureW(int widthMeasureSpec) {
        int result=0;
        int widthMode=MeasureSpec.getMode(widthMeasureSpec);//获取模式
        int widthSize=MeasureSpec.getSize(widthMeasureSpec);//获取尺寸
        switch (widthMode) {
           /**
             * mode共有三种情况,取值分别为MeasureSpec.UNSPECIFIED, MeasureSpec.EXACTLY,
             * MeasureSpec.AT_MOST。
             *
             *
             * MeasureSpec.EXACTLY是精确尺寸,
             * 当我们将控件的layout_width或layout_height指定为具体数值时如andorid
             * :layout_width="50dip",或者为FILL_PARENT是,都是控件大小已经确定的情况,都是精确尺寸。
             *
             *
             * MeasureSpec.AT_MOST是最大尺寸,
             * 当控件的layout_width或layout_height指定为WRAP_CONTENT时
             * ,控件大小一般随着控件的子空间或内容进行变化,此时控件尺寸只要不超过父控件允许的最大尺寸即可
             * 。因此,此时的mode是AT_MOST,size给出了父控件允许的最大尺寸。
             *
             *
             * MeasureSpec.UNSPECIFIED是未指定尺寸,这种情况不多,一般都是父控件是AdapterView,
             * 通过measure方法传入的模式。
             */

        case MeasureSpec.AT_MOST:

            break;
case MeasureSpec.EXACTLY:
    result=widthSize;

            break;

        default:
            break;
        }
        return result;
    }

}
private int measureH(int heightMeasureSpec) {
// TODO Auto-generated method stub
int result=0;
int heightMode=MeasureSpec.getMode(heightMeasureSpec);//获取模式
int heightSize=MeasureSpec.getSize(heightMeasureSpec);//获取大小
switch (heightMode) {
case MeasureSpec.AT_MOST:
break;
case MeasureSpec.EXACTLY:
result=heightSize;
break;
default:
break;
}
return result;
}最后重写onMeasure方法,代码如下
@Override
    protected void onMeasure(int widthMeasureSpec, int heightMeasureSpec) {
        int measureW=measureW(widthMeasureSpec);
        int measureH=measureH(heightMeasureSpec);
        measureChildren(widthMeasureSpec, heightMeasureSpec);
        setMeasuredDimension(measureW, measureH);
    }
然后在res下面新建一个anim文件夹然后创建myanim.xml和anim_right_into.xml代码如下
myanim.xml
<?xml version="1.0" encoding="utf-8"?>
<set xmlns:android="http://schemas.android.com/apk/res/android">  <!--设置时间一秒 从 隐藏到出现-->
    <alpha
        android:duration="1000"
        android:fromAlpha="0.0"
        android:toAlpha="1.0" />
</set>
anim_right_into.xml代码如下
<?xml version="1.0" encoding="utf-8"?>
<set xmlns:android="http://schemas.android.com/apk/res/android">
    <translate
        android:duration="1000"
        android:fillAfter="true"
        android:fromXDelta="50%p"
        android:interpolator="@android:anim/anticipate_interpolator"
        android:toXDelta="0" />
</set>
然后主布局文件我在这里也贴一下吧
<LinearLayout xmlns:android="http://schemas.android.com/apk/res/android"
    xmlns:tools="http://schemas.android.com/tools"
    android:layout_width="match_parent"
    android:layout_height="match_parent"
    android:orientation="vertical"
    android:padding="10dp"
   >

    <com.zm.mvptest.view.MyTextView
        android:id="@+id/cTextView"
        android:layout_width="match_parent"
        android:layout_height="match_parent">
</com.zm.mvptest.view.MyTextView>

</LinearLayout>
最后在TvActivity调用MyTextView中的setText方法,完成功能!代码如下
@Override
    protected void onCreate(Bundle savedInstanceState) {
        // TODO Auto-generated method stub
        super.onCreate(savedInstanceState);
        setContentView(R.layout.activity_tv);
        initView();
    }
    private void initView() {
        // 初始化操作
        tv=(MyTextView) findViewById(R.id.cTextView);
           // tv.setText("HelloWorld",AnimationUtils.loadAnimation(TvActivity.this,R.anim.myanim),1000);     tv.setText("My ScrollingView",AnimationUtils.loadAnimation(TvActivity.this, R.anim.anim_right_into), 2000);

    }
其实效果特别简单,这只是一个入门的Demo,在实际开发中您们要根据自己的需求去自定义TextView然后继承ViewGroup等,都是可以实现效果的,有问题可以加群讨论,扫码直接进入!欢迎大家加入!


 1447
1447


 被折叠的 条评论
为什么被折叠?
被折叠的 条评论
为什么被折叠?
 到【灌水乐园】发言


