


d3-selecition版本:v3.0.0。
一、引用/安装方式
d3-selection是一个可以单独安装使用的模块,使用方式
npm install d3-selectionimport {selectAll} from "https://cdn.skypack.dev/d3-selection@3";<script src="https://cdn.jsdelivr.net/npm/d3-selection@3"></script>
二、要点及举例
- selection 可以接收w3c 选择器(W3C selector strings ),如标签、id、class。
- 顶层方法为两个:d3.select 和 d3.selectAll。返回Selection对象。
- Selection可以设置attributes, styles, properties, HTML 或text等。
- 使用join方法可以使用元素与数据对应起来。
- 使用举例
// 选择<a>元素
const anchor = d3.select("a");
// 选择所有<p>元素
const paragraph = d3.selectAll("p");
// 设置style
d3.selectAll(document.links).style("color", "red");
//设置属性
d3.selectAll("p").attr("class", "graf")
// 为所有p元素添加click事件响应
d3.selectAll("p").on("click", function(event) {
  d3.select(this).style("color", "red");
});
// 链式调用,选择所有p元素下面的b元素
const b = d3.selectAll("p").selectAll("b");

// filter用于选择后的筛选,可使用selector或者function,funtion里返回ture/false。
const even = d3.selectAll("tr").filter(":nth-child(even)");
const even = d3.selectAll("tr").filter((d, i) => i & 1);
// 也可以使用select来实现,但返回值为this/null
d3.selectAll("tr").select(function(d, i) { return i & 1 ? this : null; });

// merge用于合并不同的selection
const odd = selection.select(function(d, i) { return i & 1 ? this : null; ));
const even = selection.select(function(d, i) { return i & 1 ? null : this; ));
const merged = odd.merge(even);

// 开关某项style
selection.classed("foo bar", true);
selection.classed("foo", () => Math.random() > 0.5);

// 添加元素
d3.selectAll("div").append("p");
// 等效于
d3.selectAll("div").append(() => document.createElement("p"));
// 或者
d3.selectAll("div").select(function() {
  return this.appendChild(document.createElement("p"));
});
//或者
d3.selectAll("div").append(d3.creator("p"));

//删除元素
d3.select("#ele").remove()
//克隆元素
d3.select("#ele").clone()

//使用data
svg.selectAll("circle")
  .data(data)
  .join("circle")
    .attr("fill", "none")
    .attr("stroke", "black");

// 分别处理enter/update/exit
svg.selectAll("circle")
  .data(data)
  .join(
    enter => enter.append("circle"),
    update => update.attr("fill", "blue"),
    exit => exit.remove()
  )
    .attr("stroke", "black");
// 单独使用enter/update/exit
const div = d3.select("body")
  .selectAll("div")
  .data([4, 8, 15, 16, 23, 42])
  .enter().append("div")
    .text(d => d);
- 事件处理
·selection.on(type,(event,d)=>{})
type可以是所有DOM事件类型,如’click’,‘mousemove’ - 获取鼠标位置
1、e.pageX/pageY返回全局坐标值
2、d3.pointer(e,d)返回当前坐标系的坐标值。
 svg.on('click',function(event,d){
     console.log(d3.pointer(event));
     console.log(event.pageX,event.pageY);
 })
- selection.each((d,i)=>{})
parent.each(function(p, j) {
  d3.select(this)
    .selectAll(".child")
      .text(d => `child ${d.name} of ${p.name}`);
});
- call, 调用自定义处理函数,实现代码复用,保持链式调用风格。
function name(selection, first, last) {
  selection
      .attr("first-name", first)
      .attr("last-name", last);
}
d3.selectAll("div").call(name, "John", "Snow");
三、模块关系
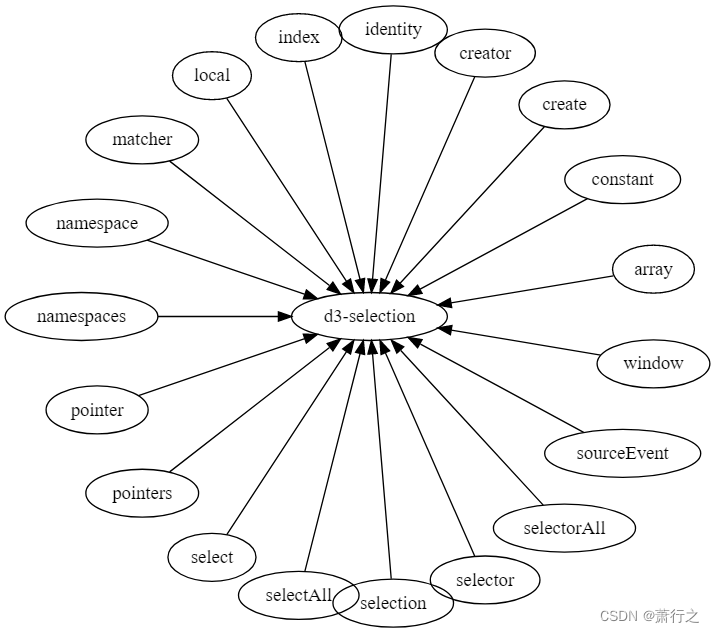
(一)模块构成
分析index.ts文件,由以下模块构成,可以通过d3.select/d3.create…调用。
(二)模块依赖关系
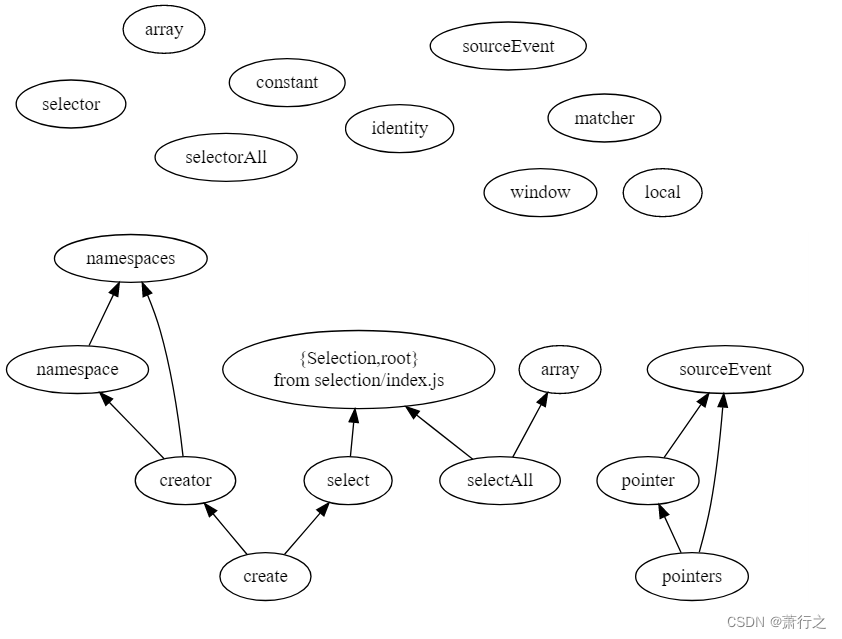
selection/index是selection子模块。

顶层模块对子模块的使用主要在Selection的定义,通过d3.select/selectAll可以返回该对象,并进一步可以使用子模块的方法进行操作。所以常看到类似的代码:
selection=d3.select("...")//返回一个Selection结构。
selection.select/selectAll/attr/...
Selection定义如下:
Selection.prototype = selection.prototype = {
  constructor: Selection,
  select: selection_select,
  selectAll: selection_selectAll,
  filter: selection_filter,
  data: selection_data,
  enter: selection_enter,
  exit: selection_exit,
  join: selection_join,
  merge: selection_merge,
  order: selection_order,
  sort: selection_sort,
  call: selection_call,
  nodes: selection_nodes,
  node: selection_node,
  size: selection_size,
  empty: selection_empty,
  each: selection_each,
  attr: selection_attr,
  style: selection_style,
  property: selection_property,
  classed: selection_classed,
  text: selection_text,
  html: selection_html,
  raise: selection_raise,
  lower: selection_lower,
  append: selection_append,
  insert: selection_insert,
  remove: selection_remove,
  clone: selection_clone,
  datum: selection_datum,
  on: selection_on,
  dispatch: selection_dispatch
};
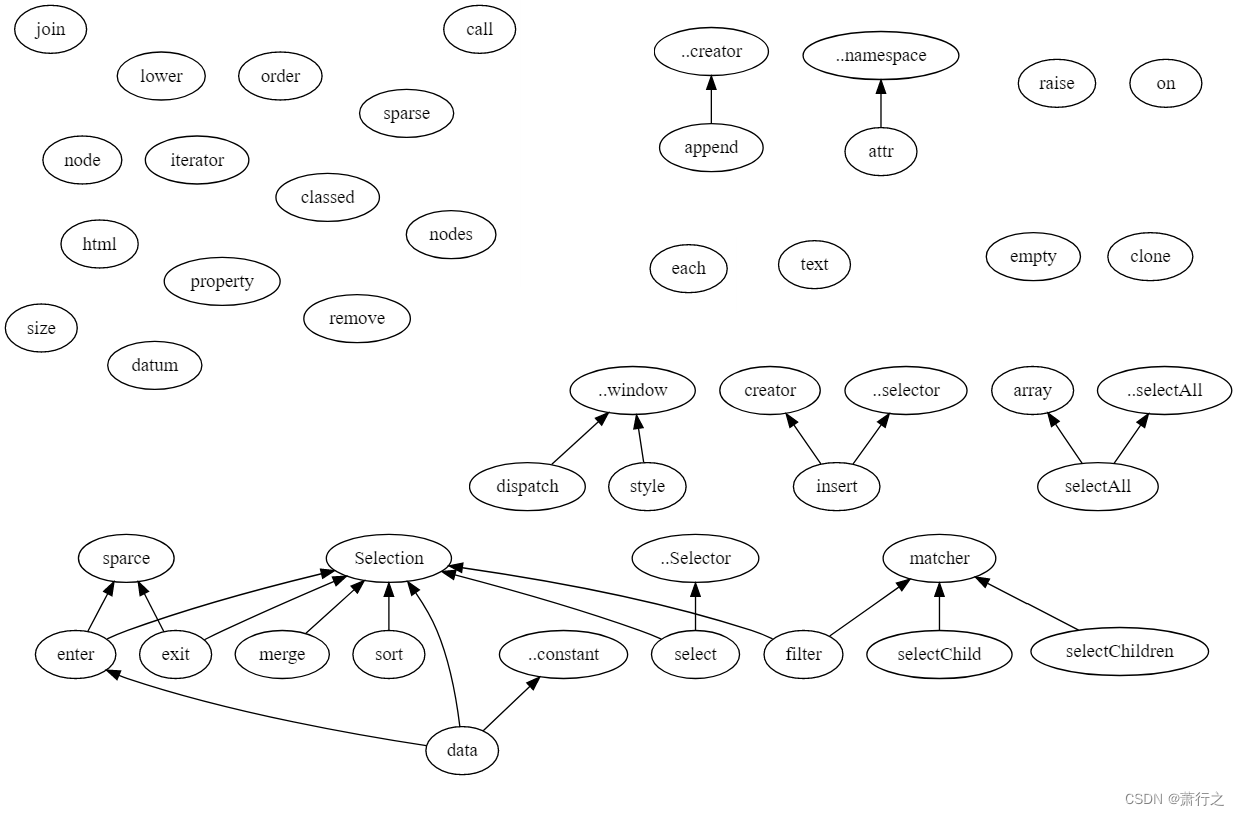
(三)子模块selection
selection文件夹下包含了若干子模块,封装了一系列对selection的操作。模块关系如下:
四、模块功能
-
选择元素
接收w3c 选择器。select选择单个,selectAll选择多个。
select / selectAll / filter / merge / selectChild / selectChildren / matcher / selector / selectorAll / window style -
修改元素
attr / classed / style / property / text / html / append / insert / remove / clone / sort / order / raise / lower / create / creator -
加入数据
data / join / enter / exit / datum -
处理事件
on / dispatch / pointer / pointers -
控制流
each / call / empty / node / nodes / size / -
本地变量
local / set / get / remove / toString / -
命名空间
namespace / namespaces


 被折叠的 条评论
为什么被折叠?
被折叠的 条评论
为什么被折叠?
 到【灌水乐园】发言


