


3.Swift 功能集锦(一)
WebView打开网页
UIWebView.loadRequest(request: NSURLRequest)
    @IBOutlet weak var wv: UIWebView!
    override func viewDidLoad() {
            super.viewDidLoad()
        // Do any additional setup after loading the view, typically from a nib.
        self.wv.loadRequest(NSURLRequest(URL:NSURL(string:"http://www.baidu.com")!))
    }
UIImageView设置图片
UIImageView.image
UIImage.init?(named name: String)
    @IBOutlet weak var ivv: UIImageView!
    override func viewDidLoad() {
        super.viewDidLoad()
        // Do any additional setup after loading the view, typically from a nib.
        self.ivv.image = UIImage(named: "m9.jpg")
    }
ViewController添加子视图
ViewController.addSubview(view: UIView)
UIView.init(frame: CGRect)
如果不想直接在storyboard中给ViewController添加子View(UIButton、UILabel等),可以调用ViewController.addSubview(view: UIView)方法动态添加子View。
override func viewDidLoad() {
super.viewDidLoad()
// Do any additional setup after loading the view.
var label = UILabel(frame: CGRect(x: 50, y: 50, width: 200, height: 100))
label.text="Save you"
self.view.addSubview(label)
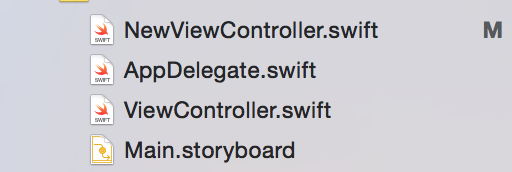
}自定义ViewController
首先,New File -> Cocoa Touch Class
然后,选择继承自UIViewController
UIViewController.init(coder aDecoder: NSCoder)
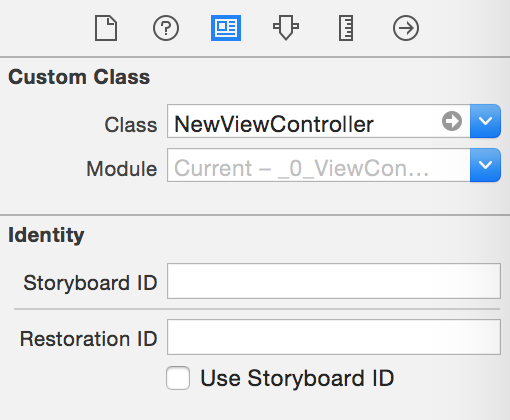
如果新建一个ViewController,它要在storyboard中呈现的话,那么必须覆写init(coder aDecoder: NSCoder)方法。
class NewViewController: UIViewController {

    required init(coder aDecoder: NSCoder) {
        super.init(coder:aDecoder)!
    }

    override func viewDidLoad() {
        super.viewDidLoad()
        // Do any additional setup after loading the view.
        var label = UILabel(frame: CGRect(x: 50, y: 50, width: 200, height: 100))
        label.text="Save you"
        self.view.addSubview(label)
    }

    override func didReceiveMemoryWarning() {
        super.didReceiveMemoryWarning()
        // Dispose of any resources that can be recreated.
    }

    /*
    // MARK: - Navigation

    // In a storyboard-based application, you will often want to do a little preparation before navigation
    override func prepareForSegue(segue: UIStoryboardSegue, sender: AnyObject?) {
        // Get the new view controller using segue.destinationViewController.
        // Pass the selected object to the new view controller.
    }
    */

}然后在storyboard中的的ViewController属性栏设置Class的内容:
自定义TableViewController
首先,New File -> Cocoa Touch Class
然后,选择继承自UITableViewController
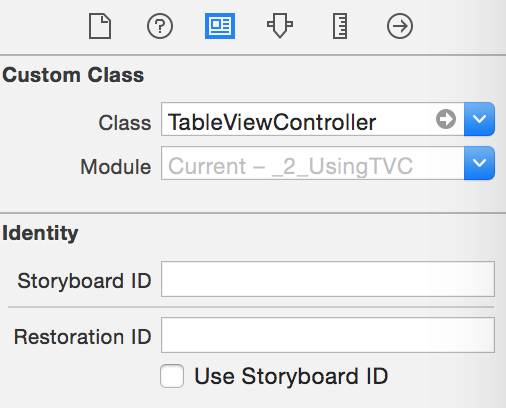
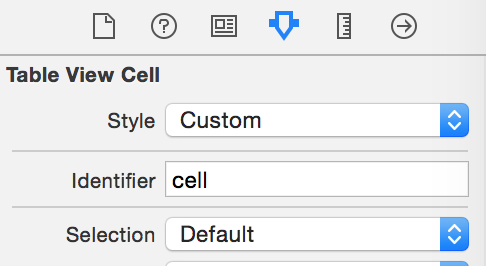
- 1.在storyboard的TableViewController属性栏中设置
Class
- 2.给cell的
identifier设置一个id,标识这个TableViewController中的每一个cell的id。
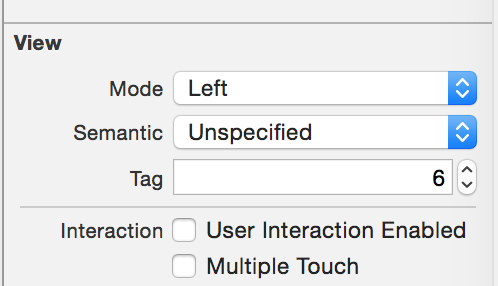
- 3.在cell中添加子View的时候,给每一个子View,设置一个tag,以供根据tag从cell中取得对应的子View(类似于Android中,BaseAdapter.getView中通过convertView.findViewById取得子View),这里就以给cell添加一个UILabel为例,给UILabel添加tag(这里设置为6)。
class TableViewController: UITableViewController {

    // Label的tag值
    let TAG_CELL = 6

    override func viewDidLoad() {
        super.viewDidLoad()

        // Uncomment the following line to preserve selection between presentations
        // self.clearsSelectionOnViewWillAppear = false

        // Uncomment the following line to display an Edit button in the navigation bar for this view controller.
        // self.navigationItem.rightBarButtonItem = self.editButtonItem()
    }

    override func didReceiveMemoryWarning() {
        super.didReceiveMemoryWarning()
        // Dispose of any resources that can be recreated.
    }

    // MARK: - Table view data source

    // 设置有多少个Section
    override func numberOfSectionsInTableView(tableView: UITableView) -> Int {
        // #warning Potentially incomplete method implementation.
        // Return the number of sections.
        return 1
    }

    // 设置有多少个cell
    override func tableView(tableView: UITableView, numberOfRowsInSection section: Int) -> Int {
        // #warning Incomplete method implementation.
        // Return the number of rows in the section.
        return 3
    }


    override func tableView(tableView: UITableView, cellForRowAtIndexPath indexPath: NSIndexPath) -> UITableViewCell {

        // 第一个参数对应了刚才填写的"identifier"
        let cell = tableView.dequeueReusableCellWithIdentifier("cell", forIndexPath: indexPath)
        // Configure the cell...

        // 子View的tag值取得子View
        let label = cell.viewWithTag(TAG_CELL) as! UILabel
        label.text = "Save you fron anything"
        return cell as UITableViewCell
    }


    /*
    // Override to support conditional editing of the table view.
    override func tableView(tableView: UITableView, canEditRowAtIndexPath indexPath: NSIndexPath) -> Bool {
        // Return NO if you do not want the specified item to be editable.
        return true
    }
    */

    /*
    // Override to support editing the table view.
    override func tableView(tableView: UITableView, commitEditingStyle editingStyle: UITableViewCellEditingStyle, forRowAtIndexPath indexPath: NSIndexPath) {
        if editingStyle == .Delete {
            // Delete the row from the data source
            tableView.deleteRowsAtIndexPaths([indexPath], withRowAnimation: .Fade)
        } else if editingStyle == .Insert {
            // Create a new instance of the appropriate class, insert it into the array, and add a new row to the table view
        }
    }
    */

    /*
    // Override to support rearranging the table view.
    override func tableView(tableView: UITableView, moveRowAtIndexPath fromIndexPath: NSIndexPath, toIndexPath: NSIndexPath) {

    }
    */

    /*
    // Override to support conditional rearranging of the table view.
    override func tableView(tableView: UITableView, canMoveRowAtIndexPath indexPath: NSIndexPath) -> Bool {
        // Return NO if you do not want the item to be re-orderable.
        return true
    }
    */

    /*
    // MARK: - Navigation

    // In a storyboard-based application, you will often want to do a little preparation before navigation
    override func prepareForSegue(segue: UIStoryboardSegue, sender: AnyObject?) {
        // Get the new view controller using [segue destinationViewController].
        // Pass the selected object to the new view controller.
    }
    */

}
自定义TableView
首先,New File -> Cocoa Touch Class
然后,选择继承自UITableView
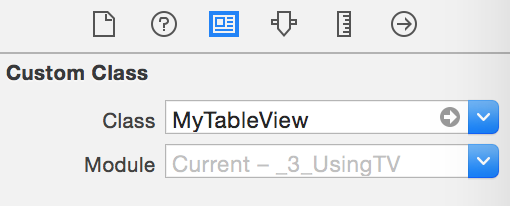
- 1.在storyboard的TableView属性栏中设置
Class
- 2.同上自定义TableViewController
- 3.同上自定义TableViewController
class MyTableView: UITableView,UITableViewDataSource,UITableViewDelegate {

    // Label的tag值
    let TAG_CELL = 6
    // 用于读取plist
    var dict:NSDictionary
    required init(coder aDecoder: NSCoder) {
        self.dict = NSDictionary(contentsOfURL: NSBundle.mainBundle().URLForResource("data", withExtension: "plist")!)!
        super.init(coder: aDecoder)!
        self.dataSource = self
        self.delegate = self
    }

    // Section 个数
    func numberOfSectionsInTableView(tableView: UITableView) -> Int {
        return 2
    }

    // item
    func tableView(tableView: UITableView, cellForRowAtIndexPath indexPath: NSIndexPath) -> UITableViewCell{
        let cell: AnyObject? = tableView.dequeueReusableCellWithIdentifier("cell")
        let label = cell!.viewWithTag(TAG_CELL) as! UILabel
        label.text = (self.dict.allValues[indexPath.section] as! NSArray).objectAtIndex(indexPath.row) as? String
        return cell as! UITableViewCell
    }

    //Header
    func tableView(tableView: UITableView, titleForHeaderInSection section: Int) -> String? {
        return self.dict.allKeys[section] as? String
    }

    // Section 名称
    func tableView(tableView: UITableView, numberOfRowsInSection section: Int) -> Int {
        return (self.dict.allValues[section] as? NSArray)!.count
    }

    // item被点击的时候
    func tableView(tableView: UITableView, didSelectRowAtIndexPath indexPath: NSIndexPath) {
        NSLog("\(self.dict.allValues[indexPath.section].objectAtIndex(indexPath.row)) clicked")
    }

    // Only override drawRect: if you perform custom drawing.
    // An empty implementation adversely affects performance during animation.
    override func drawRect(rect: CGRect) {
        // Drawing code
    }

}


 4588
4588

 被折叠的 条评论
为什么被折叠?
被折叠的 条评论
为什么被折叠?
 到【灌水乐园】发言


