GitHub 地址: QWidgetPro ,选择子工程 Battery
QT QWidget 其它文章请点击这里: QT QWidget
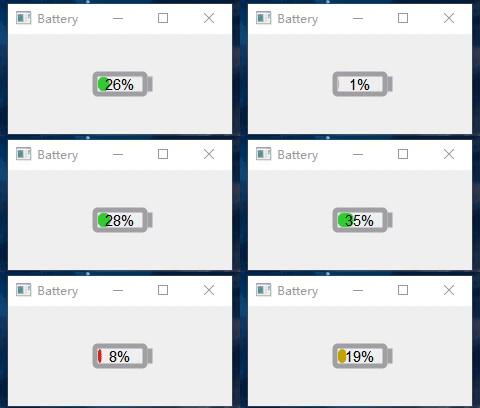
一、效果
本文采用 QPainter 来绘制电池控件,顺便很适合用来初学 QT QWidget
参考了飞扬青云大神的 Qt开源作品25-电池电量控件 ,相比之下, 此文更加适合新手学习,移除了各种 Q_PROPERTY 定义的属性,灵活性下降,但胜在简洁易懂。

二、关键信息
1. 驱动输入
设置一个 100ms 周期的定时器,不断触发 inputValue() 函数
	inputTimer = new QTimer(this);
	inputTimer->setInterval(100);
	connect(inputTimer, SIGNAL(timeout()), this, SLOT(inputValue()));
	inputTimer->start();
void Battery::inputValue()
{
    if(_isForward)      _currentValue += 1;
    else                _currentValue -= 1;

    if(_currentValue >= 45)  {
        _currentValue = 45;
        _isForward = false;
    }
    if(_currentValue <= _minValue) {
        _currentValue = _minValue;
        _isForward = true;
    }
    //重绘,将调用paintEvent()函数
    this->update();
}
2. 绘制过程
● 绘制电池边框,使用 painter->drawRoundedRect() 根据 左上角的绝对位置和矩形的宽高 来确定唯一的矩形
//使矩形框居中
batteryRect = QRectF((width()-_batteryWidth)/2, (height()-_batteryHeight)/2, _batteryWidth, _batteryHeight);
painter->drawRoundedRect(batteryRect, 2, 2);
● 绘制电池头部,使用 painter->drawLine() 画线函数
QLineF line(batteryRect.topRight().x()+5, batteryRect.topRight().y()+5, batteryRect.topRight().x()+5, batteryRect.bottomRight().y()-5);
painter->drawLine(line);
● 绘制内部填充,使用 painter->drawRoundedRect() 根据 左上角和右下角的绝对位置 来确定唯一的矩形
//确定左上角位置
QPointF topLeft(batteryRect.topLeft().x() + _margin, batteryRect.topLeft().y() + _margin);
//确定变化的右下角,
QPointF bottomRight(batteryRect.topLeft().x() + width + _margin, batteryRect.bottomRight().y() - _margin);
QRectF rect(topLeft, bottomRight);

painter->drawRoundedRect(rect, 5, 5);
● 绘制内部文本:
//在 batteryRect 中居中
painter->drawText(batteryRect,Qt::AlignCenter,value);
三、完整代码
battery.cpp
#pragma execution_character_set("utf-8")

#include "battery.h"
#include "qpainter.h"
#include "qtimer.h"
#include "qdebug.h"
#include "ui_battery.h"

Battery::Battery(QWidget *parent)
    : QMainWindow(parent)
    , ui(new Ui::Battery)
    , _currentValue(10)
    , _margin(3)
    , _minValue(0)
    , _maxValue(100)
    , _isForward(true)
    , _batteryWidth(50)
    , _batteryHeight(20)

{
//    ui->setupUi(this);       //驱动UI设计师
//    setFixedSize(300, 180);  //固定大小
    setBaseSize(350, 180);

    ///--设置了个定时器,周期 10ms ,输入值 inputValue()
    inputTimer = new QTimer(this);
    inputTimer->setInterval(100);
    connect(inputTimer, SIGNAL(timeout()), this, SLOT(inputValue()));
    inputTimer->start();
}

Battery::~Battery()
{
    if (inputTimer->isActive()) {
        inputTimer->stop();
    }
    delete ui;
}

///--1. 绘制事件
/*只要窗口部件需要被重绘就被调用, 每个要显示输出的窗口部件必须实现它。
这个事件处理器可以在子类中被重新实现来接收绘制事件。 它可以是repaint()或update()的结果。
很多窗口部件在当它们被请求时,它们很简单地重新绘制整个界面,但是一些窗口部件通过仅仅绘制被请求的区域QPaintEvent::region()进行优化,例如,QListView和QCanvas就是这样做的。
原文链接:https://blog.csdn.net/u012151242/article/details/78947024
*/
void Battery::paintEvent(QPaintEvent *)
{
    //绘制准备工作,启用反锯齿
    QPainter painter(this);
    painter.setRenderHints(QPainter::Antialiasing | QPainter::TextAntialiasing);

    ///--1.1 绘制边框和头部
    drawBorder(&painter);
    ///--1.2 绘制填充
    drawBg(&painter);
    ///--1.3 内部百分比
    drawText(&painter);
}

///--1.1 绘制边框和头部
void Battery::drawBorder(QPainter *painter)
{
    //保存状态
    painter->save();

    //设置笔的颜色和粗细
    painter->setPen(QPen(Qt::gray, 5));
    //没有画刷填充
    painter->setBrush(Qt::NoBrush);
    //绘制给定的圆角矩形              矩形        xRadius       yRadius
//    painter->drawRoundedRect(batteryRect, borderRadius, borderRadius);

    //电池边框居中
    batteryRect = QRectF((width()-_batteryWidth)/2, (height()-_batteryHeight)/2, _batteryWidth, _batteryHeight);
    painter->drawRoundedRect(batteryRect, 2, 2);

    //电池头部:画一条直线
    painter->setPen(QPen(Qt::gray, 5));
    QLineF line(batteryRect.topRight().x()+5, batteryRect.topRight().y()+5, batteryRect.topRight().x()+5, batteryRect.bottomRight().y()-5);
    painter->drawLine(line);

    //回复保存的状态
    painter->restore();
}

///--1.2 绘制填充
void Battery::drawBg(QPainter *painter)
{
    painter->save();

    //确定画刷颜色
    if(_currentValue<=10) {
        painter->setBrush(QColor(204, 38, 38));  //红
    }
    else if (_currentValue <= 20) {
        painter->setBrush(QColor(198, 163, 0));  //黄
    }
    else {
        painter->setBrush(QColor(50, 205, 51));  //绿
    }

    //当前电量转化为宽
    double width = _currentValue * (batteryRect.width() - (_margin * 2)) / 100;

    //确定左上角位置
    QPointF topLeft(batteryRect.topLeft().x() + _margin, batteryRect.topLeft().y() + _margin);
    //确定变化的右下角, 最小给个10, 显示内部的填充
    QPointF bottomRight(batteryRect.topLeft().x() + width + _margin, batteryRect.bottomRight().y() - _margin);
    QRectF rect(topLeft, bottomRight);

    //没有线宽
    painter->setPen(Qt::NoPen);
    painter->drawRoundedRect(rect, 5, 5);
    painter->restore();
}

///--1.3 内部百分比
void Battery::drawText(QPainter *painter) {

    painter->save();

    painter->setPen(Qt::black);
    painter->setFont(QFont("Arial",11));

    QString value = QString::number(_currentValue) + "%";

    //文本居中的好方法
    painter->drawText(batteryRect,Qt::AlignCenter,value);

    painter->restore();
}

//1. 驱动、输入
void Battery::inputValue()
{
    if(_isForward)      _currentValue += 1;
    else                _currentValue -= 1;

    if(_currentValue >= 45)  {
        _currentValue = 45;
        _isForward = false;
    }
    if(_currentValue <= _minValue) {
        _currentValue = _minValue;
        _isForward = true;
    }
    //重绘,将调用paintEvent()函数
    this->update();
}


///---设置画刷, 渐变的颜色
//    QLinearGradient batteryGradient(QPointF(0, 0), QPointF(0, height()));
//    if (currentValue <= alarmValue) {
//        batteryGradient.setColorAt(0.0, alarmColorStart);
//        batteryGradient.setColorAt(1.0, alarmColorEnd);
//    } else {
//        batteryGradient.setColorAt(0.0, normalColorStart);
//        batteryGradient.setColorAt(1.0, normalColorEnd);
//    }
//    painter->setBrush(batteryGradient);  //画刷填充
battery.h
#ifndef BATTERY_H
#define BATTERY_H

#include <QMainWindow>

QT_BEGIN_NAMESPACE
namespace Ui { class Battery; }
QT_END_NAMESPACE

class Battery : public QMainWindow

{
    Q_OBJECT

public:
    Battery(QWidget *parent = nullptr);
    ~Battery();

protected:
    void paintEvent(QPaintEvent *);
    void drawBorder(QPainter *painter);
    void drawBg(QPainter *painter);
    void drawText(QPainter *painter);

private slots:
    void inputValue();

private:
    Ui::Battery *ui;
    double _currentValue;
    int _margin;
    double _minValue;                //最小值
    double _maxValue;                //最大值
    bool _isForward;                 //是否往前移
    int _batteryWidth;
    int _batteryHeight;

    QRectF batteryRect;             //电池主体区域
    QTimer *inputTimer;                  //绘制定时器
};

#endif // BATTERY_H
GitHub 地址: QWidgetPro ,选择子工程 Battery
QT QWidget 其它文章请点击这里: QT QWidget


 本文介绍了一个使用QPainter在QTQWidget中绘制电池电量控件的方法,包括设置定时器更新电量、绘制电池边框和填充、以及显示内部百分比。代码详细解释了绘制过程,适合初学者学习。


 506
506

 被折叠的 条评论
为什么被折叠?


