


Oauth概念
OAUTH协议为用户资源的授权提供了一个安全的、开放而又简易的标准。与以往的授权方式不同之处是OAUTH的授权不会使第三方触及到用户的帐号信息(如用户名与密码),即第三方无需使用用户的用户名与密码就可以申请获得该用户资源的授权,因此OAUTH是安全的。OAuth是Open Authorization的简写。
学习链接
SpringSecurity(十七)—OAuth2的运行机制(下)-实现一个简单的单点登录应用程序
SpringSecurity(十六)—OAuth2的运行机制(中)-密码、客户端凭据授权类型以及刷新令牌
SpringSecurity(十五)—OAuth2的运行机制(上)-OAuth2概念和授权码模式讲解
SpringSecurity(十四)—实现过滤器(下)整合短信认证
security5.1.4官方文档 https://docs.spring.io/spring-security/site/docs/5.1.4.RELEASE/reference/html5/#community
spring oauth官方文档:https://projects.spring.io/spring-security-oauth/docs/oauth2.html
spring security针对oauth2为什么准备不再支持授权服务?https://www.zhihu.com/question/387703104
Security Oauth2实战 https://blog.csdn.net/tuyong1972873004/article/details/107257780
Springboot整理之Oauth2(认证、授权) https://blog.csdn.net/lwd2307997664/article/details/115322334
Spring Security+OAuth2认证服务之令牌管理源码分析 https://blog.csdn.net/qq_42402854/article/details/123101596
Spring Security+OAuth2资源服务之令牌校验源码分析 https://blog.csdn.net/qq_42402854/article/details/123102173
Spring Security + OAuth2.0项目搭建https://blog.csdn.net/qq_42402854/article/details/123057625
Spring Security+Oauth2四种授权模式 https://blog.csdn.net/qq_42402854/article/details/123078883
使用JWT作为Spring Security OAuth2的token存储 https://www.cnblogs.com/hellxz/p/12044340.html
security oauth2 sso 单点登录官方文档 https://docs.spring.io/spring-security-oauth2-boot/docs/2.2.0.RELEASE/reference/html5
@EnableOauth2Sso注解全分析 https://blog.csdn.net/qq_26934393/article/details/103144687
Spring Security Oauth2 SSO单点登录配置及原理深度剖析 https://blog.csdn.net/liuminglei1987/article/details/106756132
spring oauth2实现单点登录,Vue+spring boot+oauth2前后端分离 https://www.jianshu.com/p/b549220e7b34
SpringCloud OAuth2实现单点登录以及OAuth2源码原理解析 https://www.jianshu.com/p/ea0a7d89f5f0
案例
gitee地址:https://gitee.com/zzhua195/demo-spring-security-oauth2d.git
父pom
<?xml version="1.0" encoding="UTF-8"?>
<project xmlns="http://maven.apache.org/POM/4.0.0"
         xmlns:xsi="http://www.w3.org/2001/XMLSchema-instance"
         xsi:schemaLocation="http://maven.apache.org/POM/4.0.0 http://maven.apache.org/xsd/maven-4.0.0.xsd">
    <modelVersion>4.0.0</modelVersion>

    <groupId>com.zzhua</groupId>
    <artifactId>demo-security-oauth2</artifactId>
    <packaging>pom</packaging>
    <version>1.0-SNAPSHOT</version>
    <modules>
        <module>distributed-security-uaa</module>
        <module>distributed-security-salary</module>
    </modules>

    <properties>
        <maven.compiler.source>1.8</maven.compiler.source>
        <maven.compiler.target>1.8</maven.compiler.target>
        <java.version>1.8</java.version>
        <spring-boot-version>2.3.3.RELEASE</spring-boot-version>
        <spring-cloud-version>Greenwich.RELEASE</spring-cloud-version>
    </properties>

    <dependencyManagement>
        <dependencies>
            <dependency>
                <groupId>org.springframework.boot</groupId>
                <artifactId>spring-boot-dependencies</artifactId>
                <version>${spring-boot-version}</version>
                <type>pom</type>
                <scope>import</scope>
            </dependency>
            <dependency>
                <groupId>org.springframework.cloud</groupId>
                <artifactId>spring-cloud-dependencies</artifactId>
                <version>${spring-cloud-version}</version>
                <type>pom</type>
                <scope>import</scope>
            </dependency>
            <dependency>
                <groupId>javax.servlet</groupId>
                <artifactId>javax.servlet-api</artifactId>
                <version>3.1.0</version>
            </dependency>
            <dependency>
                <groupId>javax.interceptor</groupId>
                <artifactId>javax.interceptor-api</artifactId>
                <version>1.2</version>
            </dependency>
            <dependency>
                <groupId>com.alibaba</groupId>
                <artifactId>fastjson</artifactId>
                <version>1.2.47</version>
            </dependency>
            <dependency>
                <groupId>mysql</groupId>
                <artifactId>mysql-connector-java</artifactId>
                <version>5.1.47</version>
            </dependency>
            <dependency>
                <groupId>org.springframework.security</groupId>
                <artifactId>spring-security-jwt</artifactId>
                <version>1.1.1.RELEASE</version>
            </dependency>
            <dependency>
                <groupId>org.springframework.security.oauth.boot</groupId>
                <artifactId>spring-security-oauth2-autoconfigure
                </artifactId>
                <version>2.1.2.RELEASE</version>
            </dependency>
        </dependencies>
    </dependencyManagement>
    <build>
        <plugins>
            <plugin>
                <groupId>org.springframework.boot</groupId>
                <artifactId>spring-boot-maven-plugin</artifactId>
                <version>${spring-boot-version}</version>
                <configuration>
                    <!--<mainClass>com.tuling.springbootsecurity.SpringBootSecurityApplication</mainClass>-->
                </configuration>
                <executions>
                    <execution>
                        <goals>
                            <goal>repackage</goal>
                        </goals>
                    </execution>
                </executions>
            </plugin>
            <plugin>
                <artifactId>maven-compiler-plugin</artifactId>
                <configuration>
                    <source>1.8</source>
                    <target>1.8</target>
                </configuration>
            </plugin>
        </plugins>
    </build>

</project>
uaa授权服务
pom.xml
<?xml version="1.0" encoding="UTF-8"?>
<project xmlns="http://maven.apache.org/POM/4.0.0"
         xmlns:xsi="http://www.w3.org/2001/XMLSchema-instance"
         xsi:schemaLocation="http://maven.apache.org/POM/4.0.0 http://maven.apache.org/xsd/maven-4.0.0.xsd">
    <parent>
        <artifactId>demo-security-oauth2</artifactId>
        <groupId>com.zzhua</groupId>
        <version>1.0-SNAPSHOT</version>
    </parent>
    <modelVersion>4.0.0</modelVersion>

    <artifactId>distributed-security-uaa</artifactId>

    <dependencies>
        <dependency>
            <groupId>org.springframework.boot</groupId>
            <artifactId>spring-boot-starter-web</artifactId>
        </dependency>
        <dependency>
            <groupId>org.springframework.cloud</groupId>
            <artifactId>spring-cloud-starter-security</artifactId>
        </dependency>
        <dependency>
            <groupId>org.springframework.cloud</groupId>
            <artifactId>spring-cloud-starter-oauth2</artifactId>
        </dependency>
        <dependency>
            <groupId>org.springframework.security</groupId>
            <artifactId>spring-security-jwt</artifactId>
        </dependency>
        <dependency>
            <groupId>javax.interceptor</groupId>
            <artifactId>javax.interceptor-api</artifactId>
            <version>1.2</version>
        </dependency>
        <dependency>
            <groupId>com.alibaba</groupId>
            <artifactId>fastjson</artifactId>
        </dependency>
    </dependencies>

    <build>
        <plugins>
            <plugin>
                <groupId>org.springframework.boot</groupId>
                <artifactId>spring-boot-maven-plugin</artifactId>
                <version>${spring-boot-version}</version>
                <configuration>
                    <mainClass>com.zzhua.UaaServerApplication</mainClass>
                </configuration>
                <executions>
                    <execution>
                        <goals>
                            <goal>repackage</goal>
                        </goals>
                    </execution>
                </executions>
            </plugin>
            <plugin>
                <artifactId>maven-compiler-plugin</artifactId>
                <configuration>
                    <source>1.8</source>
                    <target>1.8</target>
                </configuration>
            </plugin>
        </plugins>
    </build>
</project>
application.yml
server:
  port: 53020
  servlet:
    context‐path: /uaa

spring:
  application:
    name: uaa‐service
  main:
    allow‐bean‐definition‐overriding: true
  mvc:
    throw‐exception‐if‐no‐handler‐found: true
  resources:
    add‐mappings: false

management:
  endpoints:
    web:
      exposure:
        include: refresh,health,info,env
MyAuthorizationConfig
package com.zzhua.config;

import org.springframework.beans.factory.annotation.Autowired;
import org.springframework.context.annotation.Bean;
import org.springframework.context.annotation.Configuration;
import org.springframework.http.HttpMethod;
import org.springframework.security.authentication.AuthenticationManager;
import org.springframework.security.core.userdetails.UserDetailsService;
import org.springframework.security.crypto.password.PasswordEncoder;
import org.springframework.security.oauth2.config.annotation.configurers.ClientDetailsServiceConfigurer;
import org.springframework.security.oauth2.config.annotation.web.configuration.AuthorizationServerConfigurerAdapter;
import org.springframework.security.oauth2.config.annotation.web.configuration.EnableAuthorizationServer;
import org.springframework.security.oauth2.config.annotation.web.configurers.AuthorizationServerEndpointsConfigurer;
import org.springframework.security.oauth2.config.annotation.web.configurers.AuthorizationServerSecurityConfigurer;
import org.springframework.security.oauth2.provider.ClientDetailsService;
import org.springframework.security.oauth2.provider.code.AuthorizationCodeServices;
import org.springframework.security.oauth2.provider.code.InMemoryAuthorizationCodeServices;
import org.springframework.security.oauth2.provider.token.AuthorizationServerTokenServices;
import org.springframework.security.oauth2.provider.token.DefaultTokenServices;
import org.springframework.security.oauth2.provider.token.TokenStore;
import org.springframework.security.oauth2.provider.token.store.InMemoryTokenStore;

@Configuration
@EnableAuthorizationServer
public class MyAuthorizationConfig extends AuthorizationServerConfigurerAdapter {

    /*************************令牌端点的安全约束开始************************/
    @Override
    public void configure(AuthorizationServerSecurityConfigurer security) throws Exception {
        security
                .tokenKeyAccess("permitAll()")        // oauth/token_key公开
                .checkTokenAccess("permitAll()")      // oauth/check_token公开
                .allowFormAuthenticationForClients(); // 允许表单认证,申请令牌
    }
    /*************************令牌端点的安全约束结束************************/


    /*************************配置客户端信息开始************************/
    @Autowired
    private PasswordEncoder passwordEncoder;

    @Override
    public void configure(ClientDetailsServiceConfigurer clients) throws Exception {
        //内存配置的方式配置用户信息
        clients.inMemory()//内存方式
                .withClient("c1")                                    //client_id
                .secret(passwordEncoder.encode("secret"))            //客户端秘钥
                .resourceIds("salary")                               //客户端拥有的资源列表
                .authorizedGrantTypes("authorization_code",          //该client允许的授权类型
                                      "password",
                                      "client_credentials",
                                      "implicit",
                                      "refresh_token")
                .scopes("all")                                       //允许的授权范围
                .autoApprove(false)                                  //跳转到授权页面
                .redirectUris("http://www.baidu.com");               //回调地址
    }
    /*************************配置客户端信息结束************************/


    /*************************配置令牌服务开始************************/

    @Autowired
    private AuthenticationManager authenticationManager;

    @Autowired
    private UserDetailsService userDetailsService;

    /*
        注意到 {@link ClientDetailsServiceConfiguration#clientDetailsService()}
        {@link AuthorizationServerSecurityConfiguration#configure(ClientDetailsServiceConfigurer)}
     */
    @Autowired
    private ClientDetailsService clientDetailsService;

    @Bean
    public TokenStore tokenStore() {
        return new InMemoryTokenStore(); // 使用基于内存的普通令牌
    }

    @Bean
    public AuthorizationServerTokenServices tokenService() {
        DefaultTokenServices service = new DefaultTokenServices();
        service.setClientDetailsService(clientDetailsService); // 客户端详情服务
        service.setSupportRefreshToken(true);                  // 允许令牌自动刷新
        service.setTokenStore(tokenStore());                   // 令牌存储策略-内存
        service.setAccessTokenValiditySeconds(7200);           // 令牌默认有效期2小时
        service.setRefreshTokenValiditySeconds(259200);        // 刷新令牌默认有效期3天
        return service;
    }

    //设置授权码模式的授权码如何存取,暂时用内存方式。
    @Bean
    public AuthorizationCodeServices authorizationCodeServices(){
        return new InMemoryAuthorizationCodeServices();//JdbcAuthorizationCodeServices
    }

    @Override
    public void configure(AuthorizationServerEndpointsConfigurer endpoints) throws Exception {

        endpoints
                // .pathMapping("/oauth/confirm_access","/customer/confirm_access")//定制授权同意页面
                .authenticationManager(authenticationManager)                      //认证管理器
                .userDetailsService(userDetailsService)                            //密码模式的用户信息管理
                .authorizationCodeServices(authorizationCodeServices())            //授权码服务
                .tokenServices(tokenService())                                     //令牌管理服务
                .allowedTokenEndpointRequestMethods(HttpMethod.POST,HttpMethod.GET);
    }
    /*************************配置令牌服务结束************************/
}
MyWebSecurityConfig
package com.zzhua.config;

import org.springframework.context.annotation.Bean;
import org.springframework.context.annotation.Configuration;
import org.springframework.security.authentication.AuthenticationManager;
import org.springframework.security.config.annotation.method.configuration.EnableGlobalMethodSecurity;
import org.springframework.security.config.annotation.web.builders.HttpSecurity;
import org.springframework.security.config.annotation.web.configuration.EnableWebSecurity;
import org.springframework.security.config.annotation.web.configuration.WebSecurityConfigurerAdapter;
import org.springframework.security.core.userdetails.User;
import org.springframework.security.core.userdetails.UserDetailsService;
import org.springframework.security.crypto.bcrypt.BCryptPasswordEncoder;
import org.springframework.security.crypto.password.PasswordEncoder;
import org.springframework.security.provisioning.InMemoryUserDetailsManager;

@Configuration
@EnableWebSecurity
@EnableGlobalMethodSecurity(prePostEnabled = true,securedEnabled = true)
public class MyWebSecurityConfig extends WebSecurityConfigurerAdapter {

    @Bean
    public PasswordEncoder passwordEncoder() {
        return new BCryptPasswordEncoder();
    }

    @Bean
    @Override
    public AuthenticationManager authenticationManagerBean() throws Exception {
        // 因为父类提供了一个代理 AuthenticationManagerBuilder
        return super.authenticationManagerBean();
    }

    @Bean
    public UserDetailsService userDetailsService(){
        InMemoryUserDetailsManager userDetailsManager = new InMemoryUserDetailsManager(
                User.withUsername("admin")
                        .password(passwordEncoder().encode("admin"))
                        .authorities("mobile","salary")
                        .build(),
                User.withUsername("manager")
                        .password(passwordEncoder().encode("manager"))
                        .authorities("salary")
                        .build(),
                User.withUsername("worker")
                        .password(passwordEncoder().encode("worker"))
                        .authorities("worker")
                        .build()
        );
        return userDetailsManager;
    }

    //配置用户的安全拦截策略
    @Override
    protected void configure(HttpSecurity http) throws Exception {
        http.csrf().disable()                 //关闭csrf跨域检查
                .authorizeRequests()
                .anyRequest().authenticated() //其他请求需要登录
                .and()
                .formLogin();                 //可从默认的login页面登录,并且登录后跳转到main.html
    }
}
AuthController
package com.zzhua.controller;

import org.springframework.web.bind.annotation.RequestMapping;
import org.springframework.web.bind.annotation.RestController;

@RestController
@RequestMapping("auth")
public class AuthController {

    @RequestMapping("query")
    public String query() {
        return "auth";
    }

}
启动类UaaServerApplication
@SpringBootApplication
public class UaaServerApplication {
    public static void main(String[] args) {
        SpringApplication.run(UaaServerApplication.class, args);
    }
}
客户端模式
这种模式是最简单的模式,流程如下:
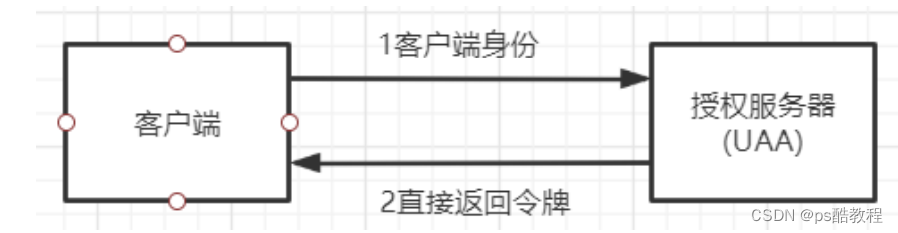
客户端向授权服务器发送自己的身份信息,请求令牌access_token。请求地址:http://localhost:53020/uaa/oauth/token?client_id=c1&client_secret=secret&grant_type=client_credentials
参数列表:
- grant_type :授权类型,需要填写client_credentials,客户端模式
- client_id :客户端标识
- client_secret :客户端密钥
这种模式是最方便但是也最不安全的模式,代表了授权服务器对客户端的完全互信。因此,这种模式一般可以用在授权服务器对客户端完全信任的场景,例如内部系统或者协议合作方系统对接
可以参考:ClientCredentialsAccessTokenProvider
测试流程
直接访问http://localhost:53020/uaa/oauth/token?client_id=c1&client_secret=secret&grant_type=client_credentials,即可获取访问令牌

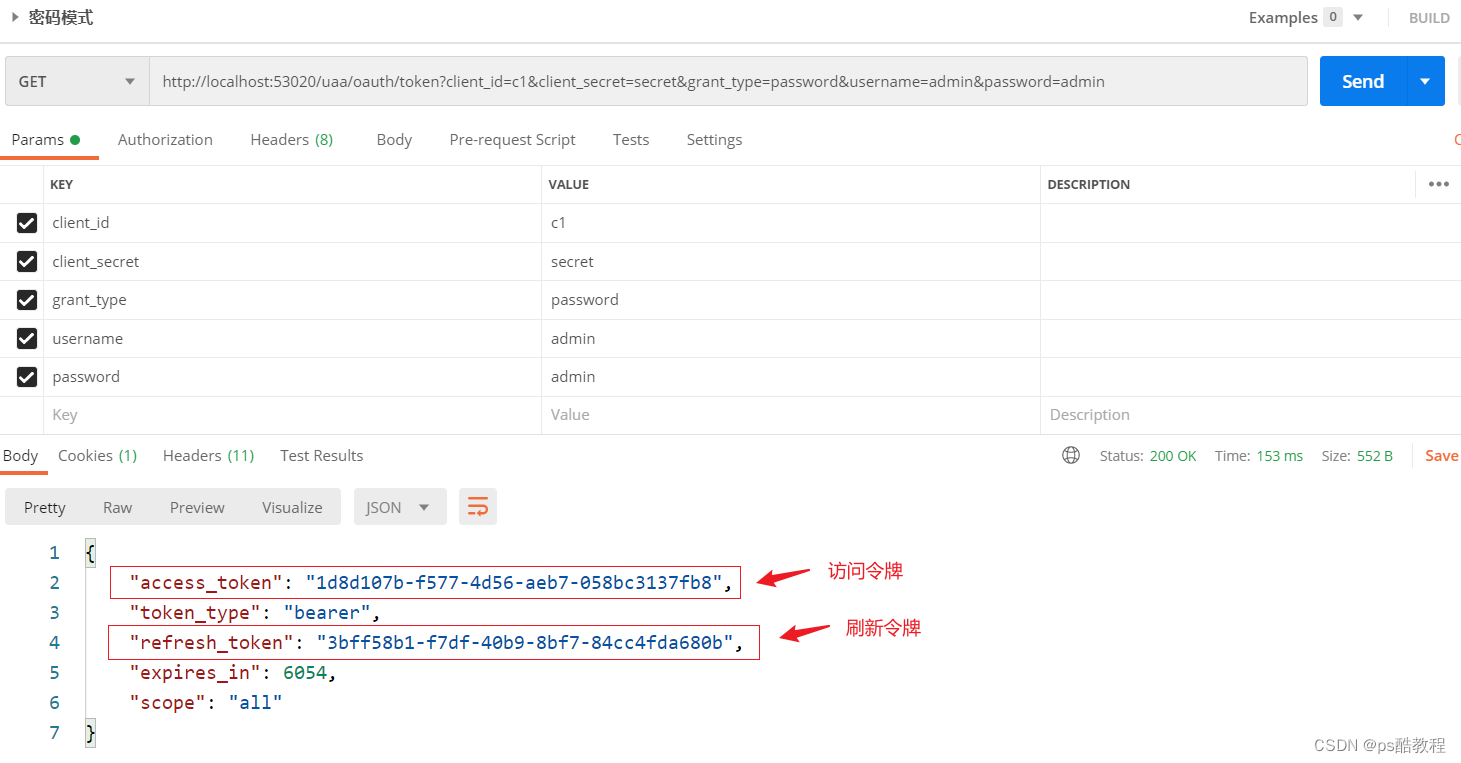
密码模式
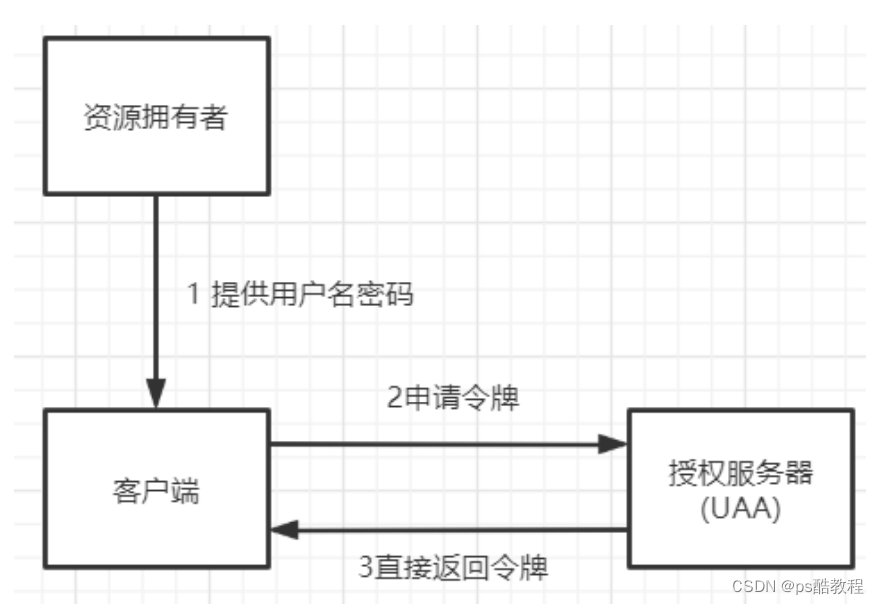
(1) 资源拥有者将用户名、密码发送给客户端
(2)客户端拿着资源拥有者的用户名、密码向授权服务器请求令牌access_token,请求http://localhost:53020/uaa/oauth/token?client_id=c1&client_secret=secret&grant_type=password&username=admin&password=admin
这种模式用户会把用户名和密码直接泄漏给客户端,代表了资源拥有者和授权服务器对客户端的绝对互信,相信客户端不会做坏事。一般适用于内部开发的客户端的场景
可以参考:ResourceOwnerPasswordAccessTokenProvider
测试流程
直接访问http://localhost:53020/uaa/oauth/token?client_id=c1&client_secret=secret&grant_type=password&username=admin&password=admin,即可获取访问令牌

简化模式
这种模式的流程如下:
(1)用户访问客户端,客户端将向授权服务器申请授权。
(2)授权服务器将引导用户进入授权验证页面,等待用户同意授权。
(3)用户在授权验证页面同意进行授权(当然,用户必须在已登录认证服务的情况下,才能授权)。
(4)用户同意授权后,授权服务器向客户端返回令牌access_token
这种方案下,一般redirect uri会配置成客户端自己的一个相应地址。这个相应地址接收到授权服务器推送过来的访问令牌后,就可以将访问令牌在本地进行保存,然后在需要调用资源服务时,再拿出来通过资源服务的认证。
这种模式下,oauth三方的数据已经进行了隔离。这种模式一般用于没有服务端的第三方单页面应用,这样可以在JS里直接获取access_token。
可以参考:ImplicitAccessTokenProvider
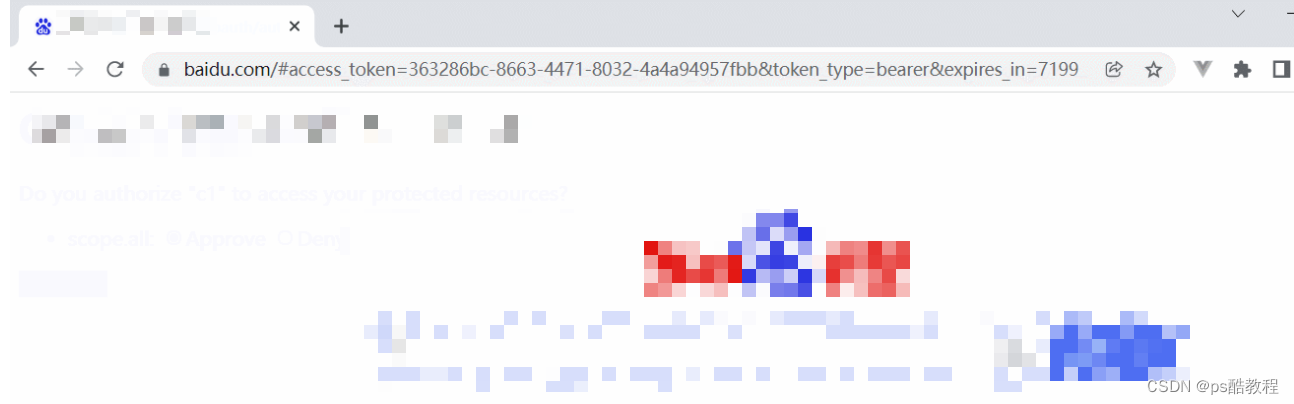
测试流程
(1) 客户端引导用户,直接访问授权服务器的授权申请地址: http://localhost:53020/uaa/oauth/authorize?client_id=c1&response_type=token&scope=all&redirect_uri=http://www.baidu.com,粘贴后,按enter键访问,此时,会跳转到授权服务器的登录页面,需要用户自己输入用户名密码,进行登录,如下图:

如果用户已登录过认证服务,则直接进入第二步的授权确认页面

(2) 用户使用admin/admin登录后,进入授权确认页面;

(3) 用户在页面选择同意,并提交;
(3) 此时页面就会跳转到指定的redirect uri(我们配置的www.baidu.com。此地址需要授权服务器预先配置,同时客户端需要提交参数)。在跳转地址上,直接带上了access_token,这个就是访问令牌,注意下,这种模式下,access_token并不是以Get请求参数的形式推送的,而是以#fragmenet的方式返回的,携带在url的后面。
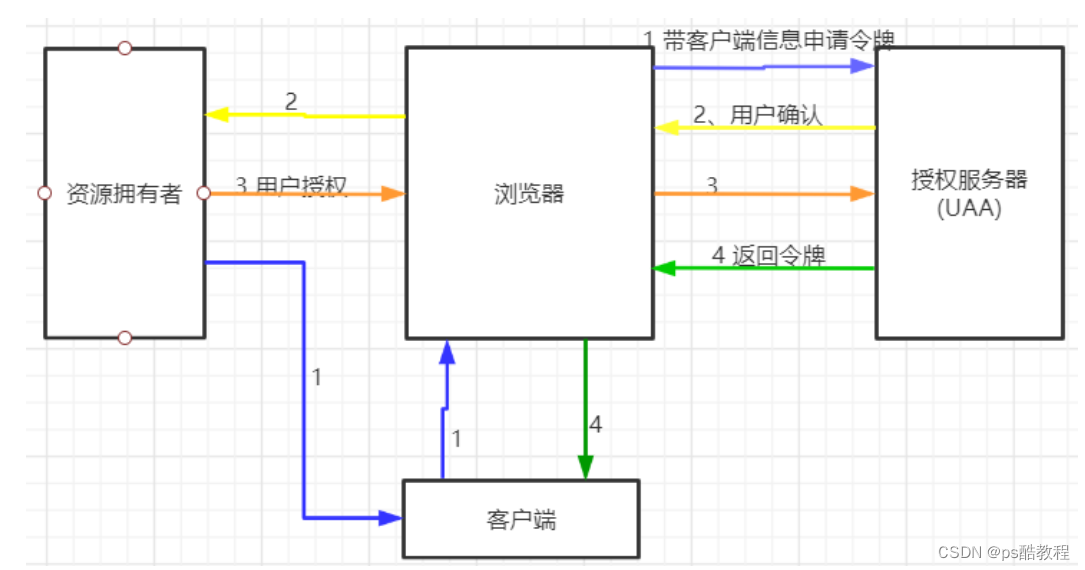
授权码模式
微信登录就是采用的这种模式。这种模式的流程如下:
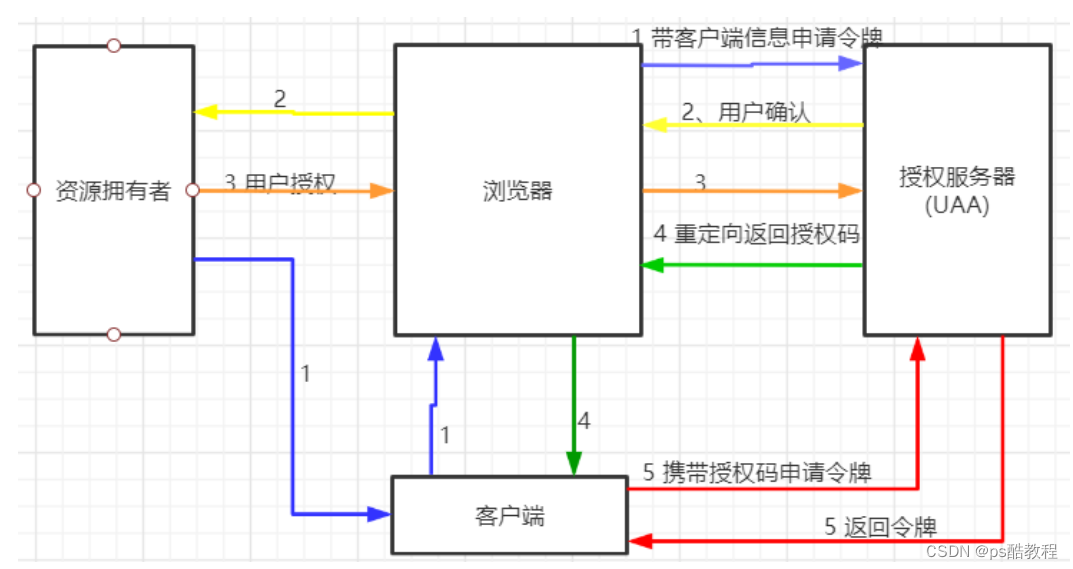
相比上面的简化模式,就是在后面第4步,授权服务器先返回给客户端一个授权码,也就是authorization_code。客户端拿到授权码后,再向授权服务器申请令牌。
这种模式是四种模式中最安全的一种。这种模式下,oauth2认证的三方可以在互不信任的情况下完成担保认证过程。而且,这种模式下,access_token是直接在后台服务端之间进行交互,这样也减少了令牌泄漏的风险。
可以参考:AuthorizationCodeAccessTokenProvider
测试流程
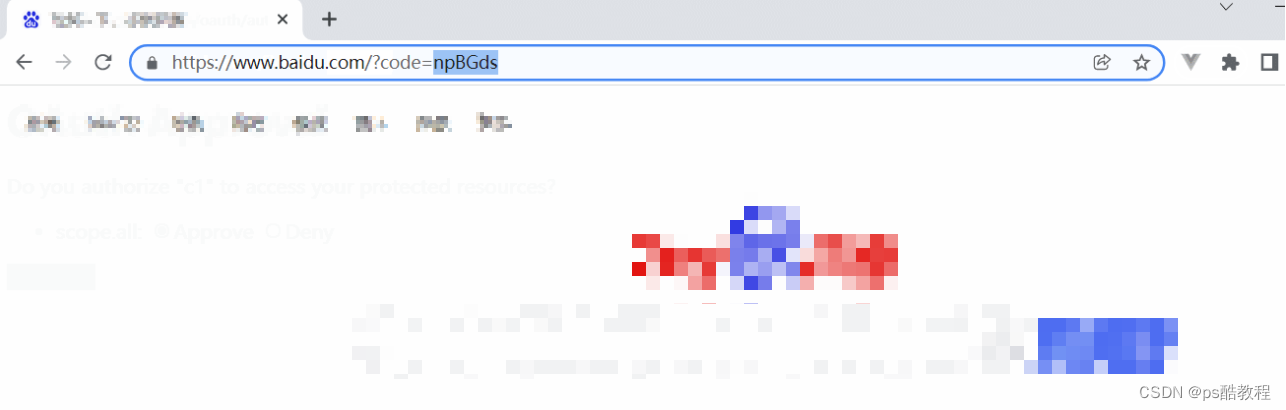
(1)用户申请access_token时(访问地址http://localhost:53020/uaa/oauth/authorize?client_id=c1&response_type=code&scope=all&redirect_uri=http://www.baidu.com),会首先跳转登录页面,需要用户进行登录。–在微信中,将这个登录页面定制成了扫二维码登录的页面

(2) 使用admin用户登录完成后,会弹出默认的授权页面。–微信将授权页面进行了定制

(3) 选择同意后,会跳转到我们指定的百度网页,并带上了授权码code,携带在路径后面。–实际项目中应该是指向自己客户端工程的一个路径,后台获取code后保存起来
(4) 拿到code后,就可以向UAA工程申请access_token,访问:http://localhost:53020/uaa/oauth/token?client_id=c1&client_secret=secret&grant_type=authorization_code&code=IU7VKS&redirect_uri=http://www.baidu.com(以这种方式就能获得access_token。这里注意,redirect_uri需要与上一步一致。)

验证令牌接口
这个接口也是oauth的统一定义端口,他的权限不在客户端配置中配置,而是在AuthorizationServerSecurityConfigurer对象中配置(/oauth/check_token的访问权限已经设置了permitAll,因此不登陆也能访问)

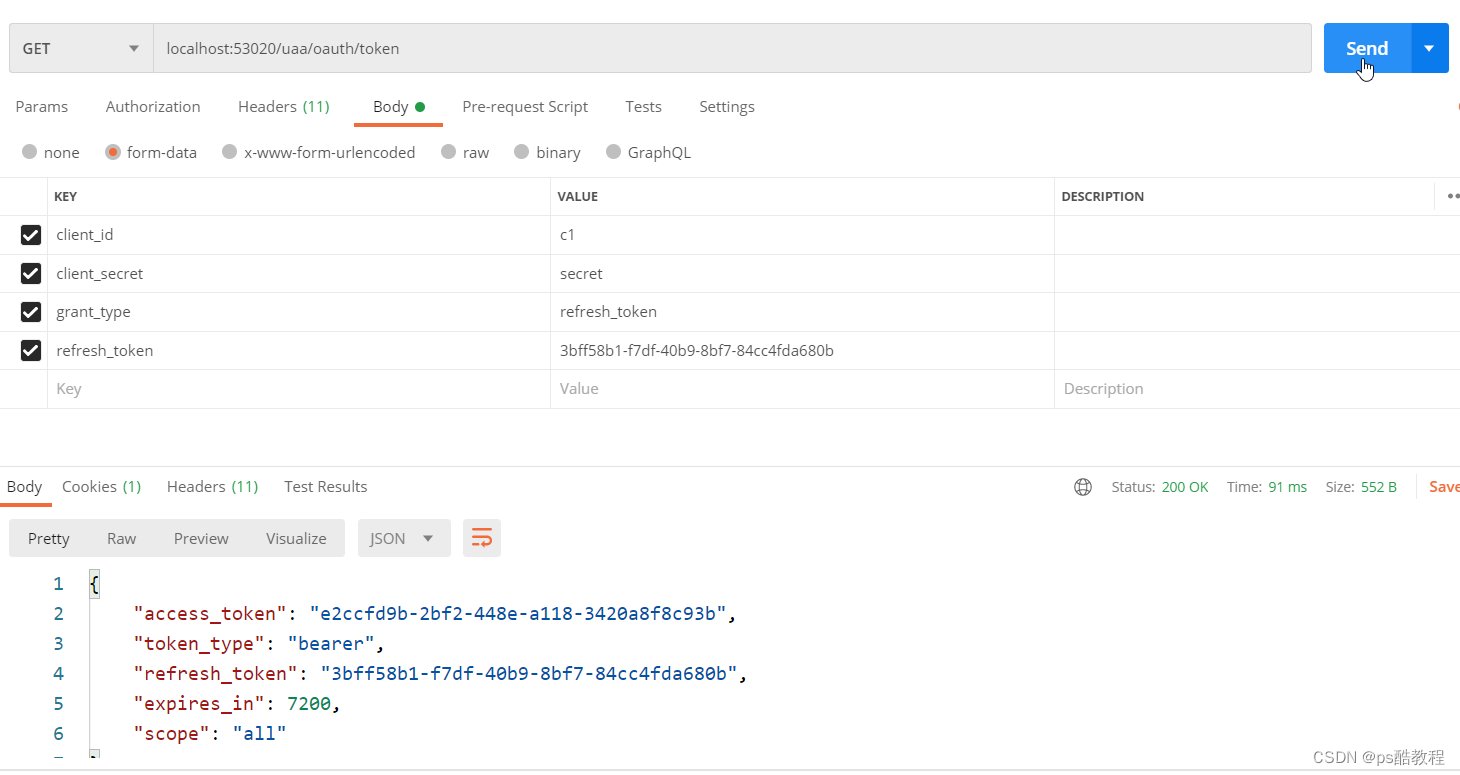
刷新令牌接口
注意到:客户端模式和简化模式下,没有返回refresh_token。而在密码模式和授权码模式下,是有返回refresh_token的。
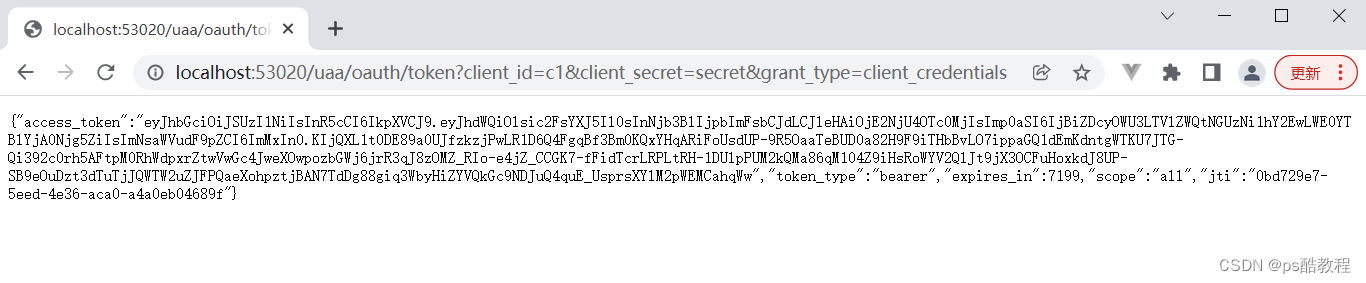
以密码模式为例
(1)访问:http://localhost:53020/uaa/oauth/token?client_id=c1&client_secret=secret&grant_type=password&username=admin&password=admin,获取到访问令牌和刷新令牌
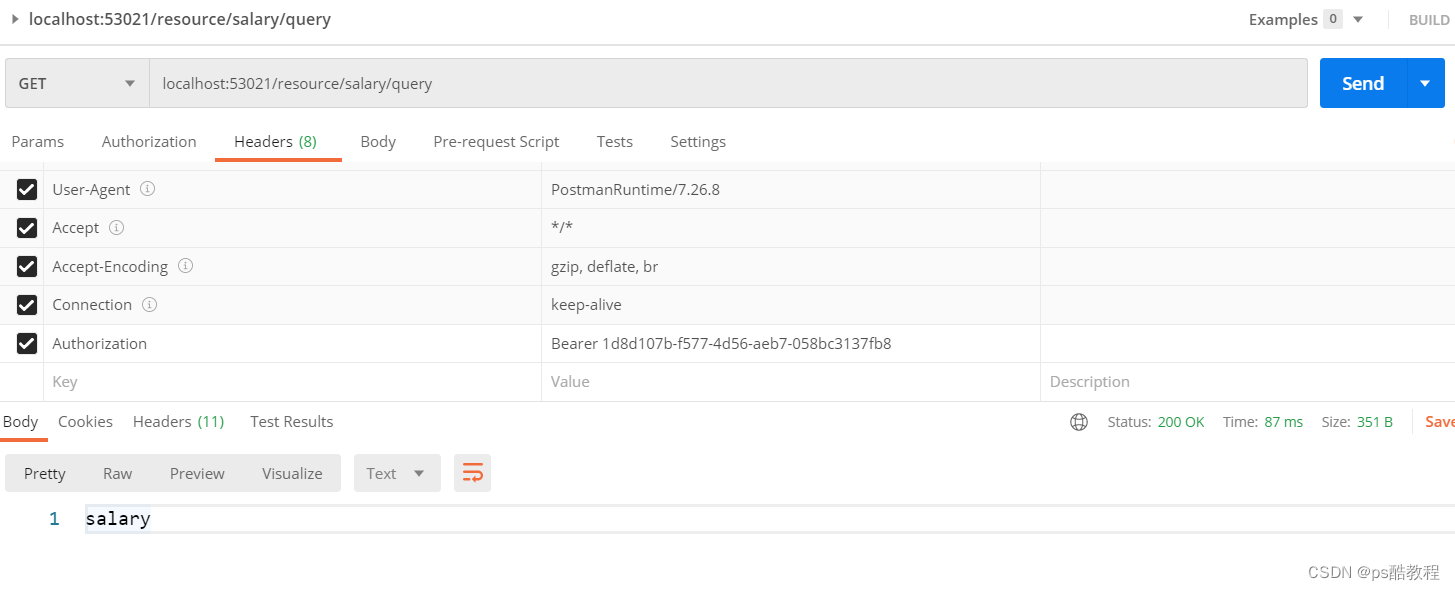
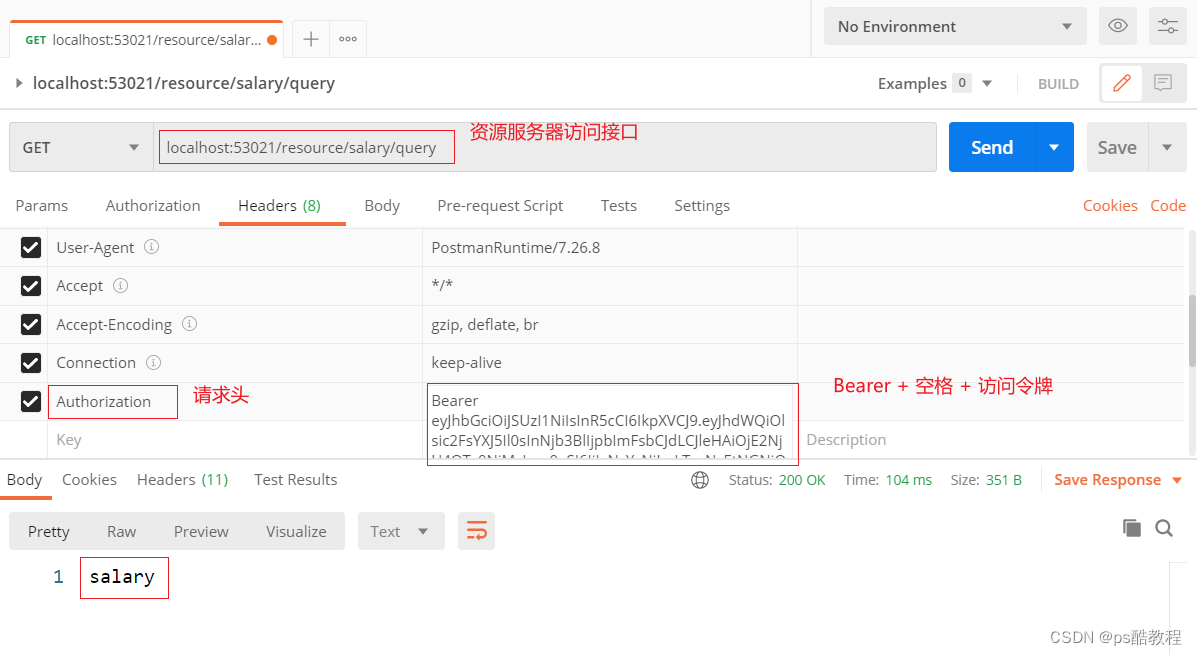
(2)使用返回的访问令牌,访问资源服务的接口:localhost:53021/resource/salary/query,能正常访问
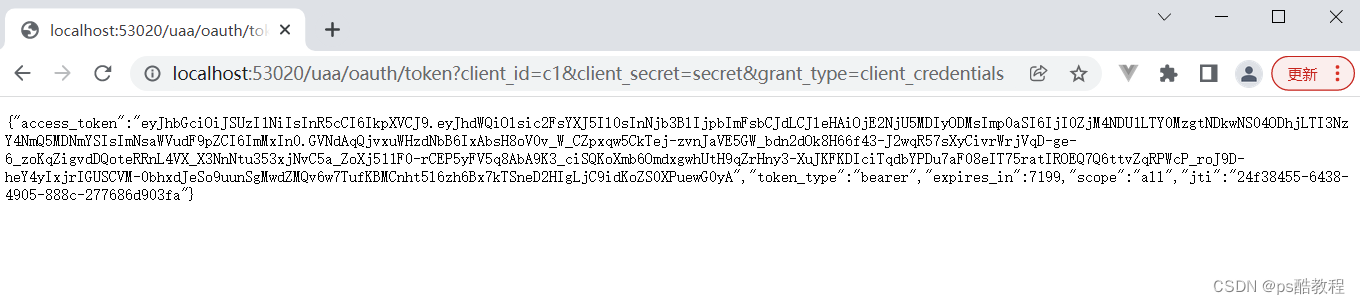
(3)使用刚开始获得的刷新令牌,继续调用localhost:53020/uaa/oauth/token,去获取新的访问令牌(注意到返回的刷新令牌并没有变化,并且新的访问令牌的过期时间也得到了更新),此时原来的令牌已失效。
原来的令牌已失效,如下: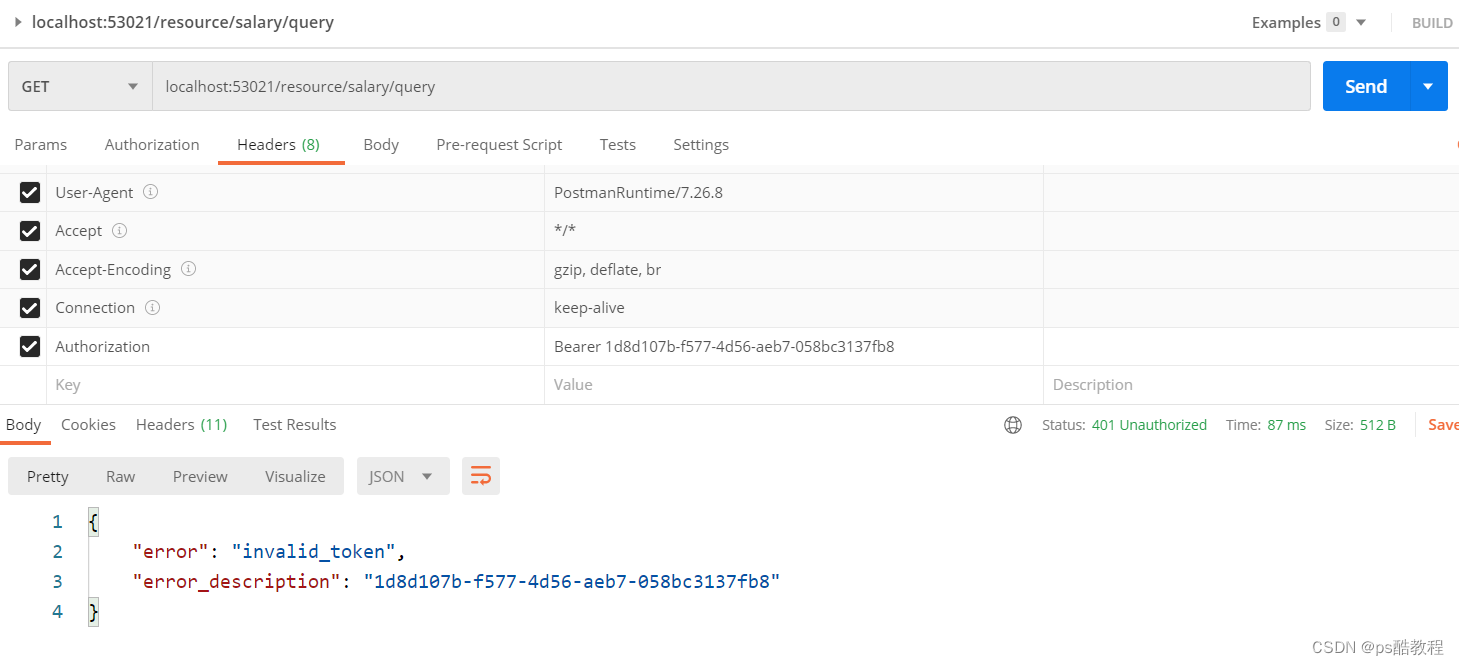
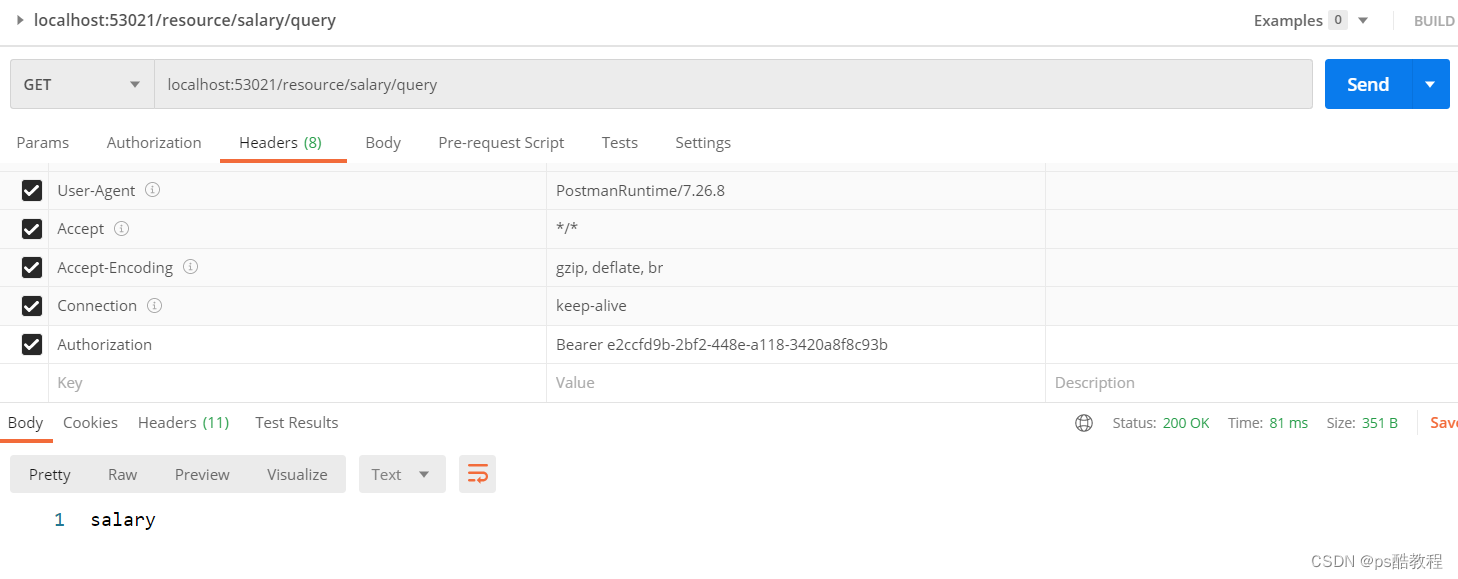
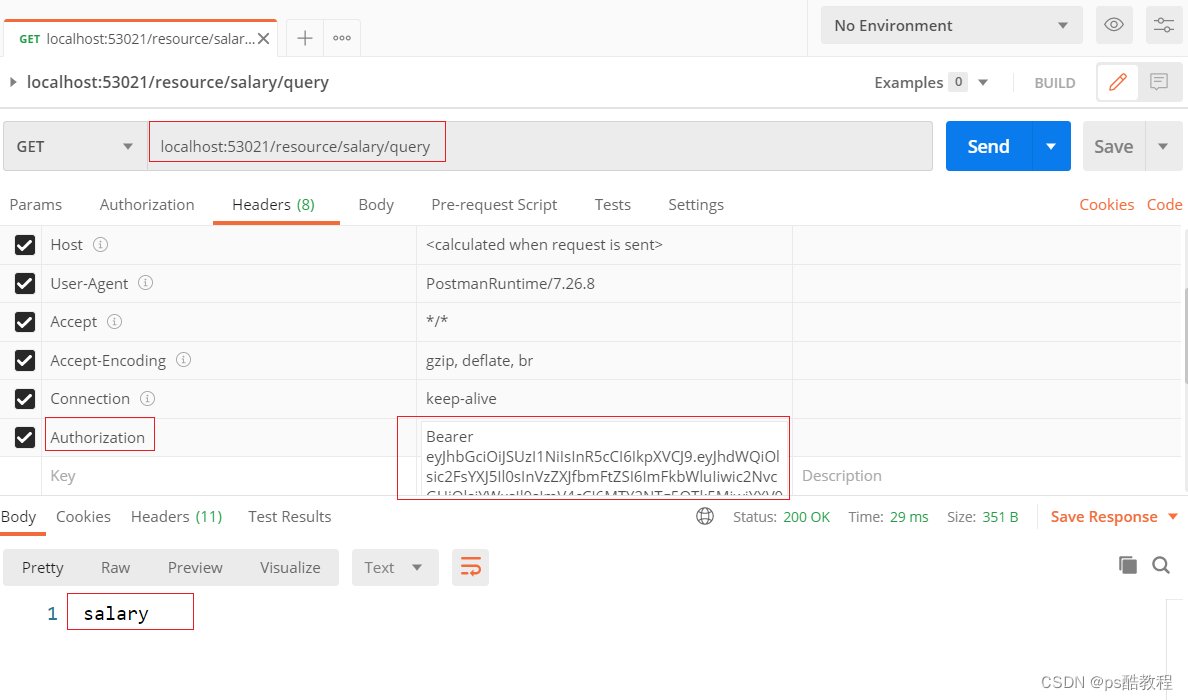
(4)使用新获得的令牌访问资源服务
salary资源服务
pom.xml
<?xml version="1.0" encoding="UTF-8"?>
<project xmlns="http://maven.apache.org/POM/4.0.0"
         xmlns:xsi="http://www.w3.org/2001/XMLSchema-instance"
         xsi:schemaLocation="http://maven.apache.org/POM/4.0.0 http://maven.apache.org/xsd/maven-4.0.0.xsd">
    <parent>
        <artifactId>demo-security-oauth2</artifactId>
        <groupId>com.zzhua</groupId>
        <version>1.0-SNAPSHOT</version>
    </parent>
    <modelVersion>4.0.0</modelVersion>

    <artifactId>distributed-security-salary</artifactId>

    <dependencies>
        <dependency>
            <groupId>org.springframework.boot</groupId>
            <artifactId>spring-boot-starter-actuator</artifactId>
        </dependency>
        <dependency>
            <groupId>org.springframework.boot</groupId>
            <artifactId>spring-boot-starter-web</artifactId>
        </dependency>
        <dependency>
            <groupId>org.springframework.cloud</groupId>
            <artifactId>spring-cloud-starter-security</artifactId>
        </dependency>
        <dependency>
            <groupId>org.springframework.cloud</groupId>
            <artifactId>spring-cloud-starter-oauth2</artifactId>
        </dependency>
        <dependency>
            <groupId>javax.interceptor</groupId>
            <artifactId>javax.interceptor-api</artifactId>
        </dependency>
        <dependency>
            <groupId>com.alibaba</groupId>
            <artifactId>fastjson</artifactId>
        </dependency>
    </dependencies>

    <build>
        <plugins>
            <plugin>
                <groupId>org.springframework.boot</groupId>
                <artifactId>spring-boot-maven-plugin</artifactId>
                <version>${spring-boot-version}</version>
                <configuration>
                    <mainClass>

                    </mainClass>
                </configuration>
                <executions>
                    <execution>
                        <goals>
                            <goal>repackage</goal>
                        </goals>
                    </execution>
                </executions>
            </plugin>
            <plugin>
                <artifactId>maven-compiler-plugin</artifactId>
                <configuration>
                    <source>1.8</source>
                    <target>1.8</target>
                </configuration>
            </plugin>
        </plugins>
    </build>

</project>
application.yml
server:
  port: 53021
  servlet:
    context‐path: /resource

spring:
  application:
    name: salary‐service
  main:
    allow‐bean‐definition‐overriding: true
  mvc:
    throw‐exception‐if‐no‐handler‐found: true
  resources:
    add‐mappings: false

management:
  endpoints:
    web:
      exposure:
        include: refresh,health,info,env

#logging:
#  level:
#    org:
#      springframework:
#        web: info
#    root: debug
MyResourceServerConfig
package com.zzhua.config;

import org.springframework.context.annotation.Configuration;
import org.springframework.security.config.annotation.web.builders.HttpSecurity;
import org.springframework.security.config.http.SessionCreationPolicy;
import org.springframework.security.oauth2.config.annotation.web.configuration.EnableResourceServer;
import org.springframework.security.oauth2.config.annotation.web.configuration.ResourceServerConfigurerAdapter;
import org.springframework.security.oauth2.config.annotation.web.configurers.ResourceServerSecurityConfigurer;
import org.springframework.security.oauth2.provider.token.RemoteTokenServices;
import org.springframework.security.oauth2.provider.token.ResourceServerTokenServices;

@Configuration
@EnableResourceServer
public class MyResourceServerConfig extends ResourceServerConfigurerAdapter {

    @Override
    public void configure(ResourceServerSecurityConfigurer resources) throws Exception {
        resources.resourceId("salary") //资源ID
                .tokenServices(tokenServices()) //使用远程服务验证令牌的服务
                .stateless(true); //无状态模式
    }

    // 配置access_token远程验证策略。
    public ResourceServerTokenServices tokenServices(){
        // DefaultTokenServices services = new DefaultTokenServices();
        RemoteTokenServices services = new RemoteTokenServices();
        services.setCheckTokenEndpointUrl("http://localhost:53020/uaa/oauth/check_token");
        services.setClientId("c1");
        services.setClientSecret("secret");
        return services;
    }

    @Override
    public void configure(HttpSecurity http) throws Exception {
        http.authorizeRequests() //校验请求
                .antMatchers("/salary/**") // 路径匹配规则。
                .access("#oauth2.hasScope('all')") // 需要匹配scope
                .and().csrf().disable()
                .sessionManagement().sessionCreationPolicy(SessionCreationPolicy.STATELESS)
        ;
    }
}
MyWebSecurityConfig
package com.zzhua.config;

import org.springframework.context.annotation.Configuration;
import org.springframework.security.config.annotation.method.configuration.EnableGlobalMethodSecurity;
import org.springframework.security.config.annotation.web.builders.HttpSecurity;
import org.springframework.security.config.annotation.web.configuration.EnableWebSecurity;
import org.springframework.security.config.annotation.web.configuration.WebSecurityConfigurerAdapter;

@Configuration
@EnableWebSecurity
@EnableGlobalMethodSecurity(prePostEnabled = true)
public class MyWebSecurityConfig extends WebSecurityConfigurerAdapter {

    @Override
    protected void configure(HttpSecurity http) throws Exception {
        http.csrf().disable()
                .authorizeRequests()
                .antMatchers("/salary/**").hasAuthority("salary") //这里采用了注解的方法级权限配置。
                .anyRequest().authenticated()
                // .anyRequest().permitAll()
        ;
    }
}
SalaryController
package com.zzhua.controller;

import org.springframework.web.bind.annotation.RequestMapping;
import org.springframework.web.bind.annotation.RestController;

@RestController
@RequestMapping("salary")
public class SalaryController {

    @RequestMapping("query")
    public String query() {
        return "salary";
    }

}
启动类SalaryResourceApplication
package com.zzhua;

import org.springframework.boot.SpringApplication;
import org.springframework.boot.autoconfigure.SpringBootApplication;
import org.springframework.security.oauth2.config.annotation.web.configuration.EnableResourceServer;

@SpringBootApplication
public class SalaryResourceApplication {
    public static void main(String[] args) {
        SpringApplication.run(SalaryResourceApplication.class, args);
    }
}
资源服务测试流程(含分析)
1、向认证服务器申请令牌,可以使用上面提到的任何一种模式,这里我们以客户端模式为例申请访问令牌(因为它比较简单方便,我比较懒)。
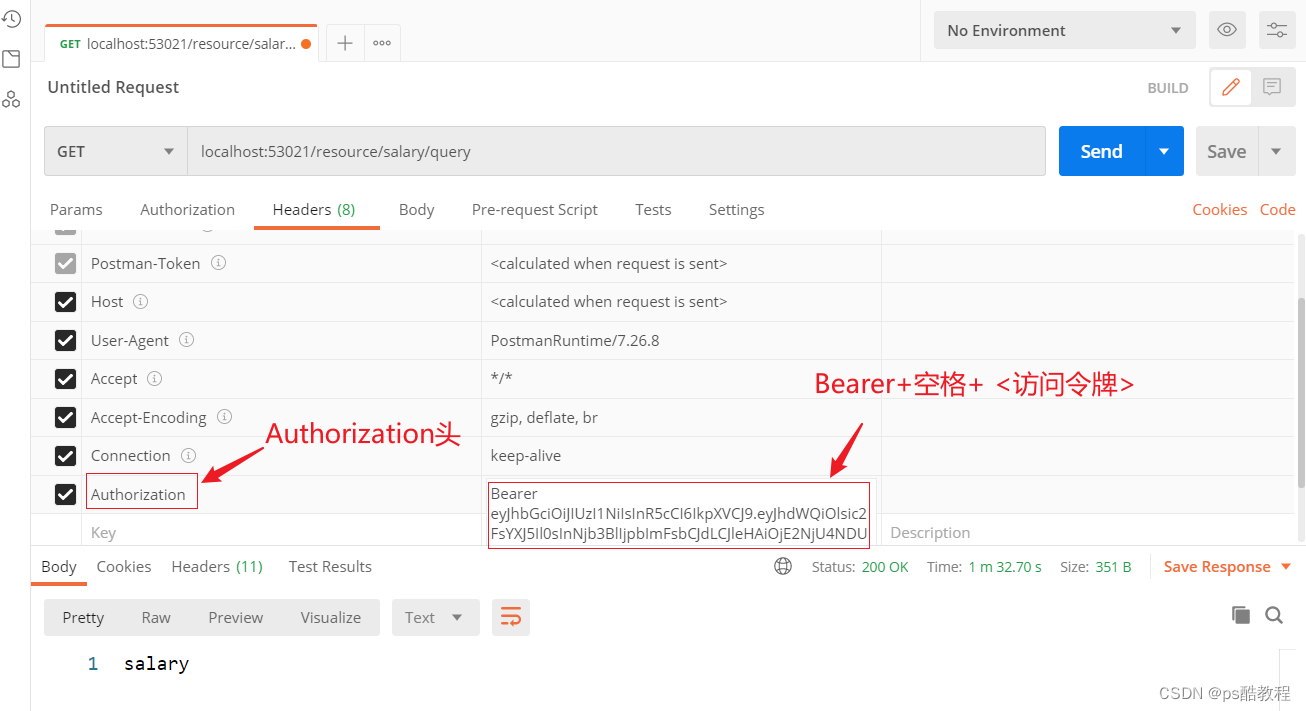
这里使用basic认证,所谓的basic认证就是->携带的请求头是:Authorization - Basic base64(clientId:clientSecret),它将会被BasicAuthenticationFilter#BasicAuthenticationConverter所解析
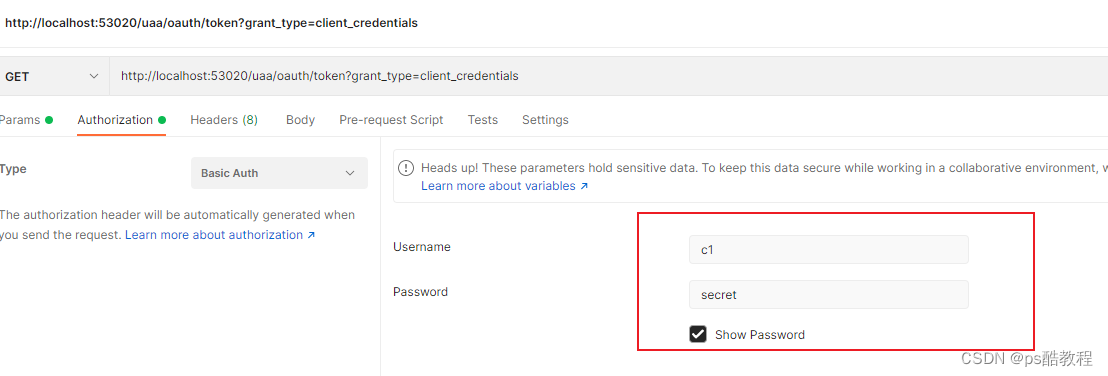
向服务端申请访问令牌,注意这里我们是在模拟第三方客户端,使用了Basic认证(相当于提交了第三方客户端在认证服务所注册的账号和密码),而认证服务查询此客户端,发现该客户端支持客户端模式,则返回访问令牌。发现没有,我们在这个模式下甚至连用户的账号信息都没有提供,在这个流程中跟用户没啥关系了,意思是:只要是这个客户端,那么我就给它授权。那肯定是认证服务对该客户端比较信任的情况下使用
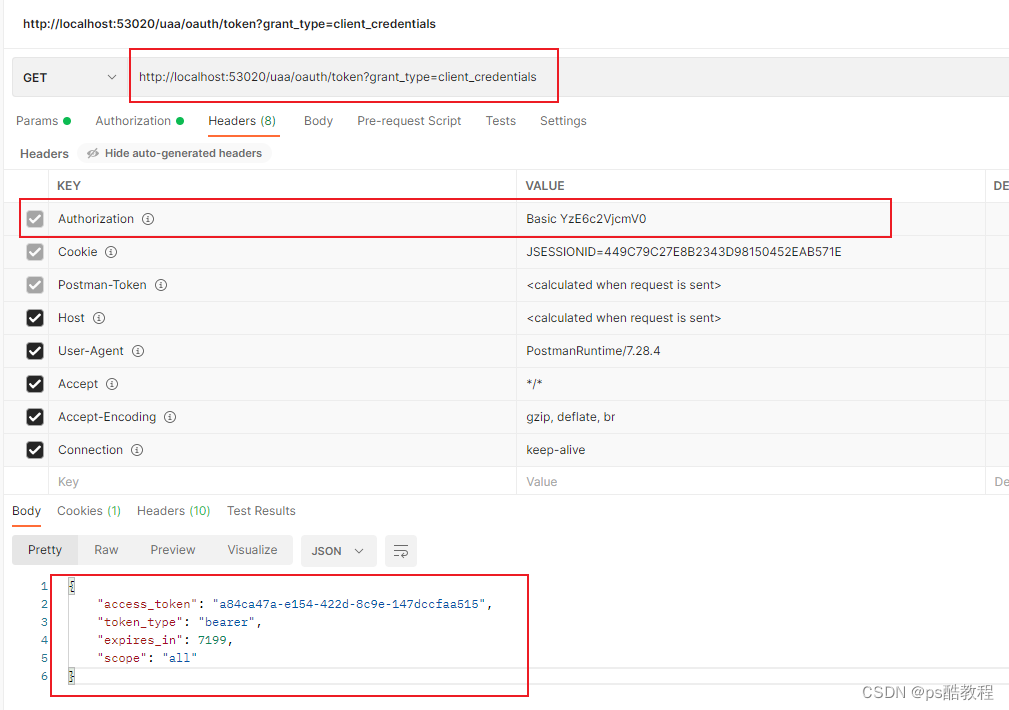
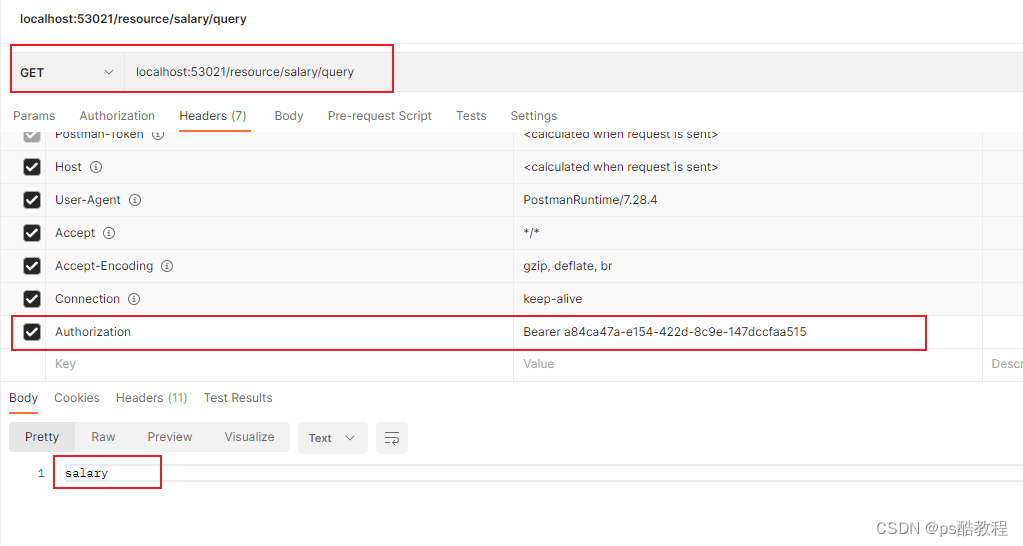
客户端在拿到访问令牌后,需要携带请求头:Authorization - Bearer 访问令牌,再访问资源服务器的接口,如果不携带此请求头,则返回未授权的信息{"error":"unauthorized","error_description":"Full authentication is required to access this resource"}。
那么我们看到,这个访问令牌其实只是一串uuid字符串而已,那资源服务是如何识别这一串uuid字符串呢?在资源服务器中,我们定义了一个ResourceServerTokenServices的实现RemoteTokenServices,它就是用在资源服务器OAuth2AuthenticationManager中,用来识别鉴别令牌用的。
它在OAuth2AuthenticationProcessingFilter过滤器中被使用:
第一步-> 提取令牌(默认使用BearerTokenExtractor提取令牌)
第二步-> 将提取的令牌交给OAuth2AuthenticationManager管理器,而管理器则交给ResourceServerTokenServices的实现,而这里的实现我们在此案例中使用的是RemoteTokenServices,在此实现中,它使用了RestTemplate,并且使用了basic认证(Authorization - Basic base64(clientId:clientSecret),相当于提交了客户端的账号和密码,其实这里也可以不用使用basic认证,因为我们已经开放了/oauth/check_token接口,但是如果没有开放的话,就一定要先认证通过噢,这样就可以使用basic认证了)
改为使用jwt(对称加密)
JWT全称JSON WEB TOKEN,具体概念可参照另外一篇:JWT使用
jwt的本质就是:把一串json字符串,通过base64加密,使用密钥对前面base64加密的结果生成签名,拼接到后面,签发给使用者。因为使用的是base64加密,相当于是明文(可以很轻易的解密出来),因此禁止把敏感信息写入进去。并且只有签发者知道密钥,因此只有签发者签发出来的jwt令牌才能通过签名校验(意思是:能通过签名校验的令牌,可以证明这个令牌就是真正的签发者颁发的,否则就是伪造的),可以使用对称或非对称加密
修改认证服务MyAuthorizationConfig
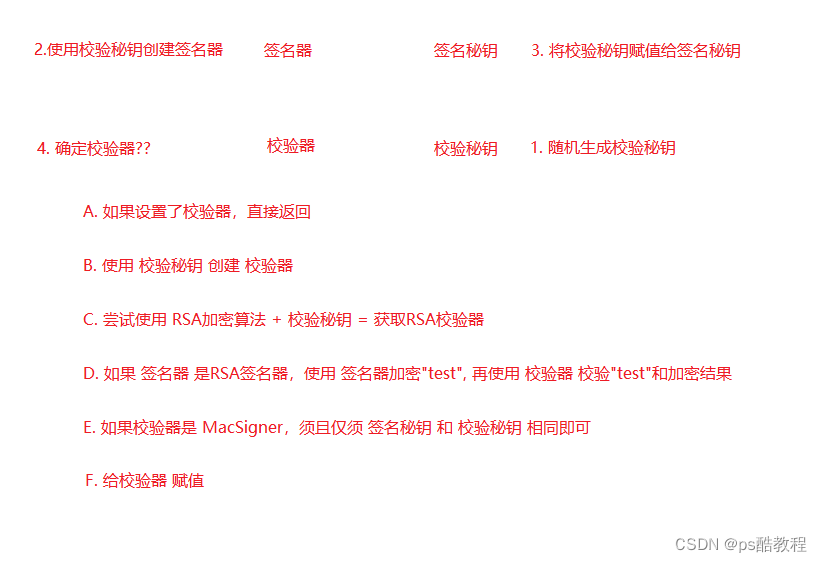
之前的令牌存在于内存当中,现在改成jwt令牌存储的实现方式,并且我们设置的签名密钥是"uaa"
这张图描述了JwtAccessTokenConverter设置密钥的流程
package com.zzhua.config;

import org.springframework.beans.factory.annotation.Autowired;
import org.springframework.context.annotation.Bean;
import org.springframework.context.annotation.Configuration;
import org.springframework.http.HttpMethod;
import org.springframework.security.authentication.AuthenticationManager;
import org.springframework.security.core.userdetails.UserDetailsService;
import org.springframework.security.crypto.password.PasswordEncoder;
import org.springframework.security.oauth2.config.annotation.configurers.ClientDetailsServiceConfigurer;
import org.springframework.security.oauth2.config.annotation.web.configuration.AuthorizationServerConfigurerAdapter;
import org.springframework.security.oauth2.config.annotation.web.configuration.EnableAuthorizationServer;
import org.springframework.security.oauth2.config.annotation.web.configurers.AuthorizationServerEndpointsConfigurer;
import org.springframework.security.oauth2.config.annotation.web.configurers.AuthorizationServerSecurityConfigurer;
import org.springframework.security.oauth2.provider.ClientDetailsService;
import org.springframework.security.oauth2.provider.code.AuthorizationCodeServices;
import org.springframework.security.oauth2.provider.code.InMemoryAuthorizationCodeServices;
import org.springframework.security.oauth2.provider.token.AuthorizationServerTokenServices;
import org.springframework.security.oauth2.provider.token.DefaultTokenServices;
import org.springframework.security.oauth2.provider.token.TokenStore;
import org.springframework.security.oauth2.provider.token.store.InMemoryTokenStore;
import org.springframework.security.oauth2.provider.token.store.JwtAccessTokenConverter;
import org.springframework.security.oauth2.provider.token.store.JwtTokenStore;

@Configuration
@EnableAuthorizationServer
public class MyAuthorizationConfig extends AuthorizationServerConfigurerAdapter {

    /*************************令牌端点的安全约束开始************************/
    @Override
    public void configure(AuthorizationServerSecurityConfigurer security) throws Exception {
        security
                .tokenKeyAccess("permitAll()")        // oauth/token_key公开
                .checkTokenAccess("permitAll()")      // oauth/check_token公开
                .allowFormAuthenticationForClients(); // 允许表单认证,申请令牌
    }
    /*************************令牌端点的安全约束结束************************/


    /*************************配置客户端信息开始************************/
    @Autowired
    private PasswordEncoder passwordEncoder;

    @Override
    public void configure(ClientDetailsServiceConfigurer clients) throws Exception {
        //内存配置的方式配置用户信息
        clients.inMemory()//内存方式
                .withClient("c1")                                    //client_id
                .secret(passwordEncoder.encode("secret"))            //客户端秘钥
                .resourceIds("salary")                               //客户端拥有的资源列表
                .authorizedGrantTypes("authorization_code",          //该client允许的授权类型
                                      "password",
                                      "client_credentials",
                                      "implicit",
                                      "refresh_token")
                .scopes("all")                                       //允许的授权范围
                .autoApprove(false)                                  //跳转到授权页面
                .redirectUris("http://www.baidu.com");               //回调地址
    }
    /*************************配置客户端信息结束************************/


    /*************************配置令牌服务开始************************/

    @Autowired
    private AuthenticationManager authenticationManager;

    @Autowired
    private UserDetailsService userDetailsService;

    /*
        注意到 {@link ClientDetailsServiceConfiguration#clientDetailsService()}
        {@link AuthorizationServerSecurityConfiguration#configure(ClientDetailsServiceConfigurer)}
     */
    @Autowired
    private ClientDetailsService clientDetailsService;

    /*@Bean
    public TokenStore tokenStore() {
        return new InMemoryTokenStore(); // 使用基于内存的普通令牌
    }*/
    @Bean
    public JwtAccessTokenConverter accessTokenConvert(){
        JwtAccessTokenConverter converter = new JwtAccessTokenConverter();// [使用JWT令牌]
        converter.setSigningKey("uaa");
        return converter;
    }
    @Bean
    public TokenStore tokenStore(){
        return new JwtTokenStore(accessTokenConvert());  // [使用JWT令牌]
    }

    @Bean
    public AuthorizationServerTokenServices tokenService() {
        DefaultTokenServices service = new DefaultTokenServices();
        service.setClientDetailsService(clientDetailsService); // 客户端详情服务
        service.setSupportRefreshToken(true);                  // 允许令牌自动刷新
        service.setTokenStore(tokenStore());                   // 令牌存储策略-内存
        service.setTokenEnhancer(accessTokenConvert());        // [使用JWT令牌]
        service.setAccessTokenValiditySeconds(7200);           // 令牌默认有效期2小时
        service.setRefreshTokenValiditySeconds(259200);        // 刷新令牌默认有效期3天
        return service;
    }

    //设置授权码模式的授权码如何存取,暂时用内存方式。
    @Bean
    public AuthorizationCodeServices authorizationCodeServices(){
        return new InMemoryAuthorizationCodeServices();//JdbcAuthorizationCodeServices
    }

    @Override
    public void configure(AuthorizationServerEndpointsConfigurer endpoints) throws Exception {

        endpoints
                // .pathMapping("/oauth/confirm_access","/customer/confirm_access")//定制授权同意页面
                .authenticationManager(authenticationManager)                      //认证管理器
                .userDetailsService(userDetailsService)                            //密码模式的用户信息管理
                .authorizationCodeServices(authorizationCodeServices())            //授权码服务
                .tokenServices(tokenService())                                     //令牌管理服务
                .allowedTokenEndpointRequestMethods(HttpMethod.POST,HttpMethod.GET);
    }
    /*************************配置令牌服务结束************************/
}
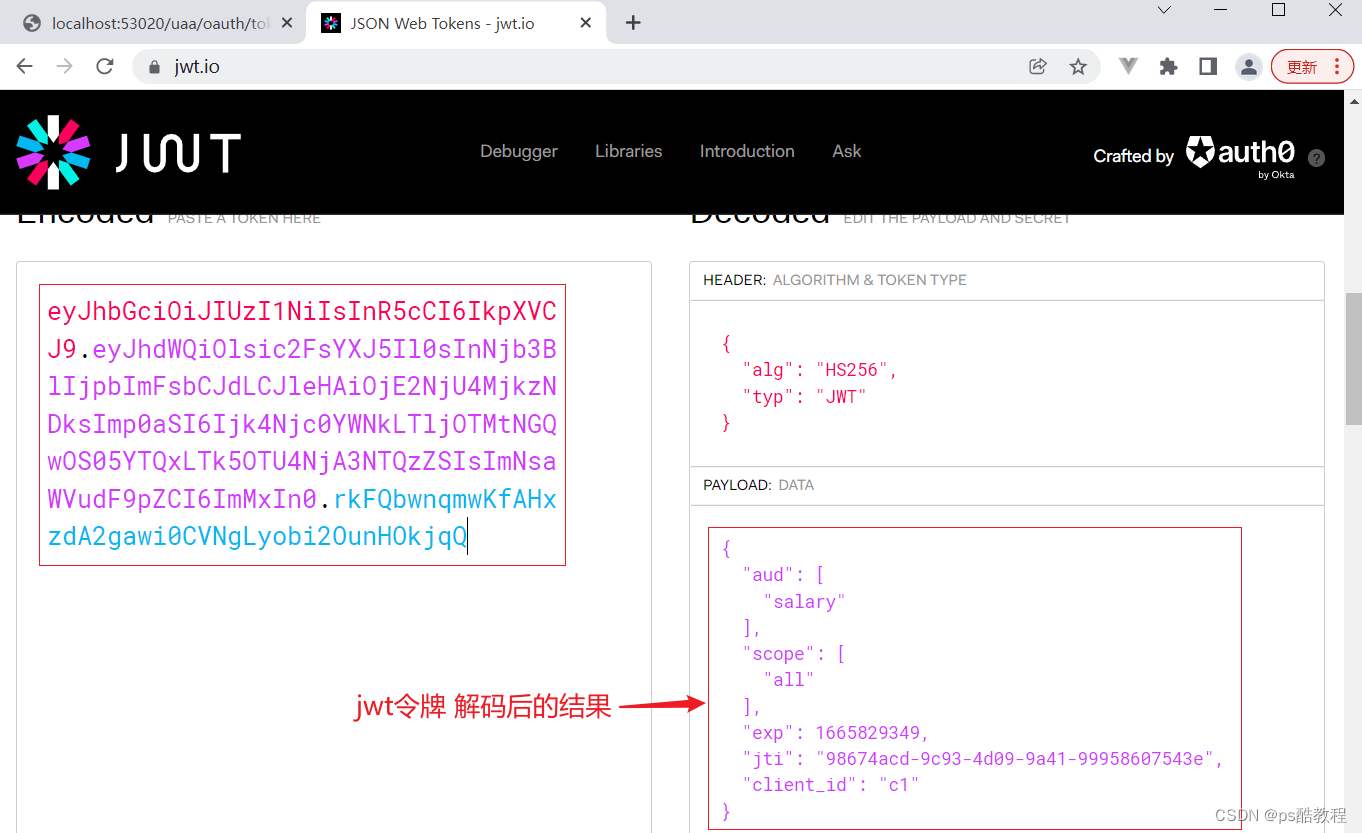
测试流程
1、我们可以仍然使用客户端模式(只要我们配置该客户端支持该模式,即可使用这个模式),直接访问:http://localhost:53020/uaa/oauth/token?client_id=c1&client_secret=secret&grant_type=client_credentials

2、查看该jwt令牌解码的结果,在这里,我们可以看到,认证服务给客户端颁发的授权信息,因为是客户端模式,所以授权信息里面只有与客户端相关的信息。假如使用其它模式的话,授权信息就会包括其它的一些信息了,比如用户的账号什么的(当然可以通过重写方法实现,只要注意下:JwtAccessTokenConverter#encode方法即可)
修改资源服务MyResourceServerConfig
因为我们配置了jwt令牌存储的实现,也就意味着jwt令牌本身就包含了用户可公开的信息,这样资源服务就不需要每次请求时都访问/oauth/check_token来校验令牌(即使认证服务挂了,该jwt令牌也能使用),来获取用户信息
package com.zzhua.config;

import org.springframework.context.annotation.Bean;
import org.springframework.context.annotation.Configuration;
import org.springframework.security.config.annotation.web.builders.HttpSecurity;
import org.springframework.security.config.http.SessionCreationPolicy;
import org.springframework.security.oauth2.config.annotation.web.configuration.EnableResourceServer;
import org.springframework.security.oauth2.config.annotation.web.configuration.ResourceServerConfigurerAdapter;
import org.springframework.security.oauth2.config.annotation.web.configurers.ResourceServerSecurityConfigurer;
import org.springframework.security.oauth2.provider.token.RemoteTokenServices;
import org.springframework.security.oauth2.provider.token.TokenStore;
import org.springframework.security.oauth2.provider.token.store.JwtAccessTokenConverter;
import org.springframework.security.oauth2.provider.token.store.JwtTokenStore;

@Configuration
@EnableResourceServer
public class MyResourceServerConfig extends ResourceServerConfigurerAdapter {

    @Override
    public void configure(ResourceServerSecurityConfigurer resources) throws Exception {
        resources.resourceId("salary") //资源ID
                // .tokenServices(tokenServices()) // 使用远程服务验证令牌的服务
                .tokenStore(tokenStore()) // [使用JWT令牌],就不需要调用远程服务了,用本地验证方式就可以了。
                .stateless(true); //无状态模式
    }

    @Bean
    public JwtAccessTokenConverter accessTokenConvert(){
        JwtAccessTokenConverter converter = new JwtAccessTokenConverter();// [使用JWT令牌]
        converter.setSigningKey("uaa");
        return converter;
    }
    @Bean
    public TokenStore tokenStore(){
        return new JwtTokenStore(accessTokenConvert());  // [使用JWT令牌]
    }

    /*// 配置access_token远程验证策略。
    public ResourceServerTokenServices tokenServices(){
        // DefaultTokenServices services = new DefaultTokenServices();
        RemoteTokenServices services = new RemoteTokenServices();
        services.setCheckTokenEndpointUrl("http://localhost:53020/uaa/oauth/check_token");
        services.setClientId("c1");
        services.setClientSecret("secret");
        return services;
    }*/

    @Override
    public void configure(HttpSecurity http) throws Exception {
        http.authorizeRequests() //校验请求
                .antMatchers("/salary/**") // 路径匹配规则。
                .access("#oauth2.hasScope('all')") // 需要匹配scope
                .and().csrf().disable()
                .sessionManagement().sessionCreationPolicy(SessionCreationPolicy.STATELESS)
        ;
    }
}
测试流程
1、访问资源服务器的时候,使用:Authorization - Bearer 访问令牌 来请求,否则返回{"error":"unauthorized","error_description":"Full authentication is required to access this resource"} 。
那么思考下,下面几个问题
1、为什么加上这个请求头就看可以访问资源服务器的接口了呢?
在OAuth2AuthenticationProcessingFilter这个过滤器中,会使用TokenExtractor(默认实现为BearerTokenExtractor)提取 Authorization请求头,获取Bearer后的token值,交给OAuth2AuthenticationManager对该token封装的Authentication进行认证,OAuth2AuthenticationManager管理器又交给ResourceServerTokenServices的实现(这里的实现为DefaultTokenServices),并且在DefaultTokenServices里,我们配置的是JwtTokenStore(并且使用的是同一个密钥),所以可以解析这个jwt令牌,封装成OAuth2Authentication。
2、那客户端拿到令牌后,是不是资源服务器的任意接口都可以被访问呢?换句话说,我们也想控制客户端只能访问资源服务中,部分指定的接口,该如何做?
我们都已经拿到当前Authentication了,那就可以拿到当前所授权客户端拥有的所有信息,那么就可以结合SPEL表达式来玩了,并且在security中,还有内置的实现,可以参考OAuth2SecurityExpressionMethods中的实现,进行仿写即可。
改为使用jwt(非对称加密)
可参考:https://www.cnblogs.com/hellxz/p/12044340.html
生成jks证书
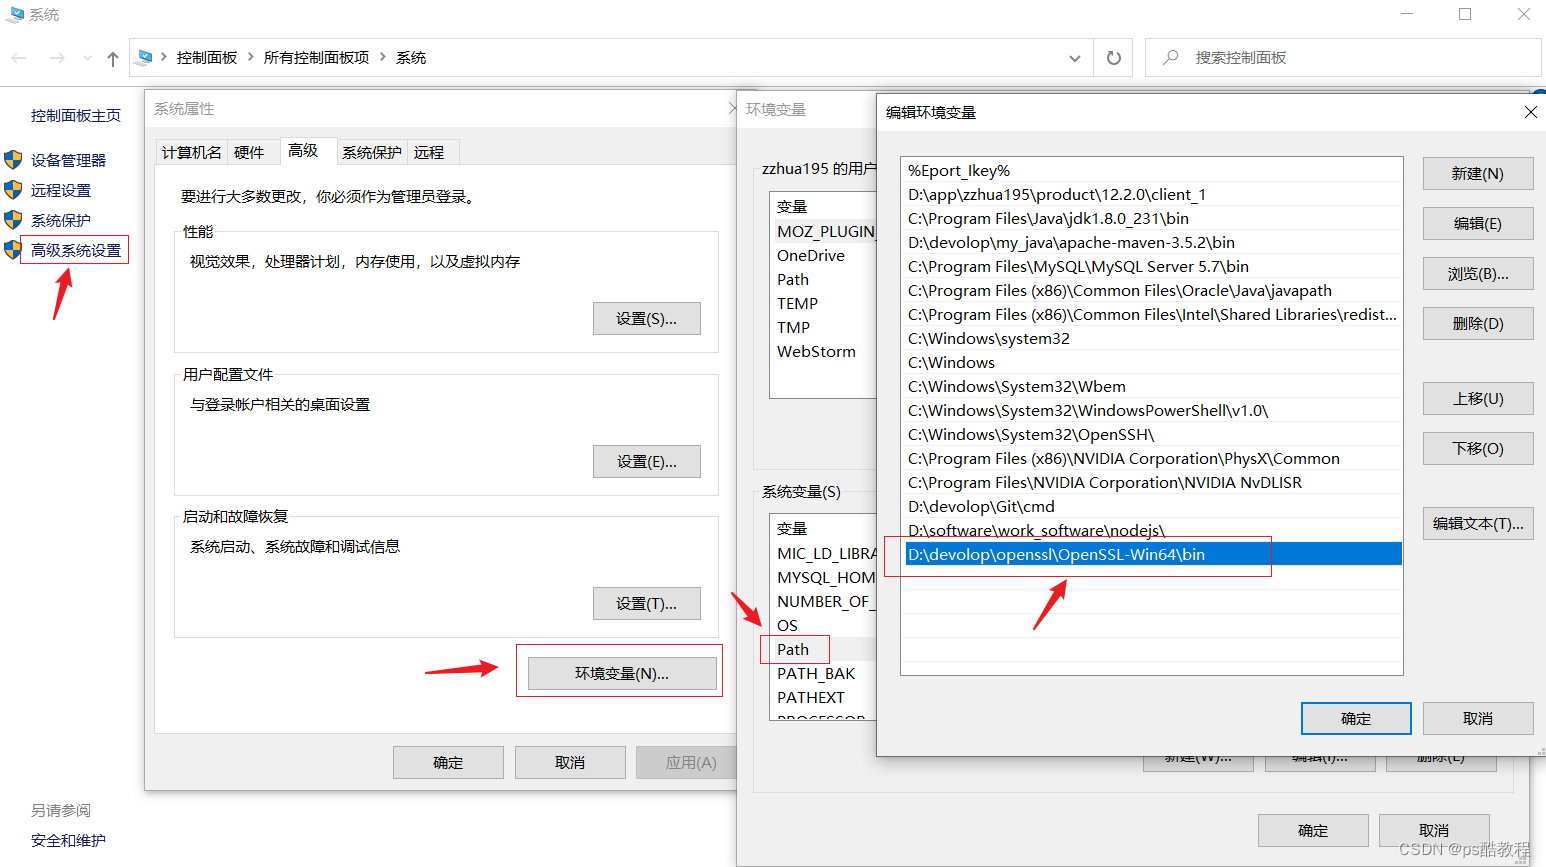
需要先安装openssl
到https://slproweb.com/products/Win32OpenSSL.html下载对应的openssl版本,只需要一直点下一步即可,安装完毕后,将它的bin目录配置到环境变量
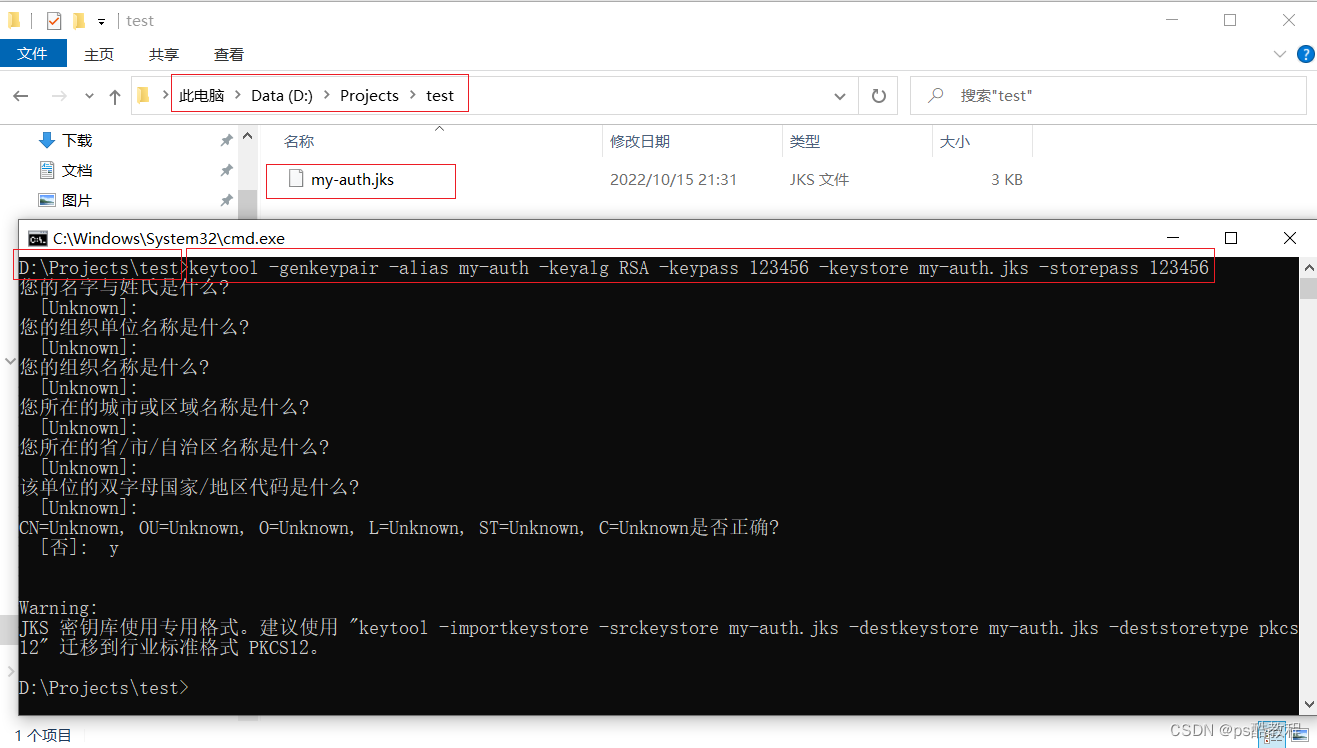
keytool生成jks (Java Key Store) 文件
首先使用keytool生成jks (Java Key Store) 证书,每个证书包含公钥和私钥`
keytool -genkeypair -alias my-auth -keyalg RSA -keypass 123456 -keystore my-auth.jks -storepass 123456
alias: 秘钥别名keyalg: 使用的hash算法keypass: 秘钥访问密码keystore: 秘钥库文件名,生成证书文件storepass: 证书的访问密码
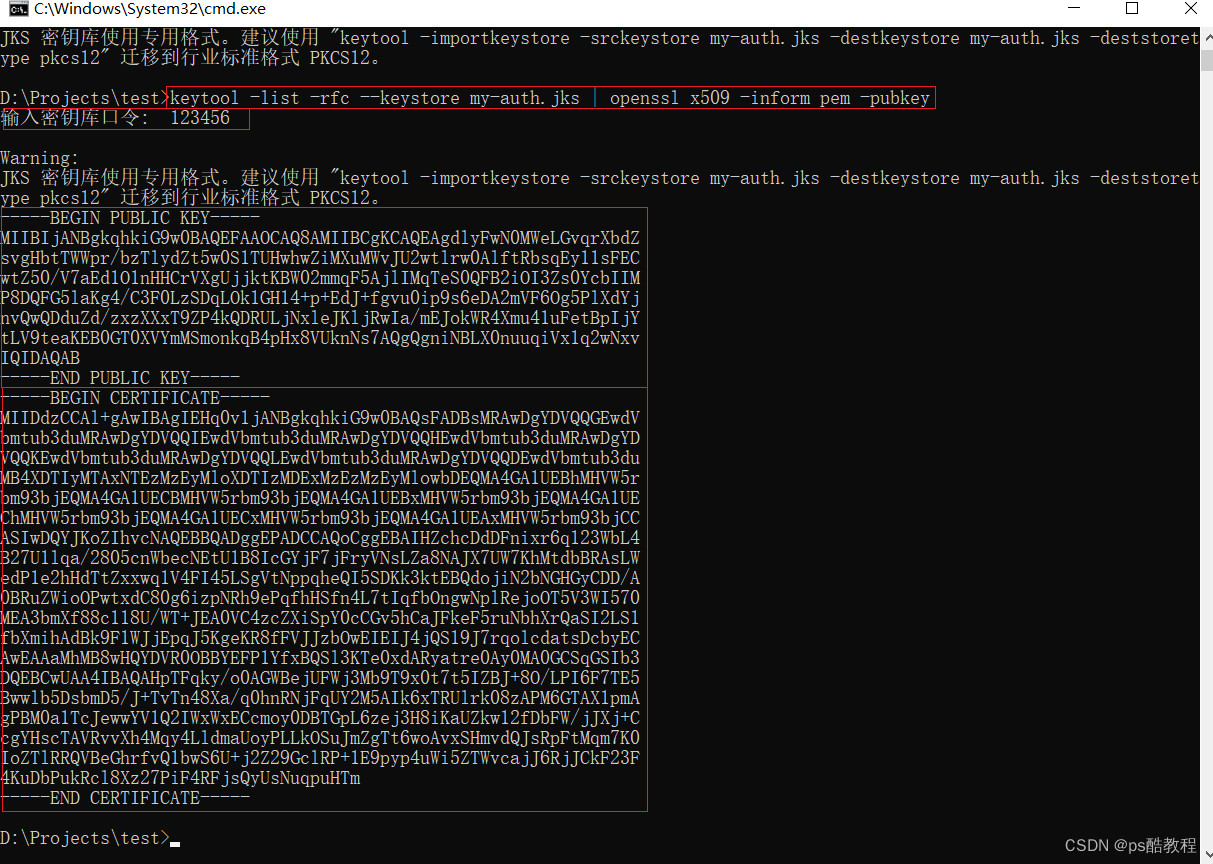
在my-auth.jks同目录下,执行命令导出公钥,需要输入口令:123456
keytool -list -rfc --keystore my-auth.jks | openssl x509 -inform pem -pubkey
测试密钥
package com.zzhua;

import com.fasterxml.jackson.core.JsonProcessingException;
import com.fasterxml.jackson.databind.ObjectMapper;
import org.junit.Test;
import org.springframework.core.io.ClassPathResource;
import org.springframework.security.jwt.Jwt;
import org.springframework.security.jwt.JwtHelper;
import org.springframework.security.jwt.crypto.sign.RsaSigner;
import org.springframework.security.jwt.crypto.sign.RsaVerifier;
import org.springframework.security.oauth2.provider.token.store.KeyStoreKeyFactory;

import java.security.KeyFactory;
import java.security.KeyPair;
import java.security.NoSuchAlgorithmException;
import java.security.interfaces.RSAPrivateKey;
import java.security.interfaces.RSAPublicKey;
import java.security.spec.InvalidKeySpecException;
import java.security.spec.PKCS8EncodedKeySpec;
import java.security.spec.X509EncodedKeySpec;
import java.util.Base64;
import java.util.HashMap;
import java.util.Map;

public class TestJwt {

    @Test
    public void test_encodeJWT() throws JsonProcessingException, NoSuchAlgorithmException, InvalidKeySpecException {

        // (这里读取jks文件的流程可以参考:
        //		ResourceServerTokenServicesConfiguration$JwtKeyStoreConfiguration#accessTokenConverter()的源码处理过程)
        /*
        	// 这个bean只有在JwtKeyStoreCondition条件满足时,才会生效
        	// (亦即:只要配置了security.oauth2.resource.jwt.key-store就会生效)
        	@Bean
			public JwtAccessTokenConverter accessTokenConverter() {

				// security.oauth2.resource.jwt.key-store
				// security.oauth2.resource.jwt.key-store-password
				// security.oauth2.resource.jwt.key-alias
				// 如果提供了key-store, 则以上三个不能为空
				Assert.notNull(this.resource.getJwt().getKeyStore(), "keyStore cannot be null");
				Assert.notNull(this.resource.getJwt().getKeyStorePassword(), "keyStorePassword cannot be null");
				Assert.notNull(this.resource.getJwt().getKeyAlias(), "keyAlias cannot be null");

				JwtAccessTokenConverter converter = new JwtAccessTokenConverter();

				// 拿到jks证书
				Resource keyStore = this.context.getResource(this.resource.getJwt().getKeyStore());
				// 证书访问密码
				char[] keyStorePassword = this.resource.getJwt().getKeyStorePassword().toCharArray();
				KeyStoreKeyFactory keyStoreKeyFactory = new KeyStoreKeyFactory(keyStore, keyStorePassword);

				// 秘钥别名
				String keyAlias = this.resource.getJwt().getKeyAlias();
				// 密钥访问密码 ,先获取秘钥访问密码,如果没有提供,则使用证书访问密码(所以最好这2个保持一致)
				char[] keyPassword = Optional.ofNullable(
						this.resource.getJwt().getKeyPassword())
						.map(String::toCharArray).orElse(keyStorePassword);

				 // 这个setKeyPair方法在下面有解释
				 converter.setKeyPair(keyStoreKeyFactory.getKeyPair(keyAlias, keyPassword));

			return converter;
		}


		*/
        //加载证书(参数:jks证书文件名)
        ClassPathResource classPathResource = new ClassPathResource("my-auth.jks");

        //密钥库(第二个参数:证书的访问密码)
        KeyStoreKeyFactory keyStoreKeyFactory = new KeyStoreKeyFactory(classPathResource, "123456".toCharArray());

        //获取秘钥对(第一个参数: 密钥别名;第二个参数:证书里面的密钥的访问密码)
        KeyPair keyPair = keyStoreKeyFactory.getKeyPair("my-auth", "123456".toCharArray());

        //获取私钥 , 私钥加密,公钥验证,是谓签名
        RSAPrivateKey privateKey = (RSAPrivateKey)keyPair.getPrivate();

        // 获取公钥 (与通过命令获取的公钥一致,只不过没有换行符,一样的效果)
        byte[] decode = Base64.getEncoder().encode(keyPair.getPublic().getEncoded());
        String s = new String(decode);
        System.out.println(s);
        // MIIBIjANBgkqhkiG9w0BAQEFAAOCAQ8AMIIBCgKCAQEAgdlyFwN0MWeLGvqrXbdZsvgHbtTWWpr/bzTlydZt5w0S1TUHwhwZiMXuMWvJU2wtlrw0AlftRbsqEy11sFECwtZ50/V7aEd1O1nHHCrVXgUjjktKBW02mmqF5AjlIMqTeS0QFB2iOI3Zs0YcbIIMP8DQFG5laKg4/C3F0LzSDqLOk1GH14+p+EdJ+fgvu0ip9s6eDA2mVF6Og5PlXdYjnvQwQDduZd/zxzXXxT9ZP4kQDRULjNxleJKljRwIa/mEJokWR4Xmu41uFetBpIjYtLV9teaKEB0GT0XVYmMSmonkqB4pHx8VUknNs7AQgQgniNBLX0nuuqiVx1q2wNxvIQIDAQAB

        //准备载荷数据
        Map<String,Object> data = new HashMap<>();
        data.put("id",1L);
        data.put("username","zzhua");
        data.put("role","admin");
        String content = new ObjectMapper().writeValueAsString(data);
        System.out.println(content); // {"role":"admin","id":1,"username":"zzhua"}

        //创建令牌
        Jwt jwt = JwtHelper.encode(content, new RsaSigner(privateKey));
        //获取创建的令牌
        String token = jwt.getEncoded();

        System.out.println(token);
        // eyJhbGciOiJSUzI1NiIsInR5cCI6IkpXVCJ9.
        // eyJyb2xlIjoiYWRtaW4iLCJpZCI6MSwidXNlcm5hbWUiOiJ6emh1YSJ9.
        // Yw-qmMtW6qqIkrj-8i_3m9QxIMOL9Xb7BKHGUIy7V4sTfkmJ7jAVTD6ij_vAHg_nNBrUtxWxcUnOLWCZGAiMKzjGl4yms8ThFQCpM5LNdH0crZi1fRZHKM0LbMSnPKO7IsuogiTbXNYdk-W3zcmk2zWoNiKMRtbflWlrKJMJEOjv5CPJwxBoWw6v0YIbFDGYC8YijnJ_b-U9YchSlpshEAiAO96l3OfwcTN99nXvMnQoGA-iOQaVNXMU_0Qa-A6xxfL8NtpqLX76ucLr6CcgmJky-VT4SyDOlA7AwiM2nsXwllBkA84T8AtFA9xSvlzN6yKPeAu_PKbJucTg8O51dw


        // 在上面的过程中, 我们把公钥的字节转成了Base64编码后的字符串,
        // 并且注意到编码后的字符串和使用命令获取的公钥是一致的。
        // 既然公钥可以这样玩,那么私钥是不是也可以这样玩呢?
        // 如果可以这样玩的话,那在后面的处理过程中就可以舍弃掉这个jks文件了,直接使用公钥和私钥的字符串就行了
        // (只是说可以这样玩,但是这样玩私钥就以明文的方式暴露了)
        // 私钥以base64字符串编码的形式暴露出去后,该怎么使用呢?
        byte[] encoded = privateKey.getEncoded(); // 获取到私钥的字节数据
        byte[] encoded2 = Base64.getEncoder().encode(encoded);// 对私钥的字节进行base64编码
        String s1 = new String(encoded2); // 获取到私钥进行base64编码后的字符串(这个就可以暴露给外界了, 使用base64编码的好处是,不会出现乱码的情况)

        byte[] decode1 = Base64.getDecoder().decode(s1.getBytes()); // 使用外界暴露的私钥字符串,获取到base64编码后的字节,然后对这些字节数据解码,来获取原始的字节数据

        KeyFactory keyFactory = KeyFactory.getInstance("RSA");
        PKCS8EncodedKeySpec keySpec = new PKCS8EncodedKeySpec(decode1);
        RSAPrivateKey generatePrivate = (RSAPrivateKey) keyFactory.generatePrivate(keySpec); // 强转成RSAPrivateKey
        Jwt jwt2 = JwtHelper.encode(content, new RsaSigner(generatePrivate)); // 使用新的私钥对象
        //获取创建的令牌
        String token2 = jwt2.getEncoded();
        System.out.println(token2); // 生成的token与前面完全一致
        // eyJhbGciOiJSUzI1NiIsInR5cCI6IkpXVCJ9.
        // eyJyb2xlIjoiYWRtaW4iLCJpZCI6MSwidXNlcm5hbWUiOiJ6emh1YSJ9.
        // Yw-qmMtW6qqIkrj-8i_3m9QxIMOL9Xb7BKHGUIy7V4sTfkmJ7jAVTD6ij_vAHg_nNBrUtxWxcUnOLWCZGAiMKzjGl4yms8ThFQCpM5LNdH0crZi1fRZHKM0LbMSnPKO7IsuogiTbXNYdk-W3zcmk2zWoNiKMRtbflWlrKJMJEOjv5CPJwxBoWw6v0YIbFDGYC8YijnJ_b-U9YchSlpshEAiAO96l3OfwcTN99nXvMnQoGA-iOQaVNXMU_0Qa-A6xxfL8NtpqLX76ucLr6CcgmJky-VT4SyDOlA7AwiM2nsXwllBkA84T8AtFA9xSvlzN6yKPeAu_PKbJucTg8O51dw

        // 既然私钥以base64编码的方式暴露出去了,那么公钥也以这种方式暴露出去,该怎么用呢?
        RSAPublicKey rsaPublicKey = (RSAPublicKey) keyPair.getPublic();
        byte[] encode = Base64.getEncoder().encode(rsaPublicKey.getEncoded());
        String s2 = new String(encode); // 暴露给外界的公钥字符串

        // 解析暴露给外界的公钥字符串,以获取RSA公钥对象
        X509EncodedKeySpec keySpec2 = new X509EncodedKeySpec(Base64.getDecoder().decode(s2.getBytes()));
        RSAPublicKey rsaPublicKey2 = (RSAPublicKey) keyFactory.generatePublic(keySpec2);
        String JWTToken = "eyJhbGciOiJSUzI1NiIsInR5cCI6IkpXVCJ9.eyJyb2xlIjoiYWRtaW4iLCJpZCI6MSwidXNlcm5hbWUiOiJ6emh1YSJ9.Yw-qmMtW6qqIkrj-8i_3m9QxIMOL9Xb7BKHGUIy7V4sTfkmJ7jAVTD6ij_vAHg_nNBrUtxWxcUnOLWCZGAiMKzjGl4yms8ThFQCpM5LNdH0crZi1fRZHKM0LbMSnPKO7IsuogiTbXNYdk-W3zcmk2zWoNiKMRtbflWlrKJMJEOjv5CPJwxBoWw6v0YIbFDGYC8YijnJ_b-U9YchSlpshEAiAO96l3OfwcTN99nXvMnQoGA-iOQaVNXMU_0Qa-A6xxfL8NtpqLX76ucLr6CcgmJky-VT4SyDOlA7AwiM2nsXwllBkA84T8AtFA9xSvlzN6yKPeAu_PKbJucTg8O51dw";
        Jwt decodedJwt = JwtHelper.decodeAndVerify(JWTToken, new RsaVerifier(rsaPublicKey2));
        //获取载荷数据
        String claims = decodedJwt.getClaims();
        System.out.println(claims);
        //{"role":"admin","id":1,"username":"zzhua"}
    }

    // 注意一下,下面的校验只会校验签名是否正确(即: 被签名的内容有没有被篡改),不会校验jwt令牌是否过期
    @Test
    public void test_decodeJWT() {
        //JWT的token
        String JWTToken = "eyJhbGciOiJSUzI1NiIsInR5cCI6IkpXVCJ9.eyJyb2xlIjoiYWRtaW4iLCJpZCI6MSwidXNlcm5hbWUiOiJ6emh1YSJ9.Yw-qmMtW6qqIkrj-8i_3m9QxIMOL9Xb7BKHGUIy7V4sTfkmJ7jAVTD6ij_vAHg_nNBrUtxWxcUnOLWCZGAiMKzjGl4yms8ThFQCpM5LNdH0crZi1fRZHKM0LbMSnPKO7IsuogiTbXNYdk-W3zcmk2zWoNiKMRtbflWlrKJMJEOjv5CPJwxBoWw6v0YIbFDGYC8YijnJ_b-U9YchSlpshEAiAO96l3OfwcTN99nXvMnQoGA-iOQaVNXMU_0Qa-A6xxfL8NtpqLX76ucLr6CcgmJky-VT4SyDOlA7AwiM2nsXwllBkA84T8AtFA9xSvlzN6yKPeAu_PKbJucTg8O51dw";
        //公钥验证,通过 ‘keytool -list -rfc --keystore whale.jks | openssl x509 -inform pem -pubkey’ 得到公钥
        String publicKey = "-----BEGIN PUBLIC KEY-----\n" +
                "MIIBIjANBgkqhkiG9w0BAQEFAAOCAQ8AMIIBCgKCAQEAgdlyFwN0MWeLGvqrXbdZ\n" +
                "svgHbtTWWpr/bzTlydZt5w0S1TUHwhwZiMXuMWvJU2wtlrw0AlftRbsqEy11sFEC\n" +
                "wtZ50/V7aEd1O1nHHCrVXgUjjktKBW02mmqF5AjlIMqTeS0QFB2iOI3Zs0YcbIIM\n" +
                "P8DQFG5laKg4/C3F0LzSDqLOk1GH14+p+EdJ+fgvu0ip9s6eDA2mVF6Og5PlXdYj\n" +
                "nvQwQDduZd/zxzXXxT9ZP4kQDRULjNxleJKljRwIa/mEJokWR4Xmu41uFetBpIjY\n" +
                "tLV9teaKEB0GT0XVYmMSmonkqB4pHx8VUknNs7AQgQgniNBLX0nuuqiVx1q2wNxv\n" +
                "IQIDAQAB\n" +
                "-----END PUBLIC KEY-----";
        //解密和验证令牌(在这里,我们可以看到公钥就是一个字符串,可以直接封装到RsaVerifier中,
        //             所以只要暴露了这个公钥字符串, 资源服务器拿着这个公钥字符串,就可以校验签名了)
        Jwt jwt = JwtHelper.decodeAndVerify(JWTToken, new RsaVerifier(publicKey));
        //获取载荷数据
        String claims = jwt.getClaims();
        System.out.println(claims);
        //{"role":"admin","id":1,"username":"zzhua"}

    }
}
修改配置类
MyAuthorizationConfig
授权服务需要读取jks证书,得到公钥和私钥,设置到JwtAccessTokenConverter转换器中。这样,授权服务就可以使用私钥对json数据签名,而使用对应的公钥则可以验签。
package com.zzhua.config;

import org.springframework.beans.factory.annotation.Autowired;
import org.springframework.context.annotation.Bean;
import org.springframework.context.annotation.Configuration;
import org.springframework.core.io.ClassPathResource;
import org.springframework.http.HttpMethod;
import org.springframework.security.authentication.AuthenticationManager;
import org.springframework.security.core.userdetails.UserDetailsService;
import org.springframework.security.crypto.password.PasswordEncoder;
import org.springframework.security.oauth2.config.annotation.configurers.ClientDetailsServiceConfigurer;
import org.springframework.security.oauth2.config.annotation.web.configuration.AuthorizationServerConfigurerAdapter;
import org.springframework.security.oauth2.config.annotation.web.configuration.EnableAuthorizationServer;
import org.springframework.security.oauth2.config.annotation.web.configurers.AuthorizationServerEndpointsConfigurer;
import org.springframework.security.oauth2.config.annotation.web.configurers.AuthorizationServerSecurityConfigurer;
import org.springframework.security.oauth2.provider.ClientDetailsService;
import org.springframework.security.oauth2.provider.code.AuthorizationCodeServices;
import org.springframework.security.oauth2.provider.code.InMemoryAuthorizationCodeServices;
import org.springframework.security.oauth2.provider.token.AuthorizationServerTokenServices;
import org.springframework.security.oauth2.provider.token.DefaultTokenServices;
import org.springframework.security.oauth2.provider.token.TokenStore;
import org.springframework.security.oauth2.provider.token.store.InMemoryTokenStore;
import org.springframework.security.oauth2.provider.token.store.JwtAccessTokenConverter;
import org.springframework.security.oauth2.provider.token.store.JwtTokenStore;
import org.springframework.security.rsa.crypto.KeyStoreKeyFactory;

import java.security.KeyPair;
import java.security.KeyPairGenerator;
import java.security.NoSuchAlgorithmException;

@Configuration
@EnableAuthorizationServer
public class MyAuthorizationConfig extends AuthorizationServerConfigurerAdapter {

    /*************************令牌端点的安全约束开始************************/
    @Override
    public void configure(AuthorizationServerSecurityConfigurer security) throws Exception {
        security
                .tokenKeyAccess("permitAll()")        // oauth/token_key公开
                .checkTokenAccess("permitAll()")      // oauth/check_token公开
                .allowFormAuthenticationForClients(); // 允许表单认证,申请令牌
    }
    /*************************令牌端点的安全约束结束************************/


    /*************************配置客户端信息开始************************/
    @Autowired
    private PasswordEncoder passwordEncoder;

    @Override
    public void configure(ClientDetailsServiceConfigurer clients) throws Exception {
        //内存配置的方式配置用户信息
        clients.inMemory()//内存方式
                .withClient("c1")                                    //client_id
                .secret(passwordEncoder.encode("secret"))            //客户端秘钥
                .resourceIds("salary")                               //客户端拥有的资源列表
                .authorizedGrantTypes("authorization_code",          //该client允许的授权类型
                                      "password",
                                      "client_credentials",
                                      "implicit",
                                      "refresh_token")
                .scopes("all")                                       //允许的授权范围
                .autoApprove(false)                                  //跳转到授权页面
                .redirectUris("http://www.baidu.com");               //回调地址
    }
    /*************************配置客户端信息结束************************/


    /*************************配置令牌服务开始************************/

    @Autowired
    private AuthenticationManager authenticationManager;

    @Autowired
    private UserDetailsService userDetailsService;

    /*
        注意到 {@link ClientDetailsServiceConfiguration#clientDetailsService()}
        {@link AuthorizationServerSecurityConfiguration#configure(ClientDetailsServiceConfigurer)}
     */
    @Autowired
    private ClientDetailsService clientDetailsService;

    /*@Bean
    public TokenStore tokenStore() {
        return new InMemoryTokenStore(); // 使用基于内存的普通令牌
    }*/
    @Bean
    public JwtAccessTokenConverter accessTokenConvert(){
        JwtAccessTokenConverter converter = new JwtAccessTokenConverter();// [使用JWT令牌]
        // converter.setSigningKey("uaa");
		// 在一般情况下, jks证书的访问密码和证书中密钥的访问密码相同, 则可以使用下面的写法, 如果不一样, 可以参考上面的测试示例
        KeyStoreKeyFactory storeKeyFactory = new KeyStoreKeyFactory(
										                new ClassPathResource("my-auth.jks"),
										                "123456".toCharArray()
								                 );
        converter.setKeyPair(storeKeyFactory.getKeyPair("my-auth")); // 传入密钥别名

		/* 我们看下这个setKeyPair的过程, 有助于了解整个过程
			public void setKeyPair(KeyPair keyPair) {
				// 获取私钥
				PrivateKey privateKey = keyPair.getPrivate();
				Assert.state(privateKey instanceof RSAPrivateKey, "KeyPair must be an RSA ");
				// 私钥用于签名
				signer = new RsaSigner((RSAPrivateKey) privateKey);
				// 获取公钥
				RSAPublicKey publicKey = (RSAPublicKey) keyPair.getPublic();
				// 公钥用于验签
				verifier = new RsaVerifier(publicKey);
				// 这里是为了方便暴露公钥(注意下: TokenKeyEndpoint端点, 可以获取该公钥)
				verifierKey = "-----BEGIN PUBLIC KEY-----\n" + new String(Base64.encode(publicKey.getEncoded())) + "\n-----END PUBLIC KEY-----";
			}
		*/

        return converter;
    }
    @Bean
    public TokenStore tokenStore(){
        return new JwtTokenStore(accessTokenConvert());  // [使用JWT令牌]
    }

    @Bean
    public AuthorizationServerTokenServices tokenService() {
        DefaultTokenServices service = new DefaultTokenServices();
        service.setClientDetailsService(clientDetailsService); // 客户端详情服务
        service.setSupportRefreshToken(true);                  // 允许令牌自动刷新
        service.setTokenStore(tokenStore());                   // 令牌存储策略-内存
        service.setTokenEnhancer(accessTokenConvert());        // [使用JWT令牌]
        service.setAccessTokenValiditySeconds(7200);           // 令牌默认有效期2小时
        service.setRefreshTokenValiditySeconds(259200);        // 刷新令牌默认有效期3天
        return service;
    }

    //设置授权码模式的授权码如何存取,暂时用内存方式。
    @Bean
    public AuthorizationCodeServices authorizationCodeServices(){
        return new InMemoryAuthorizationCodeServices();//JdbcAuthorizationCodeServices
    }

    @Override
    public void configure(AuthorizationServerEndpointsConfigurer endpoints) throws Exception {

        endpoints
                // .pathMapping("/oauth/confirm_access","/customer/confirm_access")//定制授权同意页面
                .authenticationManager(authenticationManager)                      //认证管理器
                .userDetailsService(userDetailsService)                            //密码模式的用户信息管理
                .authorizationCodeServices(authorizationCodeServices())            //授权码服务
                .tokenServices(tokenService())                                     //令牌管理服务
                .allowedTokenEndpointRequestMethods(HttpMethod.POST,HttpMethod.GET);
    }
    /*************************配置令牌服务结束************************/
}
MyResourceServerConfig
资源服务器也使用JwtAccessTokenConverter,并且设置该转换器验证签名时所使用的公钥。
package com.zzhua.config;

import org.springframework.context.annotation.Bean;
import org.springframework.context.annotation.Configuration;
import org.springframework.core.io.ClassPathResource;
import org.springframework.core.io.Resource;
import org.springframework.security.config.annotation.web.builders.HttpSecurity;
import org.springframework.security.config.http.SessionCreationPolicy;
import org.springframework.security.oauth2.config.annotation.web.configuration.EnableResourceServer;
import org.springframework.security.oauth2.config.annotation.web.configuration.ResourceServerConfigurerAdapter;
import org.springframework.security.oauth2.config.annotation.web.configurers.ResourceServerSecurityConfigurer;
import org.springframework.security.oauth2.provider.token.RemoteTokenServices;
import org.springframework.security.oauth2.provider.token.TokenStore;
import org.springframework.security.oauth2.provider.token.store.JwtAccessTokenConverter;
import org.springframework.security.oauth2.provider.token.store.JwtTokenStore;
import org.springframework.util.FileCopyUtils;

import java.io.IOException;

@Configuration
@EnableResourceServer
public class MyResourceServerConfig extends ResourceServerConfigurerAdapter {

    @Override
    public void configure(ResourceServerSecurityConfigurer resources) throws Exception {
        resources.resourceId("salary") //资源ID
                // .tokenServices(tokenServices()) // 使用远程服务验证令牌的服务
                .tokenStore(tokenStore()) // [使用JWT令牌],就不需要调用远程服务了,用本地验证方式就可以了。
                .stateless(true); //无状态模式
    }

    @Bean
    public JwtAccessTokenConverter accessTokenConvert(){
        JwtAccessTokenConverter converter = new JwtAccessTokenConverter();// [使用JWT令牌]
        // converter.setSigningKey("uaa");
        // 读取写了公钥的public.cert文件
        Resource resource = new ClassPathResource("public.cert");
        String publicKey;
        try {
            publicKey = new String(FileCopyUtils.copyToByteArray(resource.getInputStream()));
        } catch (IOException e) {
            throw new RuntimeException(e);
        }
        converter.setVerifierKey(publicKey);
        return converter;
    }
    @Bean
    public TokenStore tokenStore(){
        return new JwtTokenStore(accessTokenConvert());  // [使用JWT令牌]
    }

    /*// 配置access_token远程验证策略。
    public ResourceServerTokenServices tokenServices(){
        // DefaultTokenServices services = new DefaultTokenServices();
        RemoteTokenServices services = new RemoteTokenServices();
        services.setCheckTokenEndpointUrl("http://localhost:53020/uaa/oauth/check_token");
        services.setClientId("c1");
        services.setClientSecret("secret");
        return services;
    }*/

    @Override
    public void configure(HttpSecurity http) throws Exception {
        http.authorizeRequests() //校验请求
                .antMatchers("/salary/**") // 路径匹配规则。
                .access("#oauth2.hasScope('all')") // 需要匹配scope
                .and().csrf().disable()
                .sessionManagement().sessionCreationPolicy(SessionCreationPolicy.STATELESS)
        ;
    }
}
public.cert
可以使用前面提到的命令导出公钥(使用下面的格式)
-----BEGIN PUBLIC KEY-----
MIIBIjANBgkqhkiG9w0BAQEFAAOCAQ8AMIIBCgKCAQEAgdlyFwN0MWeLGvqrXbdZ
svgHbtTWWpr/bzTlydZt5w0S1TUHwhwZiMXuMWvJU2wtlrw0AlftRbsqEy11sFEC
wtZ50/V7aEd1O1nHHCrVXgUjjktKBW02mmqF5AjlIMqTeS0QFB2iOI3Zs0YcbIIM
P8DQFG5laKg4/C3F0LzSDqLOk1GH14+p+EdJ+fgvu0ip9s6eDA2mVF6Og5PlXdYj
nvQwQDduZd/zxzXXxT9ZP4kQDRULjNxleJKljRwIa/mEJokWR4Xmu41uFetBpIjY
tLV9teaKEB0GT0XVYmMSmonkqB4pHx8VUknNs7AQgQgniNBLX0nuuqiVx1q2wNxv
IQIDAQAB
-----END PUBLIC KEY-----
测试流程
以客户端模式为例
(1) 访问认证服务器获取令牌的接口:http://localhost:53020/uaa/oauth/token?client_id=c1&client_secret=secret&grant_type=client_credentials,获取访问令牌
(2) 访问资源服务器:localhost:53021/resource/salary/query,并携带访问令牌
以简化模式为例
(1) 访问认证服务器获取令牌的接口:http://localhost:53020/uaa/oauth/authorize?client_id=c1&response_type=token&scope=all&redirect_uri=http://www.baidu.com,由于未登录,所以输入用户名密码登录,登录成功之后,重定向到授权页面,用户同意授权后,重定向到客户端的回调地址,并携带访问令牌。

(2)访问资源服务器:localhost:53021/resource/salary/query,并携带访问令牌(同上)
暴露tokenKey
前面,我们生成jks证书,并且在服务端读取该证书,来获取私钥,作为签名使用;并且使用命令导出jks证书的公钥,粘贴在public.cert文件中,放入资源服务器的类路径下,读取该公钥。但如果需要修改私钥的话,那么所有资源服务的公钥都要跟着修改,这会比较麻烦了。所以公钥和私钥应当都交给认证服务器统一管理,而资源服务器应当作为客户端从认证服务器中获取公钥以验签
步骤
(1)授权服务器不需要任何改动,可直接访问:http://localhost:53020/uaa/oauth/token_key,获取到了公钥

那这样的话,岂不是任何人都可以访问这个公钥?我们可以配置认证服务器的令牌端点的安全约束(如果不介意的话,不配置也没关系),这样就必须经过认证才能访问了。
@Configuration
@EnableAuthorizationServer
public class MyAuthorizationConfig extends AuthorizationServerConfigurerAdapter {

    /*************************令牌端点的安全约束开始************************/
    @Override
    public void configure(AuthorizationServerSecurityConfigurer security) throws Exception {
        security
                .tokenKeyAccess("isAuthenticated()")        // oauth/token_key公开 -> 改成必须经过认证才能访问
                .checkTokenAccess("permitAll()")      // oauth/check_token公开
                .allowFormAuthenticationForClients(); // 允许表单认证,申请令牌
    }
    /*************************令牌端点的安全约束结束************************/


    /*************************配置客户端信息开始************************/
    @Autowired
    private PasswordEncoder passwordEncoder;

    @Override
    public void configure(ClientDetailsServiceConfigurer clients) throws Exception {
        //内存配置的方式配置用户信息
        clients.inMemory()//内存方式
                .withClient("c1")                                    //client_id
                .secret(passwordEncoder.encode("secret"))            //客户端秘钥
                .resourceIds("salary")                               //客户端拥有的资源列表
                .authorizedGrantTypes("authorization_code",          //该client允许的授权类型
                        "password",
                        "client_credentials",
                        "implicit",
                        "refresh_token")
                .scopes("all")                                       //允许的授权范围
                .autoApprove(false)                                  //跳转到授权页面
                .redirectUris("http://www.baidu.com");               //回调地址
    }
    /*************************配置客户端信息结束************************/


    /*************************配置令牌服务开始************************/

    @Autowired
    private AuthenticationManager authenticationManager;

    @Autowired
    private UserDetailsService userDetailsService;

    /*
        注意到 {@link ClientDetailsServiceConfiguration#clientDetailsService()}
        {@link AuthorizationServerSecurityConfiguration#configure(ClientDetailsServiceConfigurer)}
     */
    @Autowired
    private ClientDetailsService clientDetailsService;

    /*@Bean
    public TokenStore tokenStore() {
        return new InMemoryTokenStore(); // 使用基于内存的普通令牌
    }*/
    @Bean
    public JwtAccessTokenConverter accessTokenConvert(){
        JwtAccessTokenConverter converter = new JwtAccessTokenConverter();// [使用JWT令牌]
        // converter.setSigningKey("uaa");
        // 在一般情况下, jks证书的访问密码和证书中密钥的访问密码相同, 则可以使用下面的写法, 如果不一样, 可以参考上面的测试示例
        KeyStoreKeyFactory storeKeyFactory = new KeyStoreKeyFactory(
                new ClassPathResource("my-auth.jks"),
                "123456".toCharArray()
        );
        converter.setKeyPair(storeKeyFactory.getKeyPair("my-auth"));

        return converter;
    }
    @Bean
    public TokenStore tokenStore(){
        return new JwtTokenStore(accessTokenConvert());  // [使用JWT令牌]
    }

    @Bean
    public AuthorizationServerTokenServices tokenService() {
        DefaultTokenServices service = new DefaultTokenServices();
        service.setClientDetailsService(clientDetailsService); // 客户端详情服务
        service.setSupportRefreshToken(true);                  // 允许令牌自动刷新
        service.setTokenStore(tokenStore());                   // 令牌存储策略-内存
        service.setTokenEnhancer(accessTokenConvert());        // [使用JWT令牌]
        service.setAccessTokenValiditySeconds(7200);           // 令牌默认有效期2小时
        service.setRefreshTokenValiditySeconds(259200);        // 刷新令牌默认有效期3天
        return service;
    }

    //设置授权码模式的授权码如何存取,暂时用内存方式。
    @Bean
    public AuthorizationCodeServices authorizationCodeServices(){
        return new InMemoryAuthorizationCodeServices();//JdbcAuthorizationCodeServices
    }

    @Override
    public void configure(AuthorizationServerEndpointsConfigurer endpoints) throws Exception {

        endpoints
                // .pathMapping("/oauth/confirm_access","/customer/confirm_access")//定制授权同意页面
                .authenticationManager(authenticationManager)                      //认证管理器
                .userDetailsService(userDetailsService)                            //密码模式的用户信息管理
                .authorizationCodeServices(authorizationCodeServices())            //授权码服务
                .tokenServices(tokenService())                                     //令牌管理服务
                .allowedTokenEndpointRequestMethods(HttpMethod.POST,HttpMethod.GET);
    }
    /*************************配置令牌服务结束************************/
}
重启认证服务器后,再次访问:localhost:53020/uaa/oauth/token_key,发现必须使用Basic认证才能访问公钥。

(2)修改资源服务器
1、注释掉原来读取public.cert配置文件的tokenStore配置
(注释的原因在:ResourceServerTokenServicesConfiguration#JwtTokenServicesConfiguration,我们这里要改成从授权服务器中获取公钥)
package com.zzhua.config;

import org.springframework.context.annotation.Bean;
import org.springframework.context.annotation.Configuration;
import org.springframework.core.io.ClassPathResource;
import org.springframework.core.io.Resource;
import org.springframework.security.config.annotation.web.builders.HttpSecurity;
import org.springframework.security.config.http.SessionCreationPolicy;
import org.springframework.security.oauth2.config.annotation.web.configuration.EnableResourceServer;
import org.springframework.security.oauth2.config.annotation.web.configuration.ResourceServerConfigurerAdapter;
import org.springframework.security.oauth2.config.annotation.web.configurers.ResourceServerSecurityConfigurer;
import org.springframework.security.oauth2.provider.token.RemoteTokenServices;
import org.springframework.security.oauth2.provider.token.TokenStore;
import org.springframework.security.oauth2.provider.token.store.JwtAccessTokenConverter;
import org.springframework.security.oauth2.provider.token.store.JwtTokenStore;
import org.springframework.util.FileCopyUtils;

import java.io.IOException;

@Configuration
@EnableResourceServer
public class MyResourceServerConfig extends ResourceServerConfigurerAdapter {

    @Override
    public void configure(ResourceServerSecurityConfigurer resources) throws Exception {
        resources.resourceId("salary") //资源ID
                // .tokenServices(tokenServices()) // 使用远程服务验证令牌的服务
                // .tokenStore(tokenStore()) // [使用JWT令牌],就不需要调用远程服务了,用本地验证方式就可以了。
                .stateless(true); //无状态模式
    }

    /*@Bean
    public JwtAccessTokenConverter accessTokenConvert(){
        JwtAccessTokenConverter converter = new JwtAccessTokenConverter();// [使用JWT令牌]
        // converter.setSigningKey("uaa");
        Resource resource = new ClassPathResource("public.cert");
        String publicKey;
        try {
            publicKey = new String(FileCopyUtils.copyToByteArray(resource.getInputStream()));
        } catch (IOException e) {
            throw new RuntimeException(e);
        }
        converter.setVerifierKey(publicKey);
        return converter;
    }
    @Bean
    public TokenStore tokenStore(){
        return new JwtTokenStore(accessTokenConvert());  // [使用JWT令牌]
    }*/

    /*// 配置access_token远程验证策略。
    public ResourceServerTokenServices tokenServices(){
        // DefaultTokenServices services = new DefaultTokenServices();
        RemoteTokenServices services = new RemoteTokenServices();
        services.setCheckTokenEndpointUrl("http://localhost:53020/uaa/oauth/check_token");
        services.setClientId("c1");
        services.setClientSecret("secret");
        return services;
    }*/

    @Override
    public void configure(HttpSecurity http) throws Exception {
        http.authorizeRequests() //校验请求
                .antMatchers("/salary/**") // 路径匹配规则。
                .access("#oauth2.hasScope('all')") // 需要匹配scope
                .and().csrf().disable()
                .sessionManagement().sessionCreationPolicy(SessionCreationPolicy.STATELESS)
        ;
    }
}
2、修改资源服务器的配置文件
因为JwtTokenCondition的生效条件是:必须配置了security.oauth2.resource.jwt.key-value或security.oauth2.resource.jwt.key-uri,因为我们打算从认证服务器中获取密钥,所以配置了security.oauth2.resource.jwt.key-uri,下面还配置了客户端id和客户端密码,是因为访问授权服务器的/oauth/token_key令牌端点的安全约束,如果设置了isAuthenticated()则需要通过客户端认证才能访问噢。
server:
  port: 53021
  servlet:
    context‐path: /resource

spring:
  application:
    name: salary‐service
  main:
    allow‐bean‐definition‐overriding: true
  mvc:
    throw‐exception‐if‐no‐handler‐found: true
  resources:
    add‐mappings: false

# 添加如下配置
security:
  oauth2:
    client:
      client-id: c1  # 客户端id
      client-secret: secret # 客户端密码
    resource:
      jwt:
        key-uri: http://localhost:53020/uaa/oauth/token_key # 公钥地址

management:
  endpoints:
    web:
      exposure:
        include: refresh,health,info,env

#logging:
#  level:
#    org:
#      springframework:
#        web: info
#    root: debug
测试
(1)继续使用客户端为例,访问:http://localhost:53020/uaa/oauth/token?client_id=c1&client_secret=secret&grant_type=client_credentials
(2)访问:localhost:53021/resource/salary/query,并在请求头中携带访问令牌(如下)
分析
分析的部分分为2个,一个是认证服务器这边,一个是资源服务器这边
授权服务器
(1)授权服务器配置了TokenKeyEndpoint端点,里面实现很简单,从注入的JwtAccessTokenConverter获取公钥
@FrameworkEndpoint
public class TokenKeyEndpoint {

    protected final Log logger = LogFactory.getLog(getClass());

    private JwtAccessTokenConverter converter;

 	public TokenKeyEndpoint(JwtAccessTokenConverter converter) {
		super();
		this.converter = converter;
	}

    @RequestMapping(value = "/oauth/token_key", method = RequestMethod.GET)
    @ResponseBody
    public Map<String, String> getKey(Principal principal) {
        if ((principal == null || principal instanceof AnonymousAuthenticationToken) && !converter.isPublic()) {
            throw new AccessDeniedException("You need to authenticate to see a shared key");
        }
        // 从注入的JwtAccessTokenConverter获取公钥
        Map<String, String> result = converter.getKey();
        return result;
    }

}
(2)JwtAccessTokenConverter的公钥又是如何设置进去的,见JwtAccessTokenConverter#setKeyPair,我们在认证服务中是有在调用这个方法的
public void setKeyPair(KeyPair keyPair) {

	// 获取私钥对象,设置给 RsaSigner 签名器(用于签名)
	PrivateKey privateKey = keyPair.getPrivate();
	Assert.state(privateKey instanceof RSAPrivateKey, "KeyPair must be an RSA ");
	signer = new RsaSigner((RSAPrivateKey) privateKey);

	// 获取公钥对象,设置 给RsaVerifier 校验器(用于验签)
	RSAPublicKey publicKey = (RSAPublicKey) keyPair.getPublic();
	verifier = new RsaVerifier(publicKey);

	// 【将公钥的字节数据,使用base64编码后,拼接上固定格式,设置给校verfierKey】
	verifierKey = "-----BEGIN PUBLIC KEY-----\n" + new String(Base64.encode(publicKey.getEncoded())) + "\n-----END PUBLIC KEY-----";
}
资源服务器
(1)资源服务器中配置了security.oauth2.resource.jwt.key-uri(可见:ResourceServerTokenServicesConfiguration),会让JwtTokenCondition生效(配置了security.oauth2.resource.jwt.key-value 或者 security.oauth2.resource.jwt.key-uri,都会让该条件生效),则ResourceServerTokenServicesConfiguration$JwtTokenServicesConfiguration会生效
@Configuration
@Conditional(JwtTokenCondition.class)
protected static class JwtTokenServicesConfiguration {

	private final ResourceServerProperties resource;

	private final List<JwtAccessTokenConverterConfigurer> configurers;

	private final List<JwtAccessTokenConverterRestTemplateCustomizer> customizers;

	public JwtTokenServicesConfiguration(ResourceServerProperties resource,
			ObjectProvider<List<JwtAccessTokenConverterConfigurer>> configurers,
			ObjectProvider<List<JwtAccessTokenConverterRestTemplateCustomizer>> customizers) {
		this.resource = resource;
		this.configurers = configurers.getIfAvailable();
		this.customizers = customizers.getIfAvailable();
	}

	@Bean // 当容器中没有配置ResourceServerTokenServices时,该配置的bean生效
	@ConditionalOnMissingBean(ResourceServerTokenServices.class)
	public DefaultTokenServices jwtTokenServices(TokenStore jwtTokenStore) {
		DefaultTokenServices services = new DefaultTokenServices();
		services.setTokenStore(jwtTokenStore);
		return services;
	}

	@Bean // 当容器中没有配置TokenStore时,该配置的bean生效
	@ConditionalOnMissingBean(TokenStore.class)
	public TokenStore jwtTokenStore() {
		return new JwtTokenStore(jwtTokenEnhancer());
	}

	@Bean // 会自动配置JwtAccessTokenConverter
	public JwtAccessTokenConverter jwtTokenEnhancer() {

		// 创建一个JwtAccessTokenConverter 对象
		JwtAccessTokenConverter converter = new JwtAccessTokenConverter();

		// 获取security.oauth2.resource.jwt.key-value配置
		String keyValue = this.resource.getJwt().getKeyValue();

		// 如果没有配置上面的,则从服务器中拿公钥
		if (!StringUtils.hasText(keyValue)) {
			keyValue = getKeyFromServer();
		}

		// 如果不是以"-----BEGIN"开头,则说明是对称加密,设置为签名密钥
		if (StringUtils.hasText(keyValue) && !keyValue.startsWith("-----BEGIN")) {
			converter.setSigningKey(keyValue);
		}

		if (keyValue != null) {
			// 设置校验所需要的key, 设置JwtAccessTokenConverter#verifierKey属性后,
			// 会调用JwtAccessTokenConverter#afterPropertiesSet()方法
			converter.setVerifierKey(keyValue);
		}

		if (!CollectionUtils.isEmpty(this.configurers)) {
			AnnotationAwareOrderComparator.sort(this.configurers);
			for (JwtAccessTokenConverterConfigurer configurer : this.configurers) {
				configurer.configure(converter);
			}
		}
		return converter;
	}

	// 从服务器中拿公钥
	private String getKeyFromServer() {

		RestTemplate keyUriRestTemplate = new RestTemplate();

		if (!CollectionUtils.isEmpty(this.customizers)) {
			for (JwtAccessTokenConverterRestTemplateCustomizer customizer : this.customizers) {
				customizer.customize(keyUriRestTemplate);
			}
		}

		HttpHeaders headers = new HttpHeaders();

		// 客户端id
		String username = this.resource.getClientId();
		// 客户端密码
		String password = this.resource.getClientSecret();

		// 把basic认证需要的请求头给带上
		if (username != null && password != null) {
			byte[] token = Base64.getEncoder().encode((username + ":" + password).getBytes());
			headers.add("Authorization", "Basic " + new String(token));
		}

		HttpEntity<Void> request = new HttpEntity<>(headers);

		// 获取security.oauth2.resource.jwt.key-uri配置
		String url = this.resource.getJwt().getKeyUri();
		// 请求认证服务器,获取公钥
		return (String) keyUriRestTemplate
				.exchange(url, HttpMethod.GET, request, Map.class).getBody()
				.get("value");
	}

}
JwtAccessTokenConverter#afterPropertiesSet 和 JwtAccessTokenConverter#decode如下
	public void afterPropertiesSet() throws Exception {

		if (verifier != null) {
			return;
		}

		// 先设置为对称加密的签名器
		SignatureVerifier verifier = new MacSigner(verifierKey);
		try {
			// 尝试使用RsaVerifier,直接传入 公钥 字符串
			verifier = new RsaVerifier(verifierKey);
		}
		catch (Exception e) {

		}

		if (signer instanceof RsaSigner) {
			byte[] test = "test".getBytes();
			try {
				verifier.verify(test, signer.sign(test));
			}
			catch (InvalidSignatureException e) {
			}
		}
		else if (verifier instanceof MacSigner) {
			Assert.state(this.signingKey == this.verifierKey);
		}

		this.verifier = verifier;
	}

	// 看看在资源服务器中,这个JwtAccessTokenConverter是如何使用的公钥
	// (前面<测试密钥>部分可以参考这里)
	protected Map<String, Object> decode(String token) {
		try {

			// 解析和校验jwt令牌
			Jwt jwt = JwtHelper.decodeAndVerify(token, verifier);

			String claimsStr = jwt.getClaims();
			Map<String, Object> claims = objectMapper.parseMap(claimsStr);
			if (claims.containsKey(EXP) && claims.get(EXP) instanceof Integer) {
				Integer intValue = (Integer) claims.get(EXP);
				claims.put(EXP, new Long(intValue));
			}
			this.getJwtClaimsSetVerifier().verify(claims);
			return claims;
		}
		catch (Exception e) {
			throw new InvalidTokenException();
		}
	}
(2)资源服务器会配置一个OAuth2AuthenticationProcessingFilter的过滤器(注意与:OAuth2ClientAuthenticationProcessingFilter区分开,这是sso用的,这2个过滤器很容易看混),这个过滤器会提取Authorization请求头,并且会将这个请求头依次交给ResourceServerTokenServices->TokenStore->JwtAccessTokenConverter(这里面就使用从jwt令牌中解码出授权的信息,如果提取成功,则封装为OAuth2Authentication对象,设置到security上下文中)。
而另外一个关键点则是:这个过滤器是如何配置的?它里面的属性是怎样填充进去的?我们如何干涉到这一过程?
在这里并不展开叙述,提示:@EnableResourceServer注解引入了ResourceServerConfiguration配置类(它继承自WebSecurityConfigurerAdapter),里面注入了ResourceServerConfigurer的集合(可用于配置后面这个配置器),再configure(HttpSecurity)方法中,创建了ResourceServerSecurityConfigurer配置器(这个配置器就是用来添加OAuth2AuthenticationProcessingFilter过滤器的),在这个configure方法中就在填充ResourceServerSecurityConfigurer配置器的属性,最终会被用在所构建的过滤器中,详情见ResourceServerConfiguration#configure(HttpSecurtiy)这个方法即可
public void doFilter(ServletRequest req, ServletResponse res, FilterChain chain) throws IOException,ServletException {

	final boolean debug = logger.isDebugEnabled();
	final HttpServletRequest request = (HttpServletRequest) req;
	final HttpServletResponse response = (HttpServletResponse) res;

	try {

		// 提取Authorization请求头
		Authentication authentication = tokenExtractor.extract(request);

		if (authentication == null) {
			if (stateless && isAuthenticated()) {
				SecurityContextHolder.clearContext();
			}
		}
		else {
			request.setAttribute(OAuth2AuthenticationDetails.ACCESS_TOKEN_VALUE, authentication.getPrincipal());
			if (authentication instanceof AbstractAuthenticationToken) {
				AbstractAuthenticationToken needsDetails = (AbstractAuthenticationToken) authentication;
				needsDetails.setDetails(authenticationDetailsSource.buildDetails(request));
			}

			// 这里用的认证管理器是: OAuth2AuthenticationManager
			// 		里面会首先交给ResourceServerTokenServices的实现
			//		ResourceServerTokenServices的实现交给TokenStore去实现,即JwtTokenStore
			//		而JwtTokenStore又委托给了JwtAccessTokenConverter
			Authentication authResult = authenticationManager.authenticate(authentication);

			// 发布认证成功事件
			eventPublisher.publishAuthenticationSuccess(authResult);

			// 认证成功后,则将认证对象设置到security上下文中
			SecurityContextHolder.getContext().setAuthentication(authResult);

		}
	}
	catch (OAuth2Exception failed) {
		SecurityContextHolder.clearContext();

		eventPublisher.publishAuthenticationFailure(new BadCredentialsException(failed.getMessage(), failed);

		authenticationEntryPoint.commence(request, response,new InsufficientAuthenticationException();

		return;
	}

	chain.doFilter(request, response);
}


 1万+
1万+


 被折叠的 条评论
为什么被折叠?
被折叠的 条评论
为什么被折叠?
 到【灌水乐园】发言


