


文章目录
- 前端项目
- node 版本
- node镜像
- 构建项目
- 图片资源网站
- encodeURI & decodeURI
- app.config.globalProperties与getCurrentInstance
- Object.assign
- vue-cookies
- 使用vue-cookies
- router.currentRoute
- preserve log
- import.meta.env
- Request.js
- axios的post的配置详解(onUploadProgress)
- 热更新问题
- vue3动态组件
- vuex4命名空间
- 二级菜单界面控制
- defineExpose暴露组件的方法
- 图片url加随机数,防止浏览器缓存
- Table封装,slot相关
- vue3样式穿透
- prop单向数据流
- ref引用组件或dom 与 v-if/show
- @mouseenter & @mouseleave监听鼠标移入移出事件
- el-table和el-input在一起,获取焦点方法失效问题
- js对象的key可以是数字(同数字字符串)
- defineExpose暴露组件的方法
- replaceAll
- Icon.vue
- 网盘页面布局
- 新建目录,输入框聚焦问题
- el-popver 点击触发和使用方法触发
- 文件上传各组件协作关系Framework组件-Uploader组件-Main组件
- 文件上传逻辑
- 文件删除 和 批量删除
- 移动文件到指定的目录
前端项目
node 版本
v16.20.0
node历史下载地址:https://nodejs.org/download/release/v16.20.0/
node镜像
npm config get registry
# 返回: https://registry.npmmirror.com/
# 如果不是这个那么设置镜像
# npm config set registry https://registry.npmmirror.com
构建项目
创建项目
npm init vite@latest easypan-front
安装项目所有依赖
npm install
@highlightjs/vue-plugin
@moefe/vue-aplayer
aplayer
axios
docx-preview
dplayer
element-plus
highlight.js
js-md5
sass
sass-loader
spark-md5
vue-clipboard3
vue-cookies
vue-pdf-embed
vue-router
vue3-pdfjs
xlsx
--save
图片资源网站
可以免费下载图片: undraw
encodeURI & decodeURI
encodeURI()、encodeURIComponent()区别及使用场景
最好用encodeURIComponent和decodeURIComponent
# 输出:http://www.baidu.com?query=a%201&car4(%5E
encodeURI('http://www.baidu.com?query=a 1&car4(^')

# 输出:http://www.baidu.com?query=a 1&car4(^
decodeURI('http://www.baidu.com?query=a%201&car4(%5E')
app.config.globalProperties与getCurrentInstance
// 挂载到全局
app.config.globalProperties.Request = Request

// 使用
import { getCurrentInstance } from "vue";

const {proxy} = getCurrentInstance()

proxy.Request(..)
Object.assign
vue-cookies
vue-cookies使用方法,vue中使用获取cookie
安装vue-cookies
npm i vue-cookies -D
使用vue-cookies
import VueCookies from 'vue-cookies'

// 存入
// 		其实存入的时候就是 encodeURIComponent(JSON.stringify({'nickName':'zzhua'}))
// 		可以使用JSON.parse(decodeURIComponent(encodeURIComponent(JSON.stringify({'nickName':'zzhua'})))) 解析出来
VueCookies.set('userInfo', {'nickName':'zzhua'})

// 获取
let userInfo = VueCookies.get('userInfo')

// 移除
VueCookies.remove('userInfo')

// 获取所有的key
VueCookies.keys()

// cookie中是否存在指定的key
VueCookies.isKey()

// httpOnly默认为true打对号√情况下,禁止javascript操作cookie,导致获取不到,可以让后端设置false;
router.currentRoute
获取当前的路由
preserve log
可以在浏览器的控制台勾选preserve log,在页面跳转时,可以保留记录页面跳转前的请求
import.meta.env
Request.js
axios的response.config是什么(就是请求的时候传入的配置对象)
& response.config.responseType & axios的request中的config配置自定义属性(都是同一个config,并且可以手动往里面设置自定义属性)
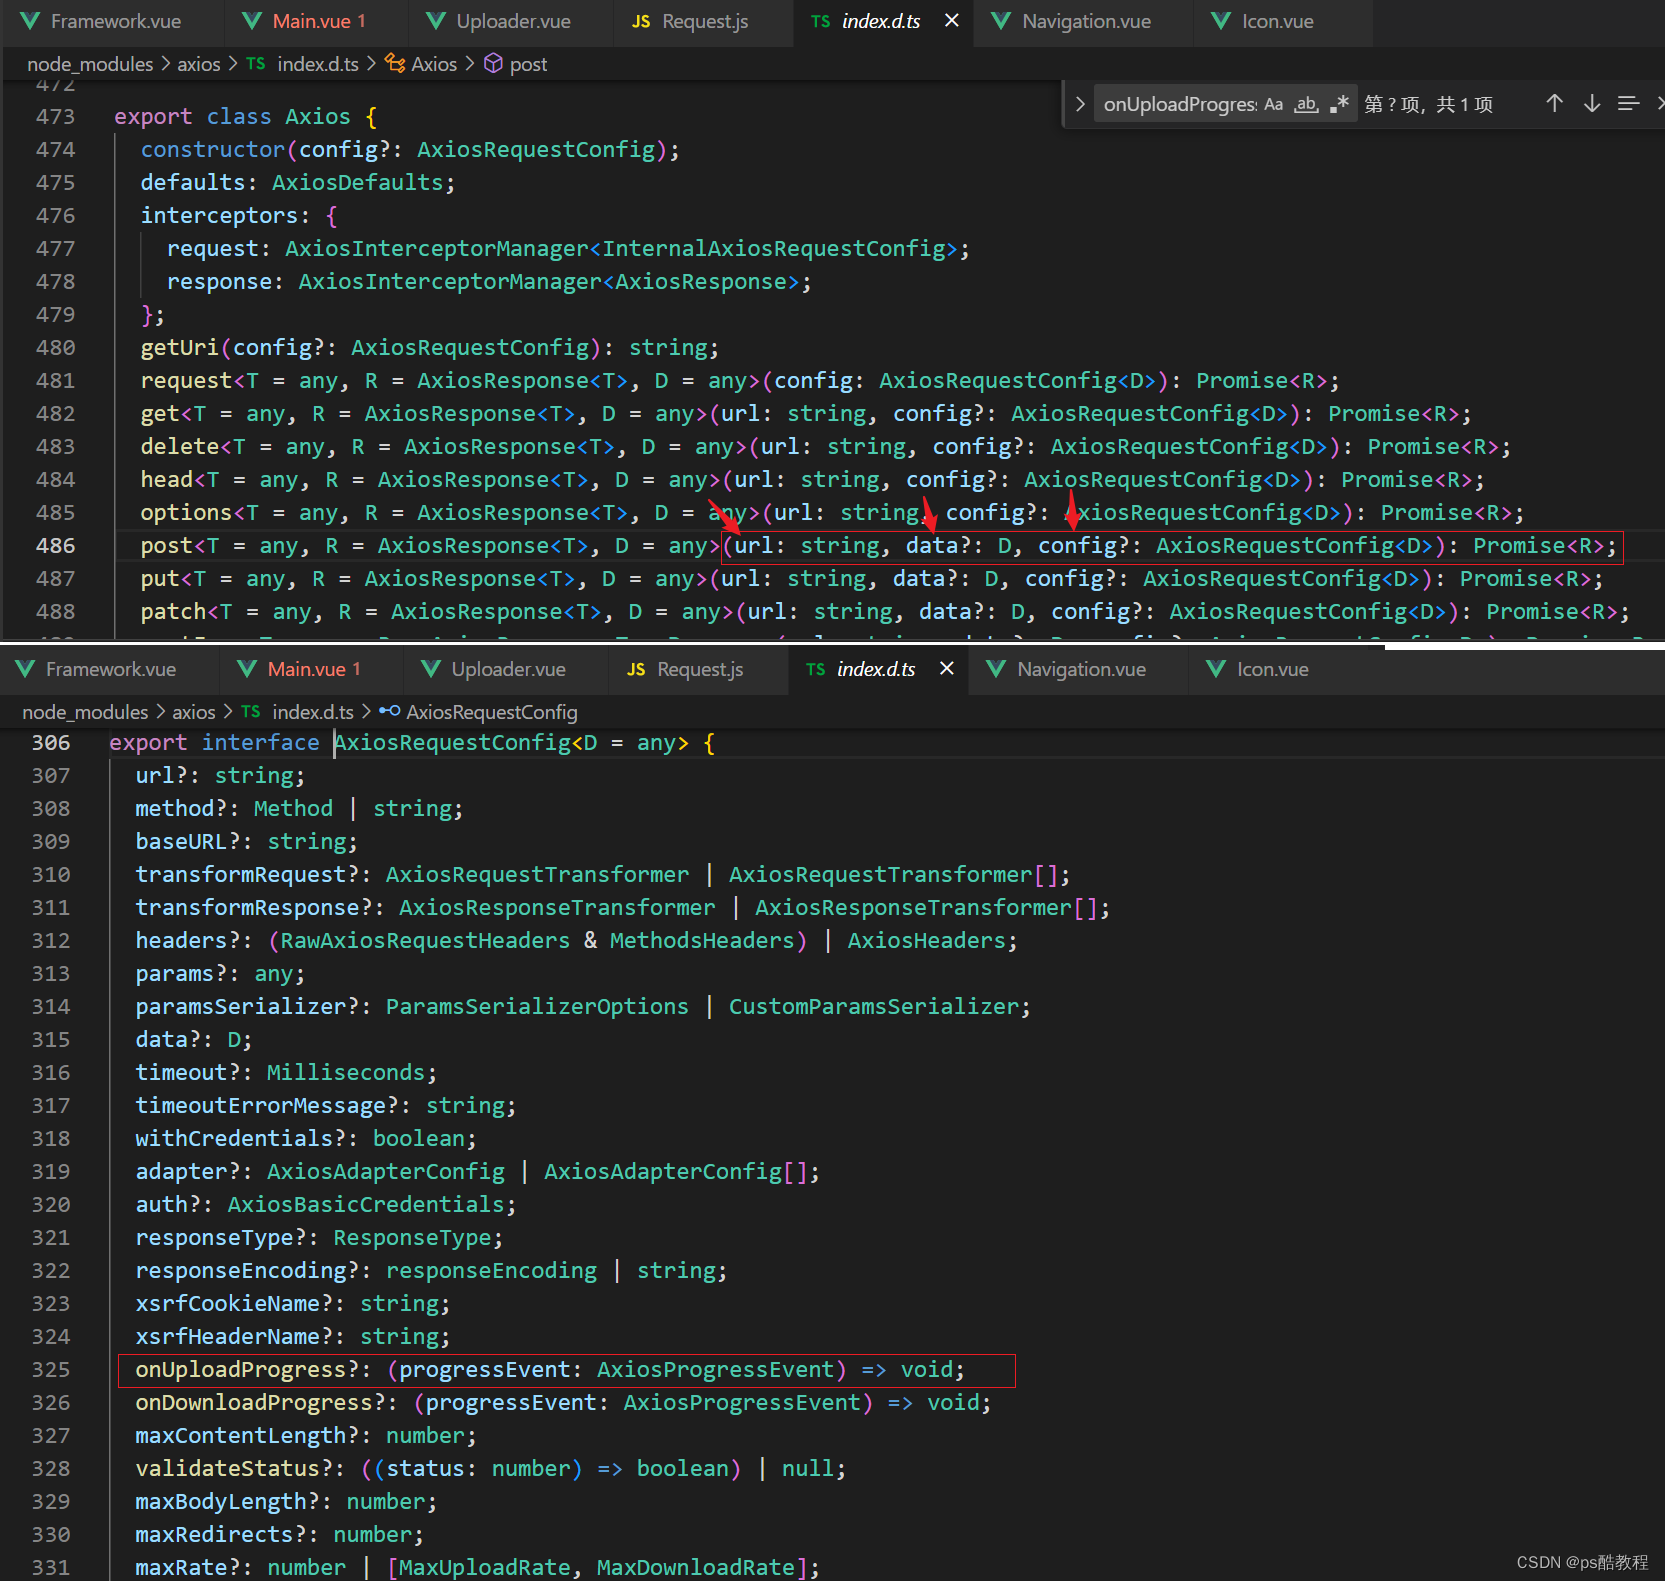
axios的post的配置详解(onUploadProgress)
import axios from 'axios'

import { ElLoading } from 'element-plus'
import router from '@/router'

import Message from '../utils/Message'

const contentTypeForm = 'application/x-www-form-urlencoded;charset=UTF-8'
const contentTypeJson = 'application/json'
//arraybuffer	ArrayBuffer对象
//blob	Blob对象
//document	Documnet对象
//json	JavaScript object, parsed from a JSON string returned by the server
//text	DOMString
const responseTypeJson = "json"

let loading = null;
const instance = axios.create({
    baseURL: '/api',
    timeout: -1,
});
//请求前拦截器
instance.interceptors.request.use(
    (config) => {
        if (config.showLoading) {
            loading = ElLoading.service({
                lock: true,
                text: '加载中......',
                background: 'rgba(0, 0, 0, 0.0)',
            });
        }
        return config;
    },
    (error) => {
        if (config.showLoading && loading) {
            loading.close();
        }
        Message.error("请求发送失败");
        return Promise.reject("请求发送失败");
    }
);
//请求后拦截器
instance.interceptors.response.use(
    (response) => {
        // 这里的response.config是什么? todo, 感觉应该就是axios发起请求前传入的配置对象
        const { showLoading, errorCallback, showError = true, responseType } = response.config;
        if (showLoading && loading) {
            loading.close()
        }
        const responseData = response.data;
        // 获取到响应类型是response.config.responseType todo
        if (responseType == "arraybuffer" || responseType == "blob") {
            return responseData;
        }
        //正常请求
        if (responseData.code == 200) {
            return responseData;
        } else if (responseData.code == 901) {
            //登录超时
            // 登录超时跳转到登录前, 对当前路径进行uri编码, 记录此路径到url上
            router.push("/login?redirectUrl=" + encodeURI(router.currentRoute.value.path));
            return Promise.reject({ showError: false, msg: "登录超时" });
        } else {
            //其他错误
            if (errorCallback) {
                errorCallback(responseData.info);
            }
            return Promise.reject({ showError: showError, msg: responseData.info });
        }
    },
    (error) => {
        // error里面也可以拿到config吗? todo
        if (error.config.showLoading && loading) {
            loading.close();
        }
        return Promise.reject({ showError: true, msg: "网络异常" })
    }
);

const request = (config) => {
    const { url, params, dataType, showLoading = true, responseType = responseTypeJson } = config;
    let contentType = contentTypeForm;
    let formData = new FormData();// 创建form对象
    for (let key in params) {
    	// 如果params[key]是undefined, 仍然能够遍历到这个key
        formData.append(key, params[key] == undefined ? "" : params[key]);
    }
    if (dataType != null && dataType == 'json') {
        contentType = contentTypeJson;
    }
    let headers = {
        'Content-Type': contentType,
        'X-Requested-With': 'XMLHttpRequest',
    }

    return instance.post(url, formData, {
        onUploadProgress: (event) => {
            if (config.uploadProgressCallback) {
                config.uploadProgressCallback(event);
            }
        },
        responseType: responseType, // responsType是axios中已定义的配置选项
        headers: headers,
        showLoading: showLoading,
        errorCallback: config.errorCallback,
        showError: config.showError
    }).catch(error => {
        console.log(error);
        if (error.showError) {
            Message.error(error.msg);
        }
        return null;
    });
};

export default request;
热更新问题
路由中使用import导入的组件所写的路径一定要注意大小写,否则热更新会没用,见:vue3+vite热更新失效问题
vue3动态组件
vue3动态组件的is不能写字符串,要直接写组件的引用
vuex4命名空间
二级菜单界面控制
defineExpose暴露组件的方法
图片url加随机数,防止浏览器缓存
Table封装,slot相关
Table.vue
<template>
  <div>
    <el-table
      ref="dataTable"
      :data="dataSource.list || []"
      :height="tableHeight"
      :stripe="options.stripe"
      :border="options.border"
      header-row-class-name="table-header-row"
      highlight-current-row
      @row-click="handleRowClick"
      @selection-change="handleSelectionChange"
    >
      <!--selection选择框-->
      <el-table-column
        v-if="options.selectType && options.selectType == 'checkbox'"
        type="selection"
        width="50"
        align="center"
      ></el-table-column>
      <!--序号-->
      <el-table-column
        v-if="options.showIndex"
        label="序号"
        type="index"
        width="60"
        align="center"
      ></el-table-column>
      <!--数据列-->
      <template v-for="(column, index) in columns">
        <template v-if="column.scopedSlots">
          <el-table-column
            :key="index"
            :prop="column.prop"
            :label="column.label"
            :align="column.align || 'left'"
            :width="column.width"
          >
            <template #default="scope">
              <slot
                :name="column.scopedSlots"
                :index="scope.$index"
                :row="scope.row"
              >
              </slot>
            </template>
          </el-table-column>
        </template>
        <template v-else>
          <el-table-column
            :key="index"
            :prop="column.prop"
            :label="column.label"
            :align="column.align || 'left'"
            :width="column.width"
            :fixed="column.fixed"
          >
          </el-table-column>
        </template>
      </template>
    </el-table>
    <!-- 分页 -->
    <div class="pagination" v-if="showPagination">
      <el-pagination
        v-if="dataSource.totalCount"
        background
        :total="dataSource.totalCount"
        :page-sizes="[15, 30, 50, 100]"
        :page-size="dataSource.pageSize"
        :current-page.sync="dataSource.pageNo"
        :layout="layout"
        @size-change="handlePageSizeChange"
        @current-change="handlePageNoChange"
        style="text-align: right"
      ></el-pagination>
    </div>
  </div>
</template>
<script setup>
import { ref, computed } from "vue";

const emit = defineEmits(["rowSelected", "rowClick"]);
const props = defineProps({
  dataSource: Object,
  showPagination: {
    type: Boolean,
    default: true,
  },
  showPageSize: {
    type: Boolean,
    default: true,
  },
  options: {
    type: Object,
    default: {
      extHeight: 0,
      showIndex: false,
    },
  },
  columns: Array,
  fetch: Function, // 获取数据的函数
  initFetch: {
    type: Boolean,
    default: true,
  },
});

const layout = computed(() => {
  return `total, ${
    props.showPageSize ? "sizes" : ""
  }, prev, pager, next, jumper`;
});
//顶部 60 , 内容区域距离顶部 20, 内容上下内间距 15*2  分页区域高度 46
const topHeight = 60 + 20 + 30 + 46;

const tableHeight = ref(
  props.options.tableHeight
    ? props.options.tableHeight
    : window.innerHeight - topHeight - props.options.extHeight
);

//初始化
const init = () => {
  if (props.initFetch && props.fetch) {
    props.fetch();
  }
};
init();

const dataTable = ref();
//清除选中
const clearSelection = () => {
  dataTable.value.clearSelection();
};

//设置行选中
const setCurrentRow = (rowKey, rowValue) => {
  let row = props.dataSource.list.find((item) => {
    return item[rowKey] === rowValue;
  });
  dataTable.value.setCurrentRow(row);
};
//将子组件暴露出去,否则父组件无法调用
defineExpose({ setCurrentRow, clearSelection });

//行点击
const handleRowClick = (row) => {
  emit("rowClick", row);
};

//多选
const handleSelectionChange = (row) => {
  emit("rowSelected", row);
};

//切换每页大小
const handlePageSizeChange = (size) => {
  props.dataSource.pageSize = size;
  props.dataSource.pageNo = 1;
  props.fetch();
};
// 切换页码
const handlePageNoChange = (pageNo) => {
  props.dataSource.pageNo = pageNo;
  props.fetch();
};
</script>
<style lang="scss" scoped>
.pagination {
  padding-top: 10px;
  padding-right: 10px;
}
.el-pagination {
  justify-content: right;
}

:deep .el-table__cell {
  padding: 4px 0px;
}
</style>
FileList.vue
<div class="file-list">
   <Table
     :columns="columns"
     :showPagination="true"
     :dataSource="tableData"
     :fetch="loadDataList"
     :initFetch="false"
     :options="tableOptions"
     @rowSelected="rowSelected"
   >
     <template #fileName="{ index, row }">
       <div
         class="file-item"
         @mouseenter="showOp(row)"
         @mouseleave="cancelShowOp(row)"
       >
         <template
           v-if="(row.fileType == 3 || row.fileType == 1) && row.status == 2"
         >
           <icon :cover="row.fileCover" :width="32"></icon>
         </template>
         <template v-else>
           <icon v-if="row.folderType == 0" :fileType="row.fileType"></icon>
           <icon v-if="row.folderType == 1" :fileType="0"></icon>
         </template>
         <span class="file-name" v-if="!row.showEdit" :title="row.fileName">
           <span @click="preview(row)">{{ row.fileName }}</span>
           <span v-if="row.status == 0" class="transfer-status">转码中</span>
           <span v-if="row.status == 1" class="transfer-status transfer-fail"
             >转码失败</span
           >
         </span>
         <div class="edit-panel" v-if="row.showEdit">
           <el-input
             v-model.trim="row.fileNameReal"
             :maxLength="190"
             @keyup.enter="saveNameEdit(index)"
           >
             <template #suffix>{{ row.fileSuffix }}</template>
           </el-input>
           <span
             :class="[
               'iconfont icon-right1',
               row.fileNameReal ? '' : 'not-allow',
             ]"
             @click="saveNameEdit(index)"
           ></span>
           <span
             class="iconfont icon-error"
             @click="cancelNameEdit(index)"
           ></span>
         </div>
         <span class="op">
           <template v-if="row.showOp && row.fileId">
             <span
               class="iconfont icon-download"
               @click="download(row)"
               v-if="row.folderType == 0"
               >下载</span
             >
             <span class="iconfont icon-del" @click="delFile(row)"
               >删除</span
             >
           </template>
         </span>
       </div>
     </template>
     <template #fileSize="{ index, row }">
       <span v-if="row.fileSize">
         {{ proxy.Utils.sizeToStr(row.fileSize) }}</span
       >
     </template>
   </Table>
</div>
vue3样式穿透
:deep .docx-wrapper > section.docx {
	margin-bottom: 0px;
}
prop单向数据流
父组件传给子组件的属性,子组件不能直接改这个传过来的属性,但是如果这个属性值是个对象,是可以在子组件间中直接改这个对象中的属性的,这并不违背prop单向数据流
ref引用组件或dom 与 v-if/show
- v-if:当flag为true的时候,divRef是有值的;当flag为false的时候,divRef是undefined/null(刚开始是undefined,后面就是null了)
- v-show:divRef都有值
<template>

    <div class="main">
        Main
        <el-button @click="flag = !flag">切换flag - {{ flag }}</el-button>
        <el-button @click="logRef">获取divRef</el-button>
        <div v-if="flag" ref="divRef">测试divRef</div>
    </div>

</template>

<script setup>

    import { ref,reactive } from 'vue'

    let flag = ref(false)

    const divRef = ref()

    function logRef () {
        console.log(divRef.value);
    }
</script>

<style lang="scss">

</style>
@mouseenter & @mouseleave监听鼠标移入移出事件
el-table和el-input在一起,获取焦点方法失效问题
发现不能使用v-show,而是要使用v-if,猜测:我觉得应该是使用v-show的话,使用editNameRef就会引用到多个组件,而vue3中引入多个组件的用法在此中的源码的写法本身就不对,因此拿不到对应的组件,而使用v-if的话,就只有一个组件,因此能拿到唯一的组件,因此就能调用focus方法了
js对象的key可以是数字(同数字字符串)
let mm = {1:'a'}
console.log(mm[1]) // a
console.log(mm['1']) // a
defineExpose暴露组件的方法
在vue3中,子组件通过defineExpose将当前组件自身的方法暴露出去,父组件才能访问的到子组件中的方法,才能调用此组件实例身上的方法。
replaceAll
字符串的replaceAll方法在一些低版本的浏览器中使用不了,可以使用replace(/_\./,'','.')来替换
Icon.vue
- js对象的key可以是数字(同数字字符串)
- 可通过
new URL('/src/assets/icon-image/${icon}.png', import.meta.url).href动态引入本地图片
<template>
  <span :style="{ width: width + 'px', height: width + 'px' }" class="icon">
    <img :src="getImage()" :style="{ 'object-fit': fit }" />
  </span>
</template>

<script setup>
import { ref, reactive, getCurrentInstance } from "vue";
const { proxy } = getCurrentInstance();

const props = defineProps({
  fileType: {
    type: Number,
  },
  iconName: {
    type: String,
  },
  cover: {
    type: String,
  },
  width: {
    type: Number,
    default: 32,
  },
  fit: {
    type: String,
    default: "cover",
  },
});

const fileTypeMap = {
  0: { desc: "目录", icon: "folder" },
  1: { desc: "视频", icon: "video" },
  2: { desc: "音频", icon: "music" },
  3: { desc: "图片", icon: "image" },
  4: { desc: "exe", icon: "pdf" },
  5: { desc: "doc", icon: "word" },
  6: { desc: "excel", icon: "excel" },
  7: { desc: "纯文本", icon: "txt" },
  8: { desc: "程序", icon: "code" },
  9: { desc: "压缩包", icon: "zip" },
  10: { desc: "其他文件", icon: "others" },
};

const getImage = () => {
  if (props.cover) {
    return proxy.globalInfo.imageUrl + props.cover;
  }
  let icon = "unknow_icon";
  if (props.iconName) {
    icon = props.iconName;
  } else {
    console.log(props.fileType);
    const iconMap = fileTypeMap[props.fileType];
    if (iconMap != undefined) {
      icon = iconMap["icon"];
    }
  }
  return new URL(`/src/assets/icon-image/${icon}.png`, import.meta.url).href;
};
</script>

<style lang="scss" scoped>
.icon {
  text-align: center;
  display: inline-block;
  border-radius: 3px;
  overflow: hidden;
  img {
    width: 100%;
    height: 100%;
  }
}
</style>
网盘页面布局
- 一个是Framework.vue中的路由菜单配置数据(需要配合router中的配置),来构建左侧的菜单
- 右侧内容区的布局,可以根据浏览器的高度自动的对内容区的高度进行调整,并且表格出现滚动条,而不至于整个右侧高度过高时而整体上下滚动

Framework.vue
<template>
<div class="framework">
<div class="framework-head">
<div class="framework-head-left">
<div class="logo">
<i class="iconfont icon-qiyeyunpan"></i>
<span>Easy云盘</span>
</div>
</div>
<div class="framework-head-right">
<el-popover placement="bottom" trigger="click">
<template #reference>
<i class="iconfont icon-chuanshu"></i>
</template>
</el-popover>
<el-dropdown @command="handleCommand">
<div class="user-info" style="display: flex;">
<img class="avatar" :src="'http://127.0.0.1:1025/api/getAvatar/3178033358?1687423291411'" alt="">
<span>测试账号</span>
</div>
<template #dropdown>
<el-dropdown-menu>
<el-dropdown-item command="updateAvatar">修改头像</el-dropdown-item>
<el-dropdown-item command="updatePwd">修改密码</el-dropdown-item>
<el-dropdown-item command="logout" divided>退出</el-dropdown-item>
</el-dropdown-menu>
</template>
</el-dropdown>
</div>
</div>
<div class="framework-body">
<div class="menu-box">
<div class="menu-list">
<div :class="['menu-list-item',{'active':menu.menuCode == currMenu.menuCode}]" @click="switchMenu(menu)" v-for="menu,idx in menus" :key="idx">
<i :class="['iconfont',`icon-${menu.menuIcon}`]"></i>
<span>{{ menu.menuName }}</span>
</div>
</div>
<div class="submenu-list">
<div class="submenu-list-items">
<div :class="['submenu-list-item',{active:currRoutePath == subMenu.path}]"
@click="router.push(subMenu.path)"
v-for="subMenu,idx in currMenu.children" :key="idx">
<i :class="['iconfont',`icon-${subMenu.subMenuIcon}`] "></i>
<span>{{ subMenu.subMenuName }}</span>
</div>
</div>
<div class="space-info">
<div>空间使用</div>
<el-progress :stroke-width="8" :percentage="70" />
</div>
</div>
</div>
<div class="content-box">
<router-view v-slot:="{Component,route}">
<component ref="routerViewRef" :is="Component" :key="route.path"/>
</router-view>
</div>
</div>
<!-- 修改头像 -->
<Dialog v-model="updateAvatarDialogShow" @doConfirm="updateAvatar">
<el-form label-width="80px">
<el-form-item label="头像:">
<avatar-upload ref="avatarUploadRef" :avatarUrl="avatarUrl" />
</el-form-item>
</el-form>
</Dialog>
<!-- 修改密码 -->
<Dialog v-model="updatePwdDialogShow" :width="400" @doConfirm="updatePwd">
<el-form :model="pwdFormData" :rules="pwdFormRules" ref="pwdFormRef" label-width="80px">
<el-form-item prop="password" label="密码">
<el-input v-model="pwdFormData.password" placeholder="请输入密码">
<template #prefix>
<i class="iconfont icon-mima"></i>
</template>
</el-input>
</el-form-item>
<el-form-item prop="rePassword" label="确认密码">
<el-input v-model="pwdFormData.rePassword" placeholder="请再次输入密码哦">
<template #prefix>
<i class="iconfont icon-mima"></i>
</template>
</el-input>
</el-form-item>
</el-form>
</Dialog>
</div>
</template>
<script setup>
import axios from 'axios'
import { ref, reactive, getCurrentInstance, nextTick, watch, provide } from 'vue'
import { useRoute, useRouter } from 'vue-router'
import AvatarUpload from '@/components/AvatarUpload.vue'
import { updatePwd as updatePwdApi } from '@/api/userApi'
const { proxy } = getCurrentInstance()
const router = useRouter()
const route = useRoute()
const updateAvatarDialogShow = ref(false)
const pwdFormRef = ref(null)
const routerViewRef = ref()
const triggerJJ = () => {
window.routerViewRef = routerViewRef
console.log(routerViewRef.value);
}
const handleCommand = (command) => {
// console.log(command);
if (command == 'updateAvatar') {
updateAvatarDialogShow.value = true
nextTick(() => {
avatarUploadRef.value.resetFile()
avatarUrl.value = 'http://127.0.0.1:1025/api/getAvatar/' + userInfo.value.userId + "?t=" + new Date().getTime()
})
} else if (command == 'updatePwd') {
updatePwdDialogShow.value = true
nextTick(() => {
pwdFormRef.value.resetFields()
})
}
}
const userInfo = ref(proxy.VueCookies.get('userInfo'))
let avatarUrl = ref('http://127.0.0.1:1025/api/getAvatar/' + userInfo.value.userId + "?t=" + new Date().getTime())
const avatarUploadRef = ref(null)
function updateAvatar() {
if (avatarUploadRef.value.localAvatarFile) {
let fd = new FormData()
fd.append('avatar', avatarUploadRef.value.localAvatarFile)
axios({
url: 'http://127.0.0.1:1025/api/updateUserAvatar',
method: 'POST',
data: fd,
withCredentials: true,
}).then(res => {
if (res.data.code == 200) {
proxy.Messager.ok('修改头像成功')
updateAvatarDialogShow.value = false
return
}
if (res.data.code = 901) {
router.push('/login')
proxy.Messager.error('请重新登录')
return
}
})
} else {
proxy.Messager.warn('您尚未选择新的图片')
}
}
const updatePwdDialogShow = ref(false)
const pwdFormData = ref({
password: '',
rePassword: '',
})
const pwdFormRules = {
password: [
{ required: true, message: '密码不能为空', trigger: 'blur' },
{
validator: (rule, value, callback) => {
if (!/\w{3,}/.test(value)) {
callback(new Error('密码至少不少于3个字符吧'))
} else {
callback()
}
}, trigger: 'blur'
}
],
rePassword: [
{ required: true, message: '确认密码不能为空', trigger: 'blur' },
{
validator: (rule, value, callback) => {
if (value != pwdFormData.value.password) {
callback(new Error('两次输入密码不一致'))
} else {
callback()
}
}, trigger: 'blur'
}
]
}
const updatePwd = () => {
// console.log('更新密码');
pwdFormRef.value.validate(valid => {
if (!valid) {
proxy.Messager.error('未按要求填写')
return
}
updatePwdApi(pwdFormData.value).then(res => {
proxy.Messager.ok('密码修改成功')
updatePwdDialogShow.value = false
})
})
}
// 菜单数据
const menus = [
{
menuName:'首页',
menuIcon:'shouye',
menuCode:'main',
path:'/main/all',
children: [
{
subMenuName:'全部',
subMenuIcon: 'quanbu',
path:'/main/all',
},
{
subMenuName:'视频',
subMenuIcon: 'shipin',
path:'/main/video',
},
{
subMenuName:'音频',
subMenuIcon: 'yinpin',
path:'/main/audio',
},
{
subMenuName:'图片',
subMenuIcon: 'tupian',
path:'/main/photo',
},
{
subMenuName:'文档',
subMenuIcon: 'wendang',
path:'/main/doc'
},
{
subMenuName:'其它',
subMenuIcon: 'qita',
path:'/main/other'
}
]
},
{
menuName:'分享',
menuIcon:'fenxiang',
menuCode:'share',
path:'/share',
children: [
{
subMenuName:'分享记录',
path:'/share'
}
]
},
{
menuName:'回收站',
menuIcon:'huishouzhan',
menuCode:'recycler',
path:'/recycler',
children: [
{
subMenuName:'删除的文件',
path:'/recycler'
}
]
},
{
menuName:'设置',
menuIcon:'shezhi',
menuCode:'setting',
path:'/setting/file',
children: [
{
subMenuName:'用户文件',
path:'/setting/file'
},
{
subMenuName:'用户管理',
path:'/setting/user'
},
{
subMenuName:'系统设置',
path:'/setting/sys'
}
]
}
]
const currMenu = ref(menus[0])
const currRoutePath = ref('')
const switchMenu = (menu)=>{
currMenu.value = menu
router.push(menu.path)
}
watch(()=>route,(newVal,oldVal)=>{
// console.log(newVal.meta.menuCode);
let menu = menus.find(menu=>menu.menuCode == newVal.meta.menuCode)
currMenu.value = menu
currRoutePath.value = newVal.path
},{deep:true,immediate:true})
provide('testFun',()=>{
console.log('framework testFun()..');
})
</script>
<style lang="scss">
.framework {
height: 100%;
position: relative;
.framework-head {
line-height: 60px;
height: 60px;
padding: 0 10px;
box-shadow: 0 3px 5px 0 rgba(0, 0, 0, .08);
z-index: 999;
position: absolute;
top: 0;
width: 100%;
display: flex;
justify-content: space-between;
background-color: #fff;
.logo {
font-size: 20px;
font-weight: bold;
color: #05a1f5;
i.iconfont {
font-size: 30px;
}
}
.framework-head-right {
display: flex;
.icon-chuanshu {
margin: 10px;
padding: 0 10px;
line-height: 40px;
font-weight: bold;
color: #05a1f5;
font-size: 20px;
cursor: pointer;
&:hover {
background-color: #eee;
border-radius: 50%;
}
}
.user-info {
display: flex;
align-items: center;
margin: 0 40px 0 0px;
outline: none;
cursor: pointer;
.avatar {
width: 40px;
height: 40px;
border-radius: 50%;
object-fit: cover;
margin-right: 5px;
}
}
}
}
.framework-body {
position: absolute;
overflow-y: auto;
top: 60px;
left: 0;
right: 0;
bottom: 0;
background-color: #ccc;
display: flex;
.menu-box {
width: 300px;
background: #fff;
display: flex;
overflow-y: auto;
border-right: 1px solid #f2f3f5;
.menu-list {
width: 80px;
background-color: #fff;
padding: 5px;
border-right: 1px solid #e6e6e6;
box-shadow: 2px 0px 2px 0 rgba(0, 0, 0, .036);
overflow-y: auto;
.menu-list-item {
display: flex;
flex-direction: column;
align-items: center;
color: #636d7e;
&.active {
color: #06a7ff;
}
padding: 5px;
border-radius: 5px;
margin-bottom: 5px;
cursor: pointer;
&>.iconfont {
font-size: 36px;
margin-bottom: -8px;
}
span {
font-weight: bold;
}
line-height: 1.3;
&:hover {
background-color: #eee;
}
}
}
.submenu-list {
flex-grow: 1;
padding: 10px 10px 20px 10px;
overflow-y: auto;
display: flex;
flex-direction: column;
justify-content: space-between;
// background-color: pink;
.submenu-list-item {
line-height: 40px;
text-align: center;
border-radius: 4px;
justify-content: center;
color: #636d7e;
margin-bottom: 5px;
cursor: pointer;
&:hover {
background: #eef9fe;
}
&.active {
color: #05a1f5;
background: #eef9fe;
}
&>i {
font-size: 18px;
margin-right: 5px;
}
}
}
}
.content-box {
flex: 1;
width: 0;
background-color: #fff;
padding: 15px;
}
}
}</style>
新建目录,输入框聚焦问题
问题描述:网盘项目那个创建文件夹发现个bug,当 当前目录下没有任何文件或目录时,此时新建目录会无法聚焦
问题可以如下代码所示解决,但是有2个问题没搞明白,记录下:
- 使用v-if的情况下,为什么使用setTimeout就可以解决这个问题,而nextTick却不行?
- 使用v-show的情况下,为什么使用nextTick就可以解决这个问题?
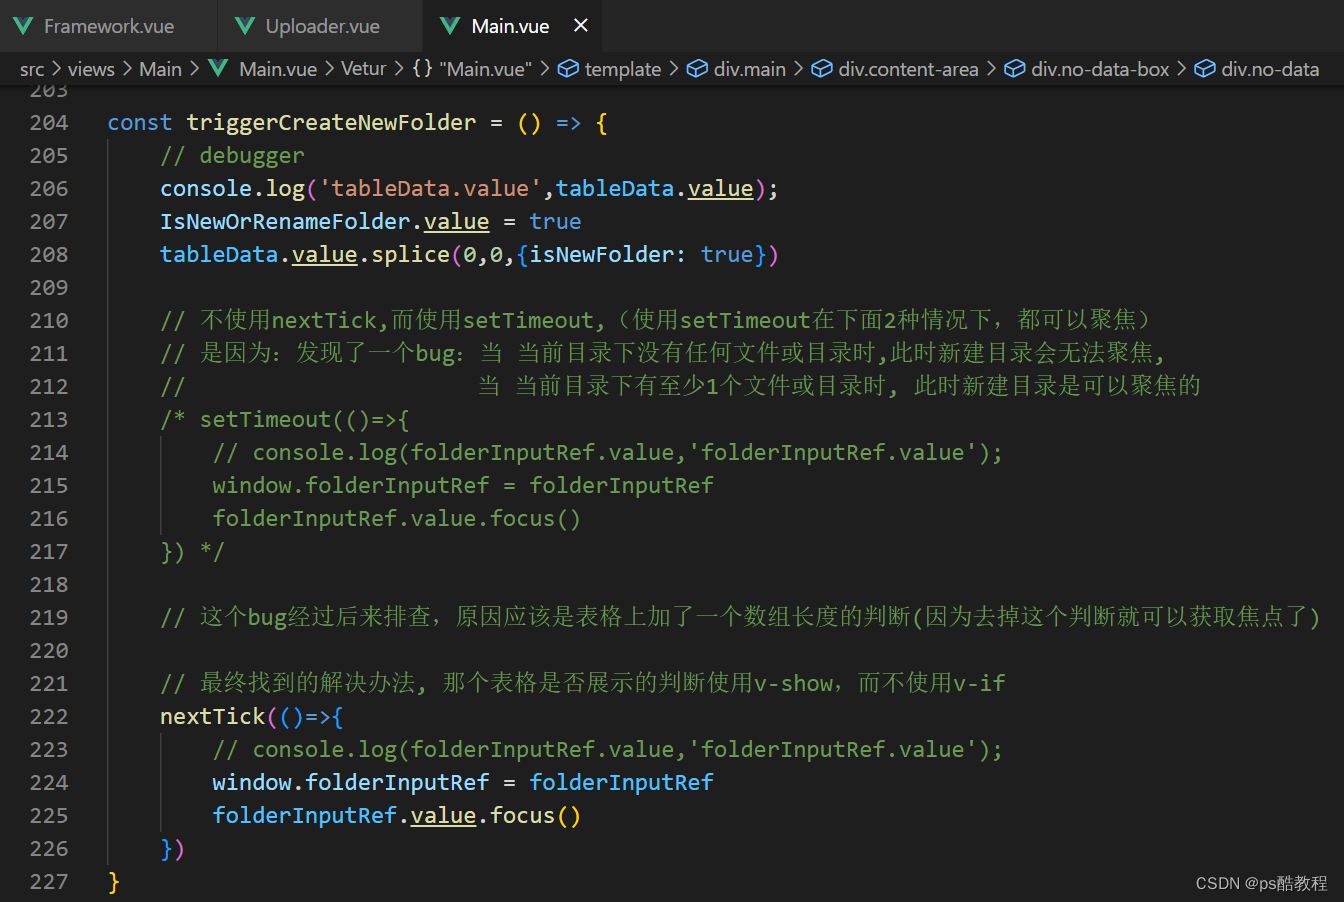
代码如下(没有聚焦问题的代码-聚焦问题已解决)
<template>
<div class="content-area">
            <div class="table-area" v-show="tableData.length > 0">
                <el-table
                    @selection-change="handleSelectionChange"
                    v-loading="tableLoading"
                    :data="tableData"
                    class="el-table">

                    <!-- 多选框 -->
                    <el-table-column type="selection" width="55" />

                    <el-table-column label="文件名">
                        <template #default="{ row }">
                            <div class="file-name" >

                                <!-- 已有的表格行数据展示 -->
                                <div class="file-icon-name ptr" v-if="!row.isNewFolder">
                                    <Icon :fileType="row.folderType == 1 ? -1 : row.fileType"
                                        style="margin-right: 6px;flex-shrink: 0;"></Icon>
                                    <span v-if="!row.isEditing" @click="preview(row)"> {{ row.fileName }} </span>
                                    <div v-else style="display: flex; flex: 1;">

                                        <el-input v-model="currEditingName" ref="currEditingIptRef" style="margin-right: 10px;">
                                            <template v-if="row.folderType == '0'" #suffix>
                                                <span>{{ row.fileName.substring(row.fileName.lastIndexOf(".")) }}</span>
                                            </template>
                                        </el-input>
                                        <el-button type="primary" @click="confirmFolderName(row)">
                                            <!-- 确定 -->
                                            <i class="iconfont icon-dui" style="font-weight: bold;"></i>
                                        </el-button>
                                        <el-button type="primary" @click="cancelCreateNewFolder(row)">
                                            <!-- 取消 -->
                                            <i class="iconfont icon-cuo" style="font-weight: bold;"></i>
                                        </el-button>
                                    </div>

                                </div>

                                <!-- 新建目录数据 -->
                                <div class="new-folder-name" v-if="row.isNewFolder">
                                    <el-input ref="folderInputRef" v-model="newFolderName" class="folder-name" placeholder="请输入文件夹名"/>
                                    <el-button type="primary" @click="confirmFolderName(row)">
                                        <i class="iconfont icon-dui" style="font-weight: bold;"></i>
                                    </el-button>
                                    <el-button type="primary" @click="cancelCreateNewFolder(row)">
                                        <i class="iconfont icon-cuo" style="font-weight: bold;"></i>
                                    </el-button>
                                </div>

                                <!-- 对文件/目录 的操作选项 -->
                                <div class="file-op">
                                    <div v-if="!row.isNewFolder">
                                        <span><i class="iconfont icon-fenxiang"></i>分享</span>
                                        <span><i class="iconfont icon-xiazai"></i>下载</span>
                                        <span @click="delFile(row)"><i class="iconfont icon-shanchu"></i>删除</span>
                                        <span @click="rename(row)"><i class="iconfont icon-chongmingming"></i>重命名</span>
                                        <span><i class="iconfont icon-move"></i>移动</span>
                                    </div>
                                </div>

                            </div>
                        </template>
                    </el-table-column>
                    <el-table-column prop="lastUpdateTime" label="修改时间" width="180" align="center" />
                    <el-table-column label="大小" width="180" align="center">
                        <template #default="{ row }">
                            <span v-if="row.folderType != 1">
                                {{ proxy.Utils.formatSize(row.fileSize) }}
                            </span>
                        </template>
                    </el-table-column>
                </el-table>
                <Pager @currPageChange="changeCurrPage" :page-options="pageOptions" />
            </div>

            <div class="no-data-box"  v-show="tableData.length == 0">
                <div class="no-data">
                    <p>当前目录为空,上传你的第一个文件吧</p>
                    <div class="img">
                        <div class="img-box">
                            <img src="@/assets/imgs/iconImgs/file.png">
                            <span>上传文件</span>
                        </div>
                        <div class="img-box" v-if="route.params.kind == 'all'">
                            <img src="@/assets/imgs/iconImgs/folder.png">
                            <span @click="createNewFolder" class="ptr">新建目录</span>
                        </div>
                    </div>
                </div>
            </div>

        </div>
</template>

<script>

const triggerCreateNewFolder = () => {
    // debugger
    console.log('tableData.value',tableData.value);
    IsNewOrRenameFolder.value = true
    tableData.value.splice(0,0,{isNewFolder: true})

    // 不使用nextTick,而使用setTimeout,(使用setTimeout在下面2种情况下,都可以聚焦)
    // 是因为:发现了一个bug:当 当前目录下没有任何文件或目录时,此时新建目录会无法聚焦,
    //                      当 当前目录下有至少1个文件或目录时, 此时新建目录是可以聚焦的
    /* setTimeout(()=>{
        // console.log(folderInputRef.value,'folderInputRef.value');
        window.folderInputRef = folderInputRef
        folderInputRef.value.focus()
    }) */

    // 这个bug经过后来排查,原因应该是表格上加了一个数组长度的判断(因为去掉这个判断就可以获取焦点了)

    // 最终找到的解决办法, 那个表格是否展示的判断使用v-show,而不使用v-if
    nextTick(()=>{
        // console.log(folderInputRef.value,'folderInputRef.value');
        window.folderInputRef = folderInputRef
        folderInputRef.value.focus()
    })
}
</script>
el-popver 点击触发和使用方法触发
- 当点击按钮的时候,上传文件浮窗要显示,当再次点击按钮时,浮窗要关闭
- 浮窗处于显示状态时,点击其它空白区域,浮窗要关闭
- 可以通过js代码的方式主动的控制浮窗的显示(比如:上传文件时,就要主动的显示浮窗)
- 如果按照官方文档仅仅设置visible属性,但是不监听事件,那点击其它地方,这个弹框不会关闭,因此需要监听这个事件,当点击空白区域的时候,关闭此弹框
<template>
    <div class="main">


        <!-- 这里可以直接使用v-model:visible = popoverShow-->
        <!-- 经过测试, 发现:点击reference的触发按钮,
                                  当popover未显示的时候, 会触发update:visible事件(携带的参数是true, 仅触发了1次), 此时popover处于显示状态;
                                  当popover显示的时候,会触发update:visible事件(携带的参数是false, 并且触发了2次), 此时popover处于隐藏状态

                           点击下面的触发按钮,
                           		  当popover未显示的时候,未触发update:visible事件,此时popover会处于显示状态, 此时popover处于显示状态;
                           		  当popover显示的时候,会触发update:visible事件(携带的参数是false) ,并且触发了2次, 此时popover处于显示状态;
        -->
        <!-- 使用v-model:visible的目的就是为了能够手动控制弹框的显示与隐藏, 并且能够在点击其它空白区域的时候, 能够隐藏弹框 -->
        <el-popover :visible="popoverShow" @update:visible="updateVisible" placement="bottom"  trigger="click">
            <template #reference>
                <el-button>触发</el-button>
            </template>
            <template #default>
                halo~
            </template>
        </el-popover>

        <el-button @click="popoverShow = true">触发</el-button>
    </div>
</template>

<script setup>

    import { ref,reactive, nextTick, inject } from 'vue'

    const popoverShow = ref(false)

    function updateVisible(val) {
        console.log('updateVisible..',val);
        popoverShow.value = val
    }

</script>

<style lang="scss">

</style>
router/index.js
import { createWebHistory, createRouter } from 'vue-router'

const routes = [
    {
        name: '登录',
        path: '/login',
        component: () => import('@/views/login/Login.vue'),

    },
    {
        name: 'test',
        path: '/test',
        component: () => import('@/views/test/Test.vue'),

    },
    {
        name:'框架页',
        path:'/',
        component: () => import('@/views/Framework.vue'),
        redirect: '/main/all',
        children: [
            {
                name:'Main',
                path:'/main/:label',
                component: () => import('@/views/main/Main.vue'),
                meta: {
                    menuCode:'main',
                },
            },
            {
                name:'Share',
                path:'/share',
                component: () => import('@/views/share/Share.vue'),
                meta: {
                    menuCode:'share',
                },
            },
            {
                name:'Recycler',
                path:'/recycler',
                component: () => import('@/views/recycler/Recycler.vue'),
                meta: {
                    menuCode:'recycler',
                },
            },
            {
                name:'FileSetting',
                path:'/setting/file',
                component: () => import('@/views/setting/FileSetting.vue'),
                meta: {
                    menuCode:'setting',
                },
            },
            {
                name:'UserSetting',
                path:'/setting/user',
                component: () => import('@/views/setting/UserSetting.vue'),
                meta: {
                    menuCode:'setting',
                },
            },
            {
                name:'SysSetting',
                path:'/setting/sys',
                component: () => import('@/views/setting/SysSetting.vue'),
                meta: {
                    menuCode:'setting',
                },
            }
        ]
    }
]

const router = createRouter({
    routes,
    history: createWebHistory()
})

export default router
Main.vue
- 布局要点
- 使用flex布局,方向改为垂直(默认水平)
- 让内容区占满剩余高度,其它区域不允许压缩高度,并且内容区overflow:auto(目的是为了不超出父容器),然后再设置el-table的高度为100%,这样当表格内容过多时,表格就可以自己产生滚动条
<template>

    <div class="main">
        <div class="opt-area">
            <div class="opt-left">
                <el-button type="primary"><i class="iconfont icon-shangchuan mr5"></i> 上传</el-button>
                <el-button type="danger"><i class="iconfont icon-shanchu mr5"></i> 批量删除</el-button>
                <el-button type="warning"><i class="iconfont icon-move mr5"></i> 批量移动</el-button>
                <el-input placeholder="请输入文件名" style="width:260px;margin-left:12px;" clearable>
                    <template #suffix>
                        <i class="iconfont icon-sousuo" style="cursor: pointer;"></i>
                    </template>
                </el-input>
                <span class="iconfont icon-shuaxin" style="margin-left:12px;cursor: pointer;color: #656e7f;"></span>
            </div>
        </div>

        <div class="navigation-area">
            <Navigation/>
        </div>

        <div class="content-area">
            <el-table :data="tableData" stripe style="height: 100%;">
                <el-table-column prop="date" label="Date" width="180" />
                <el-table-column prop="name" label="Name" width="180" />
                <el-table-column prop="address" label="Address" />
            </el-table>
        </div>
    </div>

</template>

<script setup>

    import { ref,reactive, nextTick } from 'vue'
    import { loadDataListApi } from '@/api/mainApi.js'
    import Navigation from '@/components/Navigation.vue'
    const tableData = [
  {
    date: '2016-05-03',
    name: 'Tom',
    address: 'No. 189, Grove St, Los Angeles',
  },
  {
    date: '2016-05-02',
    name: 'Tom',
    address: 'No. 189, Grove St, Los Angeles',
  },
  {
    date: '2016-05-04',
    name: 'Tom',
    address: 'No. 189, Grove St, Los Angeles',
  },
  {
    date: '2016-05-01',
    name: 'Tom',
    address: 'No. 189, Grove St, Los Angeles',
  },{
    date: '2016-05-03',
    name: 'Tom',
    address: 'No. 189, Grove St, Los Angeles',
  },
  {
    date: '2016-05-02',
    name: 'Tom',
    address: 'No. 189, Grove St, Los Angeles',
  },
  {
    date: '2016-05-04',
    name: 'Tom',
    address: 'No. 189, Grove St, Los Angeles',
  },
  {
    date: '2016-05-01',
    name: 'Tom',
    address: 'No. 189, Grove St, Los Angeles',
  },
]

</script>

<style lang="scss">

    .main {
        height: 100%;
        display: flex;
        flex-direction: column;
    }

    .opt-area {
        display: flex;
        align-items: center;
        height: 40px;
        padding: 0 10px;
        flex-shrink: 0;
        background-color: #bfa;
        .opt-left {
            align-items: center;

        }
    }

    .navigation-area {
        height: 40px;
        background-color: pink;
        flex-shrink: 0;
        line-height: 40px;
        padding: 0 10px;
    }

    .content-area {
        background-color: #ccc;
        flex-grow: 1;
        overflow: auto;
        padding: 10px;
    }
</style>
文件上传各组件协作关系Framework组件-Uploader组件-Main组件
- Framework.vue是父组件,Uploader.vue是Framework.vue的直接子组件,Main.vue是路由子组件
- 协作过程:Main.vue组件(路由子组件)中负责选择文件,然后通过自定义事件的方式触发Framework.vue组件的addFile方法,并且把file这个blob传过来了,然后在Framework.vue组件中,主动的显示el-popver组件(el-popover的插槽中放入了Uploader.vue组件),最后调用这个Uploader.vue组件的上传方法(并且把file这个blob也传入进去),完成文件上传逻辑的转移。并且文件上传完成后,Uploader.vue组件也需要通过自定义事件的方式通知Framework.vue组件,然后Framework.vue再通过router-view的组件写法调用路由子组件中所暴露(使用defineExpose编译器宏)的方法去刷新文件列表
文件上传逻辑
计算文件的md5值,并展示当前计算的进度
SpringBoot+vue文件上传&下载&预览&大文件分片上传&文件上传进度
前 # 后端分别md5加密 - 章节
- FileReader#readXXX是异步读取文件的,等读取完了再调用FileReader绑定的onload函数(因此代码种是可以先使用FileReader去读取,然后再为FileReader绑定load事件)
- 递归调用loadNext方法,并且使用了闭包
- 计算md5,须调用spark.destroy()释放内存
const computeMD5 = (fileItem) => {

  let file = fileItem.file;

  let blobSlice =
    File.prototype.slice ||
    File.prototype.mozSlice ||
    File.prototype.webkitSlice;

  let chunks = Math.ceil(file.size / chunkSize);

  let currentChunk = 0;
  let spark = new SparkMD5.ArrayBuffer();
  let fileReader = new FileReader();
  let time = new Date().getTime();

  //file.cmd5 = true;

  let loadNext = () => {

    let start = currentChunk * chunkSize;
    let end = start + chunkSize >= file.size ? file.size : start + chunkSize;

    // 这个FileReader#readAsArrayBuffer读取方法肯定是异步的, 而下面为fileReader绑定onload事件是同步执行的
    fileReader.readAsArrayBuffer(blobSlice.call(file, start, end));
  };

  loadNext();
  return new Promise((resolve, reject) => {
    let resultFile = getFileByUid(file.uid);
    fileReader.onload = (e) => {
      spark.append(e.target.result); // Append array buffer
      currentChunk++;
      if (currentChunk < chunks) {
        /*  console.log(
          `第${file.name},${currentChunk}分片解析完成, 开始第${
            currentChunk + 1
          } / ${chunks}分片解析`
        ); */
        let percent = Math.floor((currentChunk / chunks) * 100);
        resultFile.md5Progress = percent;
        loadNext();
      } else {
        let md5 = spark.end();
        /*  console.log(
          `MD5计算完成:${file.name} \nMD5:${md5} \n分片:${chunks} 大小:${
            file.size
          } 用时:${new Date().getTime() - time} ms`
        ); */
        spark.destroy(); //释放缓存
        resultFile.md5Progress = 100;
        resultFile.status = STATUS.uploading.value;
        resultFile.md5 = md5;
        resolve(fileItem.uid);
      }
    };
    fileReader.onerror = () => {
      resultFile.md5Progress = -1;
      resultFile.status = STATUS.fail.value;
      resolve(fileItem.uid);
    };
  }).catch((error) => {
    return null;
  });
};
将原对象添加(多次)到数组(响应式数据)后,修改此原对象身上的属性对应的值,响应式数据如何变化
- 这个并非easypan中的代码,只是想测试下这种情况
- 代码如下所示,将原对象多次添加到数组之后,修改person的age,发现在此次添加之前所添加的响应式数据数组中的所有元素都给改了
<template>

    <div>

        <el-button @click="addPerson">addPerson</el-button>
        <el-button @click="getPerson">getPerson</el-button>
        <el-button @click="addAge">addAge</el-button>

        <div>
            <div v-for="p,index in personList" :key="index">
                {{ p.personName }} - {{ p.age }}
            </div>
        </div>

    </div>

</template>

<script setup>

    import { ref,reactive,watch } from 'vue'

    const personList = ref([])

    let person = {
        personName:'z',
        age:12
    }

    function getPerson() {
        console.log(person);
        return person;
    }
    function addAge() {
        person.age ++
        console.log(person.age);
    }

    function addPerson() {
    	// 实际上, 我们总是添加一个新的对象, 而不是像这里一样添加一个原来定义好的对象
        personList.value.push(person)
    }

    // 方便手动控制台调试,可忽略
    /* window.getPerson = getPerson
    window.addAge = addAge
    window.addPerson = addPerson */

</script>

<style lang="scss">

</style>
上传状态的变化
需要展示当前选中文件的上传状态
- 文件为空
- 上传失败
- 解析中(需要展示当前上传的文件已计算md5值的文件大小占文件占文件总大小的百分比,并将此百分比用作解析进度变化)
- 上传中(处于上传过程中时,需要展示当前文件上传已上传的大小站文件总大小的百分比,并将此百分比用作上传进度变化)
- 上传完成
- 秒传
const STATUS = {
  emptyfile: {
    value: "emptyfile",
    desc: "文件为空",
    color: "#F75000",
    icon: "close",
  },
  fail: {
    value: "fail",
    desc: "上传失败",
    color: "#F75000",
    icon: "close",
  },
  init: {
    value: "init",
    desc: "解析中",
    color: "#e6a23c",
    icon: "clock",
  },
  uploading: {
    value: "uploading",
    desc: "上传中",
    color: "#409eff",
    icon: "upload",
  },
  upload_finish: {
    value: "upload_finish",
    desc: "上传完成",
    color: "#67c23a",
    icon: "ok",
  },
  upload_seconds: {
    value: "upload_seconds",
    desc: "秒传",
    color: "#67c23a",
    icon: "ok",
  },
};
前端上传代码
- uid是el-upload组件附加再file对象上的属性
- 使用for循环依次上传(按照chunkIndex到chunkTotal的顺序)
- uploadProgressCallback是axios的上传回调函数,从这个回调函数的参数event中,可以拿到event.loaded属性获取已上传文件的大小(这个经过后面测试,发现不准,它会比上传的文件数据更大些,可能是除了文件的数据外,还包含其它的头信息之类的)
- 上传进度还是用
已上传分片数/总分片数来表示比较好 - 一定要拿
响应式数据中的对象作修改才可以生效(响应式数据fileList中的元素,而不是原来定义的fileInfo) - 在计算小数的时候(toFixed之后,要转成数字,小数使用parseFloat,整数使用parseInt)
- 文件在上传完成之后,需要刷新文件列表(通过emit触发自定义事件,然后Uploader.vue的父组件监听此事件,再调用Main.vue组件(路由子组件,router-view的组件写法)刷新列表的方法(defineExpose暴露给父组件调用的方法方法)),这个emit调用属于直接调用而不是异步。
- 文件在上传完成之后,需要刷新用户使用空间
const emit = defineEmits(["uploadCallback"]);
const uploadFile = async (uid, chunkIndex) => {
  chunkIndex = chunkIndex ? chunkIndex : 0;
  //分片上传
  // 要拿响应式数据中的对象作修改才可以生效
  let currentFile = getFileByUid(uid);
  const file = currentFile.file;
  const fileSize = currentFile.totalSize;
  const chunks = Math.ceil(fileSize / chunkSize);
  for (let i = chunkIndex; i < chunks; i++) {
    let delIndex = delList.value.indexOf(uid);
    if (delIndex != -1) {
      delList.value.splice(delIndex, 1);
      // console.log(delList.value);
      break;
    }
    // 要拿响应式数据中的对象作修改才可以生效
    currentFile = getFileByUid(uid);
    if (currentFile.pause) {
      break;
    }
    let start = i * chunkSize;
    let end = start + chunkSize >= fileSize ? fileSize : start + chunkSize;
    let chunkFile = file.slice(start, end);
    let uploadResult = await proxy.Request({
      url: "/file/uploadFile",
      showLoading: false,
      dataType: "file",
      params: {
        file: chunkFile,
        fileName: file.name,
        fileMd5: currentFile.md5,
        chunkIndex: i,
        chunks: chunks,
        fileId: currentFile.fileId,
        filePid: currentFile.filePid,
      },
      showError: false,
      errorCallback: (errorMsg) => {
        currentFile.status = STATUS.fail.value;
        currentFile.errorMsg = errorMsg;
      },
      uploadProgressCallback: (event) => {
        let loaded = event.loaded;
        if (loaded > fileSize) {
          loaded = fileSize;
        }
        currentFile.uploadSize = i * chunkSize + loaded;
        currentFile.uploadProgress = Math.floor(
          (currentFile.uploadSize / fileSize) * 100
        );
      },
    });
    if (uploadResult == null) {
      break;
    }
    currentFile.fileId = uploadResult.data.fileId;
    currentFile.status = STATUS[uploadResult.data.status].value;
    currentFile.chunkIndex = i;
    if (
      uploadResult.data.status == STATUS.upload_seconds.value ||
      uploadResult.data.status == STATUS.upload_finish.value
    ) {
      currentFile.uploadProgress = 100;
      emit("uploadCallback");
      break;
    }
  }
};
上传速度
从浏览器获取上行速度(不够准确吗?) or 自己计算上传速度(上传的每个分片是知道大小的,上传该分片时的时间到上传完该分片的时间就是上传花费的时间)
暂停/继续 上传
在文件上传的过程中,暂停 或 继续刚刚的上传操作
删除正在上传文件的任务
在文件上传的过程中,可以删除当前上传的任务
文件删除 和 批量删除
可通过多选的方式选择多个文件删除
移动文件到指定的目录
文件夹选择列表
- 文件目录选择的弹框(注意要返回所选中文件能够移动到的个目录中,意思就是当前已选择的文件夹不能移动到自己本身已所在父目录、自己本身、自己的子文件夹中,并且当前已选择的文件不能移动到当前已所在的文件夹中 - 也就是说这些不能移动到的文件夹应当要排除掉,这是在写后台代码时,需要注意的地方(其实,就是传入当前导航所的在文件夹,在后台排除掉当前已选择的文件夹即可,因为当前已选择的文件夹都没有的话,这样导航不可能会来到子文件夹中))
FolderSelect.vue
<template>
  <div>
    <Dialog
      :show="dialogConfig.show"
      :title="dialogConfig.title"
      :buttons="dialogConfig.buttons"
      width="600px"
      :showCancel="true"
      @close="close"
    >
      <div class="navigation-panel">
        <Navigation
          ref="navigationRef"
          @navChange="navChange"
          :watchPath="false"
        ></Navigation>
      </div>
      <div class="folder-list" v-if="folderList.length > 0">
        <div
          class="folder-item"
          v-for="item,idx in folderList"
          @click="selectFolder(item)"
          :key="idx"
        >
          <icon :fileType="0"></icon>
          <span class="file-name">{{ item.fileName }}</span>
        </div>
      </div>
      <div v-else class="tips">
        移动到 <span>{{ currentFolder.fileName }}</span> 文件夹
      </div>
    </Dialog>
  </div>
</template>

<script setup>
import { ref, reactive, getCurrentInstance, nextTick } from "vue";
import { useRouter, useRoute } from "vue-router";
const { proxy } = getCurrentInstance();
const router = useRouter();
const route = useRoute();

const api = {
  loadAllFolder: "/file/loadAllFolder",
};

const dialogConfig = ref({
  show: false,
  title: "移动到",
  buttons: [
    {
      type: "primary",
      click: () => {
        folderSelect();
      },
      text: "移动到此",
    },
  ],
});

//父级ID
const filePid = ref("0");
const folderList = ref([]);
const loadAllFolder = async () => {
  let result = await proxy.Request({
    url: api.loadAllFolder,
    params: {
      filePid: filePid.value,
      currentFileIds: currentFileIds.value,
    },
  });
  if (!result) {
    return;
  }
  folderList.value = result.data;
};

const close = () => {
  dialogConfig.value.show = false;
};

//当前目录,传入后 获取目录需要排除该目录
const currentFileIds = ref({});
//展示弹出框对外的方法
const showFolderDialog = (curFileIds) => {
  dialogConfig.value.show = true;
  currentFileIds.value = curFileIds;
  filePid.value = "0";
  nextTick(() => {
    navigationRef.value.init();
  });
};

defineExpose({
  showFolderDialog,
  close,
});
//选择目录
const navigationRef = ref();
const selectFolder = (data) => {
  navigationRef.value.openFolder(data);
};

//当前的目录
const currentFolder = ref({});
//导航改变回调
const navChange = (data) => {
  const { curFolder } = data;
  currentFolder.value = curFolder;
  filePid.value = curFolder.fileId;
  loadAllFolder();
};

const emit = defineEmits(["folderSelect"]);

const folderSelect = () => {
  emit("folderSelect", filePid.value);
};
</script>
<style lang="scss" scoped>
.navigation-panel {
  padding-left: 10px;
  background: #f1f1f1;
}
.folder-list {
  .folder-item {
    cursor: pointer;
    display: flex;
    align-items: center;
    padding: 10px;
    .file-name {
      display: inline-block;
      margin-left: 10px;
    }
    &:hover {
      background: #f8f8f8;
    }
  }
  max-height: calc(100vh - 200px);
  min-height: 200px;
}
.tips {
  text-align: center;
  line-height: 200px;
  span {
    color: #06a7ff;
  }
}
</style>
文件目录导航
- 文件目录选择的弹框的最上面使用层级平铺作为导航展示,而不使用树形作为导航
- 当在顶级目录下时,显示
全部文件。当点击顶级目录下的某个文件夹,进入之后,显示返回上一级|全部文件 > 目录1
Navigation.vue
- 每次点击一次文件夹,进入到此文件夹时,将此文件夹的目录数据添加到响应式数据中,并且使用router.push({path:route.path,query:{path:‘/a/b/c’}})
将当前导航层级的信息记录在路由路径的query参数中(自定义的参数path,如:/main/all?path=/w83skmj/jaf72sf/aff51df),目的是为了能够在页面刷新时(或路由改变时,路由的query参数变化也会被监听到改变),仍然能够回到当前所进入的文件夹,因此这2中情况都需要通过watch去监听到路由的变化(会监测到路由的query参数path的变化),从而把此path参数传给后台以获取当前导航层级信息并且刷新父组件中当前所在文件夹列表 - 可以通过点击导航层级上的节点,退回到指定的层级目录下(将指定层级目录后的目录删除掉,并且让路由跳转->
不改变route.path仅改变query中的path参数。又因为前面就已经设置了在监听路由的改变,因此就会从从后台继续获取导航层级信息并且刷新父组件中当前所在文件夹列表)
<template>

  <div class="top-navigation">

    <template v-if="folderList.length > 0">
      <span class="back link" @click="backParent">返回上一级</span>
      <el-divider direction="vertical" />
    </template>

    <span v-if="folderList.length == 0" class="all-file">全部文件</span>

    <span
      class="link"
      @click="setCurrentFolder(-1)"
      v-if="folderList.length > 0"
      >全部文件</span
    >

    <template v-for="(item, index) in folderList" :key="index">

      <span class="iconfont icon-right"></span>

      <span
        class="link"
        @click="setCurrentFolder(index)"
        v-if="index < folderList.length - 1"
        >{{ item.fileName }}</span
      >

      <span v-if="index == folderList.length - 1" class="text">{{
        item.fileName
      }}</span>

    </template>

  </div>

</template>

<script setup>

import { ref, reactive, getCurrentInstance, watch } from "vue";
import { useRouter, useRoute } from "vue-router";
const { proxy } = getCurrentInstance();
const router = useRouter();
const route = useRoute();

const props = defineProps({
  watchPath: {
    type: Boolean, //是否监听路径变化
    default: true,
  },
  shareId: {
    type: String,
  },
  adminShow: {
    type: Boolean,
    default: false,
  },
});

//初始化
const init = () => {
  folderList.value = [];
  currentFolder.value = { fileId: "0" };
  doCallback();
};

//点击目录
const openFolder = (data) => {
  const { fileId, fileName } = data;
  const folder = {
    fileName: fileName,
    fileId: fileId,
  };
  folderList.value.push(folder);
  currentFolder.value = folder;
  setPath();
};

defineExpose({ openFolder, init });

const api = {
  getFolderInfo: "/file/getFolderInfo",
  getFolderInfo4Share: "/showShare/getFolderInfo",
  getFolderInfo4Admin: "/admin/getFolderInfo",
};

//分类
const category = ref();

//目录
const folderList = ref([]);

//当前目录
const currentFolder = ref({ fileId: "0" });

//返回上一级
const backParent = () => {
  let currentIndex = null;
  for (let i = 0; i < folderList.value.length; i++) {
    if (folderList.value[i].fileId == currentFolder.value.fileId) {
      currentIndex = i;
      break;
    }
  }
  setCurrentFolder(currentIndex - 1);
};

//点击导航 设置当前目录
const setCurrentFolder = (index) => {
  if (index == -1) {
    //返回全部
    currentFolder.value = { fileId: "0" };
    folderList.value = [];
  } else {
    currentFolder.value = folderList.value[index];
    folderList.value.splice(index + 1, folderList.value.length);
  }
  setPath();
};

//设置URL路径
const setPath = () => {
  if (!props.watchPath) {
    doCallback();
    return;
  }
  let pathArray = [];
  folderList.value.forEach((item) => {
    pathArray.push(item.fileId);
  });
  router.push({
    path: route.path,
    query:
      pathArray.length == 0
        ? ""
        : {
            path: pathArray.join("/"),
          },
  });
};

//获取当前路径的目录
const getNavigationFolder = async (path) => {

  let url = api.getFolderInfo;

  if (props.shareId) {
    url = api.getFolderInfo4Share;
  }

  if (props.adminShow) {
    url = api.getFolderInfo4Admin;
  }

  let result = await proxy.Request({
    url: url,
    showLoading: false,
    params: {
      path: path,
      shareId: props.shareId,
    },
  });

  if (!result) {
    return;
  }

  folderList.value = result.data;
};

const emit = defineEmits(["navChange"]);

const doCallback = () => {

  emit("navChange", {
    categoryId: category.value,
    curFolder: currentFolder.value,
  });

};

watch(

  () => route,

  (newVal, oldVal) => {

  	// 应对不需要监听路由变化的情况
    if (!props.watchPath) {
      return;
    }

    //路由切换到其他路由  首页和管理员查看文件列表页面需要监听
    if (
      newVal.path.indexOf("/main") === -1 &&
      newVal.path.indexOf("/settings/fileList") === -1 &&
      newVal.path.indexOf("/share") === -1) {
      return;
    }

    const path = newVal.query.path;
    const categoryId = newVal.params.category;
    category.value = categoryId;

    if (path == undefined) { // 当点击的是 /main/video、/main/music 这些路由(其中的query参数不含path时)

      init();

    } else { // 当点击进入某个文件夹

      getNavigationFolder(path);

      //设置当前目录
      let pathArray = path.split("/");

      currentFolder.value = {
        fileId: pathArray[pathArray.length - 1],
      };

      doCallback();
    }
  },
  { immediate: true, deep: true }
);
</script>

<style lang="scss" scoped>
.top-navigation {
  font-size: 13px;
  display: flex;
  align-items: center;
  line-height: 40px;
  .all-file {
    font-weight: bold;
  }
  .link {
    color: #06a7ff;
    cursor: pointer;
  }
  .icon-right {
    color: #06a7ff;
    padding: 0px 5px;
    font-size: 13px;
  }
}
</style>
order by field(file_id, ..) 按某字段指定顺序排序
这里按file_id字段 指定的顺序 排序,是为了按指定的顺序显示层级导航
select * from file_info fi where fi.file_id in ("BWT3YrUcaS","0PLmkIAzPC") order by field(file_id,"BWT3YrUcaS","0PLmkIAzPC")
watch监听路由的问题
遇到的问题1:我在Navigation组件中监听路由变化,但是遇到了问题,每次点击跳转路由,watch函数执行了2次。
解决办法:vue的版本是3.2.47,需要把vue-router@4.2.4移除掉,而使用vue-router@4.1.6版本
遇到的问题2:无法正确获取oldVal。这个好像无法解决,只能通过监听到具体的route的属性,才能解决
路由params参数的问题
就是在路由里面写的时候,不能写:/main/:label,我把label改成kind就可以了,解决的问题是:写成/main/:label,点击/main/all,路由不跳转。但是我单独写的demo又是可以的,反正这个问题就是这样解决的,也不知道为啥。
还有个问题没解决:重复点击进入同一路径时,它还是会push进去(路由变化会被监听到 - 在同样是开启了deep和immediate的情况下)- 我觉得这也不算问题,但是我写的另一个demo,push到同一路由,这个监听路由在第二次中没有执行 - >我去:写错一个地方了,写了个v-if=“route.params.kind = ‘all’”,就直接赋值了(不知道上面2个问题是不是这个原因导致的)


 696
696


 被折叠的 条评论
为什么被折叠?
被折叠的 条评论
为什么被折叠?
 到【灌水乐园】发言


