


介绍
一个基本功能完整的论坛项目。项目主要功能有:基于邮件激活的注册方式,基于 MD5 加密与加盐的密码存储方式,登陆功能加入了随机验证码的验证。实现登陆状态的检查、为游客和已登录用户展示不同界面与功能。实现不同用户的权限控制和网站数据统计(UV、DAU),管理员可以查看网站数据统计和网站监控信息。支持用户上传头像,实现发布帖子、评论帖子、热帖排行、发送私信与敏感词过滤等功能。实现了点赞关注与系统通知功能。支持全局搜索帖子信息的功能。
项目仓库地址:https://github.com/SageSang/community.git
核心功能具体实现
- 通过对登录用户颁发登录凭证,将登陆凭证存进 Redis 中来记录登录用户登录状态,使用拦截器进行登录状态检查,使用 Spring Security 实现权限控制,解决了 http 无状态带来的缺陷,保护需登录或权限才能使用的特定资源。
- 使用 ThreadLocal 在当前线程中存储用户数据,代替 session 的功能便于分布式部署。在拦截器的 preHandle 中存储用户数据并构建用户认证的结果存入 SecurityContext,在 postHandle 中将用户数据存入 Model,在 afterCompletion 中清理用户数据。
- 使用 Redis 的集合数据类型来解决踩赞、相互关注功能,采用事务管理,保证数据的正确,采用“先更新数据库,再删除缓存”策略保证数据库与缓存数据的一致性。采用 Redis 存储验证码,解决性能问题和分布式部署时的验证码需求。采用 Redis 的 HyperLogLog 存储每日 UV、Bitmap 存储 DAU,实现网站数据统计的需求。
- 使用 Kafka 作为消息队列,在用户被点赞、评论、关注后以系统通知的方式推送给用户,用户发布或删除帖子后向 elasticsearch 同步,wk 生成长图后将长图上传至云服务器,对系统进行解耦、削峰。
- 使用 elasticsearch + ik 分词插件实现全局搜索功能,当用户发布、修改或删除帖子时,使用 Kafka 消息队列去异步将帖子给 elasticsearch 同步。
- 使用分布式定时任务 Quartz 定时计算帖子分数,来实现热帖排行的业务功能。
- 对频繁需要访问的数据,如用户信息、帖子总数、热帖的单页帖子列表,使用 Caffeine 本地缓存 + Redis 分布式缓存的多级缓存,提高服务器性能,实现系统的高可用。
核心技术
- Spring Boot、SSM
- Redis、Kafka、Elasticsearch
- Spring Security、Quartz、Caffeine
项目亮点
- 项⽬构建在 Spring Boot+SSM 框架之上,并统⼀的进⾏了状态管理、事务管理、异常处理;
- 利⽤ Redis 实现了点赞和关注功能,单机可达 5000TPS;
- 利⽤ Kafka 实现了异步的站内通知,单机可达 7000TPS;
- 利⽤ Elasticsearch 实现了全⽂搜索功能,可准确匹配搜索结果,并⾼亮显示关键词;
- 利⽤ Caffeine+Redis 实现了两级缓存,并优化了热⻔帖⼦的访问,单机可达 8000QPS。
- 利⽤ Spring Security 实现了权限控制,实现了多重⻆⾊、URL 级别的权限管理;
- 利⽤ HyperLogLog、Bitmap 分别实现了 UV、DAU 的统计功能,100 万⽤户数据只需*M 内存空间;
- 利⽤ Quartz 实现了任务调度功能,并实现了定时计算帖⼦分数、定时清理垃圾⽂件等功能;
- 利⽤ Actuator 对应⽤的 Bean、缓存、⽇志、路径等多个维度进⾏了监控,并通过⾃定义的端点对数据库连接进⾏了监控。
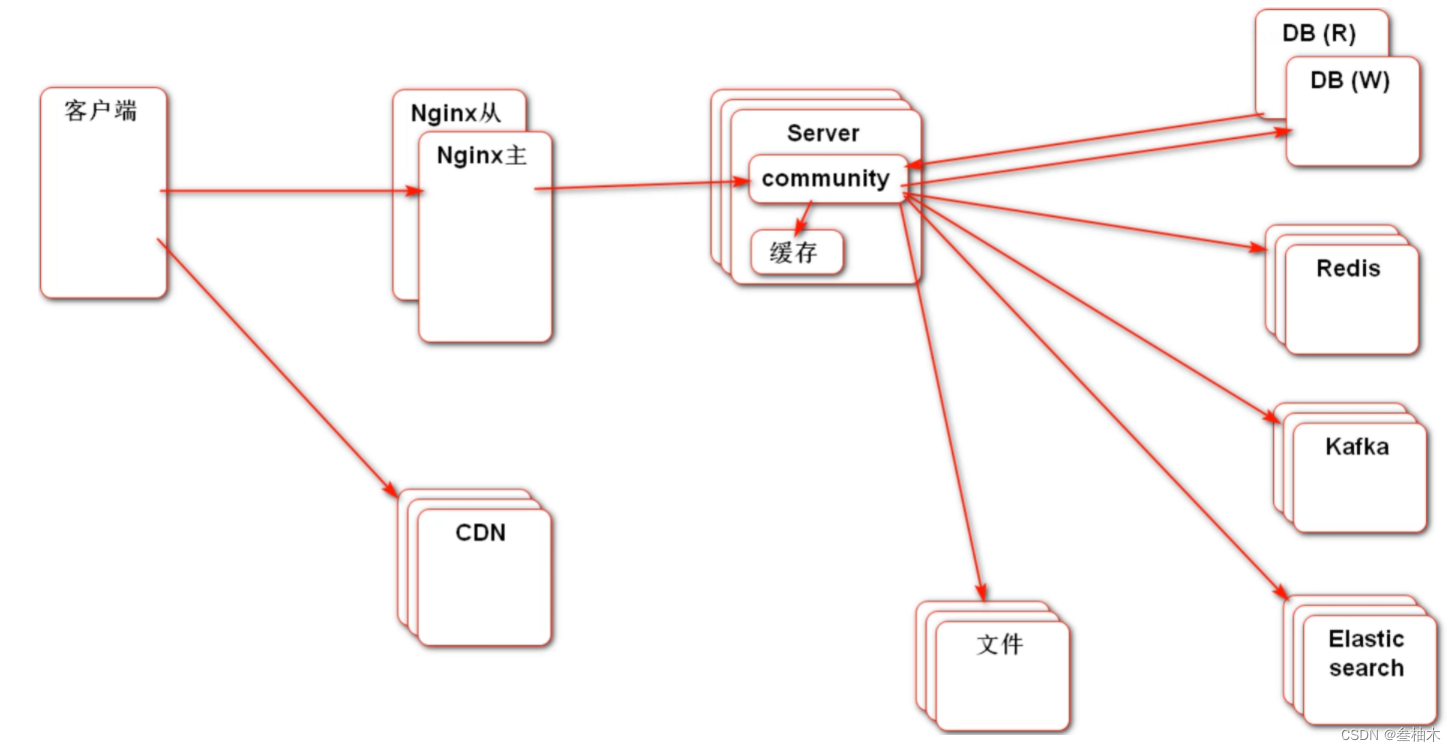
软件架构
软件版本
JDK 17.0.6 + apache-maven-3.9.1 + Spring Boot 3.1.0 + Spring Security 6.1.0 + Redis7.0.11 3 主 3 从集群 + kafka_2.12-2.4.1 集群 + Elasticsearch 7.17.10 + kaptcha2.3.2(验证码工具) + wkhtmltopdf(长图生成工具) + MySQL 8.0.32
技术栈
SpringBoot + MyBatis + Spring Email + Kaptcha + Redis + Kafka + Elasticsearch + Spring Security + Quartz + wkhtmltopdf + caffeine + Spring Boot Actuator
sql 文件介绍
在 init-sql 中有数据库建表脚本:
- init_schema.sql --> 建表 sql
- init_data.sql --> 初始化数据库数据 SQL
- tables_mysql_innodb.sql --> quarter 定时任务表 SQL
部署教程
- 拉取项目
- 创建 community 数据库,根据建表语句建好需要的表
- 准备好 Redis 集群、Kafka 集群、Elasticsearch 及 ik 分词插件、wk 环境
- 根据自己机器在 application-develop.properties 中修改数据源、SpringMail、Redis 集群、Kafka 集群、Elasticsearch、wk 路径、七牛云 url 的配置项
- 依次启动 Redis 集群,Zookeeper,kafka 集群,Elasticsearch
- 启动项目即可完成部署
项目中遇到的问题总结
Redis 中序列化问题
在 IDEA 中新增配置类:
@Configuration
public class RedisConfig {

    /**
     * *redis序列化的工具定置类,下面这个请一定开启配置
     * *127.0.0.1:6379> keys *
     * *1) “ord:102” 序列化过
     * *2)“\xaclxedlxeelx05tixeelaord:102” 野生,没有序列化过
     * *this.redisTemplate.opsForValue(); //提供了操作string类型的所有方法
     * *this.redisTemplate.opsForList();// 提供了操作List类型的所有方法
     * *this.redisTemplate.opsForset(); //提供了操作set类型的所有方法
     * *this.redisTemplate.opsForHash(); //提供了操作hash类型的所有方认
     * *this.redisTemplate.opsForZSet(); //提供了操作zset类型的所有方法
     * param LettuceConnectionFactory
     * return
     */
    @Bean
    public RedisTemplate<String, Object> redisTemplate(LettuceConnectionFactory lettuceConnectionFactory) {
        RedisTemplate<String,Object> redisTemplate = new RedisTemplate<>();
        redisTemplate.setConnectionFactory(lettuceConnectionFactory);
        // 设置key序列化方式string
        redisTemplate.setKeySerializer(RedisSerializer.string()); // RedisSerializer.string() 等价于 new StringRedisSerializer()

        // 设置value的序列化方式json,使用GenericJackson2JsonRedisSerializer替换默认序列化
        redisTemplate.setValueSerializer(RedisSerializer.json()); // RedisSerializer.json() 等价于 new GenericJackson2JsonRedisSerializer()

        // 设置hash的key的序列化方式
        redisTemplate.setHashKeySerializer(RedisSerializer.string());

        // 设置hash的value的序列化方式
        redisTemplate.setHashValueSerializer(RedisSerializer.json());

        // 使配置生效
        redisTemplate.afterPropertiesSet();
        return redisTemplate;
    }
}
如果在 Reids 命令行中,可以在启动命令后加-raw来解决序列化问题,例如:
redis-cli -a 123456 -p 6379 -c -raw
Redis 的分布式锁
浅谈 Redis 的 setNX 分布式锁redisconnection.setnx叁柚木的博客-CSDN 博客
Elasticsearch6.x 与 Redis 启动冲突问题
报错:java.lang.IllegalStateException: availableProcessors is already set to [4], rejecting [4]
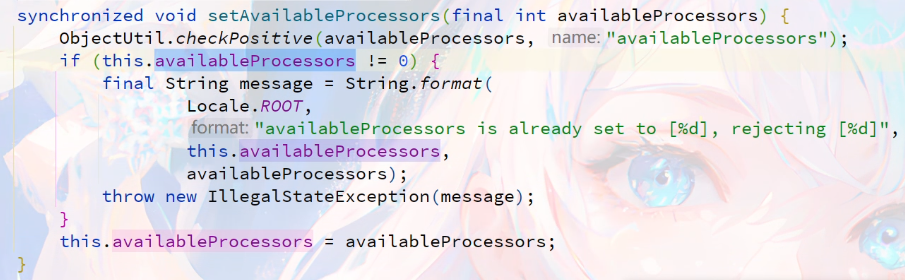
原因:SpringBoot 的 spring-boot-starter-data-redis 默认是以 lettuce 作为连接池的, 而在 lettuce,elasticsearch transport 中都会依赖 netty, 二者的 netty 版本不一致,不能够兼容。NettyRuntime 类中有下面的方法,启动的时候 Redis 和 ElasticSearch 都会调用,然后就会报下面绿字错误。即 Redis 先设置好了 availableProcessors 处理器,es 又来设置,系统就会认为重复了,就不会启动。
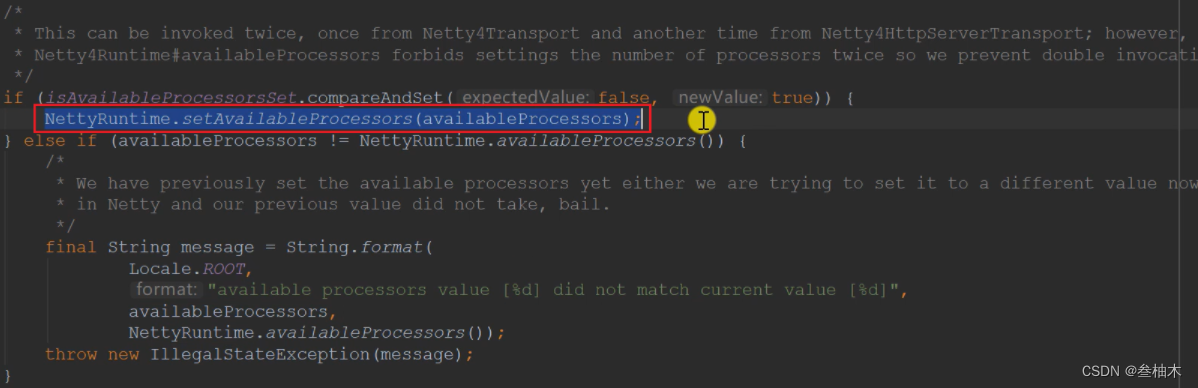
是由 es 调用这段代码所产生的错误!在 es 底层代码 Netty4Utils 类中能看到下面代码,只要调用了红框内的代码,因为 Redis 已经初始化过 availavleProcessors 了,所以不为 0,则 es 就会报错。
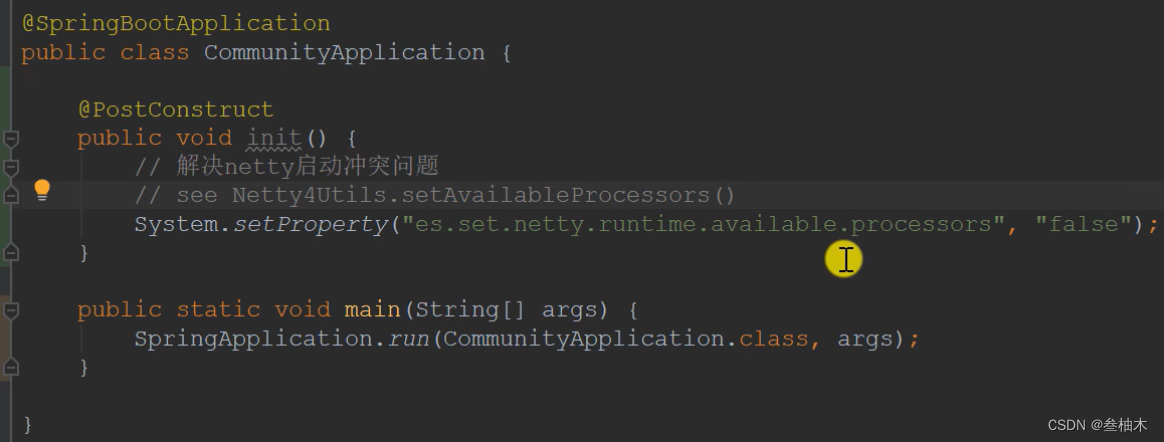
解决方案:es 中的处理比较狭隘,别人也可以依赖 netty 呀,所以我们可以修改源码位置留的开关,来达到不报错的目的。这个开关可以在在启动类初始化的时候进行配置,设置为 false 后,就会跳过下面会报错的检查了。

启动类初始化的时候进行配置来解决问题:
还有一种解决方法,直接使用 es7.x ,升级 es7.x 后不会遇到这个问题了。当然,es7 与 es6 的操作差距很大,有很多变化。我采用的是使用 es7 来解决这个问题。
Spring Security 中权限不能生效
官网文档地址:Persisting Authentication :: Spring Security
-
原因
springsecurity 持久化分为两个步骤:
- 在运行前,SecurityContextHolder 从 SecurityContextRepository 中读取 SercurityContext
- 运行结束后,SecurityContextHolder 将修改后的 SercurityContext 再存入 SecurityContextRepository 中,以便下次访问
而在 springsecurity6.1.0 中使用 SecurityContextHolder 更改 SercurityContext 时,没有上述的第二步,即虽然更改了但是没有保存,下次访问时无法识别更改的内容。
故需要在更改后自己手动保存 SercurityContext 到 securityContextRepository 中(持久化认证)
-
修改过程
// 在SecurityConfig中增加配置SecurityContextRepository
@Bean
public SecurityContextRepository securityContextRepository() {
    return new HttpSessionSecurityContextRepository();
}

// 在LoginTicketInterceptor中注入这个Bean
@Autowired
private SecurityContextRepository securityContextRepository;

// 在LoginTicketInterceptor中preHandle里,修改Context内容后增加保存SercurityContext
SecurityContextHolder.setContext(new SecurityContextImpl(authentication));

securityContextRepository.saveContext(SecurityContextHolder.getContext(), request, response);
退出账户后访问需要登录的功能会显示没有权限而不是没有登录
-
原因分析
这是因为在退出的时候也只是清理了 SecurityContextHolder,而认证信息已经存在了 session 里,没有被清理(securityContextRepository 是基于 session 的)
-
解决措施一(不优雅)
在 logout 里清理 SecurityContextHolder 后,给浏览器的 response 里增加一个对应访问认证信息的 cookie,赋予随机值,覆盖掉原本的 cookie,让浏览器无法访问原本的信息
Cookie cookie = new Cookie("JSESSIONID", CommunityUtil.generateUUID()); response.addCookie(cookie); -
解决措施二
在自定义的 logout 功能里调用 LogoutHandler 彻底地清理授权信息。
参考文档地址:https://docs.spring.io/spring-security/reference/servlet/authentication/logout.html#creating-custom-logout-endpoint
具体做法:
-
在 SecurityConfig 中配置一个 LogoutHandler
@Bean public SecurityContextLogoutHandler securityContextLogoutHandler() { return new SecurityContextLogoutHandler(); } -
在 LoginController 里注入 securityContextLogoutHandler(代码略)
-
修改我们的 logout 功能,调用 securityContextLogoutHandler
@GetMapping("/logout")
  public String logout(@CookieValue("ticket") String ticket, HttpServletRequest request, HttpServletResponse response, Authentication authentication) {
    userService.logout(ticket);
    // 加入下面这一句
    securityContextLogoutHandler.logout(request, response, authentication);
    return "redirect:/login";
  }
-
Redis 集群合并多个 HyperLogLog 统计数据的时候报错
即执行 redisTemplate.opsForHyperLogLog().union(unionKey, redisKey2, redisKey3, redisKey4); 时报错。
Java 上报错:org.springframework.dao.InvalidDataAccessApiUsageException: All keys must map to same slot for pfmerge in cluster mode
查了很久没有找到有关报错的讨论,于是在 redis 命令行上用命令 PFmerge test:hll:union test:hll:02 test:hll:03 复刻 IDEA 上的操作,也报错了。
Redis 命令行上报错:CROSSSLOT Keys in request don’t hash to the same slot
终于找到原因了,由于不在一个哈希槽的数据不能一起操作,这是为集群的安全性着想。我们可以使用 {} 来解决问题。
在启用集群模式的集群上创建由多密钥操作使用的密钥时,请使用哈希标签将密钥强制放入同一哈希槽中。当密钥包含“{…}”这种样式时,只有大括号“{”和“}”之间的子字符串得到哈希以获得哈希槽。
例如,密钥 {user1}:myset 和 {user1}:myset2 被哈希到相同的哈希槽,因为只有大括号“{”和“}”内的字符串,即“user1”,用于计算哈希槽。
关于版本的坑
Elasticsearch
es7 中废除了ElasticsearchTemplate ,需要使用 RestHighLevelClient 来操作。具体见:SpringBoot3 整合 ElasticSearch7 示例springboot 集成 elasticsearch7叁柚木的博客-CSDN 博客
Spring Security
Spring Security 6.1.0 中废除了 WebSecurityConfigurerAdapter。
Spring Security in Spring Boot 3 - Stack Overflow
查询光放文档获得解决方案:
@Configuration
@EnableWebSecurity
public class SecurityConfig implements CommunityConstant {

    /**
     * 静态资源不做认证
     *
     * @return
     */
    @Bean
    public WebSecurityCustomizer webSecurityCustomizer() {
        return (web) -> web.ignoring().requestMatchers("/resources/**");
    }

    @Bean
    public SecurityFilterChain filterChain(HttpSecurity http) throws Exception {
        // 授权
        http.authorizeHttpRequests((authorizeHttpRequests) ->
                authorizeHttpRequests
                        .requestMatchers(
                                "/user/setting",
                                "/user/upload",
                                "/discuss/add",
                                "/comment/add/**",
                                "/letter/**",
                                "/notice/**",
                                "/like",
                                "/follow",
                                "/unfollow"
                        )
                        .hasAnyAuthority(
                                AUTHORITY_USER,
                                AUTHORITY_ADMIN,
                                AUTHORITY_MODERATOR
                        )
                        .anyRequest()
                        .permitAll()
        );

        // 权限不够的时候处理
        http.exceptionHandling((exceptionHandling) ->
                exceptionHandling
                        .authenticationEntryPoint(new AuthenticationEntryPoint() {
                            // 没有登陆
                            @Override
                            public void commence(HttpServletRequest request, HttpServletResponse response, AuthenticationException authException) throws IOException, ServletException {
                                String xRequestedWith = request.getHeader("x-requested-with");
                                if ("XMLHttpRequest".equals(xRequestedWith)) {
                                    response.setContentType("application/plain;charset=utf-8");
                                    PrintWriter writer = response.getWriter();
                                    writer.write(CommunityUtil.getJSONString(403, "请您先登陆呢~"));
                                } else {
                                    response.sendRedirect(request.getContextPath() + "/login");
                                }
                            }
                        })
                        .accessDeniedHandler(new AccessDeniedHandler() {
                            // 权限不足
                            @Override
                            public void handle(HttpServletRequest request, HttpServletResponse response, AccessDeniedException accessDeniedException) throws IOException, ServletException {
                                String xRequestedWith = request.getHeader("x-requested-with");
                                if ("XMLHttpRequest".equals(xRequestedWith)) {
                                    response.setContentType("application/plain;charset=utf-8");
                                    PrintWriter writer = response.getWriter();
                                    writer.write(CommunityUtil.getJSONString(403, "你没有访问此功能的权限!"));
                                } else {
                                    response.sendRedirect(request.getContextPath() + "/denide");
                                }
                            }
                        })
        );

        // Security 底层默认会拦截 /logout 请求,进行退出的处理。
        // 我们覆盖它默认的逻辑,才能执行我们自己退出的代码
        http.logout((logout) ->
                logout.logoutUrl("/securitylogout")
        );

        return http.build();
    }

}
Quartz
刚开始引入的时候突然报 There is no DataSource named 'null’的错误
然后把注释去掉就又能正常执行,一度认为自己哪里写错了,对着视频看了挺久还是没法解决
然后就想到了配置的问题,配置了数据源还是报错找了好久才想到会不会是版本问题,把代码贴一份到以前 2.5 以下的工程里面又能正常执行 orz
2.6.0 spring 以上需把配置数据源实现的 class 从 org.quartz.impl.jdbcjobstore.JobStoreTX 改为 org.springframework.scheduling.quartz.LocalDataSourceJobStore。
# Quartz
spring.quartz.job-store-type=jdbc
spring.quartz.scheduler-name=communityScheduler
spring.quartz.properties.org.quartz.scheduler.instanceId=AUTO
#spring.quartz.properties.org.quartz.jobStore.class=org.quartz.impl.jdbcjobstore.JobStoreTX 老版本的设置,2.5.6之后的版本改为下面的配置项了。
spring.quartz.properties.org.quartz.jobStore.class=org.springframework.scheduling.quartz.LocalDataSourceJobStore
spring.quartz.properties.org.quartz.jobStore.driverDelegateClass=org.quartz.impl.jdbcjobstore.StdJDBCDelegate
spring.quartz.properties.org.quartz.jobStore.isClustered=true
spring.quartz.properties.org.quartz.threadPool.class=org.quartz.simpl.SimpleThreadPool
spring.quartz.properties.org.quartz.threadPool.threadCount=5
如果有帮助到大家的话,留下你的赞和收藏呗 ~


 446
446

 被折叠的 条评论
为什么被折叠?
被折叠的 条评论
为什么被折叠?
 到【灌水乐园】发言


