


【项目场景】
最近在做项目的时候,想把本地项目通过服务器的地址来访问,要不就把项目放到服务器中跑,要不就用Nginx反向代理来实现。
这里使用Nginx反向代理:如果使用虚拟机的话可以将虚拟机的地址通过Hosts来进行本地映射。我用的是阿里云环境,将服务器的地址在本地hosts映射之后竟然没有效果访问会被阿里云拦截显示没有备案。在网上查了很久之后才发现:
阿里云服务器的网关会对非授权的访问进行截获。 如果你没有备案,那么针对特定端口,比如80,443的请求进行截获。当你备案后就予以放行。
网上的解决方式:在网上的解决方式大部分都会推荐内网穿透,我感觉太麻烦了。还不如买个域名,新人1米一年,在备个案这多痛快!
【Nginx反向代理】
1、Nginx+Windows搭建域名访问环境

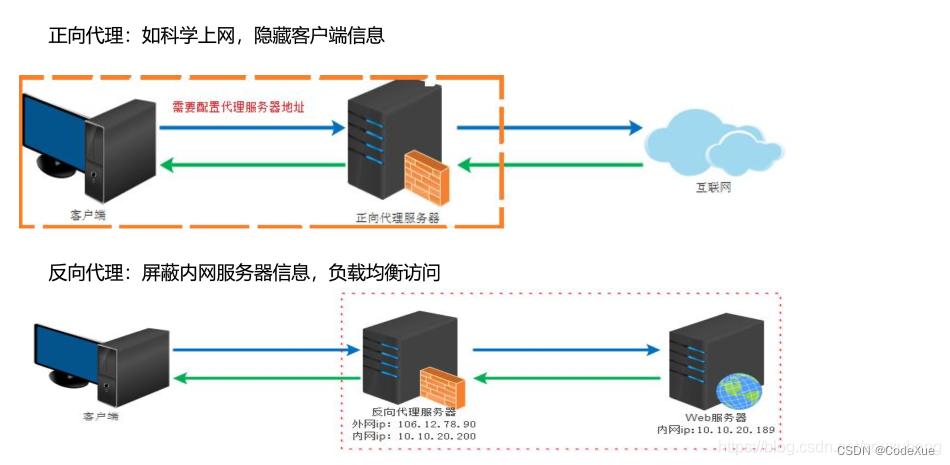
2、正向代理与反向代理
3、Nginx配置文件

4、Nginx的配置文件在/mydata/nginx/conf/nginx.conf
这个路径是使用docker挂载出来的。
user  nginx;
worker_processes  1;
error_log  /var/log/nginx/error.log warn;
pid        /var/run/nginx.pid;
events {
    worker_connections  1024;
}
http {
    include       /etc/nginx/mime.types;
    default_type  application/octet-stream;
    log_format  main  '$remote_addr - $remote_user [$time_local] "$request" '
                      '$status $body_bytes_sent "$http_referer" '
                      '"$http_user_agent" "$http_x_forwarded_for"';
    access_log  /var/log/nginx/access.log  main;
    sendfile        on;
    #tcp_nopush     on;
    keepalive_timeout  65;
    #gzip  on;
    include /etc/nginx/conf.d/*.conf;
}
以上是Nginx全局配置文件
最重要的是Server块,“include /etc/nginx/conf.d/.conf;” 这里包含Server块,它是将“/etc/nginx/conf.d/.conf”,conf.d目录下的所有配置文件包含到nginx.conf文件中,cd进去后复制default.conf一份 起名叫jdmall.conf,在这个上边改配置
[root@xueguizheng conf.d] ls
default.conf  jdmall.conf
修改一下这个文件
[root@xueguizheng conf.d] vi jdmall.conf
server {
    listen       80;
    server_name  localhost;
    #charset koi8-r;
    #access_log  /var/log/nginx/host.access.log  main;
    location / {
        root   /usr/share/nginx/html;
        index  index.html index.htm;
    }
    #error_page  404              /404.html;
    # redirect server error pages to the static page /50x.html
    #
    error_page   500 502 503 504  /50x.html;
    location = /50x.html {
        root   /usr/share/nginx/html;
    }
    # proxy the PHP scripts to Apache listening on 127.0.0.1:80
    #
    #location ~ \.php$ {
    #    proxy_pass   http://127.0.0.1;
    #}
    # pass the PHP scripts to FastCGI server listening on 127.0.0.1:9000
    #
    #location ~ \.php$ {
    #    root           html;
    #    fastcgi_pass   127.0.0.1:9000;
    #    fastcgi_index  index.php;
    #    fastcgi_param  SCRIPT_FILENAME  /scripts$fastcgi_script_name;
    #    include        fastcgi_params;
    #}
    # deny access to .htaccess files, if Apache's document root
    # concurs with nginx's one
    #
    #location ~ /\.ht {
    #    deny  all;
    #}
}
默认Nginx监听80端口主机名是localhost的请求,因此我们需要修改这个,将域名填到"server_name"中,然后修改映射路径:
server {
    listen       80;
    server_name  "这里放解析后的域名";
    #charset koi8-r;
    #access_log  /var/log/nginx/host.access.log  main;
    location / {
       proxy_pass http://"本地项目地址":"端口号";
    }
 }
proxy_pass:可以直译为"代理通过"。
最终意思就是,将域名解析后,映射到服务器上,然后访问服务器地址不输入端口号的话会默认进入Nginx监听80端口并且是来自"所解析的域名的"请求,最终在代理到
proxy_pass http://“本地项目地址”:“端口号”;
这样就相当于直接使用域名访问就可以直接路由到本地项目中去。
【Nginx负载均衡】
1、nginx负载均衡到网关,当我们服务多的时候,我们不能每次都来修改nginx的配置,因此我们需要配置一下nginx直接负载均衡到网关,再由网关去Nacos中发现我们的服务最终路由到指定的服务中。
2、配置负载均衡:
2.1、修改nginx的全局配置:“/mydata/nginx/conf/nginx.conf”
user  nginx;
worker_processes  auto;

error_log  /var/log/nginx/error.log notice;
pid        /var/run/nginx.pid;


events {
    worker_connections  1024;
}


http {
    include       /etc/nginx/mime.types;
    default_type  application/octet-stream;

    log_format  main  '$remote_addr - $remote_user [$time_local] "$request" '
                      '$status $body_bytes_sent "$http_referer" '
                      '"$http_user_agent" "$http_x_forwarded_for"';

    access_log  /var/log/nginx/access.log  main;

    sendfile        on;
    #tcp_nopush     on;

    keepalive_timeout  65;

    #gzip  on;
    upstream jdmall{
     server "本地网关地址":88;
   }
    include /etc/nginx/conf.d/*.conf;
}
2.2、配置upstream 上游服务器,在起个名jdmall,以server开头配置项目的网关地址
   upstream jdmall{
     server "本地网关地址":88;
   }
2.3、再去修改server块里的配置:
/mydata/nginx/conf/conf.d/jdmall.conf
   location / {
     proxy_set_header Host $host;
     proxy_pass http://jdmall;

    }
配置映射地址,proxy_pass 填写上游服务器的名称,这样就可以直接代理到上游服务器里边的地址。
由于在代理的时候Nginx可能会发生丢失主机名因此在代理之前加上 proxy_set_header Host $host;可以保证不丢失主机名。
2.4、配置网关
 - id: jdmall_nginx_host_route
   uri: lb://jdmall-product
   predicates:
    - Host=**."域名"
【总结】
当我们将我们的服务器地址与域名进行映射,访问域名相当于访问我们服务器地址,如果不加端口号的话默认会直接进入Nginx 80端口,然后我们根据前边配置了全局的Nginx,Nginx会监听80端口以及主机名是"我们的域名"的请求,然后代理到我们指定的位置,配置上游服务器的目的是为了负载均衡到网关。最终在配置网关,只要来自"xx域名"的请求网关都会直接去nacos中寻找我们指定的服务,并路由过去。这样就达到了使用域名就可以访问我们本地项目的目的了。


 4610
4610


 被折叠的 条评论
为什么被折叠?
被折叠的 条评论
为什么被折叠?
 到【灌水乐园】发言


