


这两天一直在编译FFmpeg库,实话真是踩坑不少,也知道了遇见问题该如何排错,所以还是打算记录下,也算是一个总结.
环境和下载
1 .CentOs 8
2. android-ndk-r17c
3. ffmpeg-4.2.2
注意要下载linux版的ndk,在获取下载链接时候,通过wget下载到linux中
Configure帮助选项
查看帮助选项 ./configure --help
Usage: configure [options]
Options: [defaults in brackets after descriptions]

帮助选项
Help options:
  --help                   print this message
  --quiet                  Suppress showing informative output
  --list-decoders          show all available decoders
  --list-encoders          show all available encoders
  --list-hwaccels          show all available hardware accelerators
  --list-demuxers          show all available demuxers
  --list-muxers            show all available muxers
  --list-parsers           show all available parsers
  --list-protocols         show all available protocols
  --list-bsfs              show all available bitstream filters
  --list-indevs            show all available input devices
  --list-outdevs           show all available output devices
  --list-filters           show all available filters

标准选项
Standard options:
  --logfile=FILE           log tests and output to FILE [ffbuild/config.log]
  --disable-logging        do not log configure debug information
  --fatal-warnings         fail if any configure warning is generated

  我们最终产出的目录
  --prefix=PREFIX          install in PREFIX [/usr/local]

  --bindir=DIR             install binaries in DIR [PREFIX/bin]
  --datadir=DIR            install data files in DIR [PREFIX/share/ffmpeg]
  --docdir=DIR             install documentation in DIR [PREFIX/share/doc/ffmpeg]
  --libdir=DIR             install libs in DIR [PREFIX/lib]
  --shlibdir=DIR           install shared libs in DIR [LIBDIR]
  --incdir=DIR             install includes in DIR [PREFIX/include]
  --mandir=DIR             install man page in DIR [PREFIX/share/man]
  --pkgconfigdir=DIR       install pkg-config files in DIR [LIBDIR/pkgconfig]
  --enable-rpath           use rpath to allow installing libraries in paths
                           not part of the dynamic linker search path
                           use rpath when linking programs (USE WITH CARE)
  --install-name-dir=DIR   Darwin directory name for installed targets

Licensing options:
  --enable-gpl             allow use of GPL code, the resulting libs
                           and binaries will be under GPL [no]
  --enable-version3        upgrade (L)GPL to version 3 [no]
  --enable-nonfree         allow use of nonfree code, the resulting libs
                           and binaries will be unredistributable [no]

--disable  代表关闭状态
--enable   代表开启状态

Configuration options:
  --disable-static         do not build static libraries [no] == 开启静态库
  --enable-shared          build shared libraries [no] == 关闭动态库
  --enable-small           optimize for size instead of speed == 可以优化库的大小

  --disable-runtime-cpudetect disable detecting CPU capabilities at runtime (smaller binary)
  --enable-gray            enable full grayscale support (slower color)
  --disable-swscale-alpha  disable alpha channel support in swscale
  --disable-all            disable building components, libraries and programs
  --disable-autodetect     disable automatically detected external libraries [no]

Program options:
  --disable-programs       do not build command line programs == 默认是关闭的,如果我们开启

  --disable-ffmpeg         disable ffmpeg build  == 使用FFmpeg命令
  --disable-ffplay         disable ffplay build  == 播放器
  --disable-ffprobe        disable ffprobe build

Documentation options:
  --disable-doc            do not build documentation
  --disable-htmlpages      do not build HTML documentation pages
  --disable-manpages       do not build man documentation pages
  --disable-podpages       do not build POD documentation pages
  --disable-txtpages       do not build text documentation pages

FFmpeg 是由多个模块组成的:
Component options:
  --disable-avdevice       disable libavdevice build  == 模块之一(可以操控我们的摄像头-(Android中是不支持))
  --disable-avcodec        disable libavcodec build == audio video codec(编码 和 解码)
  --disable-avformat       disable libavformat build == 音视频格式生成和解析相关
  --disable-swresample     disable libswresample build == 音频 重采样(如果想把单声道,变成双声道)
  --disable-swscale        disable libswscale build == 对视频显示相关(对视频的缩放,放大 缩小)
  --disable-postproc       disable libpostproc build == 后期处理,很少用,可以关闭掉
  --disable-avfilter       disable libavfilter build == 给视频加水印,加字幕,特殊效果
  --enable-avresample      enable libavresample build (deprecated) [no]
  --disable-pthreads       disable pthreads [autodetect]
  --disable-w32threads     disable Win32 threads [autodetect]
  --disable-os2threads     disable OS/2 threads [autodetect]
  --disable-network        disable network support [no]
  --disable-dct            disable DCT code
  --disable-dwt            disable DWT code
  --disable-error-resilience disable error resilience code
  --disable-lsp            disable LSP code
  --disable-lzo            disable LZO decoder code
  --disable-mdct           disable MDCT code
  --disable-rdft           disable RDFT code
  --disable-fft            disable FFT code
  --disable-faan           disable floating point AAN (I)DCT code
  --disable-pixelutils     disable pixel utils in libavutil

Individual component options:
  --disable-everything     disable all components listed below
  --disable-encoder=NAME   disable encoder NAME
  --enable-encoder=NAME    enable encoder NAME
  --disable-encoders       disable all encoders  == 如果我们去播放视频,不需要编码,那么此功能就可以关闭掉
  --disable-decoder=NAME   disable decoder NAME
  --enable-decoder=NAME    enable decoder NAME
  --disable-decoders       disable all decoders
  --disable-hwaccel=NAME   disable hwaccel NAME
  --enable-hwaccel=NAME    enable hwaccel NAME
  --disable-hwaccels       disable all hwaccels
  --disable-muxer=NAME     disable muxer NAME
  --enable-muxer=NAME      enable muxer NAME
  --disable-muxers         disable all muxers
  --disable-demuxer=NAME   disable demuxer NAME
  --enable-demuxer=NAME    enable demuxer NAME
  --disable-demuxers       disable all demuxers
  --enable-parser=NAME     enable parser NAME
  --disable-parser=NAME    disable parser NAME
  --disable-parsers        disable all parsers
  --enable-bsf=NAME        enable bitstream filter NAME
  --disable-bsf=NAME       disable bitstream filter NAME
  --disable-bsfs           disable all bitstream filters
  --enable-protocol=NAME   enable protocol NAME
  --disable-protocol=NAME  disable protocol NAME
  --disable-protocols      disable all protocols
  --enable-indev=NAME      enable input device NAME
  --disable-indev=NAME     disable input device NAME
  --disable-indevs         disable input devices
  --enable-outdev=NAME     enable output device NAME
  --disable-outdev=NAME    disable output device NAME
  --disable-outdevs        disable output devices
  --disable-devices        disable all devices
  --enable-filter=NAME     enable filter NAME
  --disable-filter=NAME    disable filter NAME
  --disable-filters        disable all filters
...
在编写FFmpeg脚本时候就是要根据上面的帮助选项来配置的,所以就贴在上面了,编译FFmpeg就是对它的配置的修改
编写Shell脚本(arm64-v8a)
#!/bin/bash

#NDK_ROOT 变量指向ndk目录
NDK_ROOT=/root/android-ndk-r17c
#TOOLCHAIN 变量指向ndk中的交叉编译gcc所在的目录
TOOLCHAIN=$NDK_ROOT/toolchains/aarch64-linux-android-4.9/prebuilt/linux-x86_64

#指定android api版本
ANDROID_API=21

#此变量用于编译完成之后的库与头文件存放在哪个目录
PREFIX=./android/arm64

#执行configure脚本,用于生成makefile
#--prefix : 安装目录
#--enable-small : 优化大小
#--disable-programs : 不编译ffmpeg程序(命令行工具),我们是需要获得静态(动态)库。
#--disable-avdevice : 关闭avdevice模块,此模块在android中无用
#--disable-encoders : 关闭所有编码器 (播放不需要编码)
#--disable-muxers :  关闭所有复用器(封装器),不需要生成mp4这样的文件,所以关闭
#--disable-filters :关闭视频滤镜
#--enable-cross-compile : 开启交叉编译
#--cross-prefix: gcc的前缀 xxx/xxx/xxx-gcc 则给xxx/xxx/xxx-
#disable-shared enable-static 不写也可以,默认就是这样的。
#--sysroot:
#--extra-cflags: 会传给gcc的参数
#--arch --target-os : 必须要给
./configure \
--prefix=$PREFIX \
--enable-small \
--disable-programs \
--disable-avdevice \
--disable-encoders \
--disable-muxers \
--disable-filters \
--disable-yasm \
--enable-cross-compile \
--cross-prefix=$TOOLCHAIN/bin/aarch64-linux-android- \
--enable-shared \ # 开启动态库
--disable-static \ # 关闭静态库
--sysroot=$NDK_ROOT/platforms/android-$ANDROID_API/arch-arm64 \
--extra-cflags="-isysroot $NDK_ROOT/sysroot -isystem $NDK_ROOT/sysroot/usr/include/aarch64-linux-android -D__ANDROID_API__=$ANDROID_API -U_FILE_OFFSET_BITS  -DANDROID -ffunction-sections -funwind-tables -fstack-protector-strong -no-canonical-prefixes -Wa,--noexecstack -Wformat -Werror=format-security  -O0 -fPIC" \
--arch=arm64 \
--target-os=android

#上面运行脚本生成makefile之后,使用make执行脚本
make clean
make install
这个脚本是可以根据自己的需求去动态配置的
踩的坑
1 . arm-linux-androideabi-gcc is unable to create an executable file

原因: FFmpeg 4.2.2 版本默认使用了 clang 进行编译 解决:
//1. 修改 configure 文件
vim configure
//2. 把 默认的 clang 修改为 gcc
if test "$target_os" = android; then
   # cc_default="clang"
		 cc_default="gcc"
fi
2 .config.mak 文件没有生成

解决: 执行./configure --disable-x86asm 生成 config.mak 文件
生成目标文件
我生成的是arm64-v8a这个abi架构的,后面贴下armeabi-v7a的脚本,亲测可用,基本现在用的这两种abi架构的

lib目录

include目录

share目录

如果没有在目标目录生成库文件,那肯定是哪里配置问题,这时候可以通过ffbuild/config.log查看报错信息,一般在最后面会告诉你哪里有问题,然后去修改对应的文件就行了
生成库文件下载
可以使用别的工具下载生成的库文件,这边懒得下载软件,直接用的lrzsz命令下载的,第一次使用需要安装
yum -y install lrzsz
库文件压缩
tar -zcvf ffmpeg_android.tar.gz android
下载
sz ffmpeg_android.tar.gz
移植到android中测试
文件拷贝
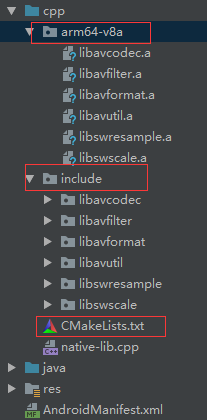
需要lib中的文件复制到arm64-v8a中,头文件复制到include目录下
修改CMakeLists.txt
cmake_minimum_required(VERSION 3.4.1)

file(GLOB allCpp *.cpp)

add_library(
        native-lib

        SHARED

        ${allCpp})

find_library(
        log-lib

        log)

# 引入FFmpeg的头文件
include_directories(${CMAKE_SOURCE_DIR}/include)

#message("CMAKE_ANDROID_ARCH_ABI版本是:" + ${CMAKE_ANDROID_ARCH_ABI})

# 引入FFmpeg的库文件,设置内部的方式引入,指定库的目录是 -L  指定具体的库-l
set(CMAKE_CXX_FLAGS "${CMAKE_CXX_FLAGS} -L${CMAKE_SOURCE_DIR}/${CMAKE_ANDROID_ARCH_ABI}")

target_link_libraries(
        native-lib

        # 具体的库文件,链接到总库
        # 这样写会报错,有坑
        # avcodec avfilter avformat avutil swresample swscale

        # 先把有依赖的库,先依赖进来
        avformat avcodec avfilter avutil swresample swscale

        ${log-lib})
修改build.gradle文件

cmake闭包中的配置是为了指定CmakeList中输出的ABI
ndk闭包中的配置是为了不让打包时候的abi架构打包到一个包中,我在用32位(手机64位)的库时候,没加ndk的闭包配置,导致一直崩溃,加上就好了
cpp中添加代码测试
#include <jni.h>
#include <string>

// 有坑,会报错,必须混合编译
// #include <libavutil/avutil.h>
extern "C" {
    #include <libavutil/avutil.h>
}

extern "C" JNIEXPORT jstring JNICALL
Java_com_example_ffmpegdemo_MainActivity_stringFromJNI(
        JNIEnv *env,
        jobject /* this */) {
    std::string hello = av_version_info();
    return env->NewStringUTF(hello.c_str());
}
运行测试

此时可以在java层获取底层FFmpeg库的版本,代表库编译和移植成功
armeabi-v7a脚本
#!/bin/bash
#NDK_ROOT 变量指向ndk目录
NDK_ROOT=/root/android-ndk-r17c
#TOOLCHAIN 变量指向ndk中的交叉编译gcc所在的目录
TOOLCHAIN=$NDK_ROOT/toolchains/arm-linux-androideabi-4.9/prebuilt/linux-x86_64
#指定android api版本
ANDROID_API=17
#此变量用于编译完成之后的库与头文件存放在哪个目录
PREFIX=./android/armeabi-v7a
#执行configure脚本,用于生成makefile
#--prefix : 安装目录
#--enable-small : 优化大小
#--disable-programs : 不编译ffmpeg程序(命令行工具),我们是需要获得静态(动态)库。
#--disable-avdevice : 关闭avdevice模块,此模块在android中无用
#--disable-encoders : 关闭所有编码器 (播放不需要编码)
#--disable-muxers : 关闭所有复用器(封装器),不需要生成mp4这样的文件,所以关闭
#--disable-filters :关闭视频滤镜
#--enable-cross-compile : 开启交叉编译
#--cross-prefix: gcc的前缀 xxx/xxx/xxx-gcc 则给xxx/xxx/xxx-
#disable-shared enable-static 不写也可以,默认就是这样的。
#--sysroot:
#--extra-cflags: 会传给gcc的参数
#--arch --target-os : 必须要给
./configure \
--prefix=$PREFIX \
--enable-small \
--disable-programs \
--disable-avdevice \
--disable-encoders \
--disable-muxers \
--disable-filters \
--enable-cross-compile \
--cross-prefix=$TOOLCHAIN/bin/arm-linux-androideabi- \
--disable-shared \
--enable-static \
--sysroot=$NDK_ROOT/platforms/android-$ANDROID_API/arch-arm \
--extra-cflags="-isysroot $NDK_ROOT/sysroot -isystem $NDK_ROOT/sysroot/usr/include/arm-linux-androideabi -D__ANDROID_API__=$ANDROID_API -U_FILE_OFFSET_BITS -DANDROID -ffunction-sections -funwind-tables -fstack-protector-strong -no-canonical-prefixes -march=armv7-a -mfloat-abi=softfp -mfpu=vfpv3-d16 -mthumb -Wa,--noexecstack -Wformat -Werror=format-security -O0 -fPIC" \
--arch=arm \
--target-os=android
#上面运行脚本生成makefile之后,使用make执行脚本
make clean
make install
总结
在编译 FFmpeg 的时候会出现很多坑,基本上每个版本的 shell 脚本编写都不一样,所以如果对 Shell 不太了解的,建议先去复习一下。
参考
1.音视频学习 (六) FFmpeg 4.2.2 交叉编译
2.Clang编译FFmpeg常见问题
3.FFmpeg的安装、编译——教程及踩坑


 445
445


 被折叠的 条评论
为什么被折叠?
被折叠的 条评论
为什么被折叠?
 到【灌水乐园】发言


