


今天主要讲解一下如何通过spring boot来整合redis,先简单看一下相关介绍
Redis 是完全开源免费的,遵守BSD协议,是一个高性能的key-value数据库。
Redis 与其他 key - value 缓存产品有以下三个特点:
Redis支持数据的持久化,可以将内存中的数据保存在磁盘中,重启的时候可以再次加载进行使用。
Redis不仅仅支持简单的key-value类型的数据,同时还提供list,set,zset,hash等数据结构的存储。
Redis支持数据的备份,即master-slave模式的数据备份。
Redis应用场景
主要能够体现 解决数据库的访问压力。
例如:短信验证码时间有效期、session共享解决方案
Redis优势
性能极高 – Redis能读的速度是110000次/s,写的速度是81000次/s 。
丰富的数据类型 – Redis支持二进制案例的 Strings,Lists, Hashes, Sets 及 Ordered Sets 数据类型操作。
原子 – Redis的所有操作都是原子性的,同时Redis还支持对几个操作全并后的原子性执行。
丰富的特性 – Redis还支持 publish/subscribe, 通知, key 过期等等特性。
Redis与其他key-value存储有什么不同?
Redis有着更为复杂的数据结构并且提供对他们的原子性操作,这是一个不同于其他数据库的进化路径。Redis的数据类型都是基于基本数据结构的同时对程序员透明,无需进行额外的抽象。
Redis运行在内存中但是可以持久化到磁盘,所以在对不同数据集进行高速读写时需要权衡内存,因为数据量不能大于硬件内存。在内存数据库方面的另一个优点是,相比在磁盘上相同的复杂的数据结构,在内存中操作起来非常简单,这样Redis可以做很多内部复杂性很强的事情。同时,在磁盘格式方面他们是紧凑的以追加的方式产生的,因为他们并不需要进行随机访问。
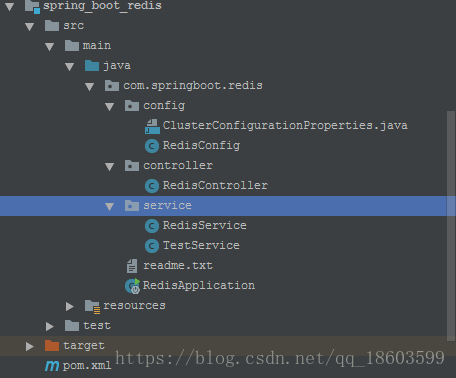
理论知识差不多讲完了,直接上代码吧,看一下整体项目结构:如下所示
首先看一下pom.xml的配置文件内容
<?xml version="1.0" encoding="UTF-8"?>
<project xmlns="http://maven.apache.org/POM/4.0.0"
         xmlns:xsi="http://www.w3.org/2001/XMLSchema-instance"
         xsi:schemaLocation="http://maven.apache.org/POM/4.0.0 http://maven.apache.org/xsd/maven-4.0.0.xsd">

    <modelVersion>4.0.0</modelVersion>

    <artifactId>spring_boot_redis</artifactId>

    <parent>
        <groupId>org.springframework.boot</groupId>
        <artifactId>spring-boot-starter-parent</artifactId>
        <version>1.5.2.RELEASE</version>
    </parent>

    <properties>
        <project.build.sourceEncoding>UTF-8</project.build.sourceEncoding>
        <project.reporting.outputEncoding>UTF-8</project.reporting.outputEncoding>
        <java.version>1.8</java.version>
    </properties>

    <dependencies>

        <!--引入cache-->
        <dependency>
            <groupId>org.springframework.boot</groupId>
            <artifactId>spring-boot-starter-cache</artifactId>
        </dependency>
        <!--data-redis-->
        <dependency>
            <groupId>org.springframework.boot</groupId>
            <artifactId>spring-boot-starter-data-redis</artifactId>
        </dependency>

        <dependency>
            <groupId>redis.clients</groupId>
            <artifactId>jedis</artifactId>
            <version>2.9.0</version>
        </dependency>

        <!--支持web开发-->
        <dependency>
            <groupId>org.springframework.boot</groupId>
            <artifactId>spring-boot-starter-web</artifactId>
        </dependency>


        <!--支持springboot测试-->
        <dependency>
            <groupId>org.springframework.boot</groupId>
            <artifactId>spring-boot-starter-test</artifactId>
        </dependency>

    </dependencies>

</project>
Springboot对于redis的支持 不同的版本可能需要用到的依赖的spring-boot-starter-data-redis的版本也是不一样的,这个要稍微注意一下:
引入 spring-boot-starter-redis(1.4版本前),spring-boot-starter-data-redis(1.4版本后),好了接下来讲解一下是是怎么和springboot进行整合的,其实很简单的,整合方式有两种类型,一种是和单机整合,还有一种是和集群整合,不管是哪一种,其实在新版本中已经没有多少差异了,主要差异就是配置文件会有所不同,下面先说和单机版整合,为了方便和springboot整合,只需要写一个config配置,指定redis的相关配置实例,看一下redisconfig.java的代码
package com.springboot.redis.config;

import org.springframework.cache.CacheManager;
import org.springframework.cache.annotation.CachingConfigurerSupport;
import org.springframework.cache.annotation.EnableCaching;
import org.springframework.cache.interceptor.KeyGenerator;
import org.springframework.context.annotation.Bean;
import org.springframework.context.annotation.Configuration;
import org.springframework.data.redis.cache.RedisCacheManager;
import org.springframework.data.redis.connection.RedisConnectionFactory;
import org.springframework.data.redis.core.RedisTemplate;
import org.springframework.data.redis.serializer.RedisSerializer;
import org.springframework.data.redis.serializer.StringRedisSerializer;

import java.lang.reflect.Method;


/**
 * @Author 18011618
 * @Description 完善redis的一些配置
 * @Date 16:33 2018/7/13
 * @Modify By
 */
@Configuration
@EnableCaching
public class RedisConfig  extends CachingConfigurerSupport {

    /**
     * 管理缓存 失效时间
     * @param redisTemplate
     * @return
     */
    @Bean
    public CacheManager cacheManager(RedisTemplate<?,?> redisTemplate) {
        CacheManager cacheManager = new RedisCacheManager(redisTemplate);
        return cacheManager;
    }

    /**
     * 设置RedisTemplate的一些属性
     * @param factory
     * @return
     */
    @Bean
    public RedisTemplate<String, String> redisTemplate(RedisConnectionFactory factory){
        RedisTemplate<String, String> redisTemplate = new RedisTemplate<String,String>();
        redisTemplate.setConnectionFactory(factory);
        // key序列化方式;(不然会出现乱码;),但是如果方法上有Long等非String类型的话,会报类型转换错误;
        // 所以在没有自己定义key生成策略的时候,以下这个代码建议不要这么写,可以不配置或者自己实现ObjectRedisSerializer
        // 或者JdkSerializationRedisSerializer序列化方式;
        RedisSerializer<String> redisSerializer = new StringRedisSerializer();// Long类型不可以会出现异常信息;
        redisTemplate.setKeySerializer(redisSerializer);//key不会乱码
        redisTemplate.setValueSerializer(redisSerializer);//value不会乱码
        redisTemplate.setHashKeySerializer(redisSerializer);//hashkey不会乱码
        return redisTemplate;
    }
    /**
     * 自定义key.
     * 此方法将会根据类名+方法名+所有参数的值生成唯一的一个key
     */
    @Bean
    public KeyGenerator keyGenerator() {
        return new KeyGenerator() {
            public Object generate(Object o, Method method, Object... objects){
                StringBuilder sb = new StringBuilder();
                sb.append(o.getClass().getName());
                sb.append(method.getName());
                for (Object obj : objects) {
                    sb.append(obj.toString());
                }
                 return sb.toString();
            }
        };
    }


}
这个类主要完成了三件事情
1 设置了缓存管理器CacheMananger
2 设置了对于key和value的序列化方式
3 设置了自定义key的生成方式
需要注意的是,这个类一定要加

这个注解,否则配置不会起到作用的,还有看下面的截图文字标注,自定义的配置文件继承与

它,而它本身是类,不是接口,看一下这个类里面的核心方法:
public class CachingConfigurerSupport implements CachingConfigurer {

	@Override
	public CacheManager cacheManager() {
		return null;
	}

	@Override
	public KeyGenerator keyGenerator() {
		return null;
	}

	@Override
	public CacheResolver cacheResolver() {
		return null;
	}

	@Override
	public CacheErrorHandler errorHandler() {
		return null;
	}

}发现所有的方法默认都是有实现的,但是都是返回null,所以需要开发者自己来实现,如果没有实现的话,这个在启动的时候肯定会报错的,切记!
其实有了这个配置类,和springboot整合就完成了,下面再通过注入RedisTemplate这个类,直接调用API即可,下面封装一个RedisService来实现简单的功能,看代码
package com.springboot.redis.service;
import org.springframework.beans.factory.annotation.Autowired;
import org.springframework.dao.DataAccessException;
import org.springframework.data.redis.connection.RedisConnection;
import org.springframework.data.redis.core.*;
import org.springframework.stereotype.Service;

import java.io.Serializable;
import java.util.List;
import java.util.Set;
import java.util.concurrent.TimeUnit;
/**
 * @Author 18011618
 * @Description 封装redis常用的方法
 * @Date 15:09 2018/7/13
 * @Modify By
 */
@Service
public class RedisService {
    @Autowired
    private RedisTemplate redisTemplate;
    /**
     * 写入缓存
     * @param key
     * @param value
     * @return
     */
    public boolean set(final String key, Object value) {
        boolean result = false;
        try {
            ValueOperations<Serializable, Object> operations = redisTemplate.opsForValue();
            operations.set(key, value);
            result = true;
        } catch (Exception e) {
            e.printStackTrace();
        }
        return result;
    }
    /**
     * 写入缓存设置时效时间
     * @param key
     * @param value
     * @return
     */
    public boolean set(final String key, Object value, Long expireTime) {
        boolean result = false;
        try {
            ValueOperations<Serializable, Object> operations = redisTemplate.opsForValue();
            operations.set(key, value);
            redisTemplate.expire(key, expireTime, TimeUnit.SECONDS);
            result = true;
        } catch (Exception e) {
            e.printStackTrace();
        }
        return result;
    }
    /**
     * 批量删除对应的value
     * @param keys
     */
    public void remove(final String... keys) {
        for (String key : keys) {
            remove(key);
        }
    }

    /**
     * 批量删除key
     * @param pattern
     */
    public void removePattern(final String pattern) {
        Set<Serializable> keys = redisTemplate.keys(pattern);
        if (keys.size() > 0)
            redisTemplate.delete(keys);
    }
    /**
     * 删除对应的value
     * @param key
     */
    public void remove(final String key) {
        if (exists(key)) {
            redisTemplate.delete(key);
        }
    }
    /**
     * 判断缓存中是否有对应的value
     * @param key
     * @return
     */
    public boolean exists(final String key) {
        return redisTemplate.hasKey(key);
    }
    /**
     * 读取缓存
     * @param key
     * @return
     */
    public Object get(final String key) {
        Object result = null;
        ValueOperations<Serializable, Object> operations = redisTemplate.opsForValue();
        result = operations.get(key);
        return result;
    }
    /**
     * 哈希 添加
     * @param key
     * @param hashKey
     * @param value
     */
    public void hmSet(String key, Object hashKey, Object value){
        HashOperations<String, Object, Object> hash = redisTemplate.opsForHash();
        hash.put(key,hashKey,value);
    }

    /**
     * 哈希获取数据
     * @param key
     * @param hashKey
     * @return
     */
    public Object hmGet(String key, Object hashKey){
        HashOperations<String, Object, Object>  hash = redisTemplate.opsForHash();
        return hash.get(key,hashKey);
    }

    /**
     * 列表添加
     * @param k
     * @param v
     */
    public void lPush(String k,Object v){
        ListOperations<String, Object> list = redisTemplate.opsForList();
        list.rightPush(k,v);
    }

    /**
     * 列表获取
     * @param k
     * @param l
     * @param l1
     * @return
     */
    public List<Object> lRange(String k, long l, long l1){
        ListOperations<String, Object> list = redisTemplate.opsForList();
        return list.range(k,l,l1);
    }

    /**
     * 集合添加
     * @param key
     * @param value
     */
    public void add(String key,Object value){
        SetOperations<String, Object> set = redisTemplate.opsForSet();
        set.add(key,value);
    }

    /**
     * 集合获取
     * @param key
     * @return
     */
    public Set<Object> setMembers(String key){
        SetOperations<String, Object> set = redisTemplate.opsForSet();
        return set.members(key);
    }

    /**
     * 有序集合添加
     * @param key
     * @param value
     * @param scoure
     */
    public void zAdd(String key,Object value,double scoure){
        ZSetOperations<String, Object> zset = redisTemplate.opsForZSet();
        zset.add(key,value,scoure);
    }

    /**
     * 有序集合获取
     * @param key
     * @param scoure
     * @param scoure1
     * @return
     */
    public Set<Object> rangeByScore(String key,double scoure,double scoure1){
        ZSetOperations<String, Object> zset = redisTemplate.opsForZSet();
        return zset.rangeByScore(key, scoure, scoure1);
    }
}
看一下对应的配置文件:
# Redis数据库索引(默认为0)
spring.redis.database=0
# Redis服务器地址
spring.redis.host=localhost
# Redis服务器连接端口
spring.redis.port=6379
# Redis服务器连接密码(默认为空)
spring.redis.password=
# 连接池最大连接数(使用负值表示没有限制)
spring.redis.pool.max-active=8
# 连接池最大阻塞等待时间(使用负值表示没有限制)
spring.redis.pool.max-wait=-1
# 连接池中的最大空闲连接
spring.redis.pool.max-idle=8
# 连接池中的最小空闲连接
spring.redis.pool.min-idle=0
# 连接超时时间(毫秒)
spring.redis.timeout=0
如果是集群的话,可以参考下面这个配置
#spring.redis.cluster.nodes=127.0.0.1:7000,127.0.0.1:7001,127.0.0.1:7002,127.0.0.1:7003,127.0.0.1:7004,127.0.0.1:7005写一个启动应用类:
package com.springboot.redis;

import org.springframework.boot.SpringApplication;
import org.springframework.boot.autoconfigure.EnableAutoConfiguration;
import org.springframework.boot.autoconfigure.SpringBootApplication;

/**
 * @Author 18011618
 * @Description
 * @Date 15:10 2018/7/13
 * @Modify By
 */
@SpringBootApplication
@EnableAutoConfiguration
public class RedisApplication {
    public static void main(String[] args) {
        SpringApplication.run(RedisApplication.class,args);
    }
}
然后写一个测试类:
package com.springboot.redis;

import com.springboot.redis.service.RedisService;
import com.springboot.redis.service.TestService;
import org.junit.Test;
import org.junit.runner.RunWith;

import org.springframework.beans.factory.annotation.Autowired;
import org.springframework.boot.test.context.SpringBootTest;
import org.springframework.test.context.junit4.SpringJUnit4ClassRunner;

/**
 * @Author 18011618
 * @Description
 * @Date 16:08 2018/7/13
 * @Modify By
 */
@RunWith(SpringJUnit4ClassRunner.class)
@SpringBootTest(classes = RedisApplication.class)
public class RedisTest {

    @Autowired
    private RedisService redisService;


    /**
     * 测试set方法
     */
    @Test
    public void testRedis(){
        redisService.set("uname","testredis");
    }

    /**
     * 测试get方法
     */
    @Test
    public void testGet(){
       String result =  redisService.get("uname").toString();
        System.err.println("result:"+result);
    }


}
先set,然后再get,可以看到下面这个效果

到此为止就说了,springboot和redis进行了整合,上面是通过代码演示了整合过程,解析来简单分析一下整合过程,看一下之前引入的pom对应的jar
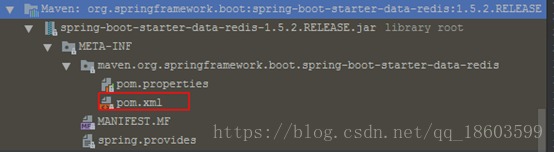
是不是很奇怪,貌似没有一行代码?那是怎么和springboot整合的呢?不错就是通过红色标注的pom文件,看一下这个文件的内容
<?xml version="1.0" encoding="UTF-8"?>

<project xmlns="http://maven.apache.org/POM/4.0.0" xmlns:xsi="http://www.w3.org/2001/XMLSchema-instance" xsi:schemaLocation="http://maven.apache.org/POM/4.0.0 http://maven.apache.org/xsd/maven-4.0.0.xsd">

   <modelVersion>4.0.0</modelVersion>

   <parent>

      <groupId>org.springframework.boot</groupId>

      <artifactId>spring-boot-starters</artifactId>

      <version>1.5.2.RELEASE</version>

   </parent>

   <artifactId>spring-boot-starter-data-redis</artifactId>

   <name>Spring Boot Data Redis Starter</name>

   <description>Starter for using Redis key-value data store with Spring Data Redis and

      the Jedis client</description>

   <url>http://projects.spring.io/spring-boot/</url>

   <organization>

      <name>Pivotal Software, Inc.</name>

      <url>http://www.spring.io</url>

   </organization>

   <properties>

      <main.basedir>${basedir}/../..</main.basedir>

   </properties>

   <dependencies>

      <dependency>

         <groupId>org.springframework.boot</groupId>

         <artifactId>spring-boot-starter</artifactId>

      </dependency>

      <dependency>

         <groupId>org.springframework.data</groupId>

         <artifactId>spring-data-redis</artifactId>

      </dependency>

      <dependency>

         <groupId>redis.clients</groupId>

         <artifactId>jedis</artifactId>

      </dependency>

   </dependencies>

   <build>

      <plugins>

         <plugin>

            <groupId>org.basepom.maven</groupId>

            <artifactId>duplicate-finder-maven-plugin</artifactId>

            <executions>

               <execution>

                  <id>duplicate-dependencies</id>

                  <phase>validate</phase>

                  <goals>

                     <goal>check</goal>

                  </goals>

                  <configuration>

                     <ignoredResourcePatterns>

                        <ignoredResourcePattern>changelog.txt</ignoredResourcePattern>

                     </ignoredResourcePatterns>

                  </configuration>

               </execution>

            </executions>

         </plugin>

      </plugins>

   </build>

</project>到这里才明白,原来还是通过spring-data-redis来实现的,而springboot只不过是通过一个pom.xml文件对依赖进行了封装而已,本身并没有做什么事情.知道这个原理之后,貌似我们自己也可以封装一个springboot的相关的jar,后面会准备一篇文章来阐述一下这方面的知识.
版权声明:转载请标明博客地址谢谢!


 2万+
2万+


 被折叠的 条评论
为什么被折叠?
被折叠的 条评论
为什么被折叠?
 到【灌水乐园】发言


