


以自定义对话框为例:https://blog.csdn.net/qq_18625571/article/details/104521544
1.在values目录下新建两个sgrings.xml文件:New->Values resource file,弹出以下对话框
 按步骤选择,先创建一个英文的string.xml

再创建一个中文的string.xml

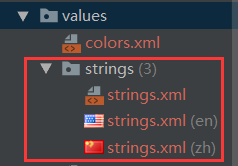
可以看到values目录下有三个string.xml文件
2.我们需要中英转换的字符串有四个
我们在values\strings.xml文件中先定义字符的id,一个用于显示应用名,其余显示文本(提示)名,具体代码如下:
values\strings.xml如果没有该操作会报错
<resources>
    <string name="baidu"><a href='http://www.baidu.com'>Go百度</a></string>
    <string name="input_phone">请输入电话号码</string>
    <string name="phone_number">电话号码</string>
    <string name="confirm">确定</string>
    <string name="cancel">取消</string>
</resources>
接着根据定义的name“id”分别在zh\strings.xml和en\strings.xml文件中进行中英文的对译
zh\strings.xml
<?xml version="1.0" encoding="utf-8"?>
<resources>
    <string name="baidu"><a href='http://www.baidu.com'>Go百度</a></string>
    <string name="input_phone">请输入电话号码</string>
    <string name="phone_number">电话号码</string>
    <string name="confirm">确定</string>
    <string name="cancel">取消</string>
</resources>
en\strings.xml
<?xml version="1.0" encoding="utf-8"?>
<resources>
    <string name="baidu"><a href='http://www.baidu.com'>GoBaidu</a></string>
    <string name="input_phone">Please input phone number</string>
    <string name="phone_number">Phone number</string>
    <string name="confirm">Confirm</string>
    <string name="cancel">Cancel</string>
</resources>
3.对布局中的控件使用国际化
只要用到了国际化的text,其使用格式为,比如第一个“请输入电话号码”:对应的id是input_phone,所以在控件中添加android:text="@string/input_phone"
整体布局如下
dialog.xml
<?xml version="1.0" encoding="utf-8"?>
<FrameLayout xmlns:android="http://schemas.android.com/apk/res/android"
    android:layout_width="match_parent"
    android:layout_height="match_parent"
    android:orientation="vertical">

    <LinearLayout
        android:layout_width="match_parent"
        android:layout_height="wrap_content"
        android:layout_gravity="center"
        android:background="#ffffff"
        android:orientation="vertical">

        <TextView
            android:id="@+id/tv_title"
            android:layout_width="match_parent"
            android:layout_height="40dp"
            android:background="#8BC34A"
            android:gravity="center"
            android:text="@string/input_phone"
            android:textColor="#ffffff"
            android:textSize="20dp"
            android:visibility="visible" />

        <LinearLayout
            android:id="@+id/ll_content"
            android:layout_width="match_parent"
            android:layout_height="60dp"
            android:gravity="center">

            <EditText
                android:layout_width="200dp"
                android:layout_height="40dp"
                android:gravity="center"
                android:minWidth="200dp"
                android:textSize="20dp"
                android:hint="@string/phone_number"
                android:textColor="#E91E63"
                android:maxLength="10"
                android:lines="1"
                android:selectAllOnFocus="true"
                android:background="@drawable/edit_bg"
                />
        </LinearLayout>

        <LinearLayout
            android:layout_width="match_parent"
            android:layout_height="60dp"
            android:layout_gravity="bottom"
            android:background="#E0E0E0"
            android:gravity="center"
            android:orientation="horizontal">

            <Button
                android:id="@+id/btn_ok"
                android:layout_width="114dp"
                android:layout_height="50dp"
                android:layout_marginLeft="20dp"
                android:gravity="center"
                android:text="@string/confirm"
                android:textColor="#4CAF50"
                android:textSize="20dp" />

            <Button
                android:id="@+id/btn_cancel"
                android:layout_width="114dp"
                android:layout_height="50dp"
                android:layout_marginLeft="20dp"
                android:layout_marginRight="20dp"
                android:gravity="center"
                android:text="@string/cancel"
                android:textColor="#009688"
                android:textSize="20dp" />
        </LinearLayout>
    </LinearLayout>
</FrameLayout>
4.自定义对话框事件响应及处理
MyDialog.java
public class MyDialog extends Dialog {
    private Button btnOK;
    private Button btnCancel;

    public MyDialog(Context context){
        super(context);
    }

    @Override
    protected void onCreate(Bundle savedInstanceState) {
        super.onCreate(savedInstanceState);
        requestWindowFeature(Window.FEATURE_NO_TITLE);//去除标题
        setContentView(R.layout.dialog);
        btnOK = (Button) findViewById(R.id.btn_ok);
        btnCancel = (Button) findViewById(R.id.btn_cancel);
        //为确定按钮设置点击事件
        btnOK.setOnClickListener(new View.OnClickListener() {
            @Override
            public void onClick(View v) {
                //点击确定按钮时的操作
            }
        });
        //为取消按钮设置点击事件
        btnCancel.setOnClickListener(new View.OnClickListener() {
            @Override
            public void onClick(View v) {
                dismiss();//关闭当前对话框
            }
        });
    }
}
MainActivity.java
public class MainActivity extends AppCompatActivity  {

    @Override
    protected void onCreate(Bundle savedInstanceState) {
        super.onCreate(savedInstanceState);

        MyDialog myDialog = new MyDialog(this);
        myDialog.show();
    }
}
5.在模拟器设置中转换系统语言,可以看到效果


 714
714


 被折叠的 条评论
为什么被折叠?
被折叠的 条评论
为什么被折叠?
 到【灌水乐园】发言


