


上文中, 我们学习到了 Spring系列三:基于注解配置bean
接下来我们学习, AOP切面编程

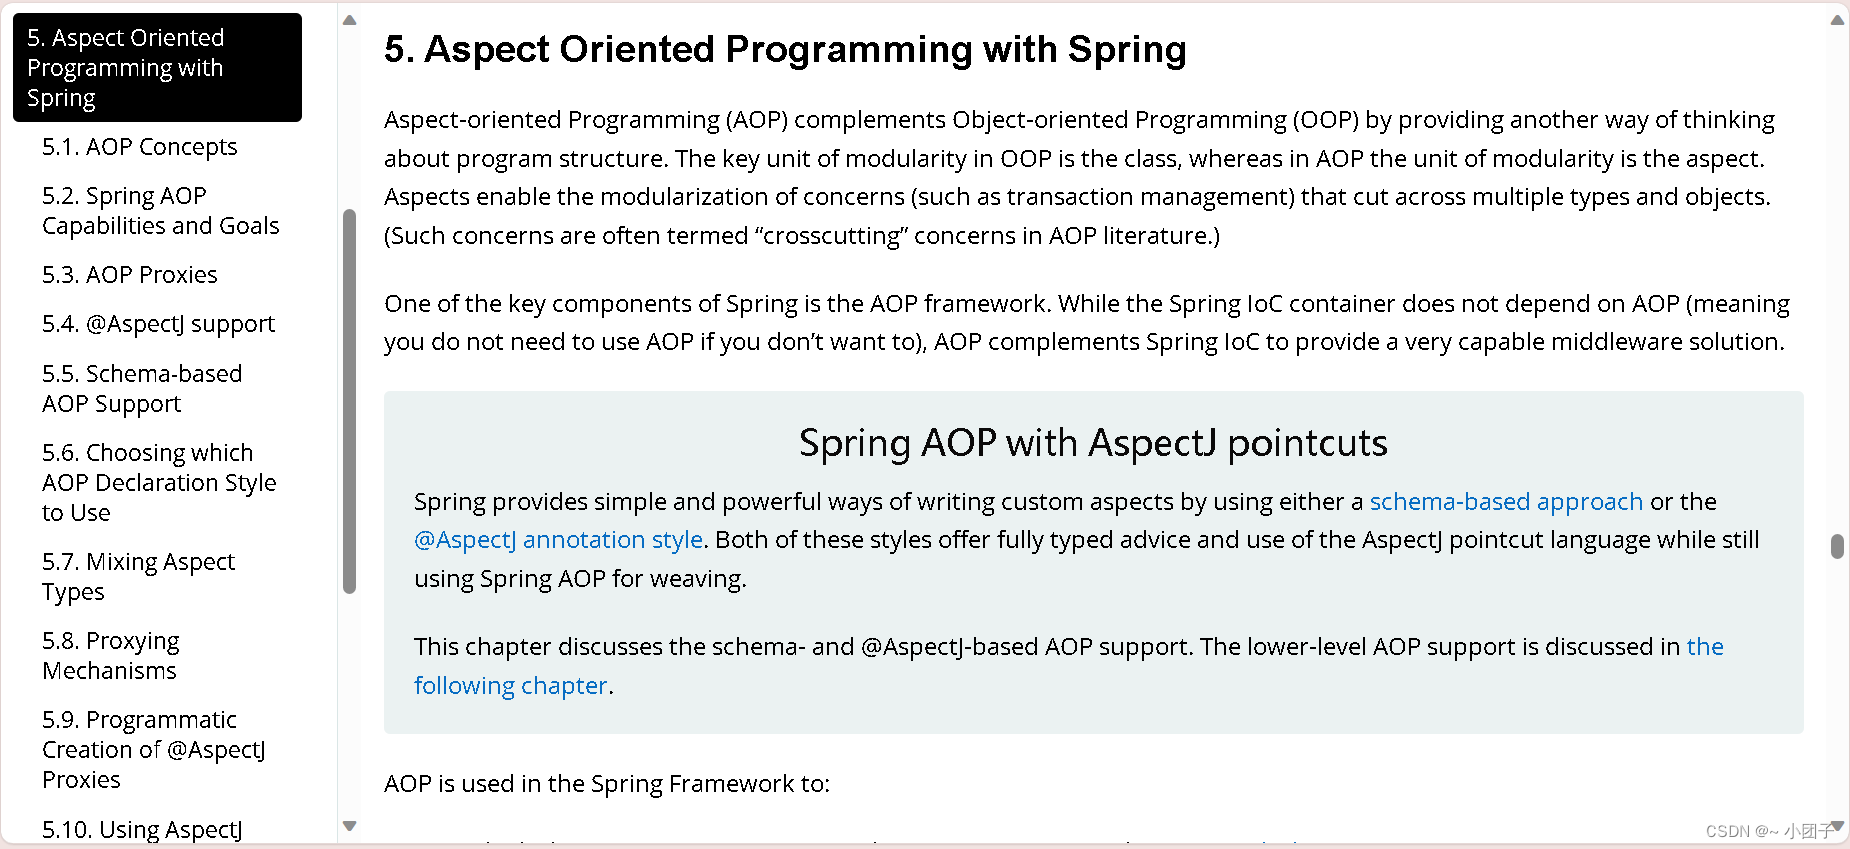
💗AOP-官方文档
🍝AOP 讲解
AOP 讲解: spring-framework-5.3.8\docs\reference\html/core.html
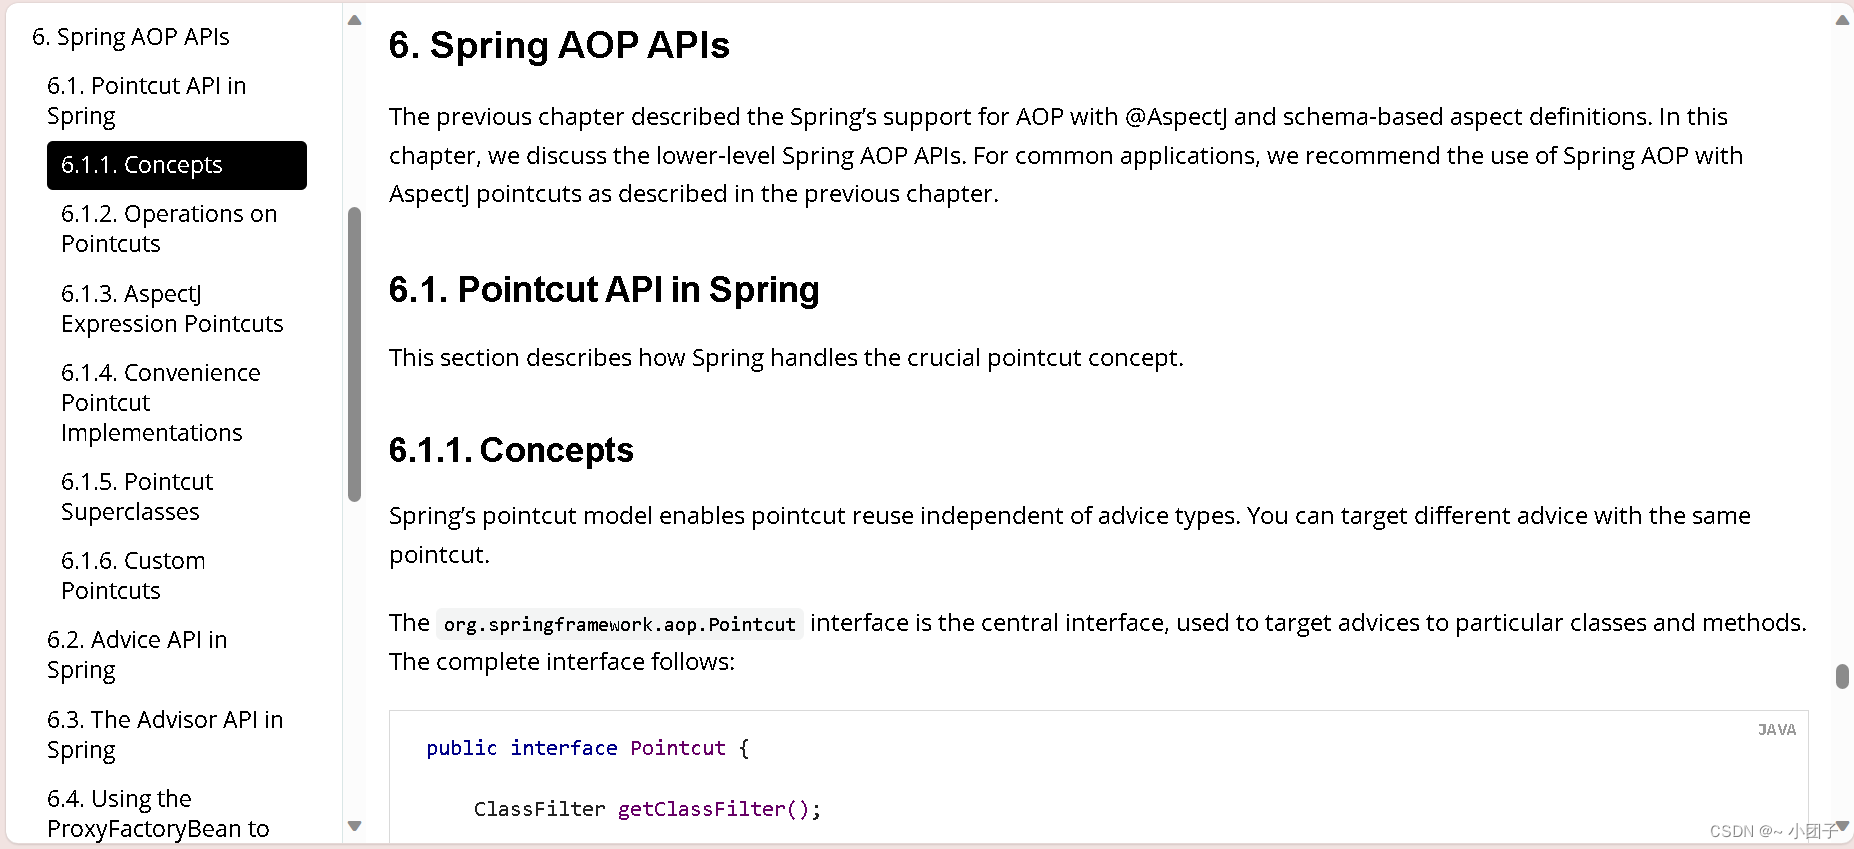
🍝AOP APIs
AOP APIs: spring-framework-5.3.8\docs\reference\html/core.html
spring-framework-5.3.8/docs/javadoc-api/index.html
💗动态代理
🍝初探动态代理
需求说明
1.由Vehicle (交通工具接口, 有一个run方法), 下面有两个类 Car 和 Ship
2.当运行Car对象的 run 方法 和 ship对象的 run 方法时, 输入如下内容
交通工具开始运行了…
轮船在海上航行…
交通工具停止运行了…
交通工具开始运行了…
小汽车在路上跑…
交通工具停止运行了…
解决方案一: 传统方案
1.新建com.zzw.spring.aop.proxy.Vehicle接口
//接口, 该接口有run方法
public interface Vehicle {
    void run();
}
2.com.zzw.spring.aop.proxy.Car
public class Car implements Vehicle {
    @Override
    public void run() {
        System.out.println("交通工具开始运行了....");
        System.out.println("小汽车在路上 running....");
        System.out.println("交通工具停止运行了....");
    }
}
3.com.zzw.spring.aop.proxy.Ship
public class Ship implements Vehicle {
    @Override
    public void run() {
        System.out.println("交通工具开始运行了....");
        System.out.println("大轮船在路上 running....");
        System.out.println("交通工具停止运行了....");
    }
}
4.com.zzw.spring.aop.proxy.TestVehicle
public class TestVehicle {
    @Test
    public void run() {
        //OOP基础=>java基础
        Vehicle vehicle = new Ship();
        //动态绑定
        vehicle.run();
    }
}
来思考一下, 这个解决方案好吗? ====> 代码冗余, 其实就是单个对象的调用, 并没有很好的解决.
解决方案二: 动态代理方式
动态代理解决思路: 在调用方法时, 使用反射机制, 根据方法去决定调用哪个对象方法
1.新建com.zzw.spring.aop.proxy.VehicleProxyProvider
public class VehicleProxyProvider {
//定义一个属性
//target_vehicle 表示真正要执行的对象
//该对象实现了Vehicle接口
private Vehicle target_vehicle;
//构造器
public VehicleProxyProvider(Vehicle target_vehicle) {
this.target_vehicle = target_vehicle;
}
//编写一个方法, 可以返回一个代理对象
public Vehicle getProxy() {
//得到类加载器
ClassLoader classLoader =
target_vehicle.getClass().getClassLoader();
//得到要代理对象/被执行对象 的接口信息, 底层是通过接口来完成调用
Class<?>[] interfaces = target_vehicle.getClass().getInterfaces();
//创建InvocationHandler 对象
//因为 InvocationHandler 是接口, 所以我们可以通过匿名对象的方式来创建该对象
/**
* public interface InvocationHandler {
* public Object invoke(Object proxy, Method method, Object[] args)
* throws Throwable;
* }
* invoke 方法是将来执行target_vehicle的方法时, 会调用到
*/
InvocationHandler invocationHandler = new InvocationHandler() {
/*
class VehicleProxyProvider$01 implements InvocationHandler {
@Override
public Object invoke(Object proxy, Method method, Object[] args) throws Throwable {
System.out.println("交通工具开始运行了....");
//这里是我们的反射基础 => OOP
Object result = method.invoke(target_vehicle, args);
System.out.println("交通工具停止运行了....");
return result;
}
}
InvocationHandler invocationHandler = new VehicleProxyProvider$01();
*/
/**
* invoke 方法是将来执行我们的target_vehicle的方法时, 会调用到
*
* @param proxy 表示代理对象
* @param method 就是通过代理对象调用方法时, 的那个方法 代理对象.run()
* @param args 表示调用 代理对象.run(xx) 传入的参数
* @return 表示 代理对象.run(xx) 执行后的结果.
* @throws Throwable
*/
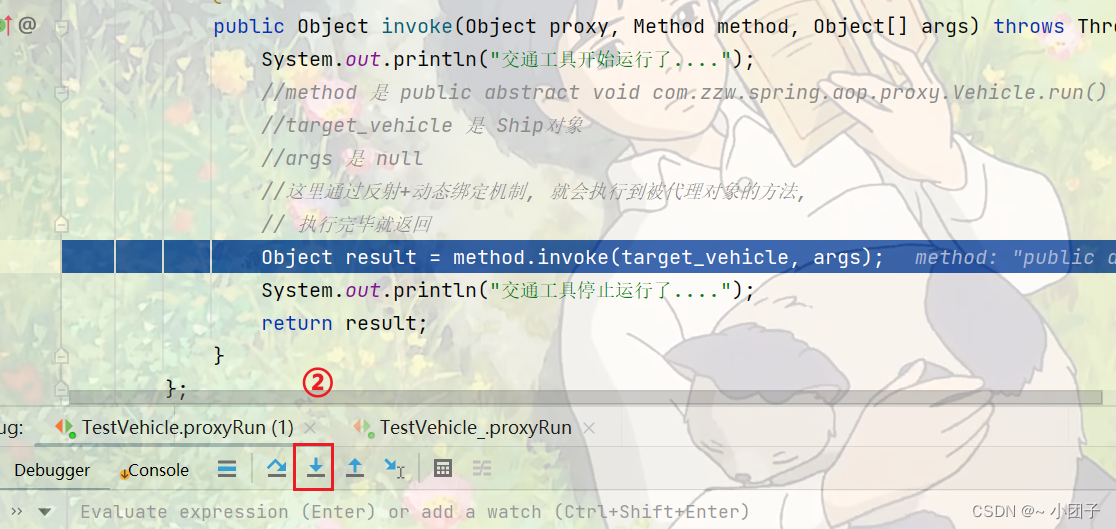
@Override
public Object invoke(Object proxy, Method method, Object[] args) throws Throwable {
System.out.println("交通工具开始运行了....");
//这里是我们的反射基础 => OOP
//method 是 public abstract void com.zzw.spring.aop.proxy.Vehicle.run()
//target_vehicle 是 Ship对象
//args 是 null
//这里通过反射+动态绑定机制, 就会执行到被代理对象的方法
//执行完毕就返回
Object result = method.invoke(target_vehicle, args);
System.out.println("交通工具停止运行了....");
return result;
}
};
/*
public static Object newProxyInstance(ClassLoader loader,
Class<?>[] interfaces,
InvocationHandler h)
解读
1.Proxy.newProxyInstance() 可以返回一个代理对象
2.ClassLoader loader: 类加载器,
3.Class<?>[] interfaces 就是将来要代理的对象的接口信息
4.InvocationHandler h 调用处理器/对象, 有一个非常重要的方法invoke
*/
Vehicle proxy =
(Vehicle) Proxy.newProxyInstance(classLoader, interfaces, invocationHandler);
return proxy;
}
}
2.修改com.zzw.spring.aop.proxy.Vehicle
public interface Vehicle {
    void run();

    public String fly(int height);
}
3.修改com.zzw.spring.aop.proxy.Ship
public class Ship implements Vehicle {
    @Override
    public void run() {
        //System.out.println("交通工具开始运行了....");
        System.out.println("大轮船在路上 running....");
        //System.out.println("交通工具停止运行了....");
    }

    @Override
    public String fly(int height) {
        return "轮船可以飞行 高度=" + height + "米";
    }
}
4.com.zzw.spring.aop.proxy.TestVehicle
public class TestVehicle {
@Test
public void proxyRun() {
//创建Ship对象
Ship ship = new Ship();
//创建VehicleProxyProvider对象, 并且我们要传入代理的对象
VehicleProxyProvider vehicleProxyProvider
= new VehicleProxyProvider(ship);
//获取代理对象, 该对象可以代理执行方法
//解读
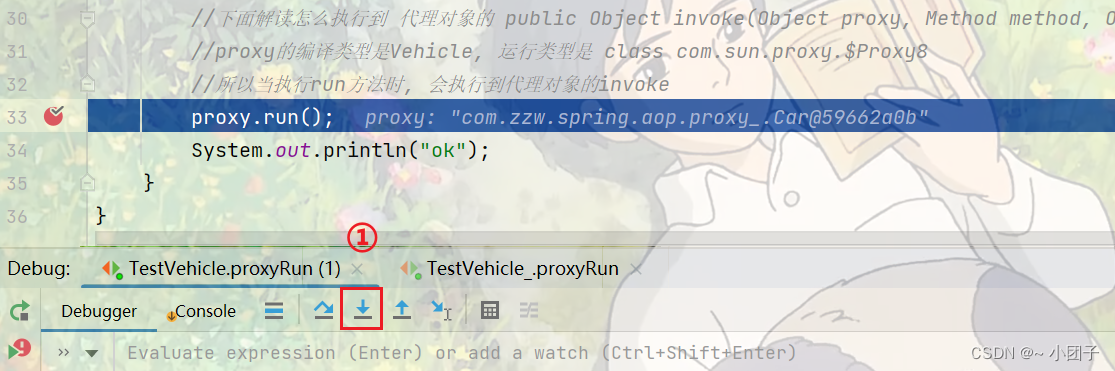
//1.proxy 编译类型Vehicle,
//2.运行类型 是代理类型, 即 class com.sun.proxy.$Proxy8
Vehicle proxy = vehicleProxyProvider.getProxy();
System.out.println("proxy的编译类型是 Vehicle");
System.out.println("proxy的运行类型是" + proxy.getClass());
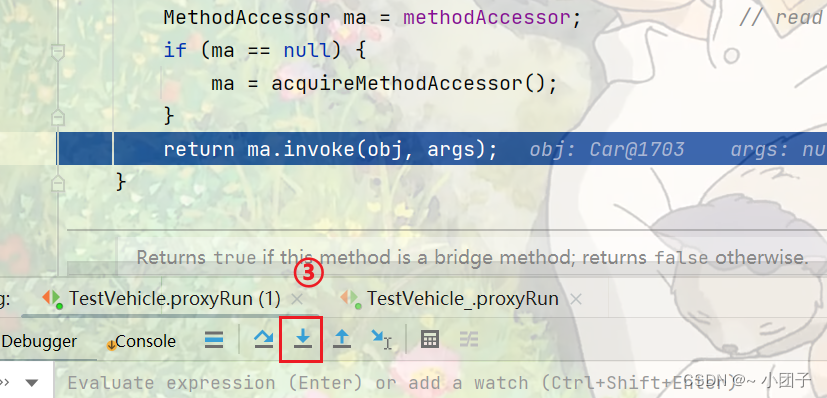
//下面解读/debug怎么执行到 代理对象的 public Object invoke(Object proxy, Method method, Object[] args)
//梳理完毕, proxy的编译类型是Vehicle, 运行类型是Proxy class com.sun.proxy.$Proxy8
//所以当执行run方法时, 会执行到 代理对象的invoke
//如果体现动态 [1.被代理的对象 2.方法]
//proxy.run();
String result = proxy.fly(10000);
System.out.println("result=" + result);
System.out.println("ok");
}
5.debug

🍝动态代理深入
需求说明
1.有一个SmartAnimal 接口, 可以完成简单的加减法, 要求在执行 getSum() 和 getSub() 时, 输出执行前, 执行过程, 执行后的日志结果. 输出内容如下:
日志-方法名-getSum-参数 1.5 4.5
方法内部打印result = 6.0
日志-方法名-getSum-结果result= 6.0
=================================
日志-方法名-getSub-参数 1.4 3.3
方法内部打印result = -1.9
日志-方法名-getSub-结果result= -1.9
解决方案一: 传统方案
1.新建com.zzw.spring.aop.proxy2.SmartAnimalAble接口
public interface SmartAnimalAble {
    //求和
    float getSum(float i, float j);

    //求差
    float getSub(float i, float j);
}
2.com.zzw.spring.aop.proxy2.SmartCat
public class SmartCat implements SmartAnimalAble {
    @Override
    public float getSum(float i, float j) {
        System.out.println("日志-方法名-getSum-参数 " + i + " " + j);
        float result = i + j;
        System.out.println("方法内部打印result = " + result);
        System.out.println("日志-方法名-getSum-结果result= " + (i + j));
        return result;
    }

    @Override
    public float getSub(float i, float j) {
        System.out.println("日志-方法名-getSub-参数 " + i + " " + j);
        float result = i - j;
        System.out.println("方法内部打印result = " + result);
        System.out.println("日志-方法名-getSub-结果result= " + (i - j));
        return result;
    }
}
3.com.zzw.spring.aop.proxy2.AopTest
public class AopTest {
    @Test
    public void run() {
        SmartAnimalAble smartAnimalAble = new SmartCat();
        smartAnimalAble.getSum(1.5f, 4.5f);
        System.out.println("=================================");
        smartAnimalAble.getSub(1.4f, 3.3f);
    }
}
解决方案二: 动态代理方式
考虑代理对象调用方法(底层是反射调用)时, 可能出现的异常- [横切关注点]
1.新建com.zzw.spring.aop.proxy2.MyProxyProvider
//可以返回一个动态代理对象, 可以执行SmartCat对象的方法
public class MyProxyProvider {
//这是一个属性, 是我们要执行的目标对象
//该对象实现了SmartAnimalAble接口
private SmartAnimalAble target_obj;
//构造器
MyProxyProvider(SmartAnimalAble target_obj) {
this.target_obj = target_obj;
}
//编写一个方法, 可以返回一个代理对象
//该代理对象可以执行目标方法
public SmartAnimalAble getProxy() {
//1.得到类加载器
ClassLoader classLoader =
target_obj.getClass().getClassLoader();
//2.得到要执行的目标对象的接口信息
Class<?>[] interfaces = target_obj.getClass().getInterfaces();
//3.创建InvocationHandler 对象
InvocationHandler invocationHandler = new InvocationHandler() {
@Override
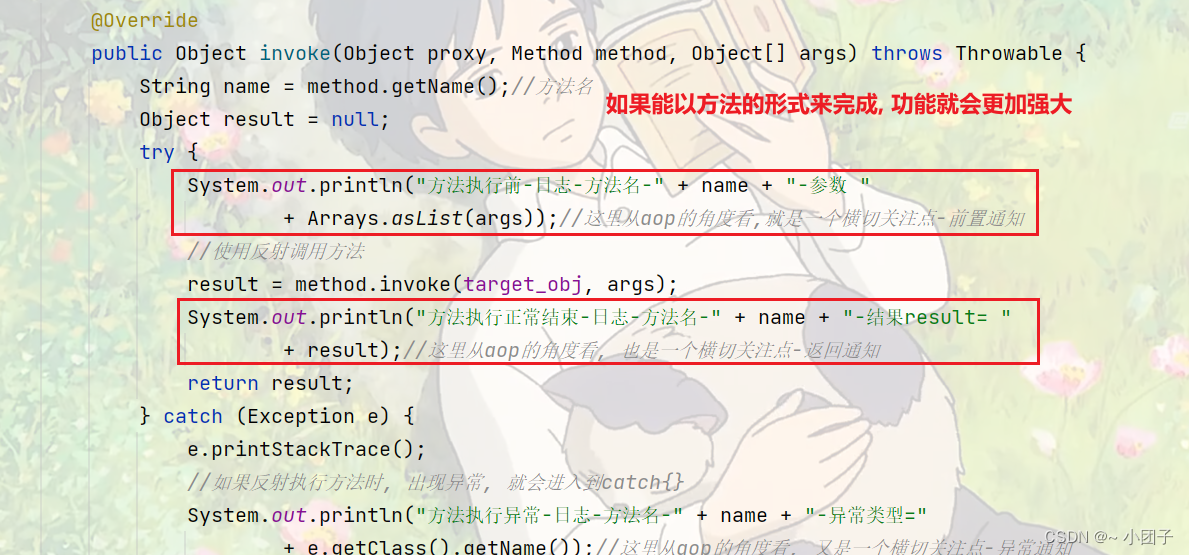
public Object invoke(Object proxy, Method method, Object[] args) throws Throwable {
String name = method.getName();//方法名
Object result = null;
try {
System.out.println("方法执行前-日志-方法名-" + name + "-参数 "
+ Arrays.asList(args));//这里从aop的角度看,就是一个横切关注点-前置通知
//使用反射调用方法
result = method.invoke(target_obj, args);
System.out.println("方法执行正常结束-日志-方法名-" + name + "-结果result= "
+ result);//这里从aop的角度看, 也是一个横切关注点-返回通知
return result;
} catch (Exception e) {
e.printStackTrace();
//如果反射执行方法时, 出现异常, 就会进入到catch{}
System.out.println("方法执行异常-日志-方法名-" + name + "-异常类型="
+ e.getClass().getName());//这里从aop的角度看, 又是一个横切关注点-异常通知
} finally {//不管你是否出现了异常, 最终都会执行到 finally {}
//这里从aop的角度看, 还是一个横切关注点-最终通知
System.out.println("方法最终结束-日志-方法名-" + name);
}
return result;
}
};
//创建代理对象
SmartAnimalAble proxy =
(SmartAnimalAble) Proxy.newProxyInstance(classLoader, interfaces, invocationHandler);
return proxy;
}
}
2.修改com.zzw.spring.aop.proxy2.SmartCat
public class SmartCat implements SmartAnimalAble {
    @Override
    public float getSum(float i, float j) {
        //System.out.println("日志-方法名-getSum-参数 " + i + " " + j);

        float result = i + j;
        System.out.println("方法内部打印result = " + result);

        //System.out.println("日志-方法名-getSum-结果result= " + (i + j));
        return result;
    }

    @Override
    public float getSub(float i, float j) {
        //System.out.println("日志-方法名-getSub-参数 " + i + " " + j);

        float result = i - j;
        System.out.println("方法内部打印result = " + result);
        //
        System.out.println("日志-方法名-getSub-结果result= " + (i - j));
        return result;
    }
}
3.com.zzw.spring.aop.proxy2.AopTest
public class AopTest {

    @Test
    public void smartCatTestProxy() {
        //创建SmartCat对象
        SmartAnimalAble smartAnimalAble = new SmartCat();
        MyProxyProvider myProxyProvider
                = new MyProxyProvider(smartAnimalAble);
        //获取代理对象, 该对象可以代理执行方法
        SmartAnimalAble proxy = myProxyProvider.getProxy();

        System.out.println("proxy的编译类型是 SmartAnimalAble");
        System.out.println("proxy的运行类型是 " + proxy.getClass());
        //proxy的编译类型是SmartAnimalAble, 运行类型是 Class com.sun.proxy.$Proxy8
        //所以当执行getSum方法时, 会执行到 代理对象的invoke
        proxy.getSum(1.2f, 2.4f);
        System.out.println("=================================");
        proxy.getSub(1.3f, 4.5f);
        System.out.println("ok");
    }
}
🍝AOP问题提出
在MyProxyProvider.java中, 我们的输出语句功能比较弱, 在实际开发中, 我们希望是以一个方法的形式, 嵌入到真正执行的目标方法前.
如图分析
📗使用土方法解决
需求分析
使用土方法解决前面的问题, 后面使用Spring的AOP组件完成
1.先建一个包, 把相关文件拷贝过来, 进行修改完成. ----这里只是模拟, 并没有真的新建包
//我们的一个方法, 在目标对象执行前执行
public void before(Method method, Object[] args) {
    System.out.println("before方法执行前-日志-方法名-" + method.getName() + "-参数 "
            + Arrays.asList(args));//这里从aop的角度看,就是一个横切关注点-前置通知
}

//我们的一个方法, 在目标对象执行后执行
public void after(Method method, Object result) {
    System.out.println("after方法执行正常结束-日志-方法名-" + method.getName() + "-结果result= "
            + result);//这里从aop的角度看, 也是一个横切关注点-返回通知
}
@Override
public Object invoke(Object proxy, Method method, Object[] args) throws Throwable {
    String name = method.getName();//方法名
    Object result = null;
    before(method, args);
    //使用反射调用方法
    result = method.invoke(target_obj, args);
    after(method, result);
    return result;
}
2.该方法问题分析: 耦合度高
📗 对土方法解耦-开发最简单的AOP类
1.新建com.zzw.spring.aop.proxy2.ZzwAOP
public class ZzwAOP {
    //我们的一个方法, 在目标对象执行前执行
    public static void before(Method method, Object[] args) {
        System.out.println("ZzwHsp-方法执行前-日志-方法名-" + method.getName() + "-参数 "
                + Arrays.asList(args));//这里从aop的角度看,就是一个横切关注点-前置通知
    }

    //我们的一个方法, 在目标对象执行后执行
    public static void after(Method method, Object result) {
        System.out.println("ZzwHsp-方法执行正常结束-日志-方法名-" + method.getName() + "-结果result= "
                + result);//这里从aop的角度看, 也是一个横切关注点-返回通知
    }
}
2.修改com.zzw.spring.aop.proxy2.MyProxyProvider
@Override
public Object invoke(Object proxy, Method method, Object[] args) throws Throwable {
    String name = method.getName();//方法名
    Object result = null;
    try {
        //before(method, args);
        ZzwAOP.before(method, args);

        //使用反射调用方法
        result = method.invoke(target_obj, args);

        //after(method, result);
        ZzwAOP.after(method, result);

        return result;
    } catch (Exception e) {
    }
}
📗 土方法缺点
土方法 不够灵活;
土方法 复用性差;
土方法 是一种硬编码 (因为没有注解和反射支撑)
Spring AOP 闪亮登场 - 底层是ASPECTJ
💗Spring AOP
🍝基本介绍
●什么是AOP
AOP的全称(aspect oriented programming), 面向切面编程.

●AOP实现方式
1.基于动态代理的方式 [内置aop实现]
2.使用框架aspectj来实现
🍝AOP编程 快速入门
●说明
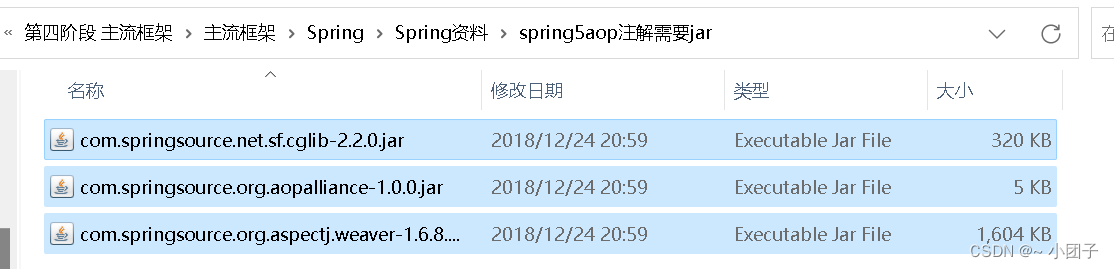
1.需要引入核心的aspect包
2.在切面类中声明通知方法
1)前置通知: @Before
2)返回通知: @AfterReturning
3)异常通知: @AfterThrowing
4)后置通知: @After 最终通知
5)环绕通知: @Around
●需求说明
我们使用aop编程的方式, 来实现手写的动态代理案例效果, 以上一个案例为例进行讲解.
2.新建com.zzw.spring.aop.aspectj.SmartAnimalAble
public interface SmartAnimalAble {
    //求和
    float getSum(float i, float j);

    //求差
    float getSub(float i, float j);
}
3.新建com.zzw.spring.aop.aspectj.SmartDog
易错点: 不要引入别的包下的SmartAnimalAble, 要引入同包下的SmartAnimalAble
@Component //使用@Component 当spring容器启动时, 将 SmartDog 注入到容器
public class SmartDog implements SmartAnimalAble {
    @Override
    public float getSum(float i, float j) {
        float result = i + j;
        System.out.println("方法内部打印result = " + result);
        return result;
    }

    @Override
    public float getSub(float i, float j) {
        float result = i - j;
        System.out.println("方法内部打印result = " + result);
        return result;
    }
}
4.新建com.zzw.spring.aop.aspectj.SmartAnimalAspect
切面类, 类似于我们前面自己写的MyProxyProvider, 但是功能强大很多
@Aspect //表示是一个切面类[底层切面编程的支撑(动态代理+反射+动态绑定)]
@Component //会将SmartAnimalAspect注入到容器
public class SmartAnimalAspect {

    //希望将showBeginLog方法切入到SmartDog-getSum前执行-前置通知

    /**
     * 解读
     * 1. @Before 表示是前置通知, 即在我们的目标对象执行方法前执行
     * 2. value = "execution(public float com.zzw.spring.aop.aspectj.SmartDog.getSum(float, float))"
     * 指定切入到哪个类的哪个方法 形式是: 访问修饰符 返回类型 全类名.方法名(形参列表)
     * 3. showBeginLog方法可以理解成就是一个切入方法, 这个方法名是可以由程序员指定的 比如:showBeginLog
     * 4. JoinPoint joinPoint 在底层执行时, 由AspectJ切面编程框架, 会给该切入方法传入 joinPoint对象
     * , 通过该方法, 程序员可以获取到 相关信息
     * @param joinPoint
     */
    @Before(value = "execution(public float com.zzw.spring.aop.aspectj.SmartDog.getSum(float, float))")
    public void showBeginLog(JoinPoint joinPoint) {
        //通过连接点对象joinPoint, 可以获取方法签名
        Signature signature = joinPoint.getSignature();
        System.out.println("切面类showBeginLog()-方法执行前-日志-方法名-" + signature.getName() + "-参数 "
                + Arrays.asList(joinPoint.getArgs()));
    }

    //返回通知: 即把showSuccessEndLog方法切入到目标对象方法正常执行完毕后的地方
    @AfterReturning(value = "execution(public float com.zzw.spring.aop.aspectj.SmartDog.getSum(float, float))")
    public void showSuccessEndLog(JoinPoint joinPoint) {
        Signature signature = joinPoint.getSignature();
        System.out.println("切面类showSuccessEndLog()-方法执行正常结束-日志-方法名-" + signature.getName());
    }

    //异常通知: 即把showExceptionLog方法切入到目标对象方法执行发生异常后的catch{}
    @AfterThrowing(value = "execution(public float com.zzw.spring.aop.aspectj.SmartDog.getSum(float, float))")
    public void showExceptionLog(JoinPoint joinPoint) {
        Signature signature = joinPoint.getSignature();
        System.out.println("切面类showExceptionLog()-方法执行异常-日志-方法名-" + signature.getName());
    }

    //最终通知: 即把showFinallyEndLog方法切入到目标方法执行后, 不管是否发生异常都要执行, finally{}
    @After(value = "execution(public float com.zzw.spring.aop.aspectj.SmartDog.getSum(float, float))")
    public void showFinallyEndLog(JoinPoint joinPoint) {
        Signature signature = joinPoint.getSignature();
        System.out.println("切面类showFinallyEndLog()-方法最终执行完毕-日志-方法名-" + signature.getName());
    }
}
5.新建src/beans08.xml
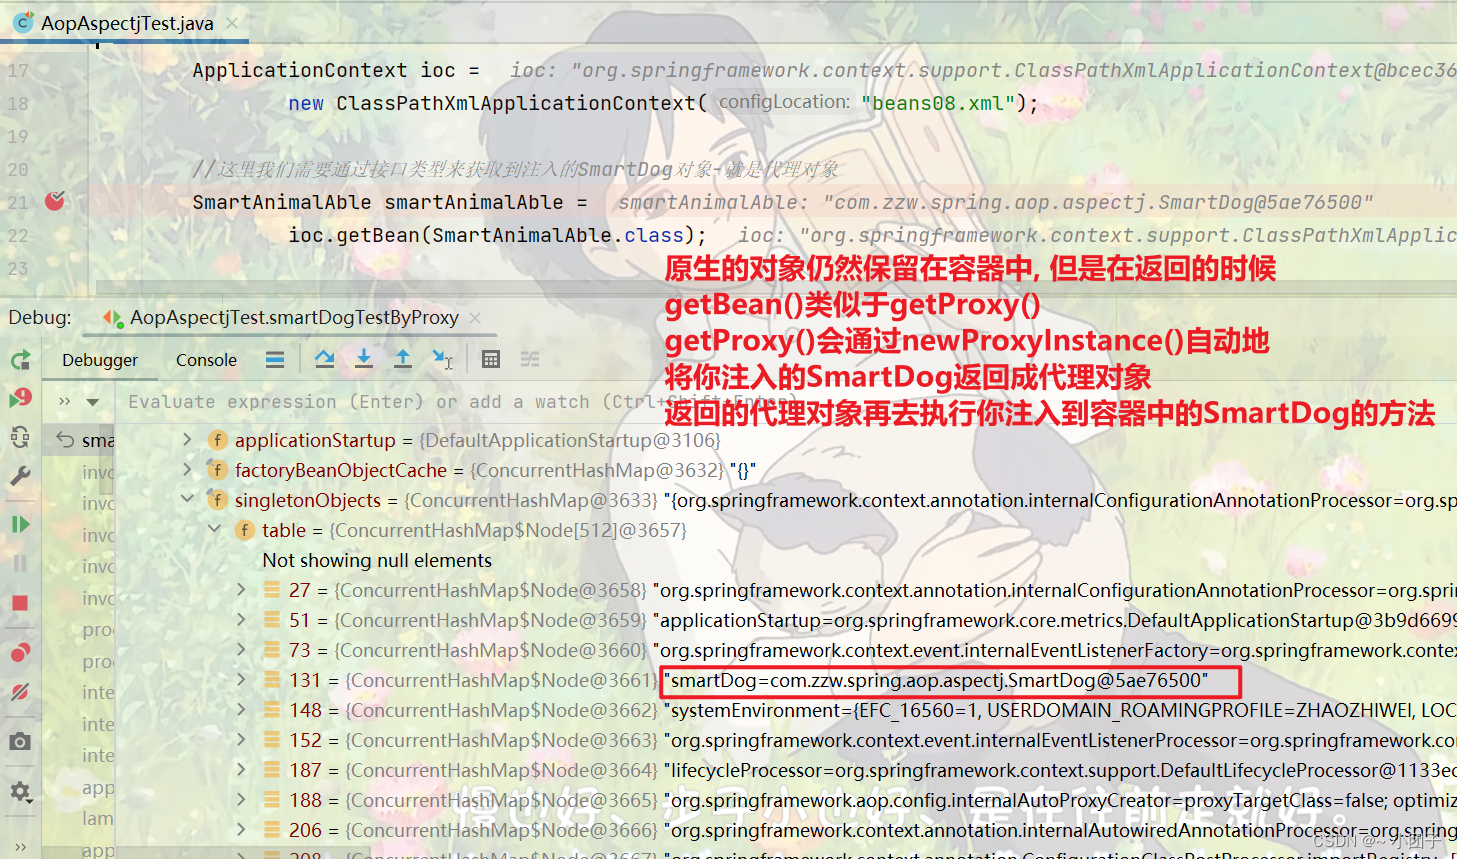
具体来说,当你通过 getBean() 方法获取 SmartDog 类时,返回的对象实际上是 Spring 自动生成的代理对象,而不是 SmartDog 类的原始对象。这个代理对象会在目标方法执行前后,以及发生异常时,执行切面类中定义的各种通知方法,从而实现了 AOP 的功能。切入到哪个类, 哪个类就会被代理
<?xml version="1.0" encoding="UTF-8"?>
<beans xmlns="http://www.springframework.org/schema/beans"
       xmlns:xsi="http://www.w3.org/2001/XMLSchema-instance"
       xmlns:context="http://www.springframework.org/schema/context"
       xsi:schemaLocation="http://www.springframework.org/schema/beans http://www.springframework.org/schema/beans/spring-beans.xsd http://www.springframework.org/schema/context https://www.springframework.org/schema/context/spring-context.xsd">

    <context:component-scan base-package="com.zzw.spring.aop.aspectj"/>

    <!--开启基于注解的AOP功能-->
    <aop:aspectj-autoproxy/>
</beans>
6.测试com.zzw.spring.aop.aspectj.AspAspectjTest
public class AopAspectjTest {

    @Test
    public void smartDogTestByProxy() {

        ApplicationContext ioc =
                new ClassPathXmlApplicationContext("beans08.xml");

        //这里我们需要通过接口类型来获取到注入的SmartDog对象-就是代理对象
        SmartAnimalAble smartAnimalAble =
                ioc.getBean(SmartAnimalAble.class);


        smartAnimalAble.getSum(1, 2);


        //System.out.println("smartAnimalAble运行类型是 " + smartAnimalAble.getClass());//class com.sun.proxy.$Proxy16
    }
}
🍝注意事项和细节
1.关于切面类方法命名可以自己规范一下, 比如showBeginLog(), showSuccessEndLog(), showExceptionLog(), showFinallyEndLog()
2.切入表达式的更多配置, 比如使用模糊配置
@Before(value=“execution(* com.zzw.aop.proxy.SmartDog.*(…))”)
第一个\*表示: 任意修饰符和返回类型
第二个\*表示: 任意方法名
..表示: 任意形参列表
3.表示所有访问权限, 所有包下的所有类的所有方法, 都会被执行该前置通知方法
@Before(value=“execution(* *.*(…))”)
4.当spring容器开启了 基于注解的AOP功能 <aop:aspectj-autoproxy/>, 我们获取注入的对象, 需要以接口的类型来获取, 因为你注入的对象.getClass() 已经是代理类型了
5.当spring容器开启了 基于注解的AOP功能 <aop:aspectj-autoproxy/>, 我们获取注入的对象, 也可以通过id来获取, 但是也要转成接口类型.
//这里我们需要通过接口类型来获取到注入的SmartDog对象-就是代理对象
SmartAnimalAble smartAnimalAble = ioc.getBean(SmartAnimalAble.class);

//SmartAnimalAble smartAnimalAble = (SmartAnimalAble) ioc.getBean("smartDog");
🍝课后作业
●作业要求
1.有接口 UsbInterface (方法 work)
2.实现子类 Phone 和 Camera 实现 UsbInterface
3.请在SmartAnimalAspect 切面类, 写一个方法(可输出日志信息作为前置通知, 在Phone和Camera对象执行work方法前调用
4.其它如返回通知, 异常通知, 后置通知, 也可以加入.
●代码实现
1.新建com.zzw.spring.aop.homework.UsbInterface接口
public interface UsbInterface {
    void work(String name);
}
2.新建com.zzw.spring.aop.homework.Phone
@Component //将Phone当作一个组件注入到容器中
public class Phone implements UsbInterface {
    @Override
    public void work(String name) {
        System.out.println(name + " 手机正在工作中....");
    }
}
3.新建com.zzw.spring.aop.homework.Camera
@Component //将Camera对象注入到Spring容器
public class Camera implements UsbInterface {
    @Override
    public void work(String name) {
        System.out.println(name + " 相机正在工作中....");
    }
}
4.切面类com.zzw.spring.aop.homework.Phone.SmartAnimalAspect
@Aspect
@Component
public class SmartAnimalAspect {
    //希望将showBeginLog切入到Phone/Camera-work() 前执行
    //前置通知
    //切入表达式也可以指向接口的方法, 这时切入表达式会对实现了接口的类/对象生效
    //比如下面我们是对UsbInterface切入, 那么对实现类 Phone/Camera 都生效
    //@Before(value = "execution(public void *.work(String))")
    @Before(value = "execution(public void com.zzw.spring.aop.homework.UsbInterface.work(String))")
    public void showBeginLog(JoinPoint joinPoint) {
        //通过连接点对象, 可以获取方法签名
        Signature signature = joinPoint.getSignature();
        System.out.println("切面类showBeginLog()-方法执行前-日志-方法名-" + signature.getName() + "-参数"
        + Arrays.asList(joinPoint.getArgs()));
    }

    //返回通知
    @AfterReturning(value = "execution(public void UsbInterface.work(String))")
    //@AfterReturning(value = "execution(public void com.zzw.spring.aop.homework.*.work(String))")
    public void showSuccessEndLog(JoinPoint joinPoint) {
        //通过连接点对象, 可以获取方法名
        Signature signature = joinPoint.getSignature();
        System.out.println("切面类showSuccessEndLog()-方法执行正常结束-日志-方法名-" + signature.getName());
    }

    //异常通知
    //@AfterThrowing(value = "execution(public void *.work(String))")
    @AfterThrowing(value = "execution(public void UsbInterface.work(String))")
    public void showExceptionLog(JoinPoint joinPoint) {
        //通过连接点对象, 可以获取方法名
        Signature signature = joinPoint.getSignature();
        System.out.println("切面类showExceptionLog()-方法执行异常-日志-方法名-" + signature.getName());
    }

    //后置通知
    //@After(value = "execution(public void *.work(String))")
    @After(value = "execution(public void UsbInterface.work(String))")
    public void showFinallyEndLog(JoinPoint joinPoint) {
        //通过连接点对象, 可以获取方法名
        Signature signature = joinPoint.getSignature();
        System.out.println("切面类showFinallyEndLog()-方法最终执行完毕-日志-方法名-" + signature.getName());
    }
}
5.src/beans09.xml
<?xml version="1.0" encoding="UTF-8"?>
<beans xmlns="http://www.springframework.org/schema/beans"
       xmlns:xsi="http://www.w3.org/2001/XMLSchema-instance"
       xmlns:context="http://www.springframework.org/schema/context"
       xmlns:aop="http://www.springframework.org/schema/aop"
       xsi:schemaLocation="http://www.springframework.org/schema/beans http://www.springframework.org/schema/beans/spring-beans.xsd http://www.springframework.org/schema/context https://www.springframework.org/schema/context/spring-context.xsd http://www.springframework.org/schema/aop https://www.springframework.org/schema/aop/spring-aop.xsd">

    <context:component-scan base-package="com.zzw.spring.aop.homework"/>

    <!--开启基于注解的AOP功能-->
    <aop:aspectj-autoproxy/>
</beans>
6.测试com.zzw.spring.aop.homework.AspAspectjTest
public class AspAspectjTest {
    public static void main(String[] args) {
        ApplicationContext ioc =
                new ClassPathXmlApplicationContext("beans09.xml");

        UsbInterface phone = (UsbInterface) ioc.getBean("phone");
        phone.work("华为");

        System.out.println("===================================");

        UsbInterface camera = (UsbInterface) ioc.getBean("camera");
        camera.work("索尼");

        //System.out.println("phone的运行类型是" + phone.getClass());
    }
}
🐋AOP-切入表达式
💧通配符
切入点表达式
1.作用
通过表达式的方式定位一个或多个具体的连接点
2.语法细节
①切入点表达式的语法格式
execution([权限修饰符] [返回值类型] [简单类名/全类名] [方法名] (参数列表))
②举例说明
| 表达式 | execution(* com.zzw.spring.aop.aspectj.SmartDog.*(..)) |
|---|---|
| 含义 | 如果SmartAnimalAble是接口, 则表示 接口/类 中声明的所有方法. 第一个 * 代表任意修饰符及任意返回值 第二个 * 表示任意方法 .. 匹配任意数量, 任意类型的参数 (规定.的数量是2个) 若目标类/接口与该切面类在同一个包中可以省略包名 |
| 表达式 | execution(public * SmartDog.*(..)) |
|---|---|
| 含义 | SmartDog 接口/类 中的所有公有方法 |
| 表达式 | execution(public double SmartDog.*(..)) |
|---|---|
| 含义 | SmartDog 接口/类 中返回double类型数值的方法 |
| 表达式 | execution(public double SmartDog.*(double, ..)) |
|---|---|
| 含义 | 第一个参数为double类型的方法. ..匹配任意数量, 任意类型的参数 |
| 表达式 | execution(public double SmartDog.*(double, double)) |
|---|---|
| 含义 | 参数类型为double, double类型的方法 |
| 表达式 | execution(public double SmartDog.*(double, double)) |
|---|---|
| 含义 | 参数类型为double, double类型的方法 |
③在AspectJ中, 切入点表达式可以通过&&, ||, ! 等操作符结合起来
| 表达式 | execution(* *.add(int, ..)) || execution(* *.sub(int, ..)) |
|---|---|
| 含义 | 任意类中第一个参数为int类型的add方法或sub方法 |
💧注意事项和细节
1.切入表达式也可以指向类的方法, 这时切入表达式会对该类/对象生效
2.切入表达式也可以指向接口的方法, 这时切入表达式会对实现了接口的类/对象生效
3.切入表达式也可以对没有实现接口的类, 进行切入
●代码实现
1.新建com.zzw.spring.aop.aspectj.Car
@Component //把Car视为一个组件[对象], 注入到Spring容器
public class Car {
    public void run() {
        System.out.println("小汽车 run...");
    }
}
2.com.zzw.spring.aop.aspectj.SmartAnimalAspect
//切面类
@Aspect //表示是一个切面类
@Component //会将SmartAnimalAspect注入到容器
public class SmartAnimalAspect {
    //给Car配置一个前置通知
    @Before(value = "execution(public void Car.run())")
    public void ok1(JoinPoint joinPoint) {
        Signature signature = joinPoint.getSignature();
        System.out.println("切面类的ok1()-执行的目标方法-" + signature.getName());
    }
}
3.测试com.zzw.spring.aop.homework.AspAspectjTest
public class AopAspectjTest {
    @Test
    public void test() {
        ApplicationContext ioc =
                new ClassPathXmlApplicationContext("beans08.xml");

        Car car = ioc.getBean(Car.class);

        //说明: car对象仍然是代理对象
        System.out.println("car的运行类型=" + car.getClass());
        //car的运行类型=class com.zzw.spring.aop.aspectj.Car$$EnhancerBySpringCGLIB$$5e9a8b7a

        car.run();
    }
}
4.补充: 动态代理jdk的Proxy和Spring的CGlib
具体来说,Spring AOP 使用 JDK 动态代理和 CGLIB 两种方式来生成代理对象,其中选择使用哪种方式取决于被代理的类是否实现了接口。
如果被代理的类实现了接口,Spring AOP 会使用 JDK 动态代理。JDK 动态代理要求被代理的类必须实现至少一个接口,代理对象会实现这个接口并在运行时生成代理实例。
如果被代理的类没有实现接口,Spring AOP 会使用 CGLIB 来生成代理对象。CGLIB 可以代理没有实现接口的类,它通过继承被代理类来生成代理对象。
🐋AOP-JoinPoint
1.通过JoinPoint可以获取到调用方法的签名
2.其他常用方法
●代码实现
1.com.zzw.spring.aop.aspectj.SmartAnimalAspect
@Aspect //表示是一个切面类
@Component //会将SmartAnimalAspect注入到容器
public class SmartAnimalAspect {
    //给Car配置一个最终通知
    @After(value = "execution(public void Car.run())")
    public void ok4(JoinPoint joinPoint) {
        //演示joinPoint常用的方法

        joinPoint.getSignature().getName();//获取目标方法名

        joinPoint.getSignature().getDeclaringType().getSimpleName();//获取目标方法所属类的简单类名

        joinPoint.getSignature().getDeclaringTypeName();//获取目标方法所属类的全类名
        joinPoint.getSignature().getDeclaringType().getName();//获取目标方法所属类的全类名

        joinPoint.getSignature().getModifiers();//获取目标方法声明类型(public, private, protected)

        Object[] args = joinPoint.getArgs();//获取传入目标方法的参数, 返回一个数组

        joinPoint.getTarget();//获取被代理的对象

        joinPoint.getThis();//获取代理对象自己
    }
}
🐋返回通知获取结果
1.修改切面类com.zzw.spring.aop.aspectj.SmartAnimalAspect
@Aspect //表示是一个切面类[底层切面编程的支撑(动态代理+反射+动态绑定)]
@Component //会将SmartAnimalAspect注入到容器
public class SmartAnimalAspect {
    //返回通知: 即把showSuccessEndLog方法切入到目标对象方法正常执行完毕后的地方
    //解读
    //1.如果我们希望把目标方法, 执行的结果, 返回给切入方法
    //2.可以在 @AfterReturning 增加属性,  比如 returning = "res"
    //3.同时在切入方法增加 Object res
    //4.注意: returning = "res" 和 Object res 的 res名字一样
    @AfterReturning(value = "execution(public float com.zzw.spring.aop.aspectj.SmartDog.getSum(float, float))", returning = "res")
    public void showSuccessEndLog(JoinPoint joinPoint, Object res) {
        Signature signature = joinPoint.getSignature();
        System.out.println("切面类showSuccessEndLog()-方法执行正常结束-日志-方法名-" + signature.getName() + " 返回的结果是=" + res);
    }
}
2.测试com.zzw.spring.aop.aspectj.AspAspectjTest
public class AopAspectjTest {

    @Test
    public void smartDogTestByProxy() {

        ApplicationContext ioc =
                new ClassPathXmlApplicationContext("beans08.xml");

        //这里我们需要通过接口类型来获取到注入的SmartDog对象-就是代理对象
        SmartAnimalAble smartAnimalAble =
                ioc.getBean(SmartAnimalAble.class);


        smartAnimalAble.getSum(1f, 2f);


        //System.out.println("smartAnimalAble运行类型是 " + smartAnimalAble.getClass());//class com.sun.proxy.$Proxy16
    }
}
🐋异常通知获取异常信息
如何在异常通知方法中获取异常信息
1.修改com.zzw.spring.aop.aspectj.SmartDog
@Component //使用@Component 当spring容器启动时, 将 SmartDog 注入到容器
public class SmartDog implements SmartAnimalAble {
    @Override
    public float getSum(float i, float j) {
        float result = i + j;
        int res = 1 / 0;//模拟一个算数异常
        System.out.println("方法内部打印result = " + result);
        return result;
    }
}
2.修改切面类com.zzw.spring.aop.aspectj.SmartAnimalAspect
@Aspect //表示是一个切面类[底层切面编程的支撑(动态代理+反射+动态绑定)]
@Component //会将SmartAnimalAspect注入到容器
public class SmartAnimalAspect {
    //异常通知: 即把showExceptionLog方法切入到目标对象方法执行发生异常后的catch{}
    @AfterThrowing(value = "execution(public float com.zzw.spring.aop.aspectj.SmartDog.getSum(float, float))", throwing = "throwable")
    public void showExceptionLog(JoinPoint joinPoint, Throwable throwable) {
        Signature signature = joinPoint.getSignature();
        System.out.println("切面类showExceptionLog()-方法执行异常-日志-方法名-" + signature.getName() + " 异常信息=" + throwable);
    }
}
3.测试com.zzw.spring.aop.aspectj.AspAspectjTest
public class AopAspectjTest {

    @Test
    public void smartDogTestByProxy() {

        ApplicationContext ioc =
                new ClassPathXmlApplicationContext("beans08.xml");

        //这里我们需要通过接口类型来获取到注入的SmartDog对象-就是代理对象
        SmartAnimalAble smartAnimalAble =
                ioc.getBean(SmartAnimalAble.class);


        smartAnimalAble.getSum(1, 2);


        //System.out.println("smartAnimalAble运行类型是 " + smartAnimalAble.getClass());//class com.sun.proxy.$Proxy16
    }
}
🐋环绕通知
需求: 如何使用环绕通知完成其它四个通知的功能.
1.新建com.zzw.spring.aop.aspectj.SmartAnimalAspect2切面类, 并把SmartAnimalAspect切面类注解注释, 避免干扰; 去掉SmartDog的异常代码.
//切面类
@Aspect //表示是一个切面类[底层切面编程的支撑(动态代理+反射+动态绑定)]
@Component //会将SmartAnimalAspect2注入到容器
public class SmartAnimalAspect2 {

    //演示环绕通知的使用
    //1. @Around 表示这是一个环绕通知[可以完成其它四个通知的功能]
    //2. (value = "execution(public float getSum(float, float))") 切入点表达式
    //3. doAround 表示要切入的方法 - 调用的基本结构 try-catch-finally
    @Around(value = "execution(public float com.zzw.spring.aop.aspectj.SmartDog.getSum(float, float))")
    public Object doAround(ProceedingJoinPoint joinPoint) {
        Object result = null;
        String methodName = joinPoint.getSignature().getName();
        try {
            //1.相当于前置通知完成的事情
            Object[] args = joinPoint.getArgs();
            List<Object> argList = Arrays.asList(args);
            System.out.println("AOP环绕通知[=前置通知]--" + methodName + "方法开始了--参数有: " + argList);
            //在环绕通知中一定要调用joinPoint.proceed()来执行目标方法
            result = joinPoint.proceed();
            //2.相当于返回通知完成的事情
            System.out.println("AOP环绕通知[=返回通知]--" + methodName + "方法结束了--结果是: " + result);
        } catch (Throwable throwable) {
            //3.相当于异常通知完成的事情
            System.out.println("AOP环绕通知[=异常通知]--" + methodName + "方法抛出异常--异常对象: " + throwable);
        } finally {
            //4.相当于最终通知完成的事情
            System.out.println("AOP环绕通知[=最终通知]--" + methodName + "方法最终结束了...");
        }
        return result;
    }
}
2.测试com.zzw.spring.aop.aspectj.AopAspectjTest
public class AopAspectjTest {
    @Test
    public void testDoAround() {
        //获取Spring容器
        ApplicationContext ioc =
                new ClassPathXmlApplicationContext("beans08.xml");

        SmartAnimalAble smartAnimalAble = ioc.getBean(SmartAnimalAble.class);

        smartAnimalAble.getSum(10f, 2f);
    }
}
3.结果
Connected to the target VM, address: '127.0.0.1:60160', transport: 'socket'
AOP环绕通知[=前置通知]--getSum方法开始了--参数有: [10.0, 2.0]
方法内部打印result = 12.0
AOP环绕通知[=返回通知]--getSum方法结束了--结果是: 12.0
AOP环绕通知[=最终通知]--getSum方法最终结束了...
🐋切入点表达式重用
为了统一管理切入点表达式, 我们可以使用切入点表达式重用技术
1.对com.zzw.spring.aop.aspectj.SmartAnimalAspect.java稍作修改
//切面类, 类似于我们前面自己写的MyProxyProvider, 但是功能强大很多
@Aspect //表示是一个切面类[底层切面编程的支撑(动态代理+反射+动态绑定)]
@Component //会将SmartAnimalAspect注入到容器
public class SmartAnimalAspect {

    //定义一个切入点, 在后面使用时可以直接引用, 提高了复用性
    @Pointcut(value = "execution(public float com.zzw.spring.aop.aspectj.SmartDog.getSum(float, float))")
    public void myPointCut() {

    }

    //@Before(value = "execution(public float com.zzw.spring.aop.aspectj.SmartDog.getSum(float, float))")
    //这里我们使用定义好的切入点
    @Before(value = "myPointCut()")
    public void showBeginLog(JoinPoint joinPoint) {
        //通过连接点对象joinPoint, 可以获取方法签名
        Signature signature = joinPoint.getSignature();
        System.out.println("切面类showBeginLog()[使用的myPointCut()]-方法执行前-日志-方法名-" + signature.getName() + "-参数 "
                + Arrays.asList(joinPoint.getArgs()));
    }

    //返回通知: 即把showSuccessEndLog方法切入到目标对象方法正常执行完毕后的地方
    //@AfterReturning(value = "execution(public float com.zzw.spring.aop.aspectj.SmartDog.getSum(float, float))", returning = "res")
    //使用切入点
    @AfterReturning(value = "myPointCut()", returning = "res")
    public void showSuccessEndLog(JoinPoint joinPoint, Object res) {
        Signature signature = joinPoint.getSignature();
        System.out.println("切面类showSuccessEndLog()-方法执行正常结束-日志-方法名-" + signature.getName() + " 返回的结果是=" + res);
    }

    //异常通知: 即把showExceptionLog方法切入到目标对象方法执行发生异常后的catch{}
    //@AfterThrowing(value = "execution(public float com.zzw.spring.aop.aspectj.SmartDog.getSum(float, float))", throwing = "throwable")
    //直接使用切入点表达式
    @AfterThrowing(value = "myPointCut()", throwing = "throwable")
    public void showExceptionLog(JoinPoint joinPoint, Throwable throwable) {
        Signature signature = joinPoint.getSignature();
        System.out.println("切面类showExceptionLog()-方法执行异常-日志-方法名-" + signature.getName() + " 异常信息=" + throwable);
    }

    //最终通知: 即把showFinallyEndLog方法切入到目标方法执行后, 不管是否发生异常都要执行, finally{}
    //@After(value = "execution(public float com.zzw.spring.aop.aspectj.SmartDog.getSum(float, float))")
    //直接使用切入点表达式
    @After(value = "myPointCut()")
    public void showFinallyEndLog(JoinPoint joinPoint) {
        Signature signature = joinPoint.getSignature();
        System.out.println("切面类showFinallyEndLog()-方法最终执行完毕-日志-方法名-" + signature.getName());
    }
}
2.测试com.zzw.spring.aop.aspectj.AspAspectjTest
public class AopAspectjTest {

    @Test
    public void smartDogTestByProxy() {

        ApplicationContext ioc =
                new ClassPathXmlApplicationContext("beans08.xml");

        //这里我们需要通过接口类型来获取到注入的SmartDog对象-就是代理对象
        SmartAnimalAble smartAnimalAble =
                ioc.getBean(SmartAnimalAble.class);


        smartAnimalAble.getSum(1, 2);


        //System.out.println("smartAnimalAble运行类型是 " + smartAnimalAble.getClass());//class com.sun.proxy.$Proxy16
    }
}
🐋切面类执行顺序
如果同一个方法, 有多个切面在同一个切入点切入, 那么执行的优先级如何控制
●基本语法
import org.springframework.core.annotation.Order;
通过@order(value=n) 来控制. n值越小, 优先级越高
●代码实现
1.新建com.zzw.spring.aop.aspectj.SmartAnimalAspect3.java, 将SmartAnimalAspect2.java注销, 保留SmartAnimalAspect.java
//切面类, 类似于我们前面自己写的MyProxyProvider, 但是功能强大很多
@Aspect //表示是一个切面类[底层切面编程的支撑(动态代理+反射+动态绑定)]
@Component //会将SmartAnimalAspect注入到容器
public class SmartAnimalAspect3 {

    @Before(value = "execution(public float com.zzw.spring.aop.aspectj_.SmartDog.getSum(float, float))")
    public void showBeginLog(JoinPoint joinPoint) {
        //通过连接点对象joinPoint, 可以获取方法签名
        Signature signature = joinPoint.getSignature();
        System.out.println("SmartAnimalAspect3-切面类showBeginLog()-方法执行前-日志-方法名-" + signature.getName() + "-参数 "
                + Arrays.asList(joinPoint.getArgs()));
    }

    //返回通知: 即把showSuccessEndLog方法切入到目标对象方法正常执行完毕后的地方
    @AfterReturning(value = "execution(public float com.zzw.spring.aop.aspectj_.SmartDog.getSum(float, float))", returning = "res")
    public void showSuccessEndLog(JoinPoint joinPoint, Object res) {
        Signature signature = joinPoint.getSignature();
        System.out.println("SmartAnimalAspect3-切面类showSuccessEndLog()-方法执行正常结束-日志-方法名-" + signature.getName() + " 返回的结果是=" + res);
    }

    //异常通知: 即把showExceptionLog方法切入到目标对象方法执行发生异常后的catch{}
    @AfterThrowing(value = "execution(public float com.zzw.spring.aop.aspectj_.SmartDog.getSum(float, float))", throwing = "throwable")
    public void showExceptionLog(JoinPoint joinPoint, Throwable throwable) {
        Signature signature = joinPoint.getSignature();
        System.out.println("SmartAnimalAspect3-切面类showExceptionLog()-方法执行异常-日志-方法名-" + signature.getName() + " 异常信息=" + throwable);
    }

    //最终通知: 即把showFinallyEndLog方法切入到目标方法执行后, 不管是否发生异常都要执行, finally{}
    @After(value = "execution(public float com.zzw.spring.aop.aspectj_.SmartDog.getSum(float, float))")
    public void showFinallyEndLog(JoinPoint joinPoint) {
        Signature signature = joinPoint.getSignature();
        System.out.println("SmartAnimalAspect3-切面类showFinallyEndLog()-方法最终执行完毕-日志-方法名-" + signature.getName());
    }
}
2.如果这两个类不加@order注解, 那么执行结果如下
SmartAnimalAspect-切面类showBeginLog()[使用的myPointCut()]-方法执行前-日志-方法名-getSum-参数 [1.0, 2.0]
SmartAnimalAspect3-切面类showBeginLog()-方法执行前-日志-方法名-getSum-参数 [1.0, 2.0]
方法内部打印result = 3.0
SmartAnimalAspect3-切面类showSuccessEndLog()-方法执行正常结束-日志-方法名-getSum 返回的结果是=3.0
SmartAnimalAspect3-切面类showFinallyEndLog()-方法最终执行完毕-日志-方法名-getSum
SmartAnimalAspect-切面类showSuccessEndLog()-方法执行正常结束-日志-方法名-getSum 返回的结果是=3.0
SmartAnimalAspect-切面类showFinallyEndLog()-方法最终执行完毕-日志-方法名-getSum
3.如果两个类加了@order注解
@Order(value = 2)//表示该切面类执行的顺序, value的值越小, 优先级越高
@Aspect
@Component
public class SmartAnimalAspect {
	//内容省略
}
@Order(value = 1)//表示该切面类执行的顺序, value的值越小, 优先级越高
@Aspect
@Component
public class SmartAnimalAspect3 {
	//内容省略
}
4.那么执行结果如下
SmartAnimalAspect3-切面类showBeginLog()-方法执行前-日志-方法名-getSum-参数 [1.0, 2.0]
SmartAnimalAspect-切面类showBeginLog()[使用的myPointCut()]-方法执行前-日志-方法名-getSum-参数 [1.0, 2.0]
方法内部打印result = 3.0
SmartAnimalAspect-切面类showSuccessEndLog()-方法执行正常结束-日志-方法名-getSum 返回的结果是=3.0
SmartAnimalAspect-切面类showFinallyEndLog()-方法最终执行完毕-日志-方法名-getSum
SmartAnimalAspect3-切面类showSuccessEndLog()-方法执行正常结束-日志-方法名-getSum 返回的结果是=3.0
SmartAnimalAspect3-切面类showFinallyEndLog()-方法最终执行完毕-日志-方法名-getSum
💧注意事项和细节
🐧不能理解成: 优先级高的每个消息通知都先执行. 这个方法调用机制和Filter过滤器链式调用类似
🐧方法调用机制如下图所示
👇👇👇👇👇👇👇👇👇👇👇👇👇👇👇👇👇👇👇👇👇👇👇👇👇👇👇👇👇👇👇👇👇👇👇👇👇👇👇👇👇👇👇👇👇👇

🐋基于XML配置AOP
●基本说明
前面我们是通过注解来配置aop的, 在spring中, 我们也可以通过xml的方式来配置AOP.
●代码实现
1.将SmartAnimalAble.java ,SmartDog.java 拷贝至 spring/aop/xml包下 注意: 不要引错包
2.新建切面类com.zzw.spring.aop.xml.SmartAnimalAspect
//这是我们开发的一个切面类, 但是不用注解, 而是使用xml配置
public class SmartAnimalAspect {

    public void showBeginLog(JoinPoint joinPoint) {
        //通过连接点对象joinPoint, 可以获取方法签名
        Signature signature = joinPoint.getSignature();
        System.out.println("SmartAnimalAspect[XML配置]-切面类showBeginLog()-方法执行前-日志-方法名-" + signature.getName() + "-参数 "
                + Arrays.asList(joinPoint.getArgs()));
    }

    public void showSuccessEndLog(JoinPoint joinPoint, Object res) {
        Signature signature = joinPoint.getSignature();
        System.out.println("SmartAnimalAspect[XML配置]-切面类showSuccessEndLog()-方法执行正常结束-日志-方法名-" + signature.getName() + " 返回的结果是=" + res);
    }

    public void showExceptionLog(JoinPoint joinPoint, Throwable throwable) {
        Signature signature = joinPoint.getSignature();
        System.out.println("SmartAnimalAspect[XML配置]-切面类showExceptionLog()-方法执行异常-日志-方法名-" + signature.getName() + " 异常信息=" + throwable);
    }

    public void showFinallyEndLog(JoinPoint joinPoint) {
        Signature signature = joinPoint.getSignature();
        System.out.println("SmartAnimalAspect[XML配置]-切面类showFinallyEndLog()-方法最终执行完毕-日志-方法名-" + signature.getName());
    }
}
3.新建src/beans09_2.xml
<?xml version="1.0" encoding="UTF-8"?>
<beans xmlns="http://www.springframework.org/schema/beans"
       xmlns:xsi="http://www.w3.org/2001/XMLSchema-instance"
       xmlns:aop="http://www.springframework.org/schema/aop"
       xsi:schemaLocation="http://www.springframework.org/schema/beans http://www.springframework.org/schema/beans/spring-beans.xsd http://www.springframework.org/schema/context https://www.springframework.org/schema/context/spring-context.xsd http://www.springframework.org/schema/aop https://www.springframework.org/schema/aop/spring-aop.xsd">

    <!--使用XML配置, 完成AOP编程-->
    <!--配置一个切面类对象-bean-->
    <bean class="com.zzw.spring.aop.xml.SmartAnimalAspect" id="smartAnimalAspect"/>
    <!--配置一个SmartDog对象-bean-->
    <bean class="com.zzw.spring.aop.xml.SmartDog" id="smartDog"/>
    <!--配置切面类, 细节: 一定要引入 xmlns:aop-->
    <aop:config>
        <!--配置切入点表达式-->
        <aop:pointcut id="myPointCut" expression="execution(public float com.zzw.spring.aop.xml.SmartDog.getSum(float, float))"/>
        <!--配置切面的 前置,返回,异常,最终通知-->
        <aop:aspect ref="smartAnimalAspect" order="10">
            <!--配置前置通知-->
            <aop:before method="showBeginLog" pointcut-ref="myPointCut"/>
            <!--配置返回通知-->
            <aop:after-returning method="showSuccessEndLog" pointcut-ref="myPointCut" returning="res"/>
            <!--配置异常通知-->
            <aop:after-throwing method="showExceptionLog" pointcut-ref="myPointCut" throwing="throwable"/>
            <!--配置最终通知-->
            <aop:after method="showFinallyEndLog" pointcut-ref="myPointCut"/>
            <!--配置环绕通知-->
            <!--<aop:around method=""-->
        </aop:aspect>
    </aop:config>
</beans>
4.测试com.zzw.spring.aop.xml.AopAspectjXMLTest
public class AopAspectjXMLTest {

    @Test
    public void testAspectByXML() {

        ApplicationContext ioc =  new ClassPathXmlApplicationContext("beans09_2.xml");

        SmartAnimalAble smartAnimalAble = ioc.getBean(SmartAnimalAble.class);

        smartAnimalAble.getSum(1, 2);
    }
}
🐋课后作业
1.请编写一个Cal接口
(1)方法 cal1(int n) 计算1 + 2 +...+ n
(2)方法 cal2(int n) 计算 1 * 2 *...* n
2.实现类 MyCal, 实现Cal的方法
3.请分别使用 注解方式 / XML配置方式 完成AOP编程
(1) 在执行cal1 前打印开始执行的时间, 执行完后打印结束的时间
(2) 在执行cal2 前打印开始执行的时间, 执行完后打印结束的时间
❶👉基于注解
1.新建com.zzw.spring.aop.homework02.annotation_.Cal接口
public interface Cal {
    //计算1+2+...+n
    int cal1(int n);

    //计算1*2*...*n
    int cal2(int n);
}
2.新建实现类com.zzw.spring.aop.homework02.annotation_.MyCal
@Component
public class MyCal implements Cal{

    @Override
    public int cal1(int n) {
        int sum = 0;
        for (int i = 1; i <= n; i++) {
            sum += i;
        }
        return sum;
    }

    @Override
    public int cal2(int n) {
        int res = 1;
        for (int i = 1; i <= n; i++) {
            res *= n;
        }
        return res;
    }
}
3.新建切面类com.zzw.spring.aop.homework02.annotation_.CalAspect
日期类指引
@Aspect //CalAspect是一个切面类
@Component //CalAspect作为对象, 注入到Spring容器
public class CalAspect {

    //注意: 如果目标类和切面类, 在同一个包, 可以省略包名
    //因为cal1和cal2方法, 都要去输出开始执行时间, 因此使用 MyCal.* 通配符
    @Pointcut(value = "execution(public int MyCal.*(int))")
    public void myPointCut() {

    }

    //前置通知
    @Before(value = "myPointCut()")
    public void calStart(JoinPoint joinPoint) {
        Signature signature = joinPoint.getSignature();
        System.out.println(signature.getName() + " 执行, 开始执行时间=" + System.currentTimeMillis());
    }

    //返回通知
    @AfterReturning(value = "myPointCut()", returning = "res")
    public void calEnd(JoinPoint joinPoint, Object res) {
        Signature signature = joinPoint.getSignature();
        System.out.println(signature.getName() + " 执行结果=" + res);
        System.out.println(signature.getName() + " 执行, 执行结束时间=" + System.currentTimeMillis());
    }
}
4.新建src/beans10.xml
<?xml version="1.0" encoding="UTF-8"?>
<beans xmlns="http://www.springframework.org/schema/beans"
       xmlns:xsi="http://www.w3.org/2001/XMLSchema-instance"
       xmlns:context="http://www.springframework.org/schema/context"
       xmlns:aop="http://www.springframework.org/schema/aop"
       xsi:schemaLocation="http://www.springframework.org/schema/beans http://www.springframework.org/schema/beans/spring-beans.xsd http://www.springframework.org/schema/context https://www.springframework.org/schema/context/spring-context.xsd http://www.springframework.org/schema/aop https://www.springframework.org/schema/aop/spring-aop.xsd">

	<!--扫描指定的包-->
    <context:component-scan base-package="com.zzw.spring.aop.homework02.annotation_"/>

    <!--开启基于注解的AOP功能-->
    <aop:aspectj-autoproxy/>
</beans>
5.测试com.zzw.spring.aop.homework02.annotation_.AopAspectjTest
public class AopAspectjTest {
    @Test
    public void test() {
        ApplicationContext ioc =
                new ClassPathXmlApplicationContext("beans10.xml");

        Cal cal = ioc.getBean(Cal.class);

        cal.cal1(10);
        System.out.println("====================================");
        cal.cal2(10);

    }
}
6.结果
cal1 执行, 开始执行时间=1691395310255
cal1 执行结果=55
cal1 执行, 结束时间=1691395310256
====================================
cal2 执行, 开始执行时间=1691395310256
cal2 执行结果=1410065408
cal2 执行, 结束时间=1691395310257
❷基于XML配置方法
1.新建com.zzw.spring.aop.homework02.xml.Cal接口
public interface Cal {
    //计算1+2+...+n
    int cal1(int n);

    //计算1*2*...*n
    int cal2(int n);
}
2.新建实现类com.zzw.spring.aop.homework02.xml.MyCal
public class MyCal implements Cal{

    @Override
    public int cal1(int n) {
        int sum = 0;
        for (int i = 1; i <= n; i++) {
            sum += i;
        }
        return sum;
    }

    @Override
    public int cal2(int n) {
        int res = 1;
        for (int i = 1; i <= n; i++) {
            res *= ;
        }
        return res;
    }
}
3.新建切面类com.zzw.spring.aop.homework02.xml.CalAspect
public class CalAspect {

    //前置通知
    public void calStart(JoinPoint joinPoint) {
        Signature signature = joinPoint.getSignature();
        System.out.println(signature.getName() + " 方法[基于XML配置], 开始执行时间=" + System.currentTimeMillis());
    }

    //返回通知
    public void calEnd(JoinPoint joinPoint, Object res) {
        Signature signature = joinPoint.getSignature();
        System.out.println(signature.getName() + " 执行结果=" + res);
        System.out.println(signature.getName() + " 方法[基于XML配置], 执行结束时间=" + System.currentTimeMillis());
    }
}
4.新建src/beans11.xml
<?xml version="1.0" encoding="UTF-8"?>
<beans xmlns="http://www.springframework.org/schema/beans"
       xmlns:xsi="http://www.w3.org/2001/XMLSchema-instance" xmlns:aop="http://www.springframework.org/schema/aop"
       xsi:schemaLocation="http://www.springframework.org/schema/beans http://www.springframework.org/schema/beans/spring-beans.xsd http://www.springframework.org/schema/aop https://www.springframework.org/schema/aop/spring-aop.xsd">

    <!--使用XML配置, 完成AOP编程-->
    <!--配置一个切面类对象-bean-->
    <bean class="com.zzw.spring.aop.homework02.xml.CalAspect" id="calAspect"/>
    <!--配置一个MyCal对象-bean-->
    <bean class="com.zzw.spring.aop.homework02.xml.MyCal" id="myCal"/>
    <!--配置切面类, 细节: 一定要引入 xmlns:aop-->
    <aop:config>
        <!--配置切入点表达式-->
        <aop:pointcut id="myPointCut" expression="execution(public int com.zzw.spring.aop.homework02.xml.MyCal.*(int))"/>
        <!--配置切面的 前置, 返回通知-->
        <aop:aspect ref="calAspect" order="10">
            <!--配置前置通知-->
            <aop:before method="calStart" pointcut-ref="myPointCut"/>
            <!--配置返回通知-->
            <aop:after-returning method="calEnd" pointcut-ref="myPointCut" returning="res"/>
        </aop:aspect>
    </aop:config>
</beans>
5.测试com.zzw.spring.aop.homework02.xml.AopAspectjTest
public class AopAspectjXMLTest {
    @Test
    public void testMyCalByXML() {
        ApplicationContext ioc =
                new ClassPathXmlApplicationContext("beans11.xml");

        Cal cal = ioc.getBean(Cal.class);

        cal.cal1(10);
        System.out.println("====================================");
        cal.cal2(10);
    }
}
6.结果
cal1 执行[基于XML配置], 开始执行时间=1691396329275
cal1 执行结果=55
cal1 执行[基于XML配置], 执行结束时间=1691396329275
====================================
cal2 执行[基于XML配置], 开始执行时间=1691396329275
cal2 执行结果=1410065408
cal2 执行[基于XML配置], 执行结束时间=1691396329275
💗引出对Spring底层实现再思考
🐋创建maven项目
1.创建maven项目 zzw-spring项目
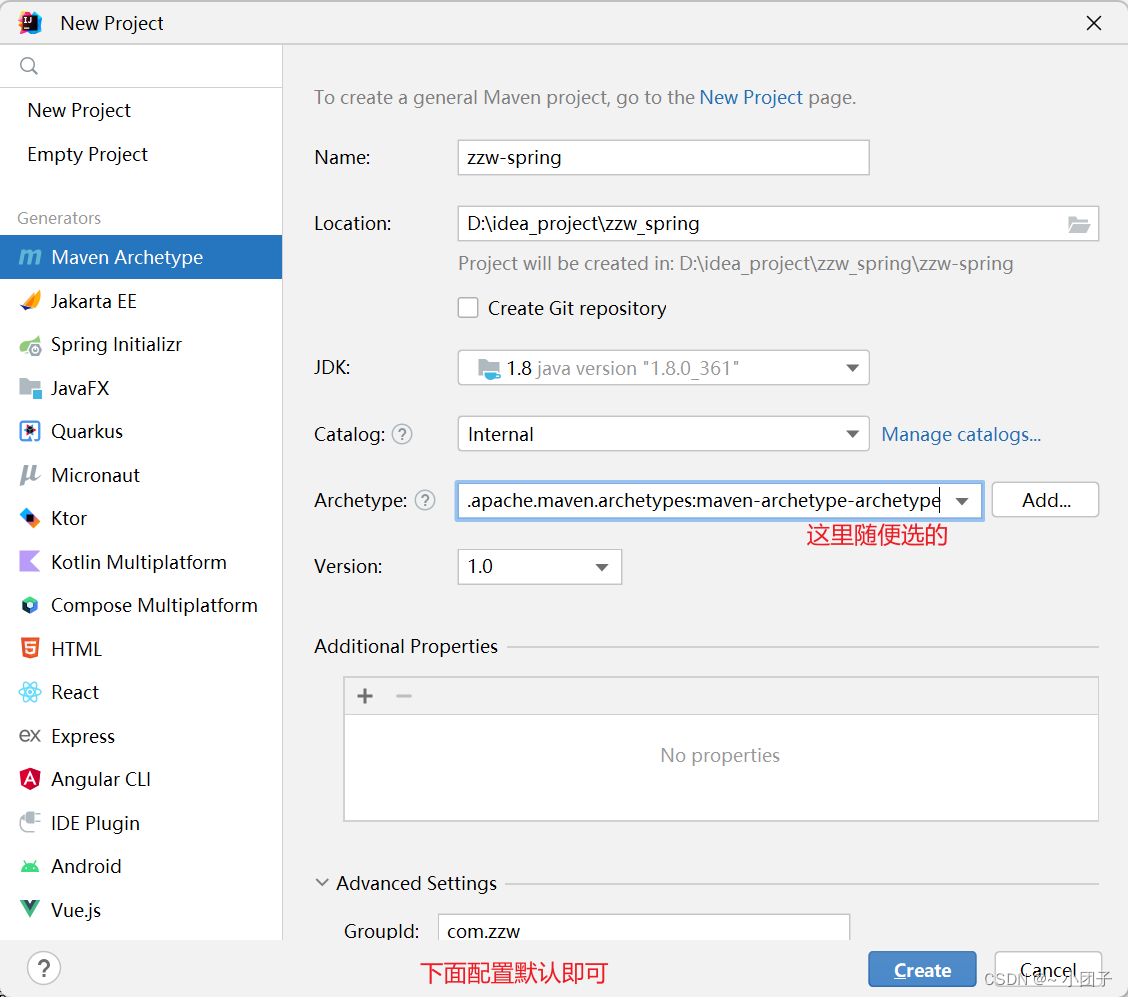
2.加入依赖pom.xml
<project xmlns="http://maven.apache.org/POM/4.0.0" xmlns:xsi="http://www.w3.org/2001/XMLSchema-instance"
  xsi:schemaLocation="http://maven.apache.org/POM/4.0.0 http://maven.apache.org/maven-v4_0_0.xsd">
  <modelVersion>4.0.0</modelVersion>

  <groupId>com.zzw</groupId>
  <artifactId>zzw-spring</artifactId>
  <version>1.0-SNAPSHOT</version>

  <dependencies>
    <!--加入spring开发的基本包-->
    <dependency>
      <groupId>org.springframework</groupId>
      <artifactId>spring-context</artifactId>
      <version>5.3.8</version>
    </dependency>
    <!--加入spring开发切面编程需要的包-->
    <dependency>
      <groupId>org.springframework</groupId>
      <artifactId>spring-aspects</artifactId>
      <version>5.3.8</version>
    </dependency>
  </dependencies>
</project>
项目目录结构, 文件夹对应不上的可以自己 添加或删除.
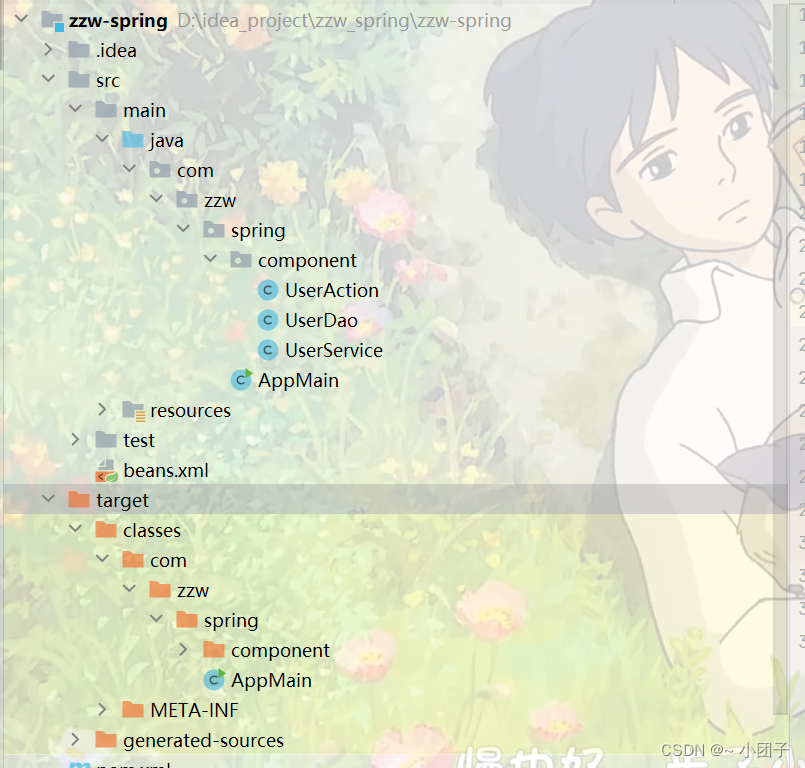
3.新建com.zzw.spring.component.UserAction
//就是一个Controller
//也可以使用 @Controller
在默认情况下, 我们配置@Component,@Repository,@Controller,@Service 是单例
@Component
public class UserAction {

}
4.新建com.zzw.spring.component.UserDao
//也可以使用 @Repository
@Component
public class UserDao {
    public void hi() {
        System.out.println("UserDao hi()...");
    }
}
5.新建com.zzw.spring.component.UserService
//也可以使用 @Service
@Component
public class UserService {

    //也可以使用 @Resource
    @Autowired
    private UserDao userDao;//定义一个属性

    public void m1() {
        userDao.hi();
    }
}
5.新建src/beans.xml
<?xml version="1.0" encoding="UTF-8"?>
<beans xmlns="http://www.springframework.org/schema/beans"
       xmlns:xsi="http://www.w3.org/2001/XMLSchema-instance"
       xmlns:context="http://www.springframework.org/schema/context"
       xsi:schemaLocation="http://www.springframework.org/schema/beans http://www.springframework.org/schema/beans/spring-beans.xsd http://www.springframework.org/schema/context https://www.springframework.org/schema/context/spring-context.xsd">

    <!--配置自动扫描的包, 同时引入对应的名称空间-->
    <context:component-scan base-package="com.zzw.spring.component"/>

</beans>
6.测试1com.zzw.spring.AppMain
public class AppMain {
    public static void main(String[] args) {

        //测试/看看是否可以得到spring容器中的bean, 同时看看依赖注入是否OK
        ApplicationContext ioc =
                new ClassPathXmlApplicationContext("beans.xml");

        UserAction userAction = ioc.getBean("userAction", UserAction.class);
        UserAction userAction2 = ioc.getBean("userAction", UserAction.class);

        System.out.println("userAction=" + userAction);
        System.out.println("userAction2=" + userAction2);

        UserDao userDao = ioc.getBean("userDao", UserDao.class);
        System.out.println("userDao=" + userDao);

        UserService userService = ioc.getBean("userService", UserService.class);
        System.out.println("userService=" + userService);
    }
}
报错: Caused by: java.io.FileNotFoundException: class path resource [beans.xml] cannot be opened because it does not exist, 其错误原因是
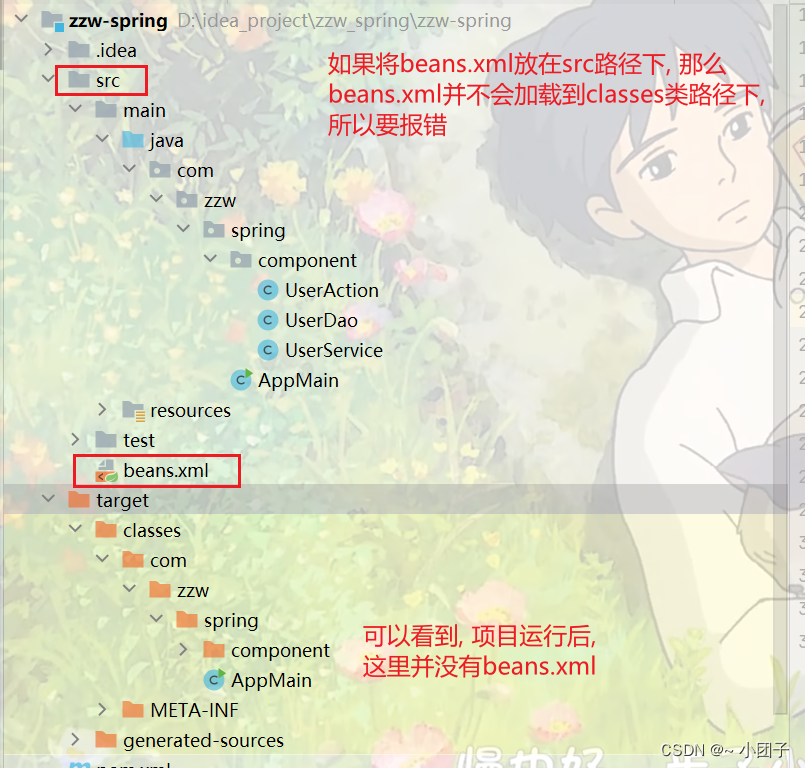
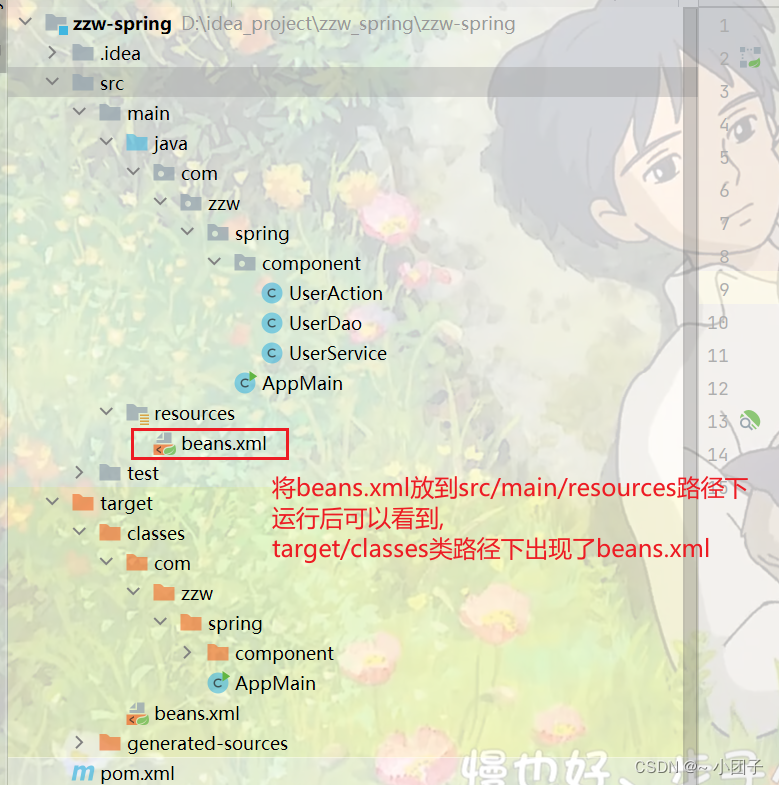
7.实际上 beans.xml 应该在 src/main/resources 下创建
<?xml version="1.0" encoding="UTF-8"?>
<beans xmlns="http://www.springframework.org/schema/beans"
       xmlns:xsi="http://www.w3.org/2001/XMLSchema-instance"
       xmlns:context="http://www.springframework.org/schema/context"
       xsi:schemaLocation="http://www.springframework.org/schema/beans http://www.springframework.org/schema/beans/spring-beans.xsd http://www.springframework.org/schema/context https://www.springframework.org/schema/context/spring-context.xsd">

    <!--配置自动扫描的包, 同时引入对应的名称空间-->
    <!--
    说明
    1.如果我们是普通的java项目, beans.xml放在src目录下即可
    2.如果我们是java maven项目, beans.xml放在src/main/resources
    -->
    <context:component-scan base-package="com.zzw.spring.component"/>

</beans>
此时项目结构图如下所示:
8.运行结果
userAction=com.zzw.spring.component.UserAction@679b62af
userAction2=com.zzw.spring.component.UserAction@679b62af
userDao=com.zzw.spring.component.UserDao@5cdd8682
userService=com.zzw.spring.component.UserService@d6da883
🐋思考一: 原生Spring如何实现依赖注入和(singleton, prototype)
1.Spring底层如何实现: IOC容器创建和初始化
2.Spring底层如何实现: 根据 singleton, prototype来返回bean对象
案例注入默认是单例注入, 标识了注解@Scope(value = "prototype")后代表多例
1.修改com.zzw.spring.component.UserAction
//在默认情况下, 我们配置@Component,@Repository,@Controller,@Service 是单例
//@Scope(value = "prototype") 表示以多例形式, 返回 UserAction bean
//多例是懒加载
//思考: Spring容器底层如何实现
@Component
@Scope(value = "prototype")
public class UserAction {

}
2.测试com.zzw.spring.AppMain
public class AppMain {
    public static void main(String[] args) {

        //测试/看看是否可以得到spring容器中的bean, 同时看看依赖注入是否OK
        ApplicationContext ioc =
                new ClassPathXmlApplicationContext("beans.xml");

        UserAction userAction = ioc.getBean("userAction", UserAction.class);
        UserAction userAction2 = ioc.getBean("userAction", UserAction.class);

        System.out.println("userAction=" + userAction);
        System.out.println("userAction2=" + userAction2);

        UserDao userDao = ioc.getBean("userDao", UserDao.class);
        System.out.println("userDao=" + userDao);

        UserService userService = ioc.getBean("userService", UserService.class);
        System.out.println("userService=" + userService);

        //测试一下当前的依赖注入
        userService.m1();
    }
}
3.运行结果
userAction=com.zzw.spring.component.UserAction@60bd273d
userAction2=com.zzw.spring.component.UserAction@121314f7
userDao=com.zzw.spring.component.UserDao@130c12b7
userService=com.zzw.spring.component.UserService@5e600dd5
UserDao hi()...
🐋思考二: 原生Spring容器如何实现BeanPostProcessor
beanPostProcessor: 配置bean后置处理器
1.新建com.zzw.spring.process.MyBeanProcessor
//编写一个后置处理器
public class MyBeanProcessor implements BeanPostProcessor {

    /**
     * 在Bean的 init初始化方法前调用
     *
     * @param bean
     * @param beanName
     * @return
     * @throws BeansException
     */
    public Object postProcessBeforeInitialization(Object bean, String beanName) throws BeansException {
        System.out.println("postProcessBeforeInitialization() 被调用... " + beanName + " bean=" + bean.getClass());
        return bean;
    }

    /**
     * 在Bean的 init初始化方法后调用
     *
     * @param bean
     * @param beanName
     * @return
     * @throws BeansException
     */
    public Object postProcessAfterInitialization(Object bean, String beanName) throws BeansException {
        System.out.println("postProcessAfterInitialization() 被调用... " + beanName + " bean=" + bean.getClass());
        return bean;
    }
}
2.修改com.zzw.spring.component.UserService
@Component
public class UserService {

    @Autowired
    private UserDao userDao;

    public void m1() {
        userDao.hi();
    }

    //这里我们需要指定init() 是初始化方法
    @PostConstruct
    public void init() {
        System.out.println("UserService init()...");
    }
}
3.修改src/beans.xml
<?xml version="1.0" encoding="UTF-8"?>
<beans xmlns="http://www.springframework.org/schema/beans"
       xmlns:xsi="http://www.w3.org/2001/XMLSchema-instance"
       xmlns:context="http://www.springframework.org/schema/context"
       xsi:schemaLocation="http://www.springframework.org/schema/beans http://www.springframework.org/schema/beans/spring-beans.xsd http://www.springframework.org/schema/context https://www.springframework.org/schema/context/spring-context.xsd">

    <!--配置自动扫描的包-->
    <!--
    说明
    1.如果我们是普通的java项目, beans.xml放在src目录下即可
    2.如果我们是java maven项目, beans.xml放在src/main/resources
    -->
    <context:component-scan base-package="com.zzw.spring.component"/>

    <!--配置后置处理器-->
    <bean class="com.zzw.spring.process.MyBeanProcessor" id="myBeanProcessor"/>
</beans>
4.测试com.zzw.spring.AppMain
public class AppMain {
    public static void main(String[] args) {

        ApplicationContext ioc =
                new ClassPathXmlApplicationContext("beans.xml");

        UserAction userAction = ioc.getBean("userAction", UserAction.class);
        UserAction userAction2 = ioc.getBean("userAction", UserAction.class);

        System.out.println("userAction=" + userAction);
        System.out.println("userAction2=" + userAction2);

        UserDao userDao = ioc.getBean("userDao", UserDao.class);
        System.out.println("userDao=" + userDao);

        UserService userService = ioc.getBean("userService", UserService.class);
        System.out.println("userService=" + userService);

        //测试一下当前的依赖注入
        //userService.m1();
    }
}
5.运行结果
由于userDao和userService是单例的, 所有没有继续调用后置处理器方法.
postProcessBeforeInitialization() 被调用... userDao bean=class com.zzw.spring.component.UserDao
postProcessAfterInitialization() 被调用... userDao bean=class com.zzw.spring.component.UserDao
postProcessBeforeInitialization() 被调用... userService bean=class com.zzw.spring.component.UserService
UserService init()...
postProcessAfterInitialization() 被调用... userService bean=class com.zzw.spring.component.UserService
postProcessBeforeInitialization() 被调用... userAction bean=class com.zzw.spring.component.UserAction
postProcessAfterInitialization() 被调用... userAction bean=class com.zzw.spring.component.UserAction
postProcessBeforeInitialization() 被调用... userAction bean=class com.zzw.spring.component.UserAction
postProcessAfterInitialization() 被调用... userAction bean=class com.zzw.spring.component.UserAction
userAction=com.zzw.spring.component.UserAction@1ffaf86
userAction2=com.zzw.spring.component.UserAction@6574a52c
userDao=com.zzw.spring.component.UserDao@6c1a5b54
userService=com.zzw.spring.component.UserService@1c7696c6
6.拿掉UserAction的@Scope(value = "prototype")注解, 运行结果如下:
UserAction为什么跑前面去了?
答: UserAction拿掉@Scope(value = "prototype")注解后, 变成了单例, 在spring容器扫描完包后, 会创建实例对象放入到单例池. 在创建实例对象时, 后置处理器被调用.
postProcessBeforeInitialization() 被调用... userAction bean=class com.zzw.spring.component.UserAction
postProcessAfterInitialization() 被调用... userAction bean=class com.zzw.spring.component.UserAction
postProcessBeforeInitialization() 被调用... userDao bean=class com.zzw.spring.component.UserDao
postProcessAfterInitialization() 被调用... userDao bean=class com.zzw.spring.component.UserDao
postProcessBeforeInitialization() 被调用... userService bean=class com.zzw.spring.component.UserService
UserService init()...
postProcessAfterInitialization() 被调用... userService bean=class com.zzw.spring.component.UserService
userAction=com.zzw.spring.component.UserAction@71a794e5
userAction2=com.zzw.spring.component.UserAction@71a794e5
userDao=com.zzw.spring.component.UserDao@76329302
userService=com.zzw.spring.component.UserService@5e25a92e
知识点: 前面是基于xml配置后置处理器, 基于注解的方式配置后置处理器(别忘了扫描包)
//编写一个后置处理器
@Component
public class MyBeanProcessor implements BeanPostProcessor {

    /**
     * 在Bean的 init初始化方法前调用
     *
     * @param bean
     * @param beanName
     * @return
     * @throws BeansException
     */
    public Object postProcessBeforeInitialization(Object bean, String beanName) throws BeansException {
        System.out.println("postProcessBeforeInitialization() 被调用... " + beanName + " bean=" + bean.getClass());
        return bean;
    }

    /**
     * 在Bean的 init初始化方法后调用
     *
     * @param bean
     * @param beanName
     * @return
     * @throws BeansException
     */
    public Object postProcessAfterInitialization(Object bean, String beanName) throws BeansException {
        System.out.println("postProcessAfterInitialization() 被调用... " + beanName + " bean=" + bean.getClass());
        return bean;
    }
}
<?xml version="1.0" encoding="UTF-8"?>
<beans xmlns="http://www.springframework.org/schema/beans"
       xmlns:xsi="http://www.w3.org/2001/XMLSchema-instance"
       xmlns:context="http://www.springframework.org/schema/context"
       xsi:schemaLocation="http://www.springframework.org/schema/beans http://www.springframework.org/schema/beans/spring-beans.xsd http://www.springframework.org/schema/context https://www.springframework.org/schema/context/spring-context.xsd">

    <context:component-scan base-package="com.zzw.spring.component"/>
    <context:component-scan base-package="com.zzw.spring.process"/>
</beans>
🐋思考三: 原生Spring容器如何实现AOP
1.新建com.zzw.spring.aop.SmartAnimalAble接口
//接口
public interface SmartAnimalAble {

    float getSum(float i, float j);

    float getSub(float i, float j);
}
2.com.zzw.spring.aop.SmartDog
@Component
public class SmartDog implements SmartAnimalAble {
    public float getSum(float i, float j) {
        float res = i + j;
        System.out.println("SmartDog getSum() 结果=" + res);
        return res;
    }

    public float getSub(float i, float j) {
        float res = i - j;
        System.out.println("SmartDog getSub() 结果=" + res);
        return res;
    }
}
3.新建切面类com.zzw.spring.aop.SmartAnimalAspect
//这是一个切面类
@Aspect
@Component
public class SmartAnimalAspect {

    //给SmartDog配置前置, 返回, 异常, 最终通知

    //前置通知
    @Before(value = "execution(public float com.zzw.spring.aop.SmartDog.getSum(float, float))")
    public void showBeginLog(JoinPoint joinPoint) {
        //通过连接点对象joinPoint, 可以获取方法签名
        Signature signature = joinPoint.getSignature();
        System.out.println("SmartAnimalAspect切面类-showBeginLog()-方法执行前-日志-方法名-" + signature.getName() + "-参数 "
                + Arrays.asList(joinPoint.getArgs()));
    }

    //返回通知: 即把showSuccessEndLog方法切入到目标对象方法正常执行完毕后的地方
    @AfterReturning(value = "execution(public float com.zzw.spring.aop.SmartDog.getSum(float, float))", returning = "res")
    public void showSuccessEndLog(JoinPoint joinPoint, Object res) {
        Signature signature = joinPoint.getSignature();
        System.out.println("SmartAnimalAspect切面类-showSuccessEndLog()-方法执行正常结束-日志-方法名-" + signature.getName() + " 返回的结果是=" + res);
    }

    //异常通知: 即把showExceptionLog方法切入到目标对象方法执行发生异常后的catch{}
    @AfterThrowing(value = "execution(public float com.zzw.spring.aop.SmartDog.getSum(float, float))", throwing = "throwable")
    public void showExceptionLog(JoinPoint joinPoint, Throwable throwable) {
        Signature signature = joinPoint.getSignature();
        System.out.println("SmartAnimalAspect切面类-showExceptionLog()-方法执行异常-日志-方法名-" + signature.getName() + " 异常信息=" + throwable);
    }

    //最终通知: 即把showFinallyEndLog方法切入到目标方法执行后, 不管是否发生异常都要执行, finally{}
    @After(value = "execution(public float com.zzw.spring.aop.SmartDog.getSum(float, float))")
    public void showFinallyEndLog(JoinPoint joinPoint) {
        Signature signature = joinPoint.getSignature();
        System.out.println("SmartAnimalAspect切面类-showFinallyEndLog()-方法最终执行完毕-日志-方法名-" + signature.getName());
    }
}
4.配置src/beans.xml
<?xml version="1.0" encoding="UTF-8"?>
<beans xmlns="http://www.springframework.org/schema/beans"
       xmlns:xsi="http://www.w3.org/2001/XMLSchema-instance"
       xmlns:context="http://www.springframework.org/schema/context"
       xmlns:aop="http://www.springframework.org/schema/aop"
       xsi:schemaLocation="http://www.springframework.org/schema/beans http://www.springframework.org/schema/beans/spring-beans.xsd http://www.springframework.org/schema/context https://www.springframework.org/schema/context/spring-context.xsd http://www.springframework.org/schema/aop https://www.springframework.org/schema/aop/spring-aop.xsd">

    <!--配置自动扫描的包, 同时引入对应的名称空间-->
    <context:component-scan base-package="com.zzw.spring.component"/>

    <context:component-scan base-package="com.zzw.spring.aop"/>
    <!--开启基于注解的AOP功能-->
    <aop:aspectj-autoproxy/>

    <!--配置后置处理器-->
    <bean class="com.zzw.spring.process.MyBeanProcessor" id="myBeanProcessor"/>
</beans>
5.测试com.zzw.spring.AppMain
public class AppMain {
    public static void main(String[] args) {

        //测试/看看是否可以得到spring容器中的bean, 同时看看依赖注入是否OK
        ApplicationContext ioc =
                new ClassPathXmlApplicationContext("beans.xml");

		//UserAction userAction = ioc.getBean("userAction", UserAction.class);
        //UserAction userAction2 = ioc.getBean("userAction", UserAction.class);
        //System.out.println("userAction=" + userAction);
        //System.out.println("userAction2=" + userAction2);
        //
        //UserDao userDao = ioc.getBean("userDao", UserDao.class);
        //System.out.println("userDao=" + userDao);
        //
        //UserService userService = ioc.getBean("userService", UserService.class);
        //System.out.println("userService=" + userService);
        //
        测试一下当前的依赖注入
        //userService.m1();

        //测试一下AOP
        SmartAnimalAble smartDog = ioc.getBean(SmartAnimalAble.class);
        System.out.println(smartDog.getSum(1,2));
    }
}
6.运行结果
postProcessBeforeInitialization() 被调用... userAction bean=class com.zzw.spring.component.UserAction
postProcessAfterInitialization() 被调用... userAction bean=class com.zzw.spring.component.UserAction
postProcessBeforeInitialization() 被调用... userDao bean=class com.zzw.spring.component.UserDao
postProcessAfterInitialization() 被调用... userDao bean=class com.zzw.spring.component.UserDao
postProcessBeforeInitialization() 被调用... userService bean=class com.zzw.spring.component.UserService
UserService init()...
postProcessAfterInitialization() 被调用... userService bean=class com.zzw.spring.component.UserService
postProcessBeforeInitialization() 被调用... smartAnimalAspect bean=class com.zzw.spring.aop.SmartAnimalAspect
postProcessAfterInitialization() 被调用... smartAnimalAspect bean=class com.zzw.spring.aop.SmartAnimalAspect
postProcessBeforeInitialization() 被调用... smartDog bean=class com.zzw.spring.aop.SmartDog
postProcessAfterInitialization() 被调用... smartDog bean=class com.sun.proxy.$Proxy16
SmartAnimalAspect-切面类showBeginLog()-方法执行前-日志-方法名-getSum-参数 [1.0, 2.0]
SmartDog getSum() 结果=3.0
SmartAnimalAspect-切面类showSuccessEndLog()-方法执行正常结束-日志-方法名-getSum 返回的结果是=3.0
SmartAnimalAspect-切面类showFinallyEndLog()-方法最终执行完毕-日志-方法名-getSum
3.0
简析Spring AOP 和 BeanPostProcessor关系
1.AOP实现, Spring可以通过给一个类, 加入注解 @EnableAspectJAutoProxy 来指定
2.新建com.zzw.spring.aop.Test
@EnableAspectJAutoProxy
public class Test {}
3.追一下@EnableAspectJAutoProxy的源码
@Target({ElementType.TYPE})
@Retention(RetentionPolicy.RUNTIME)
@Documented
@Import({AspectJAutoProxyRegistrar.class}) 👈
public @interface EnableAspectJAutoProxy {
    boolean proxyTargetClass() default false;

    boolean exposeProxy() default false;
}
进入到AspectJAutoProxyRegistrar.class
    public void registerBeanDefinitions(AnnotationMetadata importingClassMetadata, BeanDefinitionRegistry registry) {
        AopConfigUtils.registerAspectJAnnotationAutoProxyCreatorIfNecessary(registry); 👈
        AnnotationAttributes enableAspectJAutoProxy = AnnotationConfigUtils.attributesFor(importingClassMetadata, EnableAspectJAutoProxy.class);
        if (enableAspectJAutoProxy != null) {
            if (enableAspectJAutoProxy.getBoolean("proxyTargetClass")) {
                AopConfigUtils.forceAutoProxyCreatorToUseClassProxying(registry);
            }

            if (enableAspectJAutoProxy.getBoolean("exposeProxy")) {
                AopConfigUtils.forceAutoProxyCreatorToExposeProxy(registry);
            }
        }
    }
进入到registerAspectJAnnotationAutoProxyCreatorIfNecessary()方法
    @Nullable
    public static BeanDefinition registerAspectJAnnotationAutoProxyCreatorIfNecessary(BeanDefinitionRegistry registry, @Nullable Object source) {
        return registerOrEscalateApcAsRequired(AnnotationAwareAspectJAutoProxyCreator.class, registry, source); 👈
    }
4.看一下AnnotationAwareAspectJAutoProxyCreator的类图

4.解读
1)AOP底层是基于BeanPostProcessor机制的.
2)即在Bean创建好后, 根据是否需要AOP处理, 决定返回代理对象, 还是原生Bean
3)在返回代理对象时, 就可以根据要代理的类和方法来返回
4)机制并不难, 本质就是BeanPostProcessor机制 + 动态代理技术
🐋补充说明
| 后置处理器 | SmartDog类型 |
|---|---|
| postProcessBeforeInitialization() | class com.zzw.spring.aop.SmartDog |
| postProcessAfterInitialization() | class com.sun.proxy.$Proxy16 |
为何: SmartDog 在 postProcessBeforeInitialization() 中类型是普通类型, 在postProcessAfterInitialization()中成了代理类型.
●本质原因: SmartAnimalAspect类是一个切面类, 并且对SmartDog中的方法做了切入, 所以后置处理器处理成了代理对象.
💗Spring整体架构分析


 3580
3580


 被折叠的 条评论
为什么被折叠?
被折叠的 条评论
为什么被折叠?
 到【灌水乐园】发言


