


UITableVie是在Apple应用十分广泛的UI组件,在 MVC 模式(Model -View-Control)的界面中共很具有代表性,下面介绍一些很基础的UITableView的知识:
实现UITableView的显示效果,需要加载各行cell,并且赋予数据内容,这需要使VC成为UITableViewDataSource的数据源代理开始,并且用对应的数据模型设置Cell。
主要代码:
- (UITableViewCell *)tableView:(UITableView *)tableView cellForRowAtIndexPath:(NSIndexPath *)indexPath
{
static NSString *CellIdentifier = @"TableViewDemoVC_CellIndetifier";
UITableViewCell *cell = [tableView dequeueReusableCellWithIdentifier:CellIdentifier];
if (cell == nil) {
cell = [[UITableViewCell alloc] initWithStyle:UITableViewCellStyleDefault reuseIdentifier:CellIdentifier];
cell.accessoryType = UITableViewCellAccessoryDisclosureIndicator;
}
cell.imageView.image = [UIImage imageNamed:@"computerLogo.jpg"];
cell.textLabel.text = [noteList[indexPath.row] description];
cell.detailTextLabel.text = @"detailInfo";
return cell;
}
系统提供的cell的style有三种:
UITableViewCellStyleDefault :无detailTextLabel,设置了内容也不显示
UITableViewCellStyleSubtitle:有detailTextLabel,显示于textLabel下方
UITableViewCellStyleValue1:有detailTextLabel,textLabel与accessoryView之间,居右;
UITableViewCellStyleValue2:有detailTextLabel,textLabel与accessoryView之间,居左;(该style将使得cell的imageView变为nil,将无法显示图片)
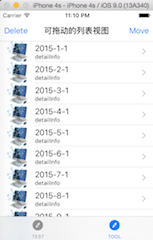
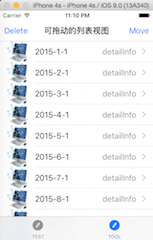
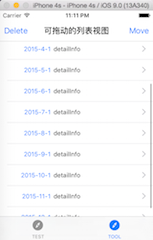
以下是三种cell的截图:

系统提供的cell的accessoryType有五种:
UITableViewCellAccessoryNone,
UITableViewCellAccessoryDisclosureIndicator,
UITableViewCellAccessoryDetailDisclosureButton,
UITableViewCellAccessoryCheckmark,
UITableViewCellAccessoryDetailButton
(当然你也可以自定义accessoryView通过cell的accessoryView属性)


----------------------------------------------------------------------------------------------------------------------------
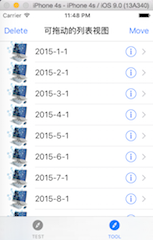
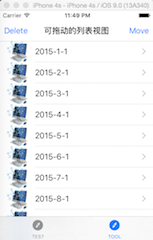
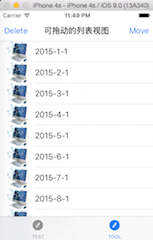
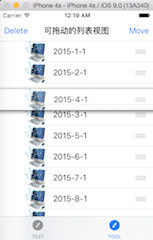
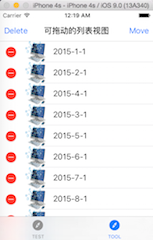
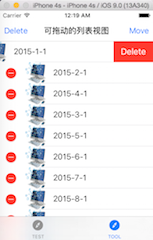
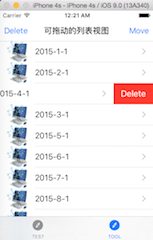
UITableView 的行操作(换行,点击删除、左滑删除):
// 在表视图单元编辑模式的开启和关闭之间切换
- (void)noteMove:(id)sender
{
editState = YES; // 标记下: 处于编辑状态
[self.listView setEditing:!self.listView.editing animated:YES];
}
- (void)noteDelete:(id)sender
{
editState = NO; // 标记下: 处于普通的查看状态
[self.listView setEditing:!self.listView.editing animated:YES];
}
通过设置UITableView的编辑状态 [self.listView setEditing:!self.listView.editing animated:YES];,可以实现 删除 和 换行操作
当然,前提需要实现<UITableViewDataSource,UITableViewDelegate>中的若干方法
具体代码如下:
- (NSInteger)numberOfSectionsInTableView:(UITableView *)tableView
{
return 1;
}
- (NSInteger)tableView:(UITableView *)tableView numberOfRowsInSection:(NSInteger)section
{
return noteList.count;
}
- (UITableViewCell *)tableView:(UITableView *)tableView cellForRowAtIndexPath:(NSIndexPath *)indexPath
{
static NSString *CellIdentifier = @"TableViewDemoVC_CellIndetifier";
UITableViewCell *cell = [tableView dequeueReusableCellWithIdentifier:CellIdentifier];
if (cell == nil) {
cell = [[UITableViewCell alloc] initWithStyle:UITableViewCellStyleDefault reuseIdentifier:CellIdentifier];
cell.accessoryType = UITableViewCellAccessoryDisclosureIndicator;
}
cell.imageView.image = [UIImage imageNamed:@"computerLogo.jpg"];
cell.textLabel.text = [noteList[indexPath.row] description];
cell.detailTextLabel.text = @"detailInfo";
return cell;
}
// 询问是否可以删除:
-(UITableViewCellEditingStyle)tableView:(UITableView *)tableView
editingStyleForRowAtIndexPath:(NSIndexPath *)indexPath
{
if(!editState)
return UITableViewCellEditingStyleDelete; // 可以删除
else
return UITableViewCellEditingStyleNone; // 不允许删除
}
// 询问是否可以移动: 如编辑状态为假则进行删除操作,如果为真则进入编辑状态
-(BOOL)tableView:(UITableView *)tableView canMoveRowAtIndexPath:(NSIndexPath *)indexPath
{
if(editState)
return YES;
else
return NO;
}
// 移动行 之后 需要怎么处理
-(void)tableView:(UITableView *)tableView
moveRowAtIndexPath:(NSIndexPath *)sourceIndexPath
toIndexPath:(NSIndexPath *)destinationIndexPath
{
NSUInteger fromRow = [sourceIndexPath row]; // 旧的 行号
NSUInteger toRow = [destinationIndexPath row]; // 新的 行号
id object = [noteList objectAtIndex:fromRow]; // 取除数据
[noteList removeObjectAtIndex:fromRow]; // 移除
[noteList insertObject:object atIndex:toRow]; // 添加
}
// 删除行 之后 需要怎么处理
- (void)tableView:(UITableView *)tableView
commitEditingStyle:(UITableViewCellEditingStyle)editingStyle
forRowAtIndexPath:(NSIndexPath *)indexPath
{
// 取出目标行号
NSUInteger row = [indexPath row];
// 从数组中移除数据
[noteList removeObjectAtIndex:row];
// 从列表视图中,以动画的形式,移除行
[tableView deleteRowsAtIndexPaths:[NSArray arrayWithObject:indexPath]
withRowAnimation:UITableViewRowAnimationFade];
}
补充一些相关信息:
需要修改删除文字,可以 实现 以下方法:
- (nullable NSString *)tableView:(UITableView *)tableView titleForDeleteConfirmationButtonForRowAtIndexPath:(nonnull NSIndexPath *)indexPath
{
return @"删除";
}


 1627
1627


 被折叠的 条评论
为什么被折叠?
被折叠的 条评论
为什么被折叠?
 到【灌水乐园】发言


