


版权声明:本文为博主原创文章,未经博主允许不得转载。
本文纯个人学习笔记,由于水平有限,难免有所出错,有发现的可以交流一下。
一、Application 创建流程
我们知道,当用户点击桌面上的 app 图标进行启动一个 app,是由 Zygote 进程 fork 一个子进程而来的。然后将 ActivityThread 加载到子进程中,这时候会调用 ActivityThread 中的 main 函数。我们这边从 ActivityThread 讲起。
ActivityThread 的 main
    public static void main(String[] args) {
        Trace.traceBegin(Trace.TRACE_TAG_ACTIVITY_MANAGER, "ActivityThreadMain");

        // CloseGuard defaults to true and can be quite spammy.  We
        // disable it here, but selectively enable it later (via
        // StrictMode) on debug builds, but using DropBox, not logs.
        CloseGuard.setEnabled(false);

        Environment.initForCurrentUser();

        // Set the reporter for event logging in libcore
        EventLogger.setReporter(new EventLoggingReporter());

        // Make sure TrustedCertificateStore looks in the right place for CA certificates
        final File configDir = Environment.getUserConfigDirectory(UserHandle.myUserId());
        TrustedCertificateStore.setDefaultUserDirectory(configDir);

        Process.setArgV0("<pre-initialized>");

        //准备了 Loop
        Looper.prepareMainLooper();

        //创建新的 ActivityThread,调用 attach 函数
        ActivityThread thread = new ActivityThread();
        thread.attach(false);

        if (sMainThreadHandler == null) {
            sMainThreadHandler = thread.getHandler();
        }

        if (false) {
            Looper.myLooper().setMessageLogging(new
                    LogPrinter(Log.DEBUG, "ActivityThread"));
        }

        // End of event ActivityThreadMain.
        Trace.traceEnd(Trace.TRACE_TAG_ACTIVITY_MANAGER);

        //与上面对应,调用   Looper.loop()
        Looper.loop();

        throw new RuntimeException("Main thread loop unexpectedly exited");
    }
ActivityThread 的 main 中调用了 ActivityThread 的 attach 方法,传递了一个 false 参数。
ActivityThread 的 attach
    private void attach(boolean system) {
        sCurrentActivityThread = this;
        mSystemThread = system;
        if (!system) {
            ......
            RuntimeInit.setApplicationObject(mAppThread.asBinder());
            //通过 ActivityManager 获取到一个 bundle 对象
            final IActivityManager mgr = ActivityManager.getService();
            try {
                //会调用到
                mgr.attachApplication(mAppThread);
            } catch (RemoteException ex) {
                throw ex.rethrowFromSystemServer();
            }
           ......
        } else {
          ......
        }
      ......
    }
ActivityManager.getService() 获取到的对象实际是一个 ActivityManagerProxy,调用了 ActivityManagerProxy 的 attachApplication 方法,通过 Bundle 的流程,最终会调到 ActivityManager 的 bindApplication 方法。
ActivityThread 的 bindApplication
        public final void bindApplication(String processName, ApplicationInfo appInfo,
                List<ProviderInfo> providers, ComponentName instrumentationName,
                ProfilerInfo profilerInfo, Bundle instrumentationArgs,
                IInstrumentationWatcher instrumentationWatcher,
                IUiAutomationConnection instrumentationUiConnection, int debugMode,
                boolean enableBinderTracking, boolean trackAllocation,
                boolean isRestrictedBackupMode, boolean persistent, Configuration config,
                CompatibilityInfo compatInfo, Map services, Bundle coreSettings,
                String buildSerial) {
            ......
            sendMessage(H.BIND_APPLICATION, data);
        }

    private void sendMessage(int what, Object obj) {
        sendMessage(what, obj, 0, 0, false);
    }


    private void sendMessage(int what, Object obj, int arg1, int arg2, boolean async) {
        if (DEBUG_MESSAGES) Slog.v(
            TAG, "SCHEDULE " + what + " " + mH.codeToString(what)
            + ": " + arg1 + " / " + obj);
        Message msg = Message.obtain();
        msg.what = what;
        msg.obj = obj;
        msg.arg1 = arg1;
        msg.arg2 = arg2;
        if (async) {
            msg.setAsynchronous(true);
        }
        mH.sendMessage(msg);
    }

    final H mH = new H();
在 ActivityThread 的 bindApplication 最后会给 mH 发送一个 H.BIND_APPLICATION 的消息, mH 是成员变量,直接初始化,是 ActivityThread 的内部类 H, H 继承自 Handler。查找到 H 中对对应消息的处理。
H 中对 BIND_APPLICATION 的处理
                case BIND_APPLICATION:
                    Trace.traceBegin(Trace.TRACE_TAG_ACTIVITY_MANAGER, "bindApplication");
                    AppBindData data = (AppBindData)msg.obj;
                    handleBindApplication(data);
                    Trace.traceEnd(Trace.TRACE_TAG_ACTIVITY_MANAGER);
                    break;
H 中对 BIND_APPLICATION 的处理调用了 ActivityThread 的 handleBindApplication 这个方法,这个方法就是准备 Application 的,包括创建 Application 和创建过程中调用到 Application 中的各个方法。
ActivityThread 的 handleBindApplication
    private void handleBindApplication(AppBindData data) {
        ......

        // Allow disk access during application and provider setup. This could
        // block processing ordered broadcasts, but later processing would
        // probably end up doing the same disk access.
        Application app;
        final StrictMode.ThreadPolicy savedPolicy = StrictMode.allowThreadDiskWrites();
        final StrictMode.ThreadPolicy writesAllowedPolicy = StrictMode.getThreadPolicy();
        try {
            // If the app is being launched for full backup or restore, bring it up in
            // a restricted environment with the base application class.
            //创建 Application
            app = data.info.makeApplication(data.restrictedBackupMode, null);
            //对 Application 进行赋值记录
            mInitialApplication = app;

            ......
            try {
                //调用 Application 的 onCreate 方法
                mInstrumentation.callApplicationOnCreate(app);
            } catch (Exception e) {
                if (!mInstrumentation.onException(app, e)) {
                    throw new RuntimeException(
                            "Unable to create application " + app.getClass().getName()
                                    + ": " + e.toString(), e);
                }
            }
        ........
    }
我们先查看 app = data.info.makeApplication(data.restrictedBackupMode, null); 这个代码的实现, data.info 是一个 LoadedApk,查看 LoadedApk 的 makeApplication 方法。
LoadedApk 的 makeApplication
    public Application makeApplication(boolean forceDefaultAppClass,
                                       Instrumentation instrumentation) {
        if (mApplication != null) {
            return mApplication;
        }

        Trace.traceBegin(Trace.TRACE_TAG_ACTIVITY_MANAGER, "makeApplication");

        Application app = null;

        //获取 AndroidManifest.xml 中配置的 Application 全类名
        String appClass = mApplicationInfo.className;
        if (forceDefaultAppClass || (appClass == null)) {
            appClass = "android.app.Application";
        }

        try {
            java.lang.ClassLoader cl = getClassLoader();

            //我们自己的应用肯定不满足这个 if 判断
            if (!mPackageName.equals("android")) {
                Trace.traceBegin(Trace.TRACE_TAG_ACTIVITY_MANAGER,
                        "initializeJavaContextClassLoader");
                initializeJavaContextClassLoader();
                Trace.traceEnd(Trace.TRACE_TAG_ACTIVITY_MANAGER);
            }
            //创建一个 Context
            ContextImpl appContext = ContextImpl.createAppContext(mActivityThread, this);
            //通过反射创建 Application,同时调用 Application 的 attachBaseContext 方法
            app = mActivityThread.mInstrumentation.newApplication(
                    cl, appClass, appContext);
            //记录使用 app
            appContext.setOuterContext(app);
        } catch (Exception e) {
            if (!mActivityThread.mInstrumentation.onException(app, e)) {
                Trace.traceEnd(Trace.TRACE_TAG_ACTIVITY_MANAGER);
                throw new RuntimeException(
                        "Unable to instantiate application " + appClass
                                + ": " + e.toString(), e);
            }
        }
        //记录使用 app
        mActivityThread.mAllApplications.add(app);
        //记录使用 app
        mApplication = app;

	//这时候传进来的 instrumentation 是 null
        if (instrumentation != null) {
            try {
                instrumentation.callApplicationOnCreate(app);
            } catch (Exception e) {
                if (!instrumentation.onException(app, e)) {
                    Trace.traceEnd(Trace.TRACE_TAG_ACTIVITY_MANAGER);
                    throw new RuntimeException(
                            "Unable to create application " + app.getClass().getName()
                                    + ": " + e.toString(), e);
                }
            }
        }

        // Rewrite the R 'constants' for all library apks.
        SparseArray<String> packageIdentifiers = getAssets().getAssignedPackageIdentifiers();
        final int N = packageIdentifiers.size();
        for (int i = 0; i < N; i++) {
            final int id = packageIdentifiers.keyAt(i);
            if (id == 0x01 || id == 0x7f) {
                continue;
            }

            rewriteRValues(getClassLoader(), packageIdentifiers.valueAt(i), id);
        }

        Trace.traceEnd(Trace.TRACE_TAG_ACTIVITY_MANAGER);

        return app;
    }
通过 app = mActivityThread.mInstrumentation.newApplication(cl, appClass, appContext) 来创建 Application。
newApplication
    public Application newApplication(ClassLoader cl, String className, Context context)
            throws InstantiationException, IllegalAccessException,
            ClassNotFoundException {
        return newApplication(cl.loadClass(className), context);
    }

    static public Application newApplication(Class<?> clazz, Context context)
            throws InstantiationException, IllegalAccessException,
            ClassNotFoundException {
        Application app = (Application)clazz.newInstance();
        //调用到 Application 的 attach 方法
        app.attach(context);
        return app;
    }
newApplication 调用到 Application 的 attach 方法。
Application 的 attach
    final void attach(Context context) {
        attachBaseContext(context);
        mLoadedApk = ContextImpl.getImpl(context).mPackageInfo;
    }
Application 的 attach 中调用了 Application 的 attachBaseContext 方法。attachBaseContext 是在 Application 创建的时候进行调用。
在 LoadedApk 的 makeApplication 中,创建完 Application,有三个地方记录保存了新建的 Application。
        appContext.setOuterContext(app);
        mActivityThread.mAllApplications.add(app);
        mApplication = app;
继续回到 ActivityThread 的 handleBindApplication 方法,往下把获取到的 Application 赋值给成员变量 mInitialApplication。
mInitialApplication = app;
再继续往下,调用了 mInstrumentation.callApplicationOnCreate(app);
callApplicationOnCreate
    public void callApplicationOnCreate(Application app) {
        app.onCreate();
    }
callApplicationOnCreate 直接调用 Application 的 onCreate 方法。
总结 :由上面流程分析可以知道, Application 在初始化完之后有四个地方使用记录了这个 Application。
1.ActivityThread 的成员变量 mInitialApplication
ActivityThread 的 handleBindApplication 是直接对 ActivityThread 的成员变量 mInitialApplication 进行赋值。
2. ContextImpl 的成员变量 mOuterContext
LoadedApk 的 makeApplication 中 appContext.setOuterContext(app) 对 ContextImpl 的成员变量 mOuterContext 进行赋值。
    final void setOuterContext(Context context) {
        mOuterContext = context;
    }
3. ActivityThread 的成员变量 mAllApplications
LoadedApk 的 makeApplication 中 mActivityThread.mAllApplications.add(app) 直接调用 ActivityThread 的成员变量 mAllApplications,这是一个集合,直接把 Application 保存在 mAllApplications 集合中。
**4. LoadedApk 的成员变量 mApplication **
LoadedApk 的 makeApplication 中 mApplication = app 直接把 Application 赋值保存在 LoadedApk 的成员变量 mApplication 中。
二、分析
通过 Application 的创建流程,可以知道在创建出 Application 后,有 4 个地方保存了 Application 的实例对象,要想替换 Application,需要对这 4 个地方保存的对象进行修改。
接下来要考虑的是如何获取到这些要替换掉成员变量的对象(ActivityThread、ContextImpl 和 LoadedApk)。
1.ContextImpl
我们先看一下 ContextImpl 这个对象,
LoadedApk 的 makeApplication:
    public Application makeApplication(boolean forceDefaultAppClass,
            Instrumentation instrumentation) {
		......
            ContextImpl appContext = ContextImpl.createAppContext(mActivityThread, this);
            app = mActivityThread.mInstrumentation.newApplication(
                    cl, appClass, appContext);
		......
    }
由上面分析可以知道,LoadedApk 的 makeApplication 中,调用 mActivityThread.mInstrumentation.newApplication 通过反射创建 Application,同时调用 Application 的 attachBaseContext 方法。在这个过程中,attachBaseContext 获取的参数 Context 就是 ContextImpl 对象。
2.ActivityThread 和 LoadedApk
ActivityThread 和 LoadedApk 获取的方式比较多,这边介绍一个。
LoadedApk 的 makeApplication:
    public Application makeApplication(boolean forceDefaultAppClass,
            Instrumentation instrumentation) {
		......
            ContextImpl appContext = ContextImpl.createAppContext(mActivityThread, this);
            app = mActivityThread.mInstrumentation.newApplication(
                    cl, appClass, appContext);
		......
    }
在创建 ContextImpl 对象的时候,传递了两个参数进去,一个是 mActivityThread,另一个是 this,也就是 LoadedApk 的实例对象。
点进去查看,很简单的代码, mActivityThread 与 LoadedApk 的实例对象分别保存在 ContextImpl 的成员变量 mMainThread 和 mPackageInfo。
3.ApplicationInfo 的 className
要替换一个 Application,至少在四大组件中获取的 Application、ApplicationContext 以及 ApplicationInfo 都要是新的 Application 中的信息。所以这还需要进行 ApplicationInfo 的 className 的替换。
注:LoadedApk 的 makeApplication 中,先创建了 Application ,这时候调用了 Application 的 attachBaseContext 方法,然后再把 Application 的对象赋值给各个变量。所以,我们修改这些变量不能放在 attachBaseContext 方法中。
三、Application 的替换
ProxyApplication 是在 AndroidManifest.xml 中配置的 Application,真正的 Application 这边以参数的形势配置在
AndroidManifest.xml 中。
<meta-data android:name="app_name" android:value="com.xiaoyue.replaceapplication.MyApplication"/>
ProxyApplication
public class ProxyApplication extends Application {

    private String app_name;

    private Application delegate;

    @Override
    protected void attachBaseContext(Context base) {
        super.attachBaseContext(base);
        Log.e(TAG, "xiaoyue ProxyApplication attachBaseContext:");
        getMetaData();
    }

    @Override
    public void onCreate() {
        super.onCreate();
        Log.e(TAG, "xiaoyue ProxyApplication onCreate:");

        try {
            bindRealApplication();
        } catch (Exception e) {
            e.printStackTrace();
        }
    }

    public void bindRealApplication() throws Exception {

        //如果用户没有配置 Application 就不用管了
        if (TextUtils.isEmpty(app_name)) {
            return;
        }

        //这个就是attachBaseContext传进来的 ContextImpl
        Context baseContext = getBaseContext();

        //反射创建出真实的用户配置的 Application
        Class<?> delegateClass = Class.forName(app_name);
        delegate = (Application) delegateClass.newInstance();
        //反射获得 attach 函数
        Method attach = Application.class.getDeclaredMethod("attach", Context.class);
        //设置允许访问
        attach.setAccessible(true);
        attach.invoke(delegate, baseContext);

        /**
         *  替换 ContextImpl 的成员变量 mOuterContext
         */
        Class<?> contextImplClass = Class.forName("android.app.ContextImpl");
        //获得 mOuterContext 属性
        Field mOuterContextField = contextImplClass.getDeclaredField("mOuterContext");
        mOuterContextField.setAccessible(true);
        mOuterContextField.set(baseContext, delegate);

        /**
         * 替换 ActivityThread 的成员变量 mInitialApplication 和 mAllApplications
         */
        //通过 ContextImpl 的成员变量 mMainThread 获得 ActivityThread 对象
        Field mMainThreadField = contextImplClass.getDeclaredField("mMainThread");
        mMainThreadField.setAccessible(true);
        Object mMainThread = mMainThreadField.get(baseContext);

        //替换 mInitialApplication
        Class<?> activityThreadClass = Class.forName("android.app.ActivityThread");
        Field mInitialApplicationField = activityThreadClass.getDeclaredField
                ("mInitialApplication");
        mInitialApplicationField.setAccessible(true);
        mInitialApplicationField.set(mMainThread, delegate);

        //替换 mAllApplications
        Field mAllApplicationsField = activityThreadClass.getDeclaredField
                ("mAllApplications");
        mAllApplicationsField.setAccessible(true);
        ArrayList<Application> mAllApplications = (ArrayList<Application>) mAllApplicationsField.get(mMainThread);
        mAllApplications.remove(this);
        mAllApplications.add(delegate);

        /**
         * 替换 LoadedApk 的成员变量 mApplication
         */
        //通过 ContextImpl 的成员变量 mPackageInfo 获得 LoadedApk 对象
        Field mPackageInfoField = contextImplClass.getDeclaredField("mPackageInfo");
        mPackageInfoField.setAccessible(true);
        Object mPackageInfo = mPackageInfoField.get(baseContext);

        Class<?> loadedApkClass = Class.forName("android.app.LoadedApk");
        Field mApplicationField = loadedApkClass.getDeclaredField("mApplication");
        mApplicationField.setAccessible(true);
        mApplicationField.set(mPackageInfo, delegate);

        //修改 ApplicationInfo 的 className
        Field mApplicationInfoField = loadedApkClass.getDeclaredField("mApplicationInfo");
        mApplicationInfoField.setAccessible(true);
        ApplicationInfo mApplicationInfo = (ApplicationInfo) mApplicationInfoField.get(mPackageInfo);
        mApplicationInfo.className = app_name;

        delegate.onCreate();
    }

    public void getMetaData() {
        try {
            ApplicationInfo applicationInfo = getPackageManager().getApplicationInfo
                    (getPackageName(), PackageManager.GET_META_DATA);
            Bundle metaData = applicationInfo.metaData;
            //是否设置 app_name 与 app_version
            if (null != metaData) {
                //是否存在name为app_name的meta-data数据
                if (metaData.containsKey("app_name")) {
                    app_name = metaData.getString("app_name");
                }
            }
        } catch (PackageManager.NameNotFoundException e) {
            e.printStackTrace();
        }
    }
}
替换后,分别在四大组件中对 Application、ApplicationContext 和 ApplicationInfo 的信息进行打印。
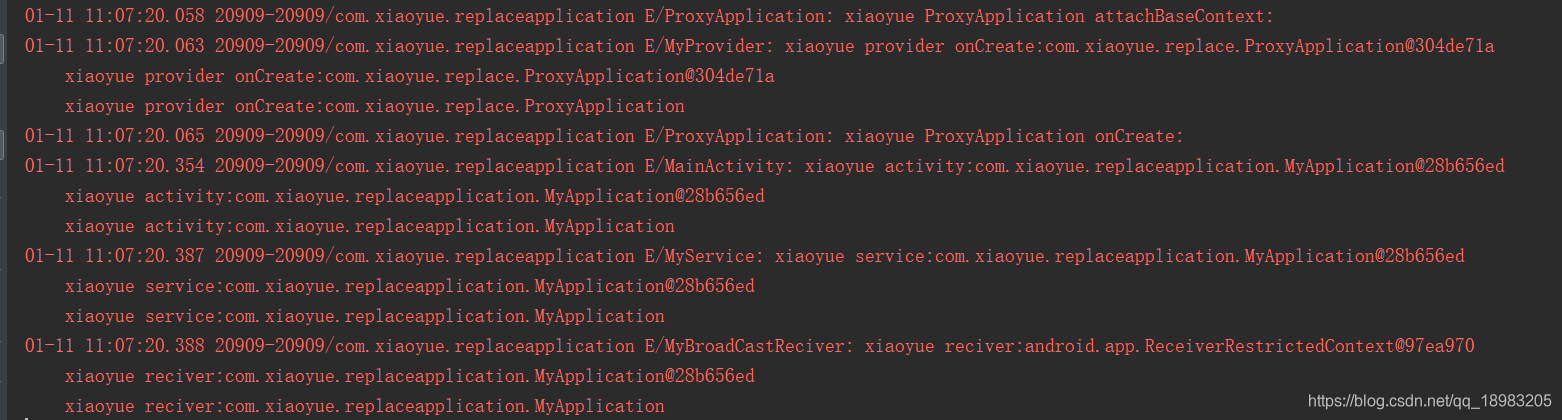
可以发现,四大组件中,只有 Provider 没有替换成功,我们查看下源码,分析下各个组件替换结果的原因。
1.Activity
        Log.e(TAG, "xiaoyue activity:" + getApplication());
        Log.e(TAG, "xiaoyue activity:" + getApplicationContext());
        Log.e(TAG, "xiaoyue activity:" + getApplicationInfo().className);
查看 getApplication() 代码。
Activity 的 getApplication :
    public final Application getApplication() {
        return mApplication;
    }
getApplication 直接返回 mApplication,全局搜索可以发现,mApplication 是在 attach 函数中进行初始化,由外部传递进来的。
Activity 的创建也是在 ActivityThread 中。
ActivityThread :
    @Override
    public Activity handleLaunchActivity(ActivityClientRecord r,
            PendingTransactionActions pendingActions, Intent customIntent) {
        ........
        final Activity a = performLaunchActivity(r, customIntent);
        ........
        return a;
    }

    private Activity performLaunchActivity(ActivityClientRecord r, Intent customIntent) {

        ........
        ContextImpl appContext = createBaseContextForActivity(r);
        Activity activity = null;
        try {
        	//与 Application 一样,通过反射创建
            java.lang.ClassLoader cl = appContext.getClassLoader();
            activity = mInstrumentation.newActivity(
                    cl, component.getClassName(), r.intent);
            StrictMode.incrementExpectedActivityCount(activity.getClass());
            r.intent.setExtrasClassLoader(cl);
            r.intent.prepareToEnterProcess();
            if (r.state != null) {
                r.state.setClassLoader(cl);
            }
        } catch (Exception e) {
            if (!mInstrumentation.onException(activity, e)) {
                throw new RuntimeException(
                    "Unable to instantiate activity " + component
                    + ": " + e.toString(), e);
            }
        }

        try {
            // makeApplication 直接返回 LoadedApk 的 mApplication,这个我们已经替换过了
            Application app = r.packageInfo.makeApplication(false, mInstrumentation);

            ........
                activity.attach(appContext, this, getInstrumentation(), r.token,
                        r.ident, app, r.intent, r.activityInfo, title, r.parent,
                        r.embeddedID, r.lastNonConfigurationInstances, config,
                        r.referrer, r.voiceInteractor, window, r.configCallback);
        ........
        return activity;
    }
在 ActivityThread 的 performLaunchActivity 中创建 Activity,然后调用了 Acticity 的 attach 方法,这里的第六个参数传递的就是 Activity 中获取的 Application 信息。而这个 Application 对象是用过获取 LoadedApk 的 mApplication 属性,这个我们已经替换过了,所以 Activity 获取 Application 是替换后的。
2.Service
        Log.e(TAG, "xiaoyue service:" + getApplication());
        Log.e(TAG, "xiaoyue service:" + getApplicationContext());
        Log.e(TAG, "xiaoyue service:" + getApplicationInfo().className);
Service 与 Activity 类似,我们查看 getApplication 。
Service 的 getApplication :
    public final Application getApplication() {
        return mApplication;
    }
可以发现,直接返回属性 mApplication,这个属性也是在 attach 方法中进行赋值,有外部传递进来的。
Service 启动是在 ActivityThread 的 handleCreateService 中。
ActivityThread 的 handleCreateService :
    private void handleCreateService(CreateServiceData data) {
        // If we are getting ready to gc after going to the background, well
        // we are back active so skip it.
        unscheduleGcIdler();

        LoadedApk packageInfo = getPackageInfoNoCheck(
                data.info.applicationInfo, data.compatInfo);
        Service service = null;
        try {
            java.lang.ClassLoader cl = packageInfo.getClassLoader();
            service = packageInfo.getAppFactory()
                    .instantiateService(cl, data.info.name, data.intent);
        } catch (Exception e) {
            if (!mInstrumentation.onException(service, e)) {
                throw new RuntimeException(
                    "Unable to instantiate service " + data.info.name
                    + ": " + e.toString(), e);
            }
        }

        try {
            if (localLOGV) Slog.v(TAG, "Creating service " + data.info.name);

            ContextImpl context = ContextImpl.createAppContext(this, packageInfo);
            context.setOuterContext(service);

            Application app = packageInfo.makeApplication(false, mInstrumentation);
            service.attach(context, this, data.info.name, data.token, app,
                    ActivityManager.getService());
        ........
    }
与 Activity 一样,也是通过反射创建,创建成功后调用 attach 方法,传递的参数 Application 同样是获取 LoadedApk 的 mApplication 属性。
3.BroadcastReceiver
        Log.e(TAG, "xiaoyue reciver:" + context);
        Log.e(TAG, "xiaoyue reciver:" + context.getApplicationContext());
        Log.e(TAG, "xiaoyue reciver:" + context.getApplicationInfo().className);
BroadcastReceiver 的 getApplicationContext 和 getApplicationInfo().className 是沒有没有问题的,但是 context 是一个我们没有见过的对象。

BroadcastReceiver 也是在 ActivityThread 中创建的,查看 handleReceiver 方法。
ActivityThread 的 handleReceiver:
    private void handleReceiver(ReceiverData data) {
            ........
            java.lang.ClassLoader cl = context.getClassLoader();
            data.intent.setExtrasClassLoader(cl);
            data.intent.prepareToEnterProcess();
            data.setExtrasClassLoader(cl);
            receiver = packageInfo.getAppFactory()
                    .instantiateReceiver(cl, data.info.name, data.intent);
            ........
            receiver.onReceive(context.getReceiverRestrictedContext(),
                    data.intent);
            ........
    }
handleReceiver 中也是通过反射创建出 BroadcastReceiver ,然后调用 BroadcastReceiver 的 onReceive 方法,但是传递的参数不是直接传递 context,而是调用 ContextImpl 的 getReceiverRestrictedContext 方法。
ContextImpl 的 getReceiverRestrictedContext:
    final Context getReceiverRestrictedContext() {
        if (mReceiverRestrictedContext != null) {
            return mReceiverRestrictedContext;
        }
        return mReceiverRestrictedContext = new ReceiverRestrictedContext(getOuterContext());
    }
可以发现,在 ContextImpl 的 getReceiverRestrictedContext 中是创建一个 ReceiverRestrictedContext 进行返回,创建 ReceiverRestrictedContext 传递的 getOuterContext 这个其实就是我们的 Application。
ContextImpl 的 getOuterContext:
    final Context getOuterContext() {
        return mOuterContext;
    }
ContextImpl 的 getOuterContext 我们也已经进行替换了,所以返回的 ReceiverRestrictedContext 只是对我们替换过的 Application 进行一次封装。
注: ReceiverRestrictedContext 只是重写几个方法,避免我们在接收到广播后进行注册广播和绑定服务等。
4.ContentProvider
        Log.e(TAG, "xiaoyue provider onCreate:" + getContext());
        Log.e(TAG, "xiaoyue provider onCreate:" + getContext().getApplicationContext());
        Log.e(TAG, "xiaoyue provider onCreate:" + getContext().getApplicationInfo().className);

由日志可以知道, ContentProvider 的创建是在 Application 的 attachBaseContext 之后,onCreate 之前。在前面的 Application 的 创建流程中可以知道,这一段代码是在 ActivityThread 的 handleBindApplication。
ActivityThread 的 handleBindApplication:
   private void handleBindApplication(AppBindData data) {
		........
        Application app;
        final StrictMode.ThreadPolicy savedPolicy = StrictMode.allowThreadDiskWrites();
        final StrictMode.ThreadPolicy writesAllowedPolicy = StrictMode.getThreadPolicy();
        try {
            // If the app is being launched for full backup or restore, bring it up in
            // a restricted environment with the base application class.
            //调用 Application 的 attachBaseContext  方法
            app = data.info.makeApplication(data.restrictedBackupMode, null);

            // Propagate autofill compat state
            app.setAutofillCompatibilityEnabled(data.autofillCompatibilityEnabled);

            mInitialApplication = app;

            // don't bring up providers in restricted mode; they may depend on the
            // app's custom Application class
            //ContentProvider  的创建
            if (!data.restrictedBackupMode) {
                if (!ArrayUtils.isEmpty(data.providers)) {
                    installContentProviders(app, data.providers);
                    // For process that contains content providers, we want to
                    // ensure that the JIT is enabled "at some point".
                    mH.sendEmptyMessageDelayed(H.ENABLE_JIT, 10*1000);
                }
            }

            // Do this after providers, since instrumentation tests generally start their
            // test thread at this point, and we don't want that racing.
            try {
                mInstrumentation.onCreate(data.instrumentationArgs);
            }
            catch (Exception e) {
                throw new RuntimeException(
                    "Exception thrown in onCreate() of "
                    + data.instrumentationName + ": " + e.toString(), e);
            }
            try {

                //调用 Application 的 onCreate 方法
                mInstrumentation.callApplicationOnCreate(app);
			........
    }
在 ActivityThread 的 handleBindApplication 中,创建了 Application 的实例对象,这是我们配置在 AndroidManifest.xml 中的假的 Application。然后调用了 installContentProviders 方法,把这个假的 Application 传递进去。
ActivityThread 的 installContentProviders:
    private void installContentProviders(
            Context context, List<ProviderInfo> providers) {
        final ArrayList<ContentProviderHolder> results = new ArrayList<>();

        for (ProviderInfo cpi : providers) {
            if (DEBUG_PROVIDER) {
                StringBuilder buf = new StringBuilder(128);
                buf.append("Pub ");
                buf.append(cpi.authority);
                buf.append(": ");
                buf.append(cpi.name);
                Log.i(TAG, buf.toString());
            }
            ContentProviderHolder cph = installProvider(context, null, cpi,
                    false /*noisy*/, true /*noReleaseNeeded*/, true /*stable*/);
            if (cph != null) {
                cph.noReleaseNeeded = true;
                results.add(cph);
            }
        }

        try {
            ActivityManager.getService().publishContentProviders(
                getApplicationThread(), results);
        } catch (RemoteException ex) {
            throw ex.rethrowFromSystemServer();
        }
    }
ActivityThread 的 installContentProviders 对 ProviderInfo 进行遍历,调用 installProvider 这个方法进行创建各个 ContentProvider,这时候传递的 Application 也是假的 Application。
ActivityThread 的 installProvider:
    private ContentProviderHolder installProvider(Context context,
            ContentProviderHolder holder, ProviderInfo info,
            boolean noisy, boolean noReleaseNeeded, boolean stable) {
        ContentProvider localProvider = null;
        IContentProvider provider;
        if (holder == null || holder.provider == null) {
            if (DEBUG_PROVIDER || noisy) {
                Slog.d(TAG, "Loading provider " + info.authority + ": "
                        + info.name);
            }
            Context c = null;
            ApplicationInfo ai = info.applicationInfo;
            if (context.getPackageName().equals(ai.packageName)) {
                c = context;
            } else if (mInitialApplication != null &&
                    mInitialApplication.getPackageName().equals(ai.packageName)) {
                c = mInitialApplication;
            } else {
                try {
                    c = context.createPackageContext(ai.packageName,
                            Context.CONTEXT_INCLUDE_CODE);
                } catch (PackageManager.NameNotFoundException e) {
                    // Ignore
                }
            }
            if (c == null) {
                Slog.w(TAG, "Unable to get context for package " +
                      ai.packageName +
                      " while loading content provider " +
                      info.name);
                return null;
            }
            try {
            	//通过反射创建 ContentProvider
                final java.lang.ClassLoader cl = c.getClassLoader();
                LoadedApk packageInfo = peekPackageInfo(ai.packageName, true);
                if (packageInfo == null) {
                    // System startup case.
                    packageInfo = getSystemContext().mPackageInfo;
                }
                localProvider = packageInfo.getAppFactory()
                        .instantiateProvider(cl, info.name);
                provider = localProvider.getIContentProvider();
                if (provider == null) {
                    Slog.e(TAG, "Failed to instantiate class " +
                          info.name + " from sourceDir " +
                          info.applicationInfo.sourceDir);
                    return null;
                }
                if (DEBUG_PROVIDER) Slog.v(
                    TAG, "Instantiating local provider " + info.name);
                // XXX Need to create the correct context for this provider.
                // ContentProvider 调用 attachInfo 方法
                localProvider.attachInfo(c, info);
		........
    }
ActivityThread 的 installProvider中也是通过反射创建出 ContentProvider ,然后调用 attachInfo 这个方法,这时候传递的参数 c ,由于传递的 context 获取的 packageName 与 Application 获取的 packageName 相同,所以 c 就是传递进来的 context,是假的 Application。
四、ContentProvider 的修改
在上面分析可以知道,ContentProvider 创建成功后会调用 attachInfo 这个方法,这时候传递进去的参数 c 是假的 Application,我们现在需要把这个替换成真正的 Application。
可以一步步分析其具体的位置,然后使用反射进行替换,不过较复杂,这边使用一个相对简单的方案。
我们先分析参数 c 的获取。
ActivityThread 的 installProvider:
    private ContentProviderHolder installProvider(Context context,
            ContentProviderHolder holder, ProviderInfo info,
            boolean noisy, boolean noReleaseNeeded, boolean stable) {
            ........
            //判断当前 context 的包名是否与 Application 的包名一直
            if (context.getPackageName().equals(ai.packageName)) {
                c = context;
            } else if (mInitialApplication != null &&
                    mInitialApplication.getPackageName().equals(ai.packageName)) {
                //mInitialApplication 在前面分析过,其实也是假的 Application
                c = mInitialApplication;
            } else {
                try {
                    c = context.createPackageContext(ai.packageName,
                            Context.CONTEXT_INCLUDE_CODE);
                } catch (PackageManager.NameNotFoundException e) {
                    // Ignore
                }
            }
		........
    }
根据上面,不管是 if 还是 else if ,获取的 c 都肯定是假的 Application。要想使 c 不为假的 Application,那必须要走 else。if 和 else if 都是调用假的 Application 的 getPackageName 方法进行获取包名,然后与 ApplicationInfo 中获取的包名进行比较。所以我们重写这个方法,使这个判断不成立。
重写 getPackageName:
    @Override
    public String getPackageName() {
        //如果meta-data 设置了 application
        //让 ContentProvider 创建的时候使用的上下文
        //在ActivityThread 中的 installProvider 函数命中else
        if (!TextUtils.isEmpty(app_name)){
            return "";
        }
        return super.getPackageName();
    }
这时候:
c = context.createPackageContext(ai.packageName, Context.CONTEXT_INCLUDE_CODE);
context 是 Application ,createPackageContext 是 Application 的父类 ContextWrapper 的方法。
**ContextWrapper 的 createPackageContext: **
    @Override
    public Context createPackageContext(String packageName, int flags)
        throws PackageManager.NameNotFoundException {
        return mBase.createPackageContext(packageName, flags);
    }
ContextWrapper 的 createPackageContext 直接调用了属性 mBase 的 createPackageContext 方法,mBase 的具体实现是 ContextImpl,这个在 LoadedApk 的 makeApplication 的时候传递进来的。
ContextImpl :
    @Override
    public Context createPackageContext(String packageName, int flags)
            throws NameNotFoundException {
        return createPackageContextAsUser(packageName, flags, mUser);
    }

    @Override
    public Context createPackageContextAsUser(String packageName, int flags, UserHandle user)
            throws NameNotFoundException {
        if (packageName.equals("system") || packageName.equals("android")) {
            // The system resources are loaded in every application, so we can safely copy
            // the context without reloading Resources.
            return new ContextImpl(this, mMainThread, mPackageInfo, null, mActivityToken, user,
                    flags, null);
        }

        LoadedApk pi = mMainThread.getPackageInfo(packageName, mResources.getCompatibilityInfo(),
                flags | CONTEXT_REGISTER_PACKAGE, user.getIdentifier());
        if (pi != null) {
            ContextImpl c = new ContextImpl(this, mMainThread, pi, null, mActivityToken, user,
                    flags, null);

            final int displayId = mDisplay != null
                    ? mDisplay.getDisplayId() : Display.DEFAULT_DISPLAY;

            c.setResources(createResources(mActivityToken, pi, null, displayId, null,
                    getDisplayAdjustments(displayId).getCompatibilityInfo()));
            if (c.mResources != null) {
                return c;
            }
        }

        // Should be a better exception.
        throw new PackageManager.NameNotFoundException(
                "Application package " + packageName + " not found");
    }
在 ContextImpl 的 createPackageContext 中,最终会新建一个 ContextImpl 返回,创建 ContextImpl 使用的 ActivityThread 和 LoadedApk 都是假的 Application 信息,所以创建出来赋值给 c,拥有的 Application 信息还是假的。
回到最上面 c 的创建。
c = context.createPackageContext(ai.packageName, Context.CONTEXT_INCLUDE_CODE);
这里的 context 是假的 Application,createPackageContext 方法是 public 的。所以,我们直接重写假的 Application 的 createPackageContext 方法,让它返回真正 Application 的信息。
ProxyApplication 的 createPackageContext:
    @Override
    public Context createPackageContext(String packageName, int flags) throws PackageManager.NameNotFoundException {
        if (TextUtils.isEmpty(app_name)){
            return super.createPackageContext(packageName, flags);
        }
        try {
            bindRealApplication();
        } catch (Exception e) {
            e.printStackTrace();
        }
        return delegate;
    }
为了避免 bindRealApplication 中重复进行反射创建等操作,对 bindRealApplication 进行判断。
ProxyApplication 的 bindRealApplication:
    public void bindRealApplication() throws Exception {

        //为了避免多次进行反射创建
        if (delegate != null){
            return;
        }

        //如果用户没有配置 Application 就不用管了
        if (TextUtils.isEmpty(app_name)) {
            return;
        }
        ........
    }
运行结果:

可以看见,在四大组件中,Application 全部替换成功。


 199
199


 被折叠的 条评论
为什么被折叠?
被折叠的 条评论
为什么被折叠?
 到【灌水乐园】发言


