如何快速搭建一个vue项目

如何搭建一个vue项目

一、安装node环境

1、 下载地址:https://nodejs.org/en/
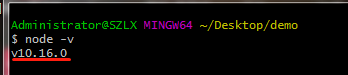
2、 检查是否安装成功:node -v
如果输出版本号,说明我们安装node环境成功

3、 可以使用淘宝的镜像:http://npm.taobao.org/
命令:npm install -g cnpm –registry=https://registry.npm.taobao.org
即可安装npm镜像,以后再用到npm的地方直接用cnpm来代替
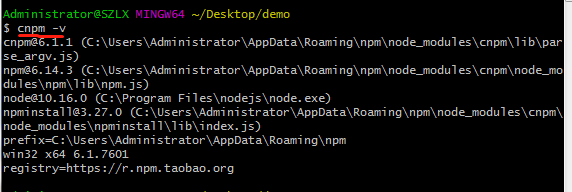
检查安装成功:cnpm -v

二、 搭建vue环境

1、 全局安装vue-cli
命令:npm inst

  • 0
    点赞
  • 3
    收藏
    觉得还不错? 一键收藏
  • 0
    评论
好的,以下是基于Vue.js和Element-UI的后台管理界面快速搭建步骤: 1. 创建一个新的Vue.js项目 ```bash vue create my-project ``` 2. 安装Element-UI ```bash npm i element-ui -S ``` 3. 在main.js中引入Element-UI并注册组件 ```javascript import Vue from 'vue' import App from './App.vue' import ElementUI from 'element-ui' import 'element-ui/lib/theme-chalk/index.css' Vue.use(ElementUI) new Vue({ render: h => h(App), }).$mount('#app') ``` 4. 创建一个后台管理页面组件 ```javascript <template> <div class="admin"> <el-menu :default-active="$route.path" class="el-menu-vertical-demo" @select="handleSelect"> <el-menu-item index="/dashboard"> <i class="el-icon-menu"></i> <span slot="title">Dashboard</span> </el-menu-item> <el-submenu index="/system"> <template slot="title"> <i class="el-icon-setting"></i> <span>System</span> </template> <el-menu-item index="/system/user">User</el-menu-item> <el-menu-item index="/system/role">Role</el-menu-item> </el-submenu> </el-menu> <div class="admin-container"> <router-view></router-view> </div> </div> </template> <script> export default { name: 'Admin', methods: { handleSelect(key, path) { this.$router.push({ path }) } } } </script> <style> .admin { display: flex; height: 100%; } .el-menu-vertical-demo { width: 200px; height: 100%; position: fixed; } .admin-container { margin-left: 200px; padding: 20px; height: 100%; width: calc(100% - 200px); overflow: auto; } </style> ``` 5. 创建一个Dashboard页面组件 ```javascript <template> <div class="dashboard"> <h1>Dashboard</h1> </div> </template> <script> export default { name: 'Dashboard' } </script> <style> .dashboard { height: 100%; } </style> ``` 6. 创建一个用户管理页面组件 ```javascript <template> <div class="user"> <h1>User</h1> </div> </template> <script> export default { name: 'User' } </script> <style> .user { height: 100%; } </style> ``` 7. 创建一个角色管理页面组件 ```javascript <template> <div class="role"> <h1>Role</h1> </div> </template> <script> export default { name: 'Role' } </script> <style> .role { height: 100%; } </style> ``` 8. 配置路由 ```javascript import Vue from 'vue' import Router from 'vue-router' import Admin from './views/Admin.vue' import Dashboard from './views/Dashboard.vue' import User from './views/User.vue' import Role from './views/Role.vue' Vue.use(Router) export default new Router({ mode: 'history', routes: [ { path: '/', redirect: '/dashboard' }, { path: '/dashboard', component: Admin, children: [ { path: '', component: Dashboard }, { path: '/system/user', component: User }, { path: '/system/role', component: Role } ] } ] }) ``` 9. 运行项目 ```bash npm run serve ``` 以上就是快速搭建一个基于Vue.js和Element-UI的后台管理界面的步骤,希望对你有所帮助。

“相关推荐”对你有帮助么?

  • 非常没帮助
  • 没帮助
  • 一般
  • 有帮助
  • 非常有帮助
提交
评论
添加红包

请填写红包祝福语或标题

红包个数最小为10个

红包金额最低5元

当前余额3.43前往充值 >
需支付:10.00
成就一亿技术人!
领取后你会自动成为博主和红包主的粉丝 规则
hope_wisdom
发出的红包
实付
使用余额支付
点击重新获取
扫码支付
钱包余额 0

抵扣说明:

1.余额是钱包充值的虚拟货币,按照1:1的比例进行支付金额的抵扣。
2.余额无法直接购买下载,可以购买VIP、付费专栏及课程。

余额充值