


一.smartTable简介
1.简单介绍它的功能:
具体使用方法不再赘述,可以去 GitHub 去查看:https://github.com/huangyanbin/smartTable
2.添加依赖:
build.gradle (Project:***)
allprojects {
    repositories {
        google()
        jcenter()
            *
            *
            *
        maven { url 'https://www.jitpack.io' }
    }
}
build.gradle (Module:app)
dependencies {
        *
        *
        *
    // SmartTable-依赖
    implementation 'com.github.huangyanbin:SmartTable:2.0'
}
3.使用方式(两种)
- 采用注解的形式
- 基本模式,手动配置行与列
二.两种方式的使用
1.注解方式
- 步骤一:在布局文件中使用 SmartTable
 <com.bin.david.form.core.SmartTable
        android:id="@+id/table"
        android:layout_width="match_parent"
android:layout_height="match_parent"/>- 步骤二:定义表格(自定义bean对象)
**
* 注解方法
* */
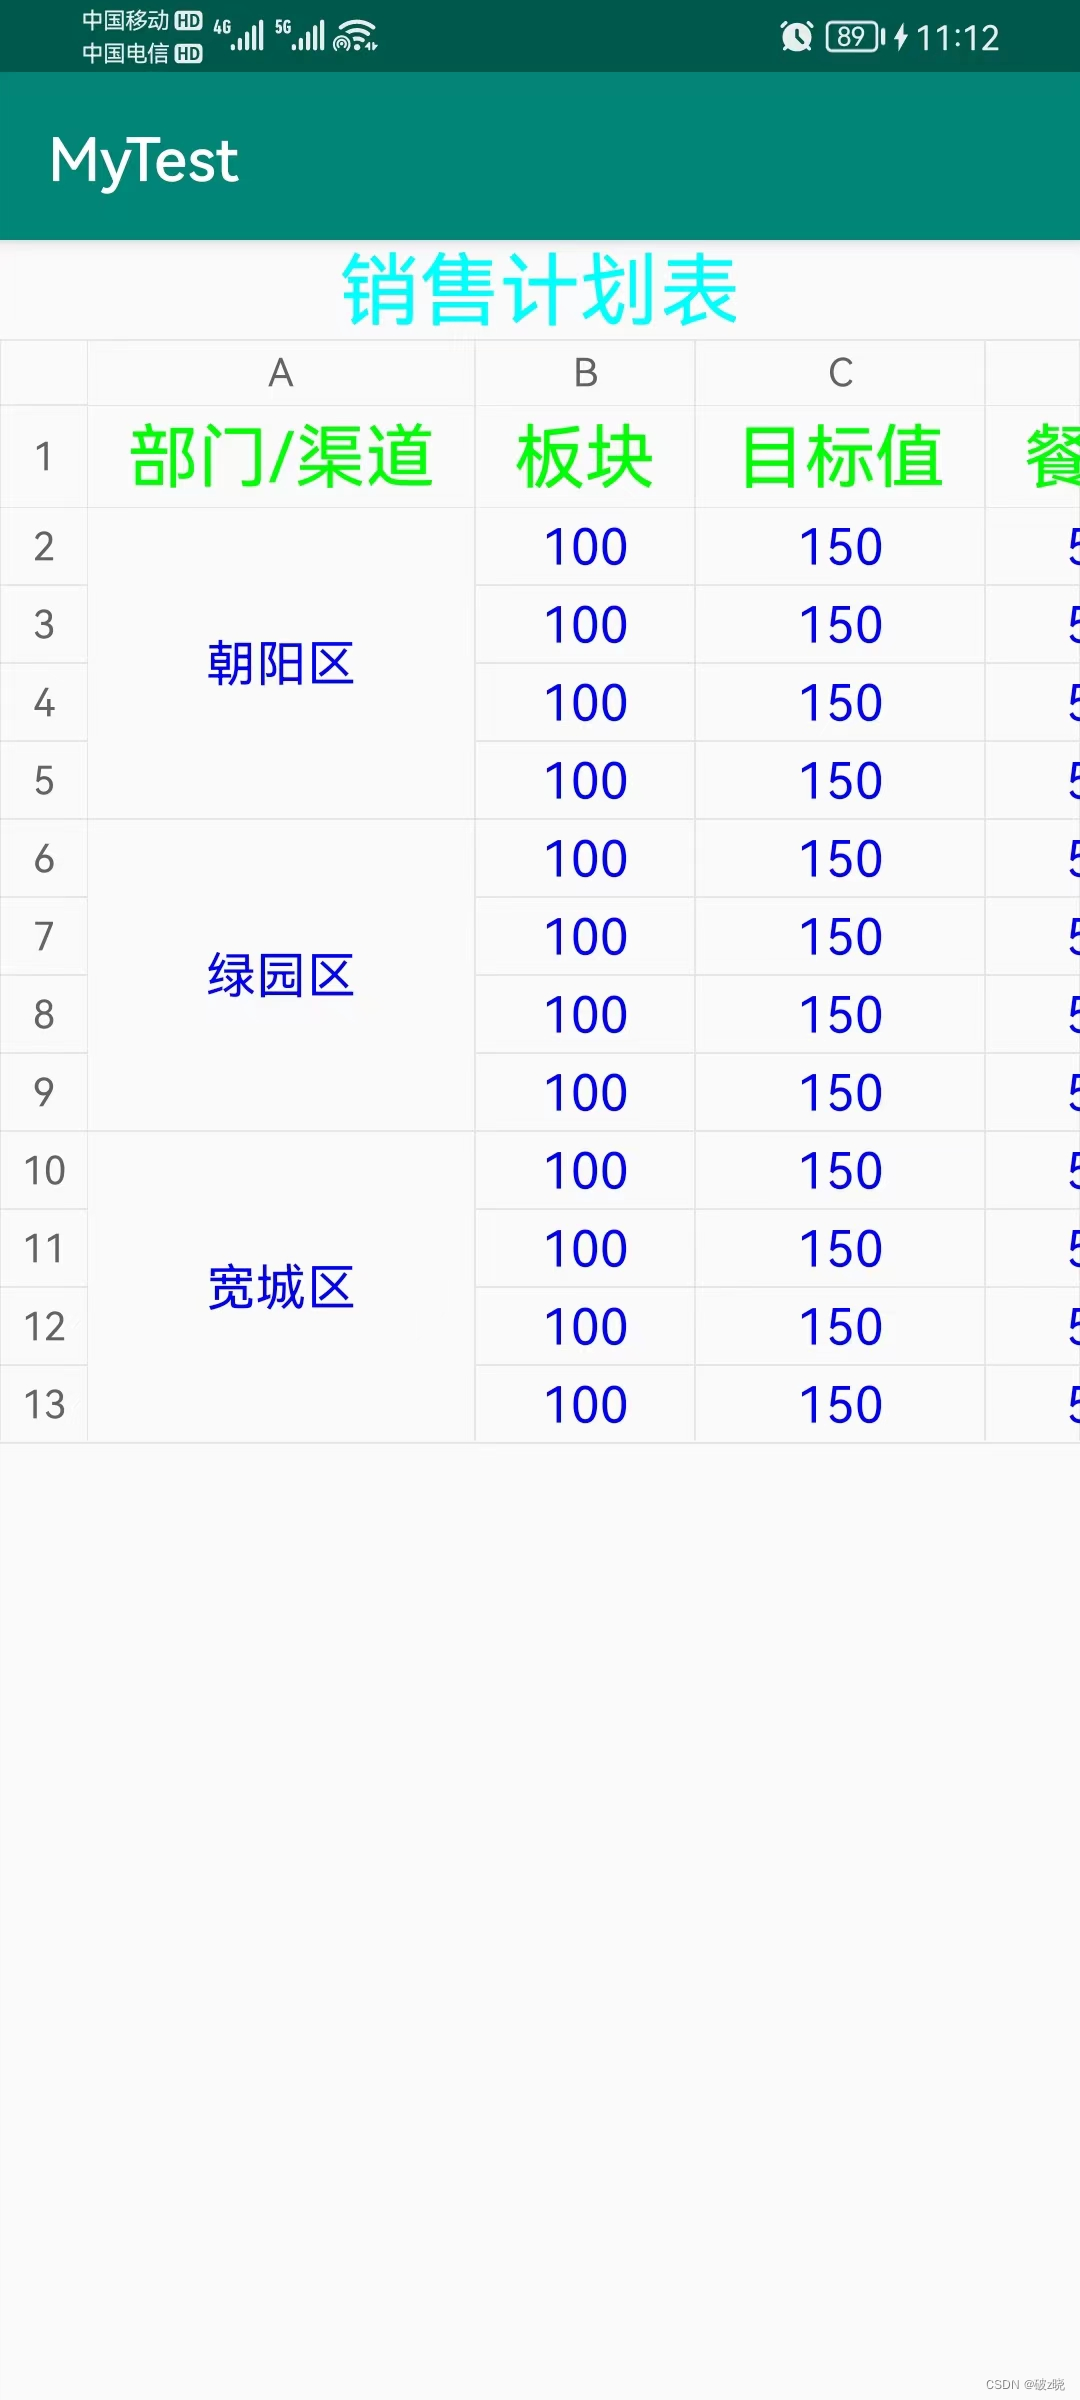
@SmartTable(name = "销售计划表")
public class UserInfo {
public UserInfo(String city, int name, int count, int restaurant, int ka, int wholesale, int industry, int other) {
this.city = city;
this.name = name;
this.count = count;
this.restaurant = restaurant;
this.ka = ka;
this.wholesale = wholesale;
this.industry = industry;
this.other = other;
}
/**
* name:版块名称,count:目标值,restaurant:餐饮数量,
* ka:KA数量,wholesale:流通批发数量,industry:工业加工数量,
* other:其它数量
* */
@SmartColumn(id = 0, name = "部门/渠道", autoMerge = true)
private String city;
@SmartColumn(id = 1, name = "板块")
private int name;
@SmartColumn(id = 2, name = "目标值")
private int count;
@SmartColumn(id = 3, name = "餐饮")
private int restaurant;
@SmartColumn(id = 4, name = "KA")
private int ka;
@SmartColumn(id = 5, name = "流通批发")
private int wholesale;
@SmartColumn(id = 6, name = "工业加工")
private int industry;
@SmartColumn(id = 7, name = "其他")
private int other;
}- 步骤三:绑定数据
    /**
     * 初始化-注解方法
     * */
    private void initAnnotation(){
        smartTable = findViewById(R.id.table);

        List<UserInfo> list = new ArrayList<>();
        list.add(new UserInfo("朝阳区",100, 150, 50, 240, 1100, 450, 23458));
        list.add(new UserInfo("朝阳区",100, 150, 50, 240, 1100, 450, 23458));
        list.add(new UserInfo("朝阳区",100, 150, 50, 240, 1100, 450, 23458));
        list.add(new UserInfo("朝阳区",100, 150, 50, 240, 1100, 450, 23458));
        list.add(new UserInfo("绿园区",100, 150, 50, 240, 1100, 450, 23458));
        list.add(new UserInfo("绿园区",100, 150, 50, 240, 1100, 450, 23458));
        list.add(new UserInfo("绿园区",100, 150, 50, 240, 1100, 450, 23458));
        list.add(new UserInfo("绿园区",100, 150, 50, 240, 1100, 450, 23458));
        list.add(new UserInfo("宽城区",100, 150, 50, 240, 1100, 450, 23458));
        list.add(new UserInfo("宽城区",100, 150, 50, 240, 1100, 450, 23458));
        list.add(new UserInfo("宽城区",100, 150, 50, 240, 1100, 450, 23458));
        list.add(new UserInfo("宽城区",100, 150, 50, 240, 1100, 450, 23458));

        smartTable.setData(list);
        // 设置表格标题名称文字样式
        smartTable.getConfig().setTableTitleStyle(new FontStyle(80,Color.CYAN));
        // 设置表格标题文字样式
        smartTable.getConfig().setColumnTitleStyle(new FontStyle(70,Color.GREEN));
        // 设置表格主体内容文字样式
        smartTable.getConfig().setContentStyle(new FontStyle(50, Color.BLUE));

    }
实现效果:
2.基本方式,手动创建行与列
- 步骤一:在布局文件中使用 SmartTable
 <com.bin.david.form.core.SmartTable
        android:id="@+id/table"
        android:layout_width="match_parent"
android:layout_height="match_parent"/>- 步骤二:定义表格(自定义bean对象),与采用注解方式唯一的不同就是不在使用 @SmartTable与 @SmartColumn 进行标注
/**
 * 基本方式
 * */
public class User {

    public User(String city, int name, int count, int restaurant, int ka, int wholesale, int industry, int other) {
        this.city = city;
        this.name = name;
        this.count = count;
        this.restaurant = restaurant;
        this.ka = ka;
        this.wholesale = wholesale;
        this.industry = industry;
        this.other = other;
    }

    /**
     *     name:版块名称,count:目标值,restaurant:餐饮数量,
     *     ka:KA数量,wholesale:流通批发数量,industry:工业加工数量,
     *     other:其它数量
     * */
    private String city;
    private int name;
    private int count;
    private int restaurant;
    private int ka;
    private int wholesale;
    private int industry;
    private int other;

}
- 步骤三:手动创建列字段
//普通列
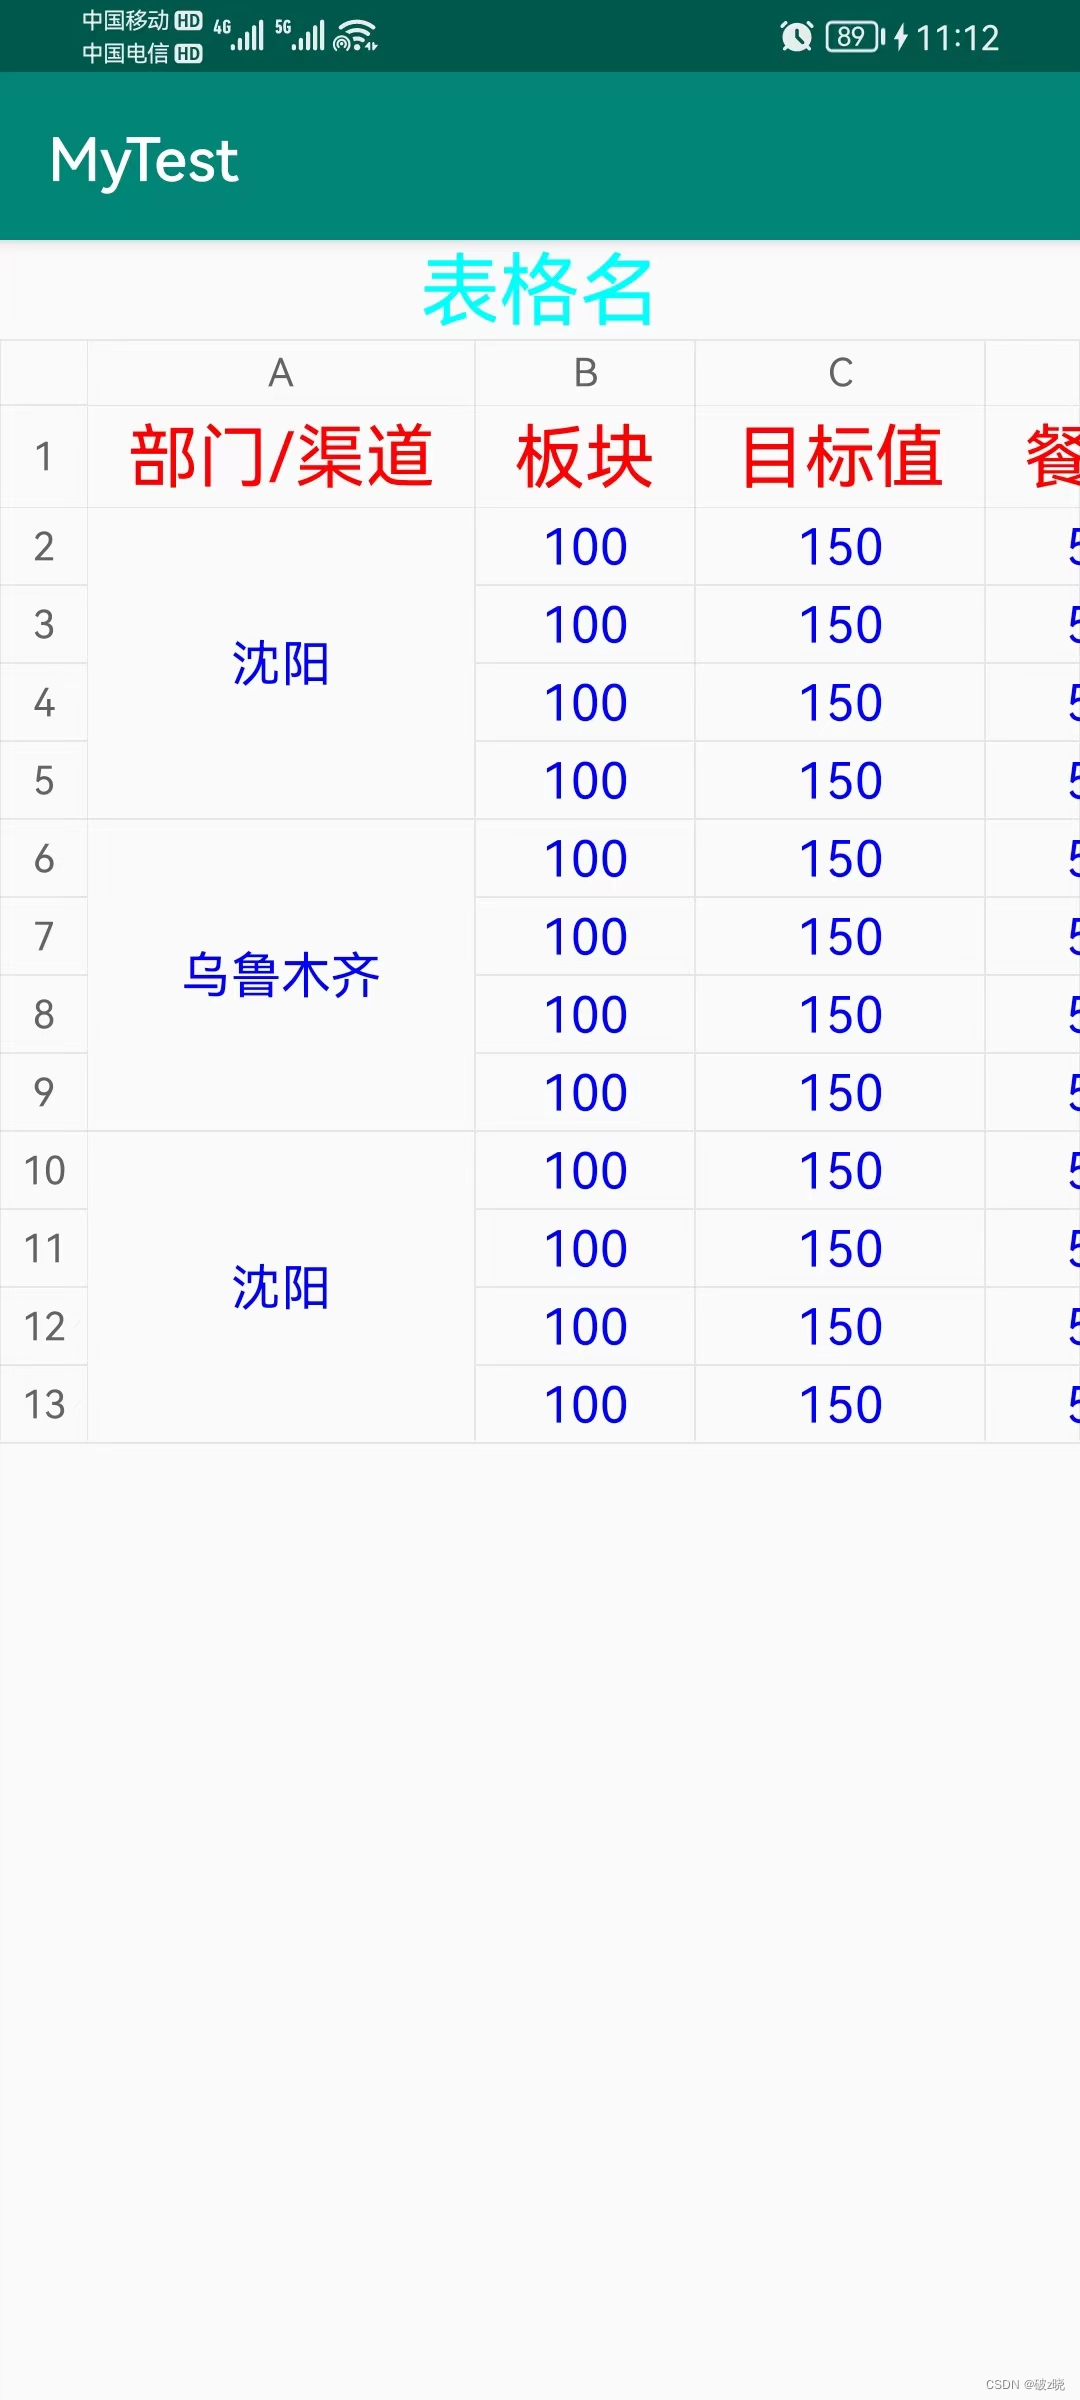
Column<String> city = new Column<>("部门/渠道", "city");
Column<Integer> name = new Column<>("板块", "name");
Column<Integer> count = new Column<>("目标值", "count");
Column<Integer> restaurant = new Column<>("餐饮", "restaurant");
Column<Integer> ka = new Column<>("KA", "ka");
Column<Integer> wholesale = new Column<>("流通批发", "wholesale");
Column<Integer> industry = new Column<>("工业加工", "industry");
Column<Integer> other = new Column<>("其他", "other");
//设置该列当字段相同时自动合并
city.setAutoMerge(true);- 步骤四:设置单元格内容
        //设置单元格内容
        List<User> list = new ArrayList<>();
        list.add(new User("沈阳", 100, 150, 50, 240, 1100, 450, 23458));
        list.add(new User("沈阳", 100, 150, 50, 240, 1100, 450, 23458));
        list.add(new User("沈阳", 100, 150, 50, 240, 1100, 450, 23458));
        list.add(new User("沈阳", 100, 150, 50, 240, 1100, 450, 23458));
        list.add(new User("乌鲁木齐", 100, 150, 50, 240, 1100, 450, 23458));
        list.add(new User("乌鲁木齐", 100, 150, 50, 240, 1100, 450, 23458));
        list.add(new User("乌鲁木齐", 100, 150, 50, 240, 1100, 450, 23458));
        list.add(new User("乌鲁木齐", 100, 150, 50, 240, 1100, 450, 23458));
        list.add(new User("沈阳", 100, 150, 50, 240, 1100, 450, 23458));
        list.add(new User("沈阳", 100, 150, 50, 240, 1100, 450, 23458));
        list.add(new User("沈阳", 100, 150, 50, 240, 1100, 450, 23458));
list.add(new User("沈阳", 100, 150, 50, 240, 1100, 450, 23458));- 步骤五:把数据绑定到 SmartTable 上
        //表格数据 datas 是需要填充的数据
        TableData<User> tableData = new TableData<>("表格名",  list, city, name, count, restaurant, ka, wholesale, industry, other);

        //设置数据
        smartTable = findViewById(R.id.table);
        // 设置表格主标题
        smartTable.setTableData(tableData);
        // 设置表格标题名称文字样式
        smartTable.getConfig().setTableTitleStyle(new FontStyle(80,Color.CYAN));
        // 设置表格标题文字样式
        smartTable.getConfig().setColumnTitleStyle(new FontStyle(70,Color.RED));
        // 设置表格主体内容文字样式
        smartTable.getConfig().setContentStyle(new FontStyle(50, Color.BLUE));
实现效果:
注解的其他功能
- @SmartTable:表格注解,用于生成表格
可用属性:
- name:表格名
- count:是否显示统计行
- pageSize:页数量
- currentPage:当前页
目测没什么用,可能还没找到技巧,先记录下........
- @SmartColumn列,用于注解列
- name:列标题
- id:列排列位置(id越小,位置越靠前)
- parent:父列名称(不设置则没有父列)
- align:列对其方式,默认居中
- type:设置是否查询下一级,有 ColumnType.Own,ColumnType.Child,两个值可以设置,假设 UserInfo 有个属性是 Family family 对象,你想解析 faily 对象的属性 monther,father 两个属性,则需要设置 Child,并在 monther,father 下添加相对应的注解@SmartColumn,否则只解析到 Family,默认是 Own。
- autoMerge:设置是否自动合并,假设你返回的数据格式化之后 该列附近数据有相同,则会自动合并成一个单元格,默认不开启合并。
- maxMergeCount:合并最大数量
- autoCount:是否开启统计,table 开启显示统计行,设置 autoCount 为 true,则该列可以自动统计,默认为 false。
- fixed:是否固定该列, fixed 设置为 true,该列滚动到最左边时,可以自动固定住。
基本方法介绍
- Column 类的常用方法
- setAutoCount(boolean isAutoCount):设置自动排序(默认升序)
- isReverseSort:是否是反序排列
- setComparator:设置排序比较
- setCountFormat:统计格式化
- OnColumnItemClickListener:列内容点击事件
- setFixed:滑动到表格左边时固定列
- setTextAlign:设置开启自动合并
- setMaxMergeCount:设置开启最大数量
- setDrawFormat:设置绘制样式格式化
- setFormat:设置文字格式化
- TableData 类常用方法
- setSortColumn:设置排序列
- settitleDrawFormat:设置列标题格式化
- setXSequenceFormat:设置顶部序列号格式化
- setYSequenceFormat:设置左边序列号格式化
- setShowCount:设置是否显示统计
- setTitleDrawFormat:设置列标题绘制格式化
- setXSequenceFormat :设置 X 序号行文字格式化
- setYSequenceFormat :设置 Y 序号行文字格式化
- setUserCellRange(List<CellRange> userCellRange) :设置添加自定义合并规则
TableConfig 类常用方法
- setContentStyle :设置内容文字样式
- setYSequenceStyle :设置左边序列文字样式
- setXSequenceStyle :设置顶部序列文字样式
- setColumnTitleStyle :设置列标题文字样式
- setTableTitleStyle :设置表格标题文字样式
- setCountStyle :设置统计行样式
- setColumnTitleGridStyle :设置列标题网格样式
- setGridStyle :设置内容网格样式
- setVerticalPadding :设置网格列 padding
- setHorizontalPadding :设置网格行 padding
- setYSequenceBackgroundColor :设置左序列背景
- setXSequenceBackgroundColor :设置横序行背景
- setColumnTitleBackgroundColor :设置列标题背景
- setContentBackgroundColor :设置内容背景
- setCountBackgroundColor :设置统计行背景
- setFixedYSequence :固定左侧
- setFixedXSequence :固定顶部
- setFixedTitle :固定列标题
- setFixedCountRow :固定统计行
- setColumnTitleVerticalPadding :列标题上下 padding
- setColumnTitleHorizontalPadding :增加列标题左右 padding
- setSequenceGridStyle :序列网格样式
- columnTitleGridStyle :列标题网格样式
- setShowXSequence :设置是否显示顶部序号列
- setShowYSequence :设置是否显示左侧序号列
- setShowTableTitle :设置是否显示表格标题
- isShowColumnTitle :设置是否显示列标题
- setMinTableWidth :设置表格最小宽度
SmartTable 类的常用方法
- setOnColumnClickListener :设置列标题点击事件
- setSortColumn :设置排序列
- setZoom(boolean zoom,float maxZoom,float minZoom) :设置是否开启缩放
- addData(List<T> t, boolean isFoot) :添加新数据
- setSelectFormat :设置选中 Cell 样式
- notifyDataChanged :重新计算布局


 9351
9351


 被折叠的 条评论
为什么被折叠?
被折叠的 条评论
为什么被折叠?
 到【灌水乐园】发言


